NVR (Blue GUI)
Playback
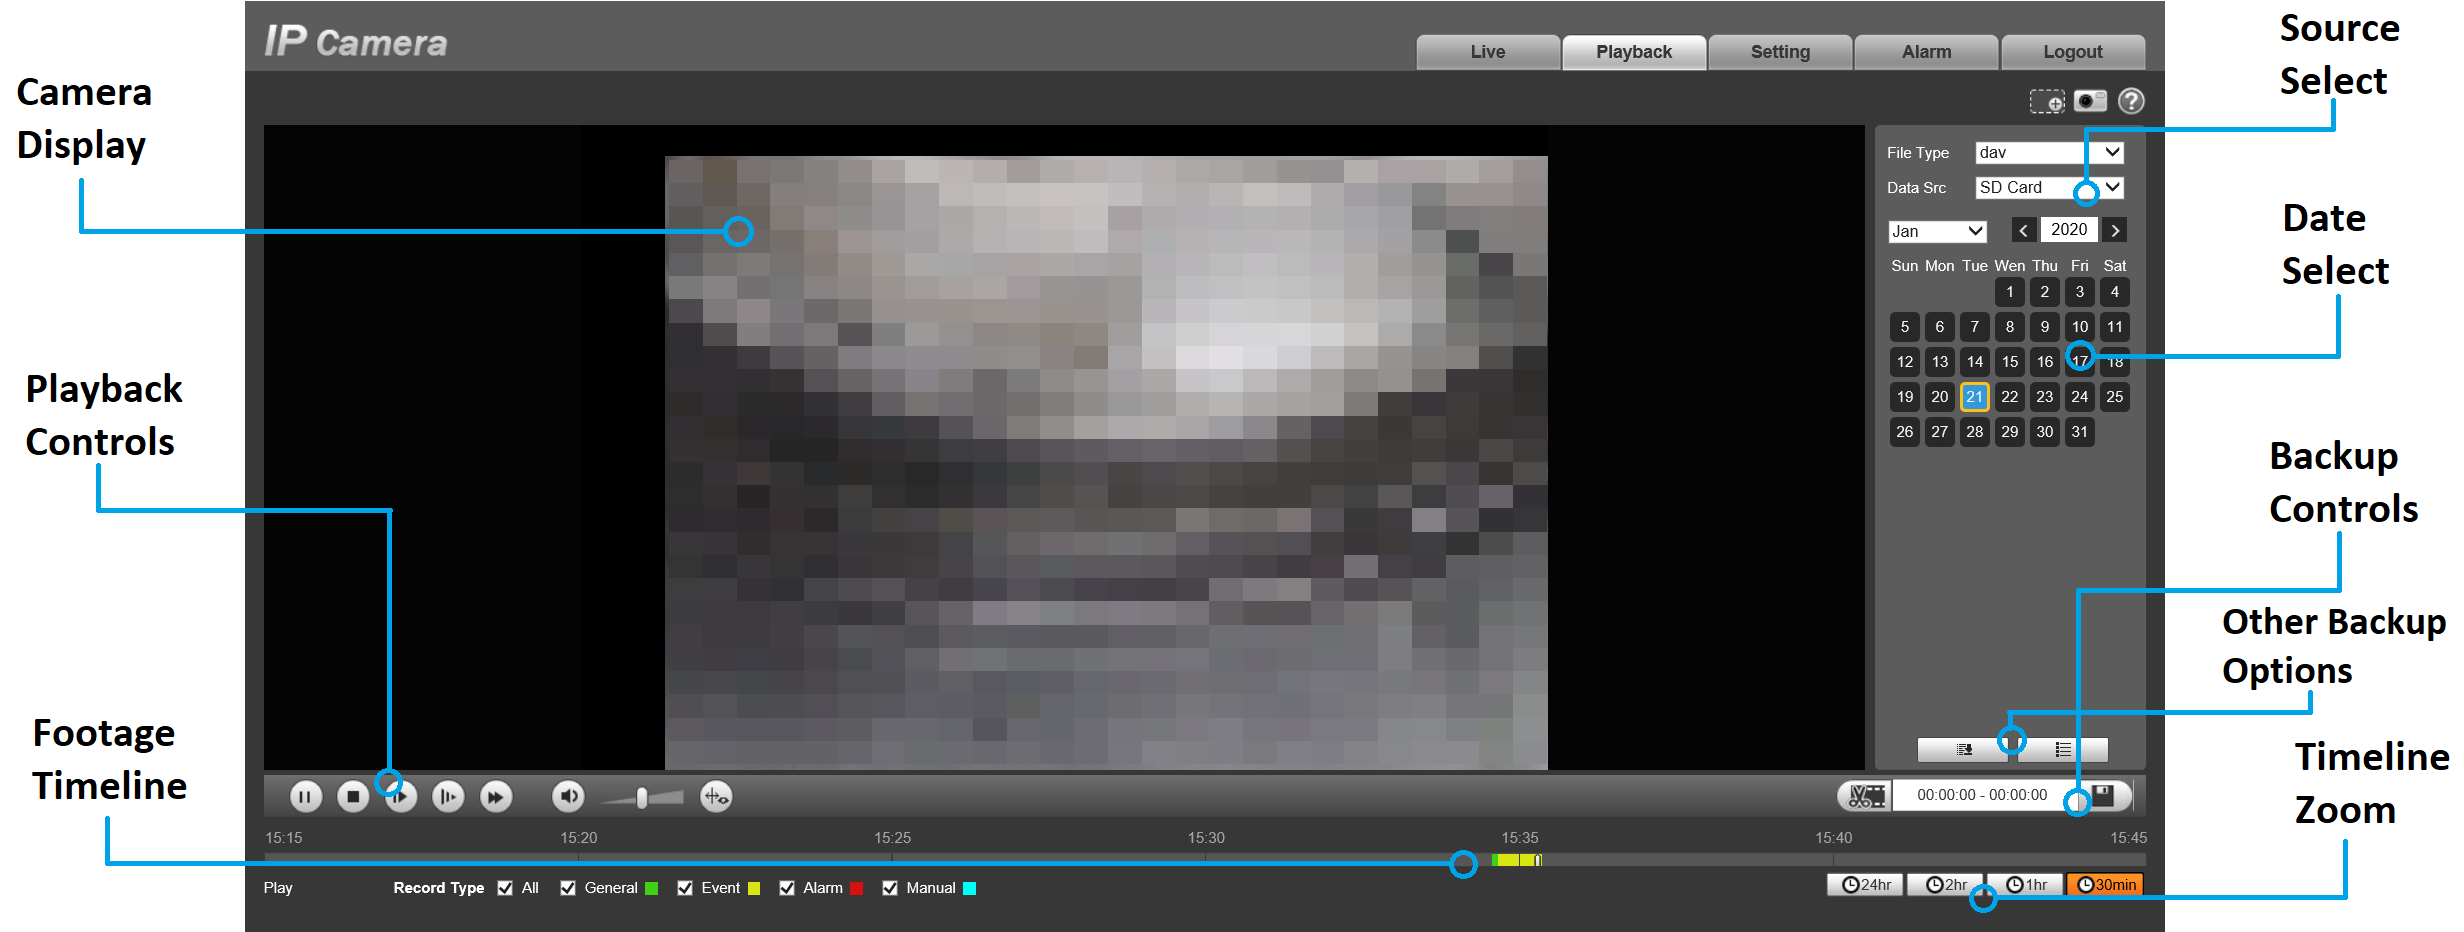
To access footage playback, select the Search button from the Main Menu. Stored footage can be accessed by searching by date and refined by footage type (Regular, Motion Detection, Alarm, etc). The below image details the playback interface with footage selected. After locating desired footage, you can immediately backup the video by using the playback menu.
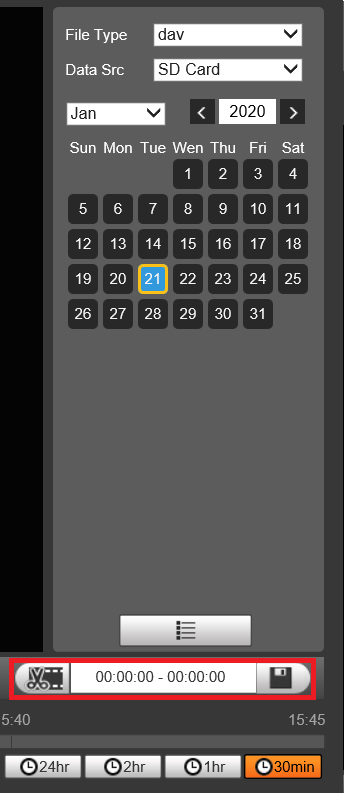
The calendar days that have footage available for playback are highlighted in light blue.
.png)
Playback Footage by Date
- Ensure that the correct HDD is selected and that REC is selected in Source Select.
- Using the Date Select calendar, choose your date for footage playback. A coloured date icon indicates stored footage is available for that day.
- In the View Select section, tick the box next to the cameras you wish to view.
- The Footage Timeline should populate with stored footage, indicated by coloured bars in the timeline. Click anywhere on the timeline to begin footage playback. Other cameras will automatically sync their playback to the selected camera.
- For greater precision playback control, zoom in on areas using the Timeline Zoom, up to 30 minutes.
- Using the Playback Controls, you can speed up or slow down playback, place marks on key footage times and take snapshots.
Playback Footage by Smart Search
NOTE: Smart search requires motion detection to be recorded to function. You can only Smart Search playback footage one camera at a time.
- As detailed in the previous section, use Date Select to choose the desired date for footage playback, ticking a single camera only in View Select.
- Click anywhere on the Footage Timeline to begin playback. Then click the Smart Search button.
- A grid will appear overlaid onto your camera playback. Highlight an area of interest on the grid. This will define the motion detection area that is used by Smart Search.
- Click the Smart Search button again to begin playback of all motion detected events in the area you selected.
Backup
Should you wish to preserve recorded footage before it is overwritten, you will need to perform a footage backup. Footage can be exported from your NVR in a .DAV or .MP4 file. A .DAV file will require conversion for sharing, whereas an .MP4 file is compatible with most video players on Windows or Mac PCs.
There are two different ways to backup footage to USB: via the Search menu through searching playback footage; and by performing a direct backup via the Backup menu. Both are accessed via the Main Menu.
NOTE: Backup file type (.DAV/.MP4) selection is only available in the Backup menu. Backup in Search Menu outputs .DAV files only.
Backup Footage via Search Menu
.jpg)
Using the Search Menu, find start/end points of backup footage by using playback video as a reference.
- As detailed in the Playback section above, locate the footage you wish to backup. Select the desired camera in by ticking the box next to it.
- Using the Footage Timeline, click the approximate desired time for your backup video start point. Click the Clip Button
 on the Backup Controls to set your start point.
 - Again, using the Footage Timeline, click the approximate desired time for your backup video end point. Select the Clip Button
 again to set your end point.
 - Click the Save Button
 to bring up the Backup menu.
 - This process can be repeated to add more clips from different channels.
- Plug in your USB device, exiting any automated prompts, and select Backup to begin backup.
Backup Footage via Backup Menu
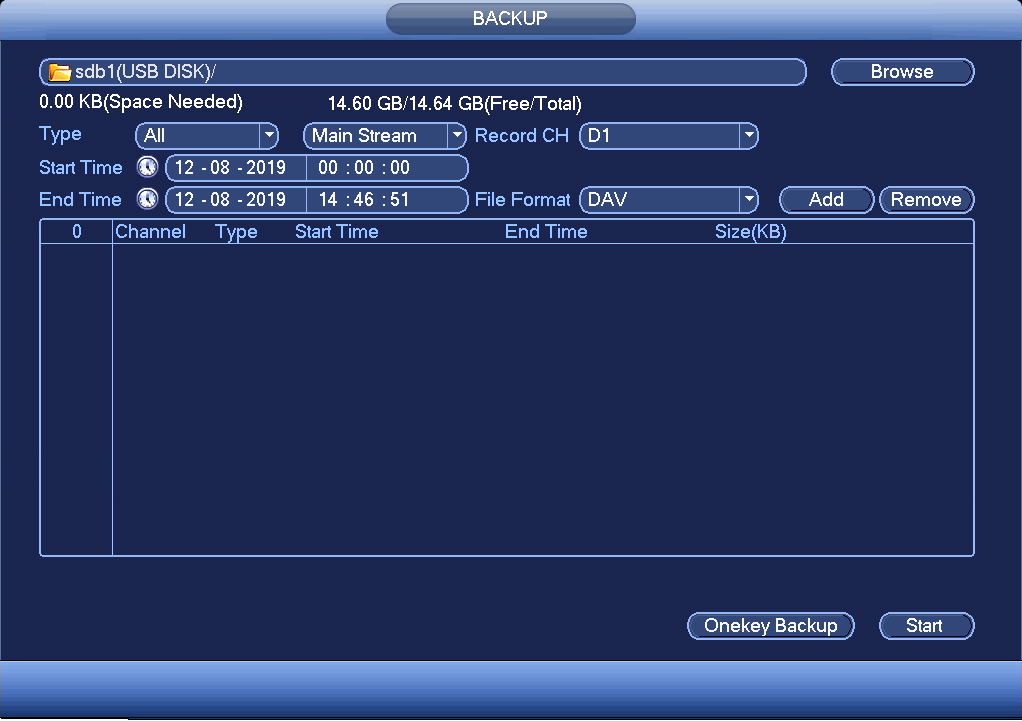
Using the Backup Menu, specify start/end dates & times across multiple cameras simultaneously. This is useful for large footage export, such as full days.
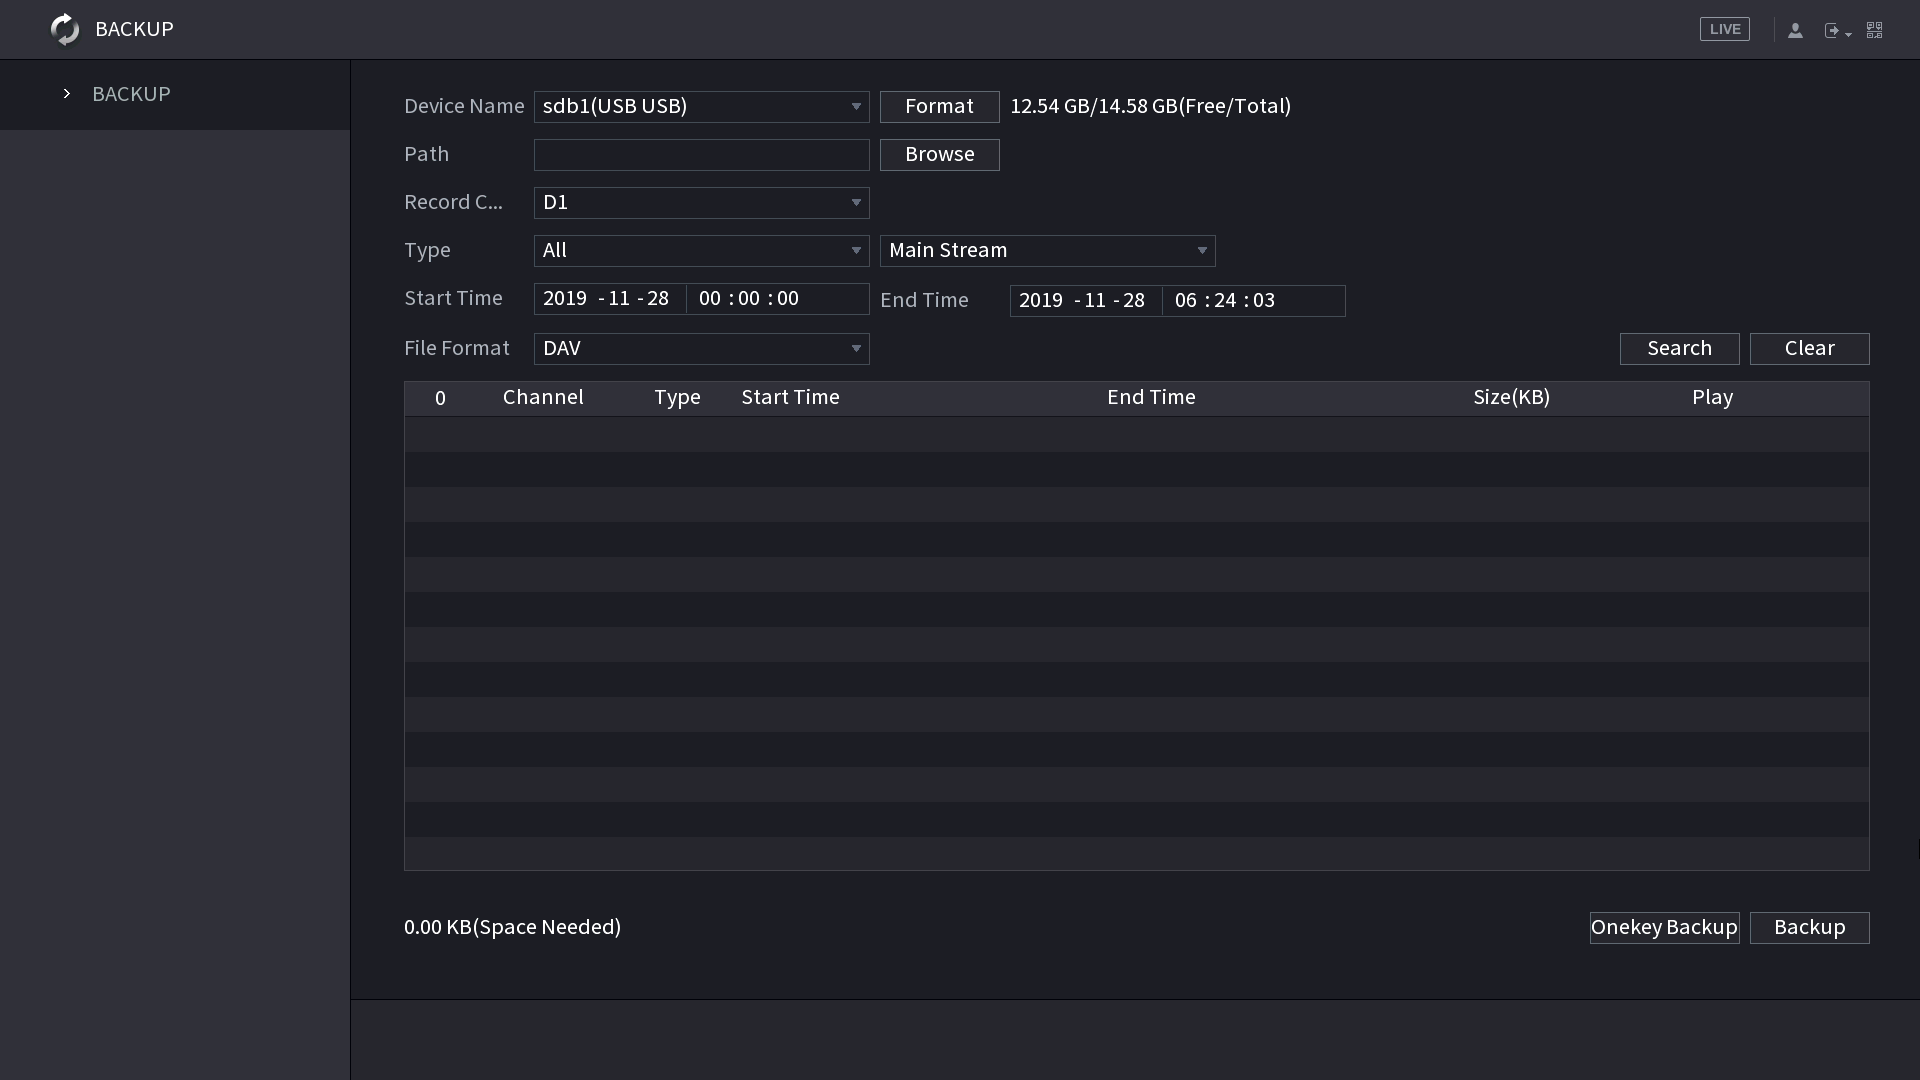
- Select Backup from the Main Menu, or, insert your USB device and select File Backup.
- Here, you can select the Type of footage to backup (default: All), the Start Time and End Time and what Record Channels to backup video from.
- Selecting Add will populate the list with individual video clips ready for backup. Clips can be added or removed from the backup process using the check box.
- Select Start to begin backup.
NOTE: Regular type footage (R) will be split into in one hour segments, unless Motion Detection type footage (M) was recorded. Storage capacity is also shown. Ensure you have the required USB device storage to accept the backup video.
NVR (Black GUI)
Playback
To access footage playback, select the Search button from the Main Menu.
Stored footage can be accessed by searching by date and refined by footage type (Regular, Motion Detection, Alarm, etc). The below image details the playback interface with footage selected.
The calendar days that have footage available for playback will be indicated by a dot. (As shown below)

After locating desired footage, you can immediately backup the video by using the playback menu.

Playback Footage by Date
- Ensure that the correct HDD is selected and that REC is selected in Source Select.
- Using the Date Select calendar, choose your date for footage playback. A coloured date icon indicates stored footage is available for that day.
- In the View Select section, tick the box next to the cameras you wish to view.
- The Footage Timeline should populate with stored footage, indicated by coloured bars in the timeline. Click anywhere on the timeline to begin footage playback. Other cameras will automatically sync their playback to the selected camera.
- For greater precision playback control, zoom in on areas using the Timeline Zoom, up to 30 minutes.
- Using the Playback Controls, you can speed up or slow down playback, place marks on key footage times and take snapshots.
Playback Footage by Smart Search
NOTE: Smart search requires motion detection to be recorded to function. You can only Smart Search playback footage one camera at a time.
- As detailed in the previous section, use Date Select to choose the desired date for footage playback, ticking a single camera only in View Select.
- Click anywhere on the Footage Timeline to begin playback. Then click the Smart Search button.
- A grid will appear overlaid onto your camera playback. Highlight an area of interest on the grid. This will define the motion detection area that is used by Smart Search.
- Click the Smart Search button again to begin playback of all motion detected events in the area you selected.
Backup
Should you wish to preserve recorded footage before it is overwritten, you will need to perform a footage backup. Footage can be exported from your NVR in a .DAV or .MP4 file. A .DAV file will require conversion for sharing, whereas an .MP4 file is compatible with most video players on Windows or Mac PCs.
There are two different ways to backup footage to USB: via the Search menu through searching playback footage; and by performing a direct backup via the Backup menu. Both are accessed via the Main Menu.
NOTE: Backup file type (.DAV/.MP4) selection is only available in the Backup menu. Backup in Search Menu outputs .DAV files only.
Backup Footage via Search Menu
Using the Search Menu, find start/end points of backup footage by using playback video as a reference.
- As detailed in the Playback section above, locate the footage you wish to backup. Select the desired camera in by ticking the box next to it.
- Using the Footage Timeline, click the approximate desired time for your backup video start point. Click the Clip Button
 on the Backup Controls to set your start point.
 - Again, using the Footage Timeline, click the approximate desired time for your backup video end point. Select the Clip Button
 again to set your end point.
 - Click the Save Button
 to bring up the Backup menu.
 - This process can be repeated to add more clips from different channels.
- Plug in your USB device, exiting any automated prompts, and select Backup to begin backup.
Backup Footage via Backup Menu
Using the Backup Menu, specify start/end dates & times across multiple cameras simultaneously. This is useful for large footage export, such as full days.
- Select Backup from the Main Menu, or, insert your USB device and select File Backup.
- Here, you can select the Type of footage to backup (default: All), the Start Time and End Time and what Record Channels to backup video from.
- Selecting Add will populate the list with individual video clips ready for backup. Clips can be added or removed from the backup process using the check box.
- Select Start to begin backup.
NOTE: Regular type footage (R) will be split into in one hour segments, unless Motion Detection type footage (M) was recorded. Storage capacity is also shown. Ensure you have the required USB device storage to accept the backup video.
SmartPSS
Playback
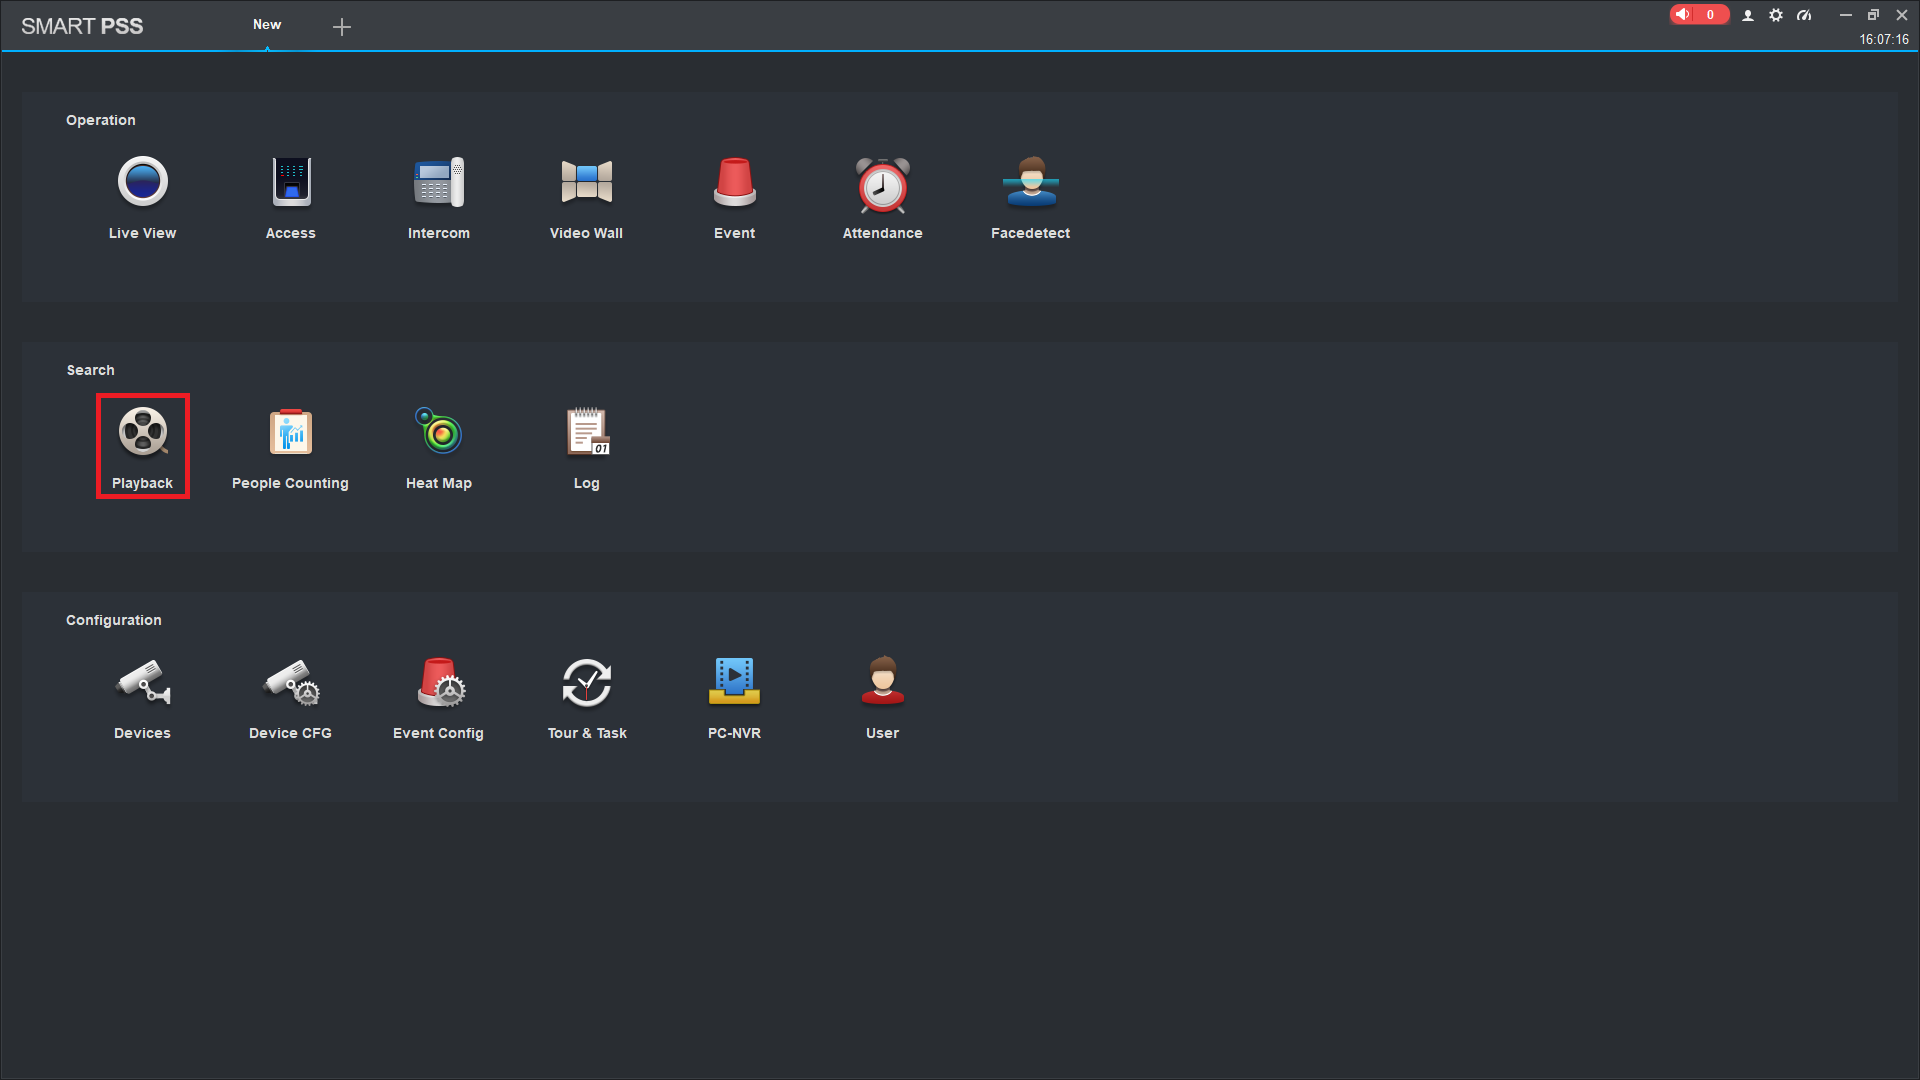
On the Main Menu of Smart PSS, Click Playback.
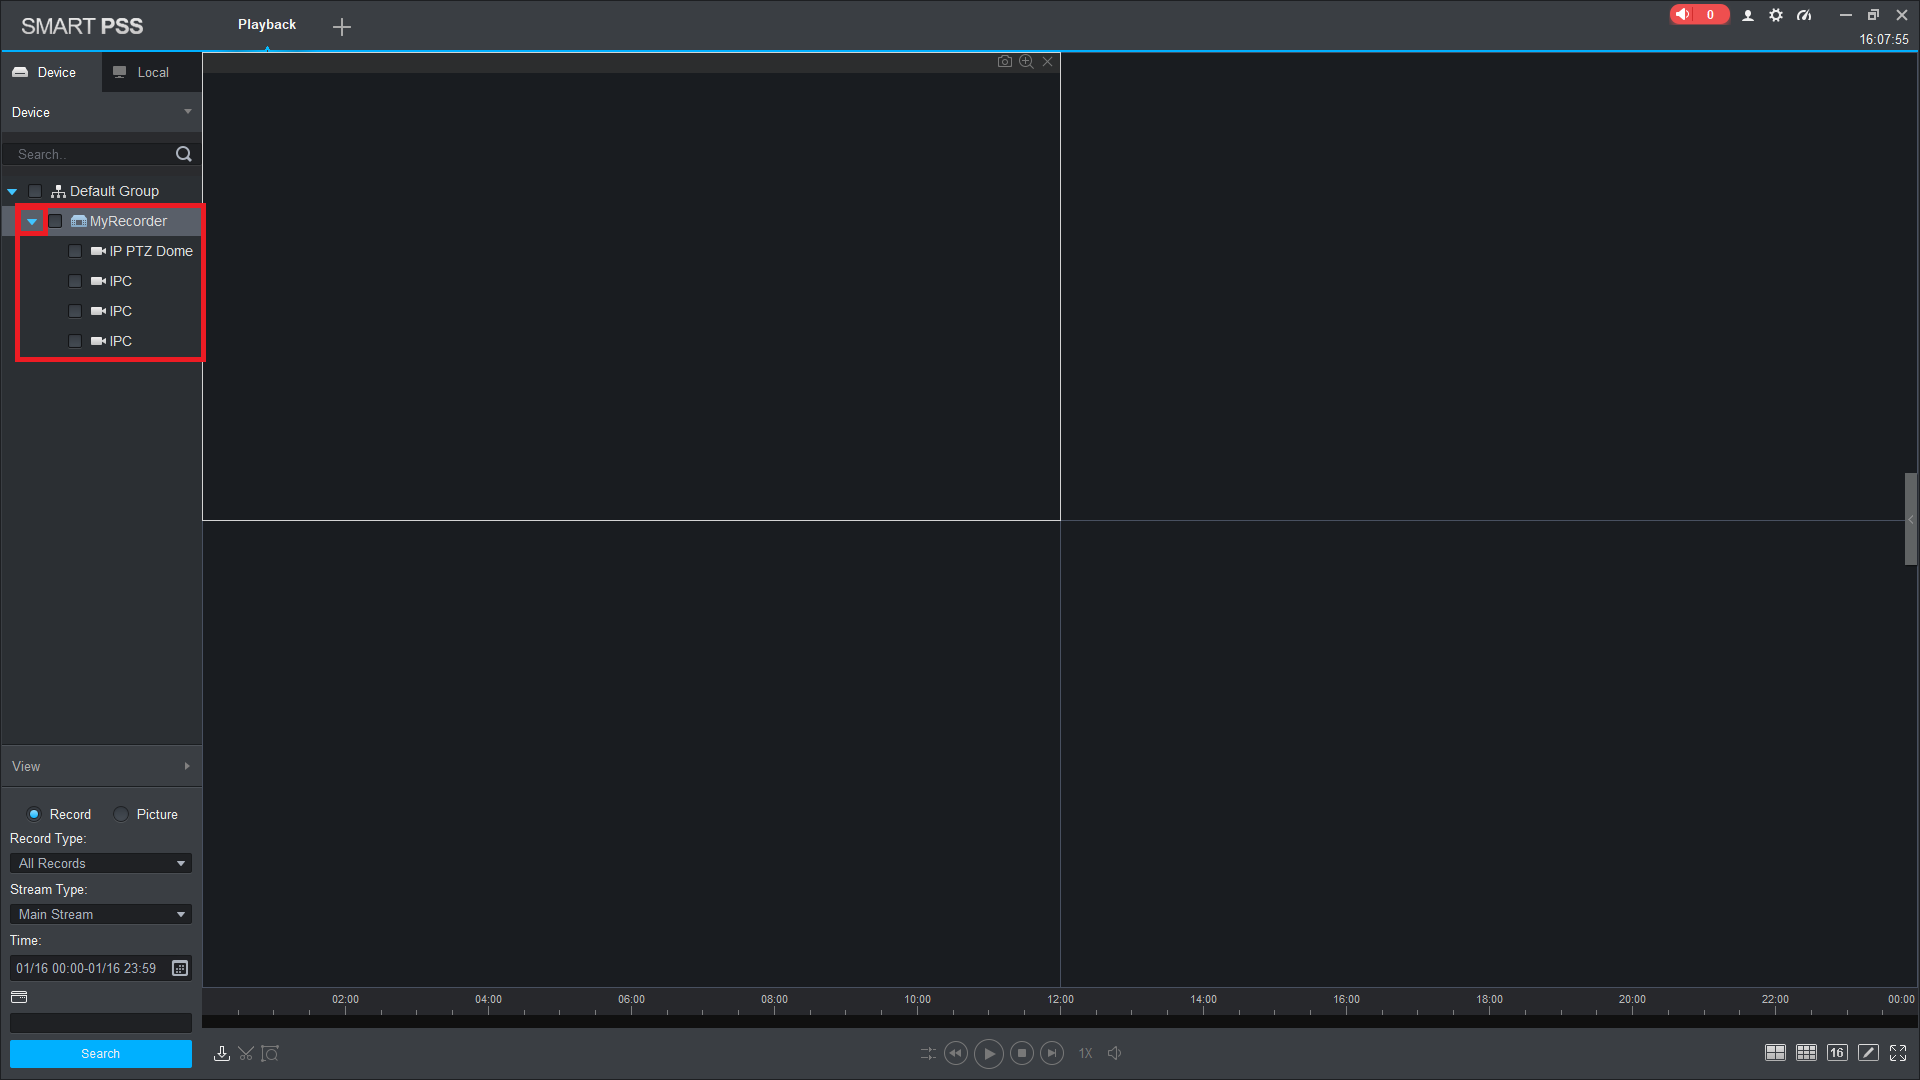
Tick the Cameras that you wish to look for footage on. Click on the Triangle icon to expand the list if necessary.
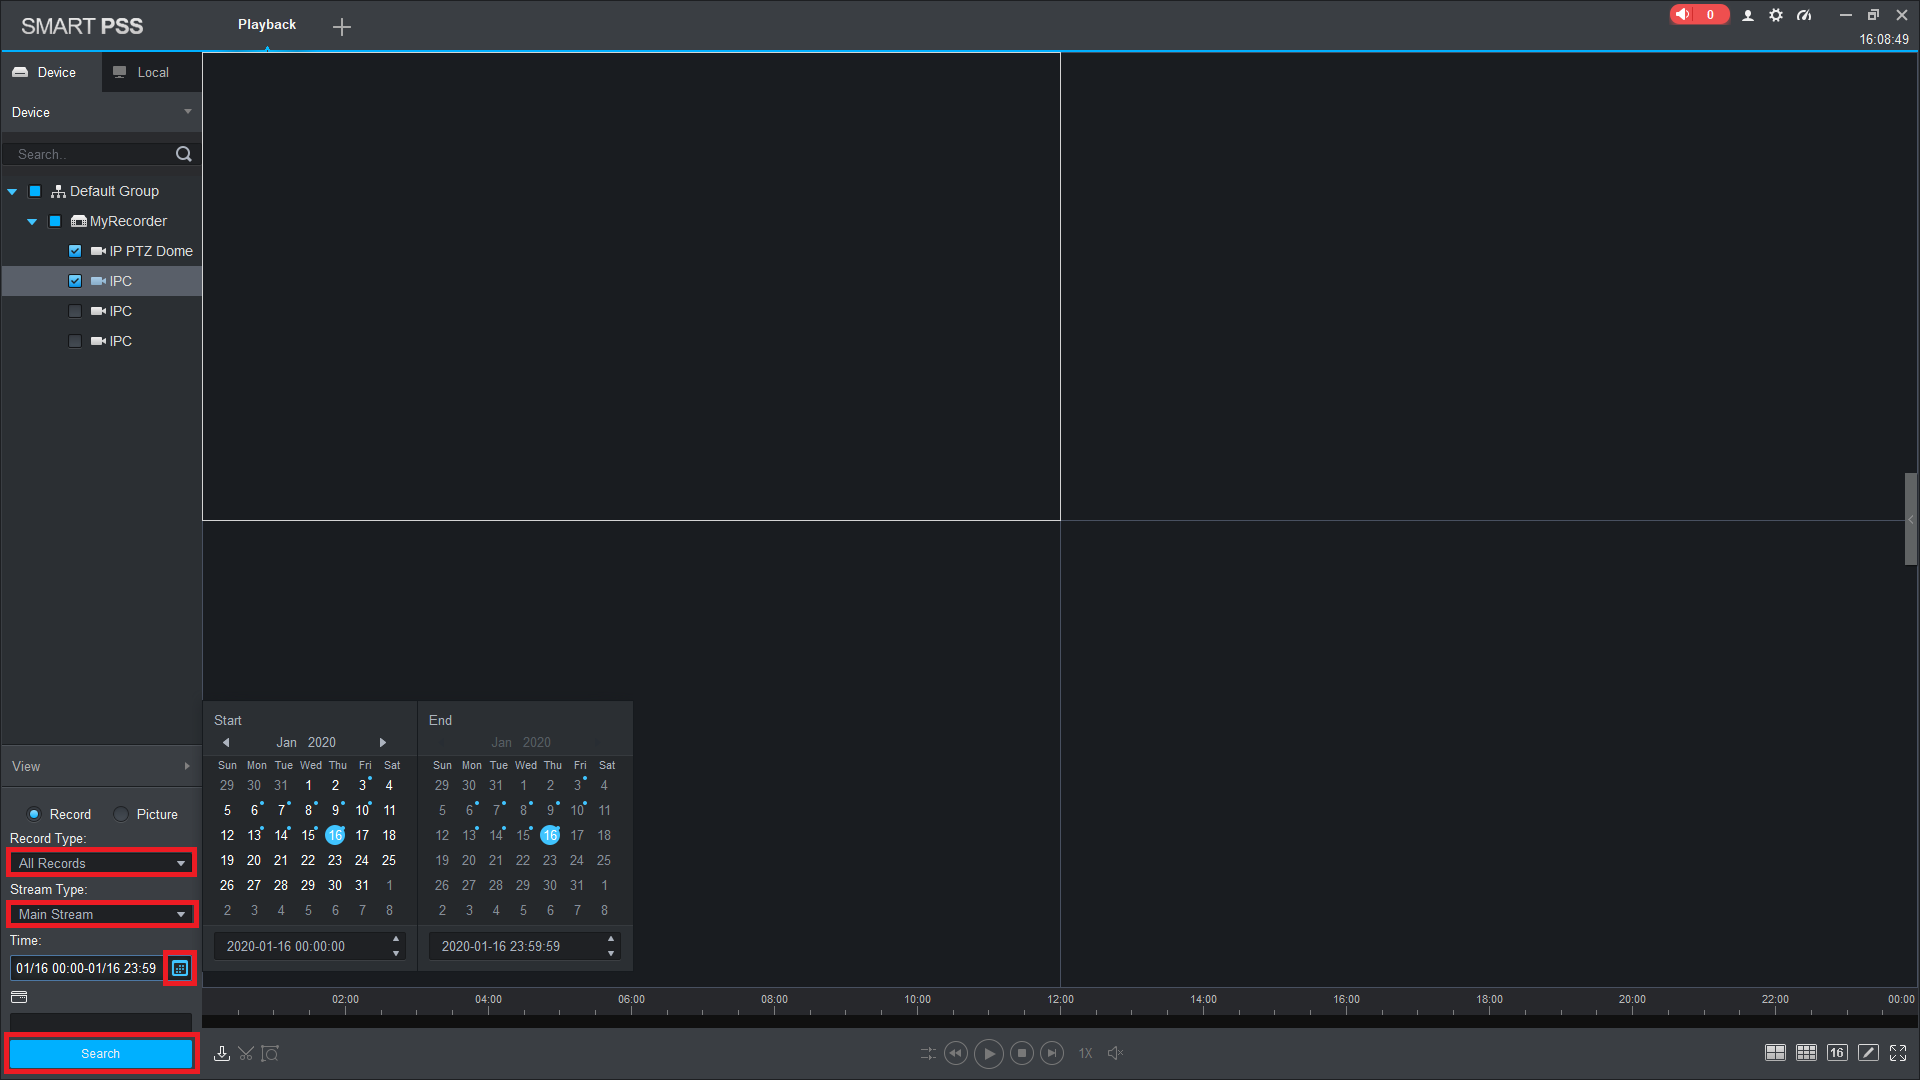
Select the Record Type and Stream Type if desired.
Click the Calendar icon to choose what day to search for footage on. The large blue circle indicates what day is selected, while the small blue dots indicate which days have footage for the selected cameras.
Click Search.
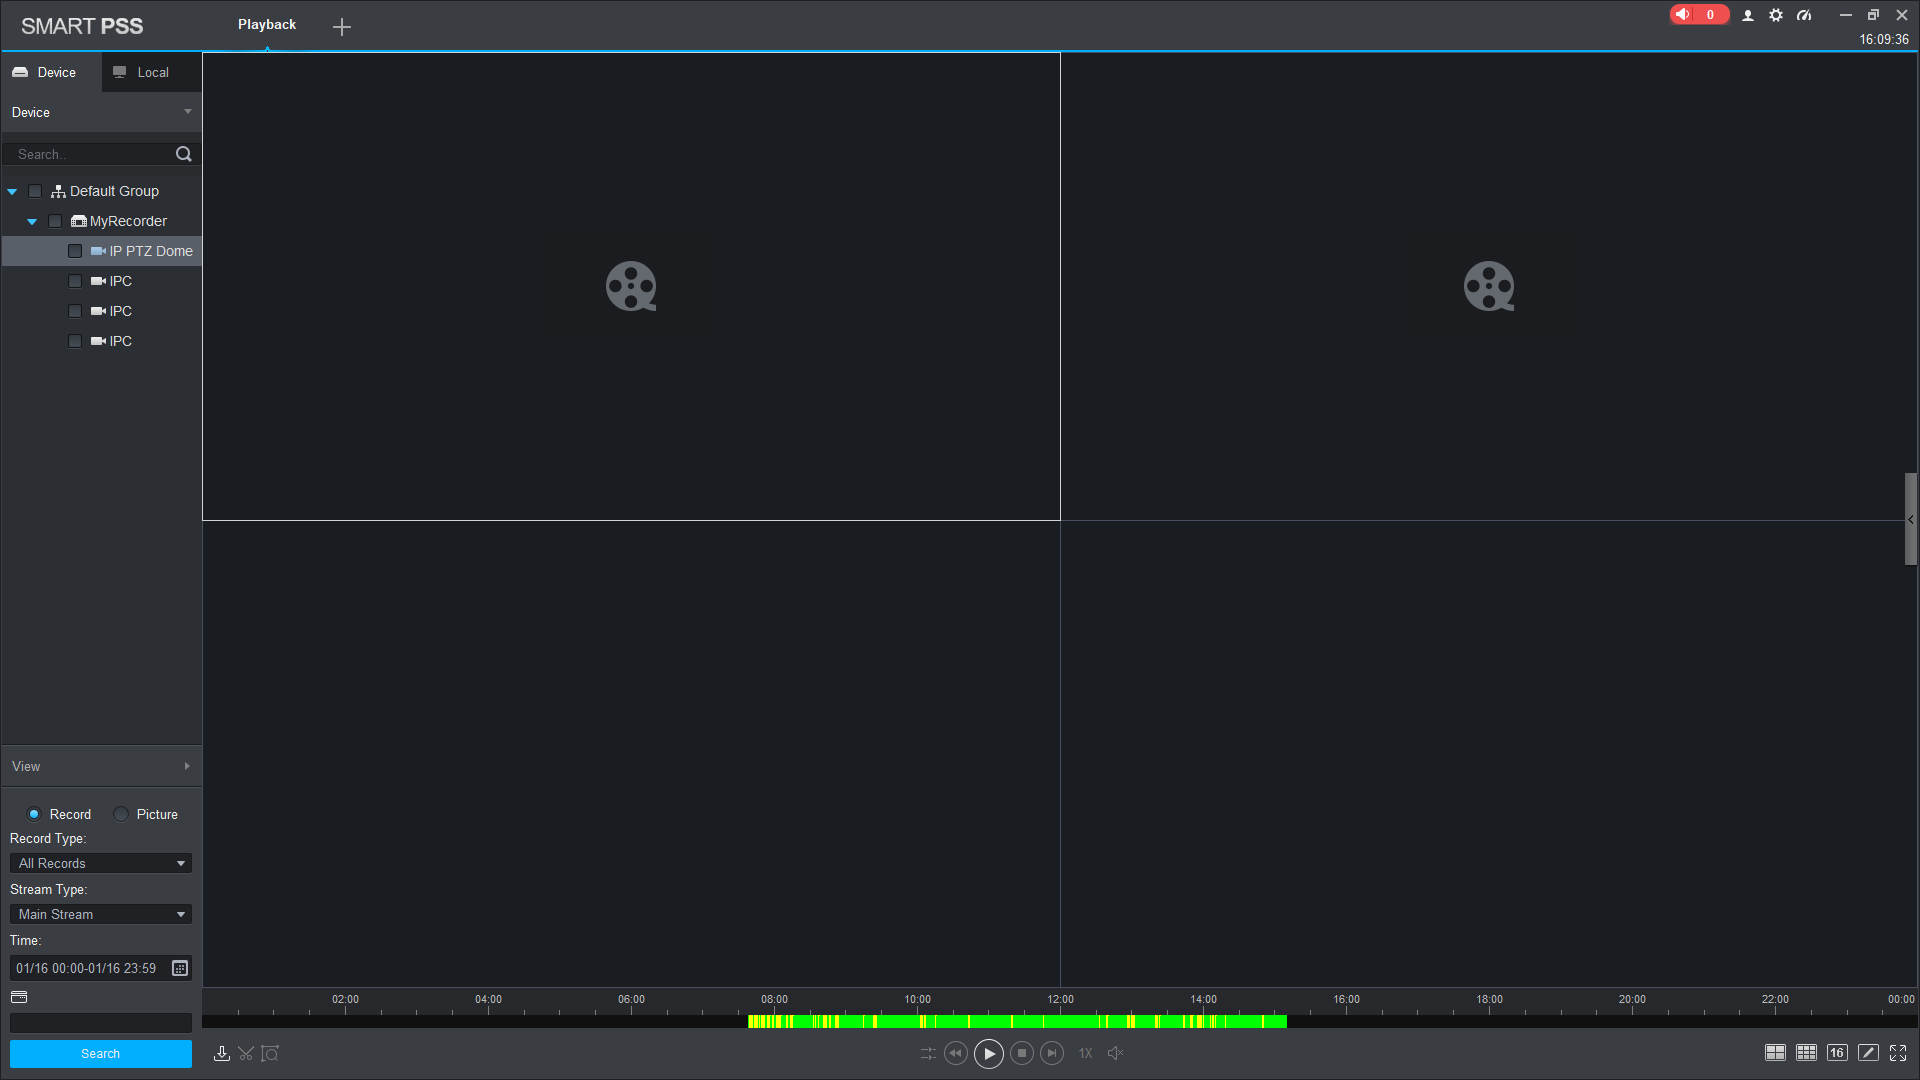
Click anywhere on the coloured bars to start playback. Alternatively, click the Play button to start playback from the earliest available footage.
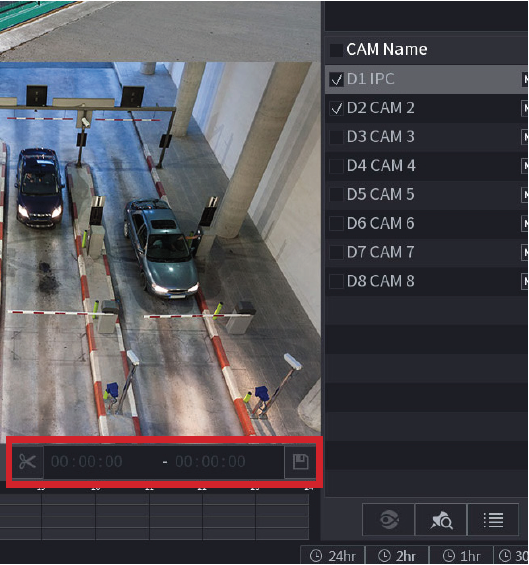
Backup
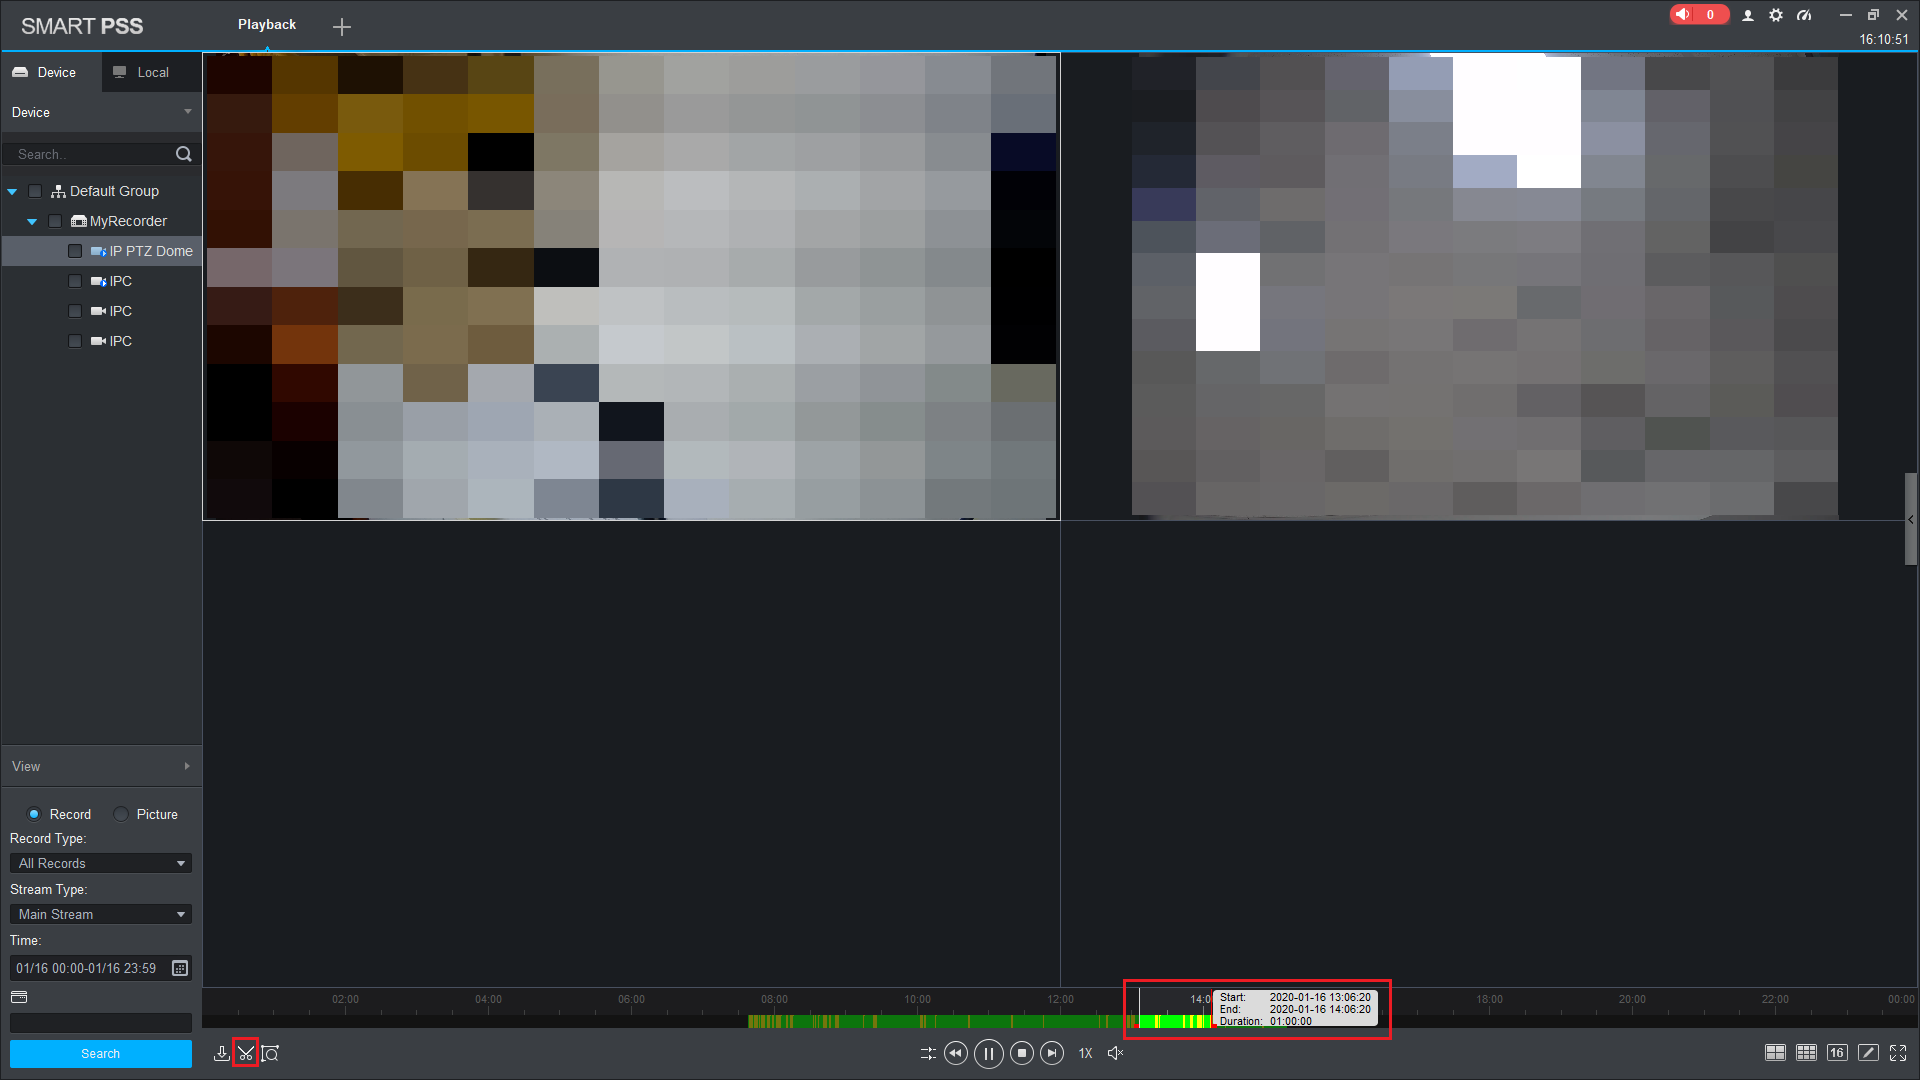
Click on the Scissors Icon.
Click and drag the Start and End lines so there are positioned at the start and end points of the footage you wish to export.
Click the Scissors Icon again.
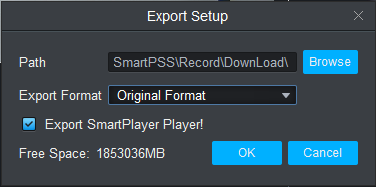
Click Browse to change where the footage will be saved.
Select the Export Format.
Click OK.
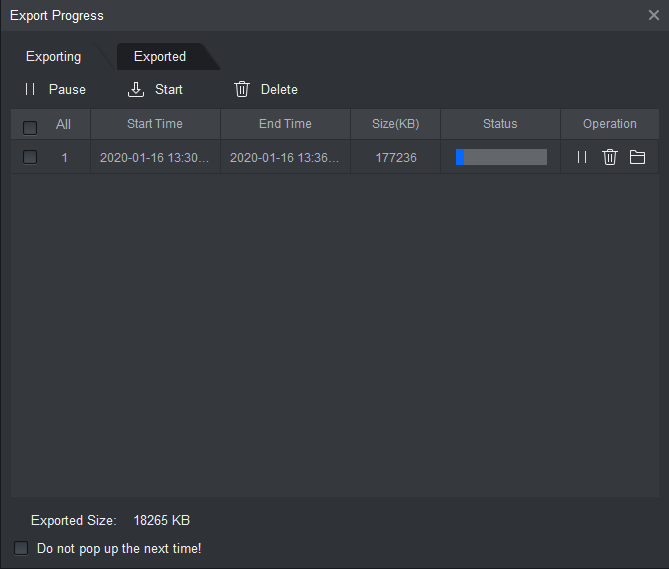
The Exporting tab will show you the status of your current backup.
Once the backup is complete, it will be moved to the Exported tab.
Click the Folder Icon to open the location your footage was saved.
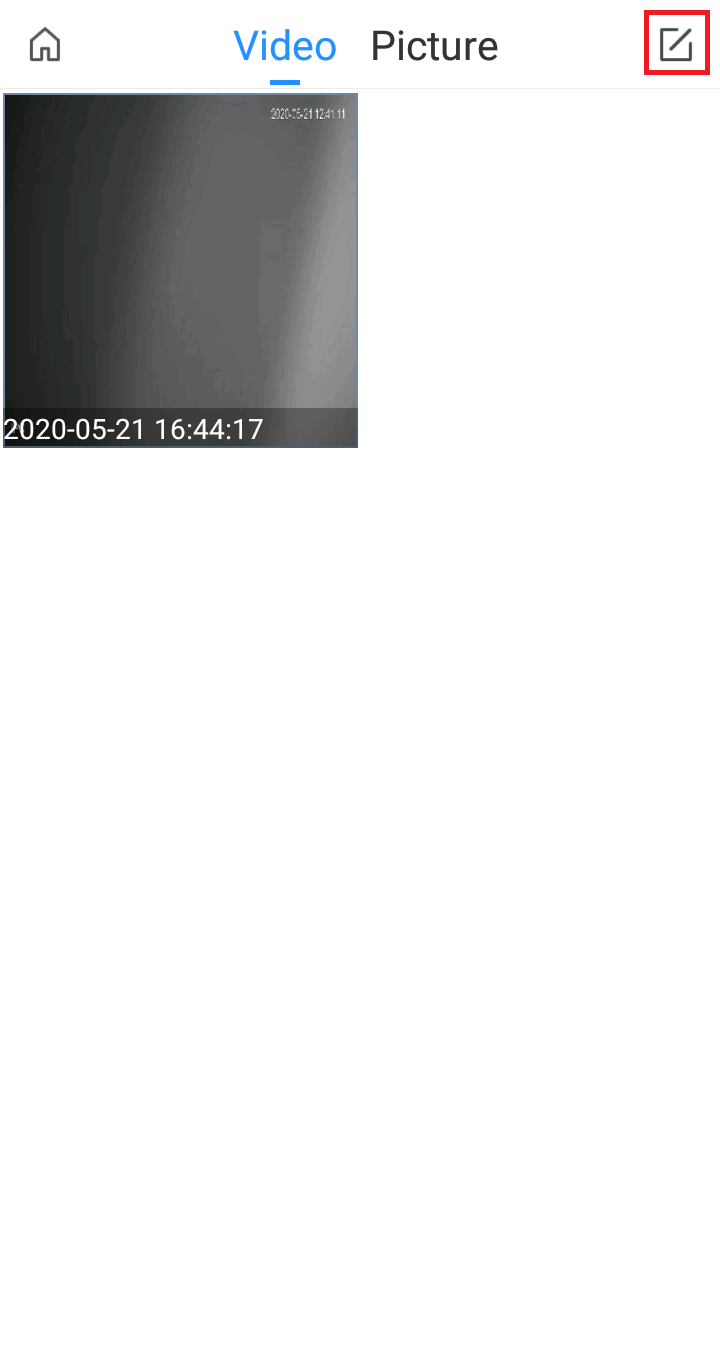
DMSS
Playback
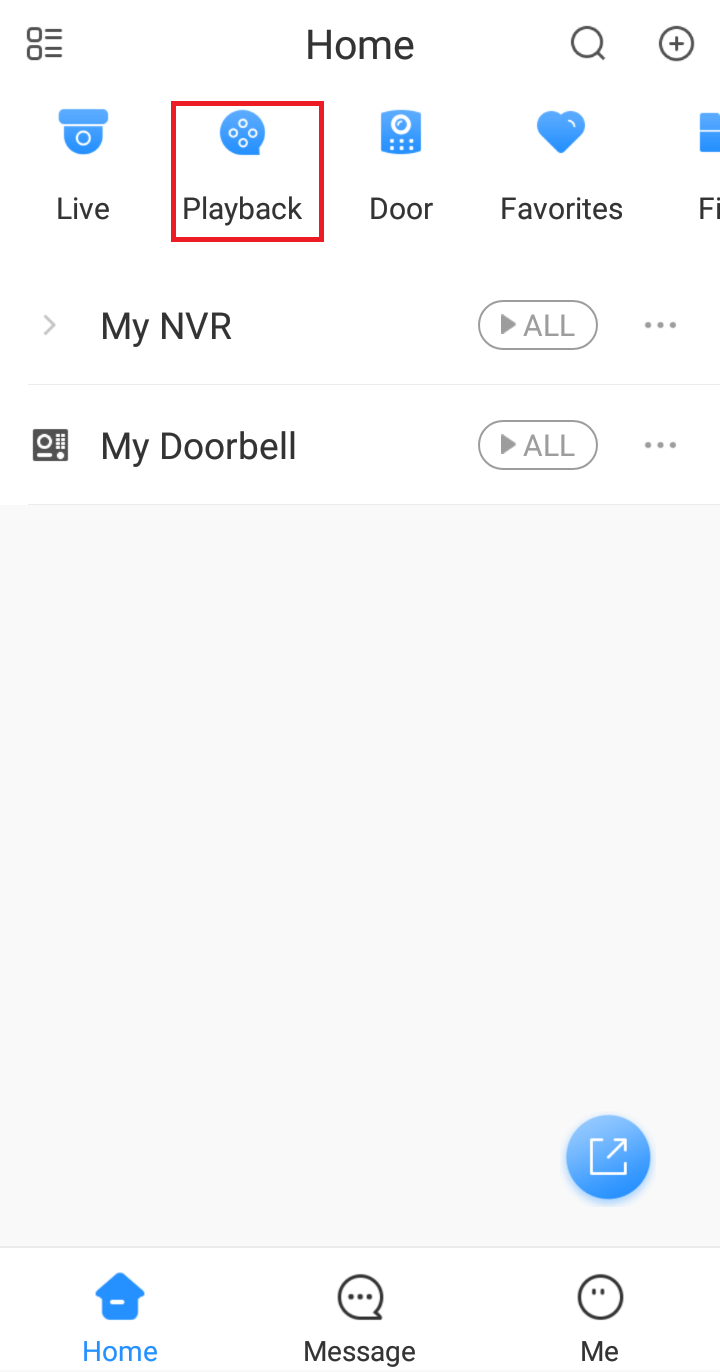 |
Tap on Playback |
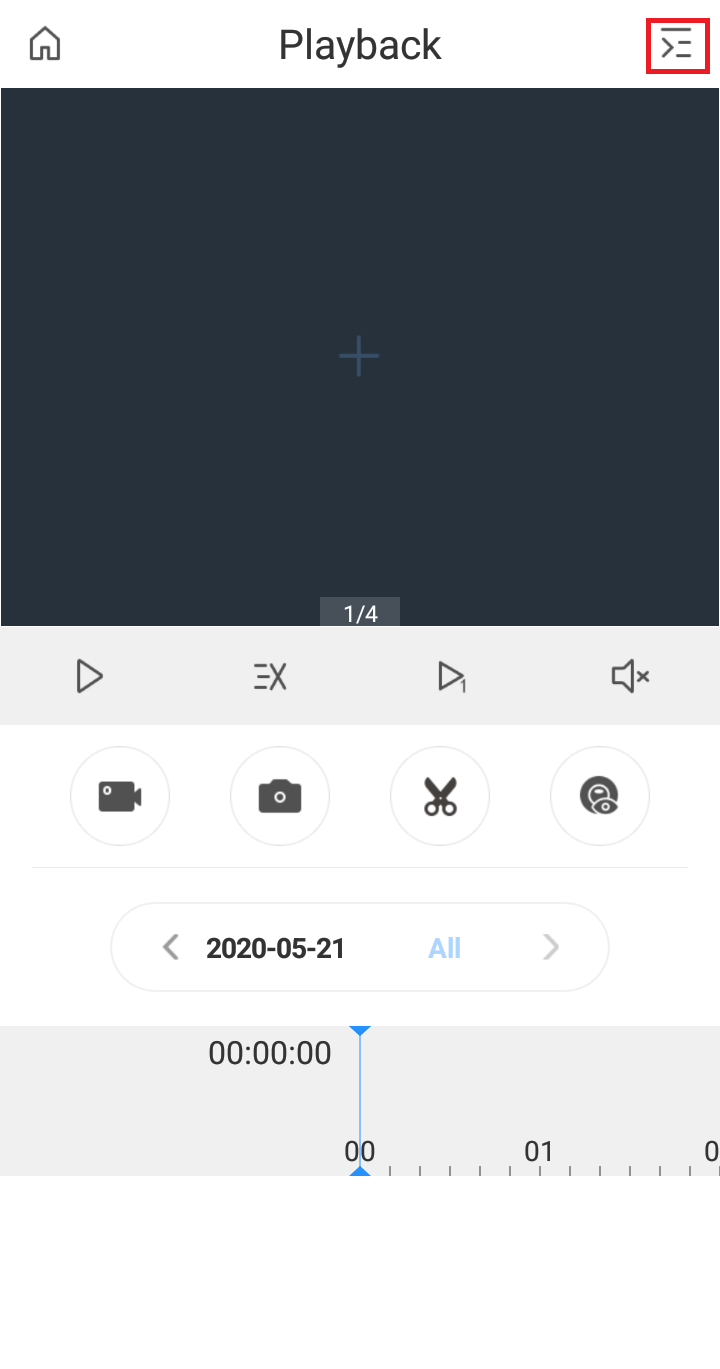 |
Tap on the  Icon Icon |
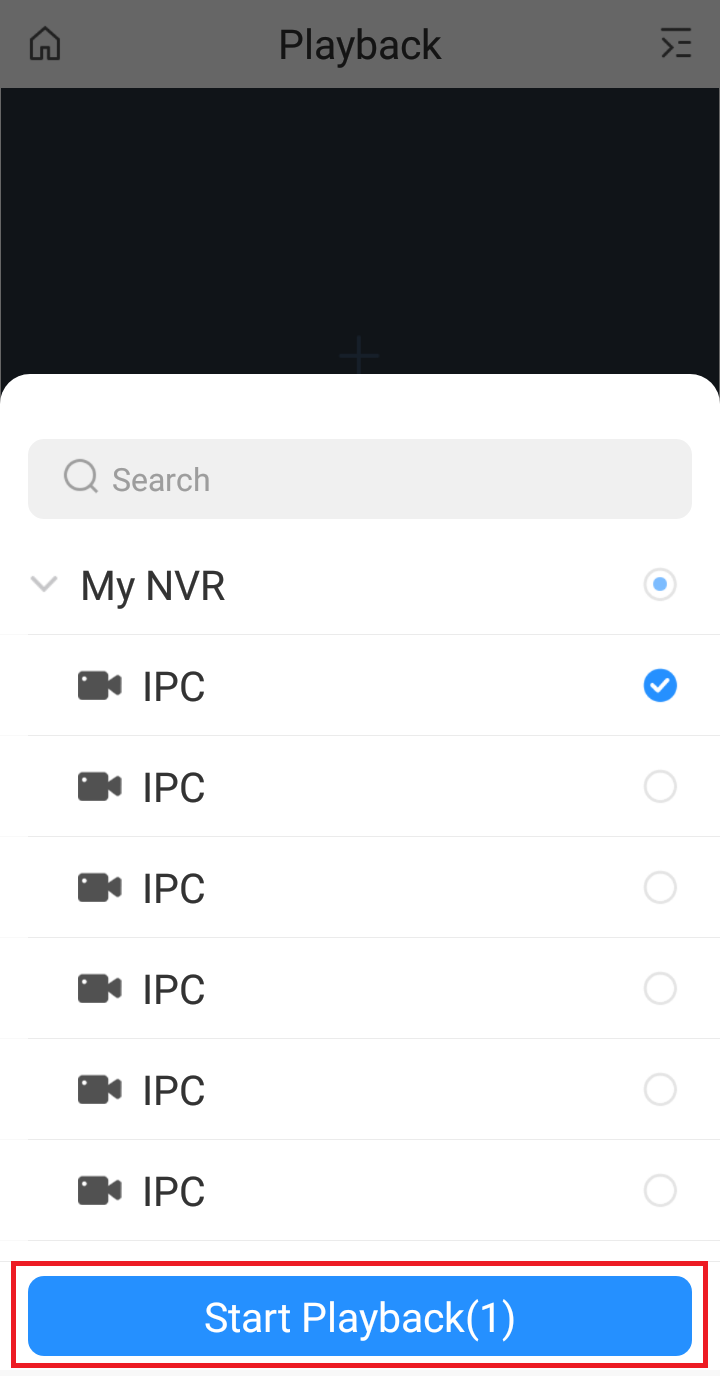 |
Tap on up to up to 4 cameras to select them, then tap Start Playback |
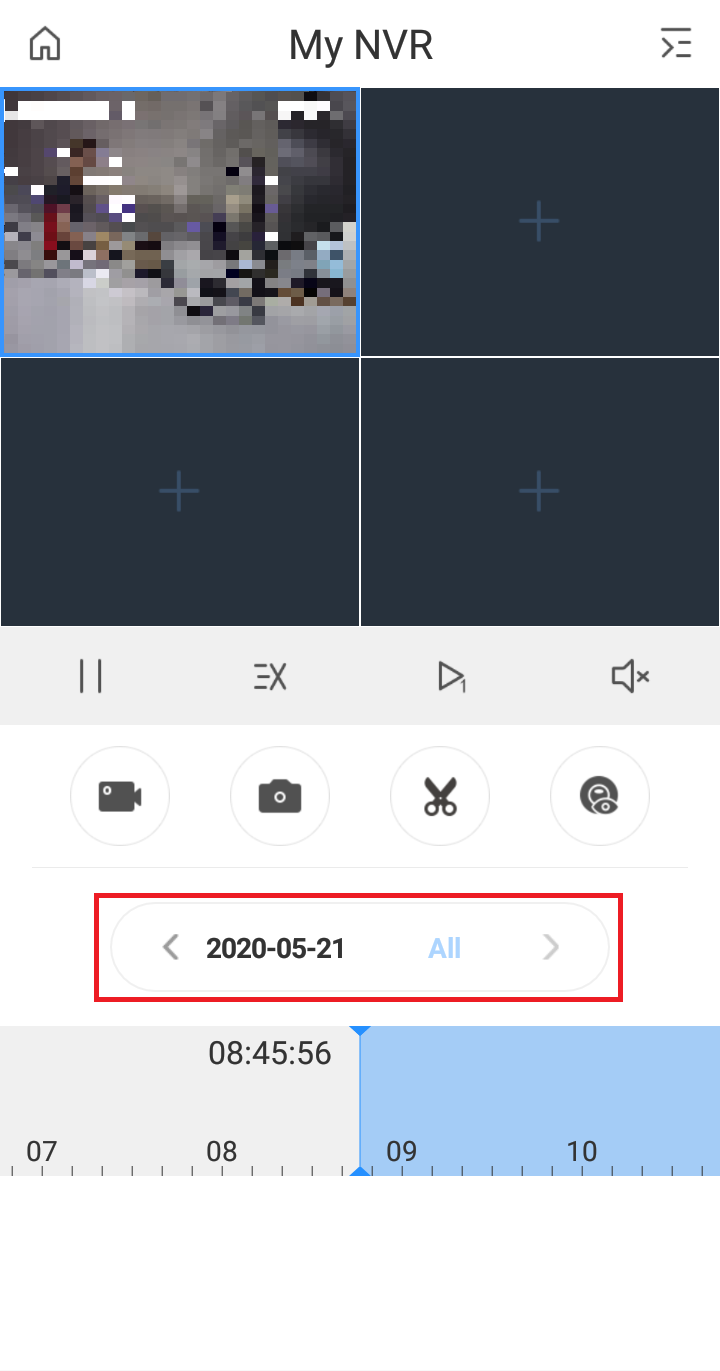 |
Tap on the Date / Stream Type |
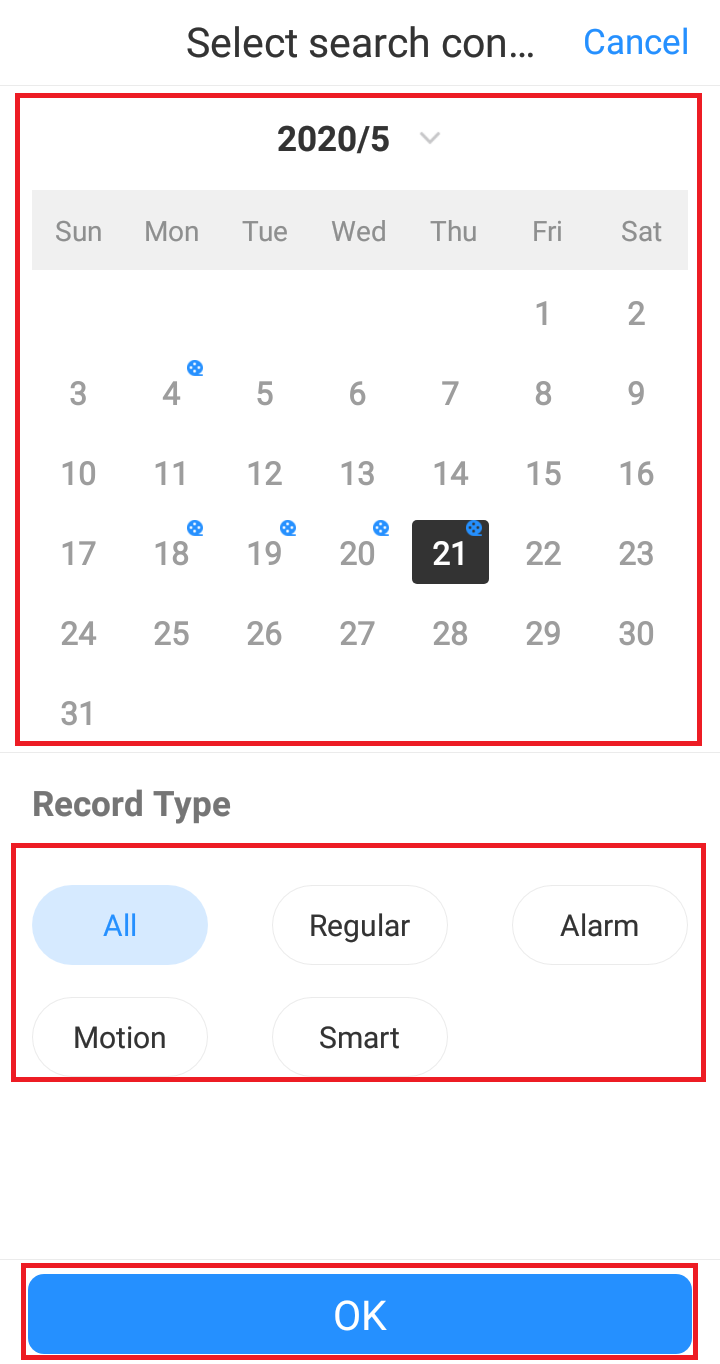 |
Tap on the desired Date. Days with footage will have a small blue film reel icon in the top right  Select the desired Record Type. Tap OK |
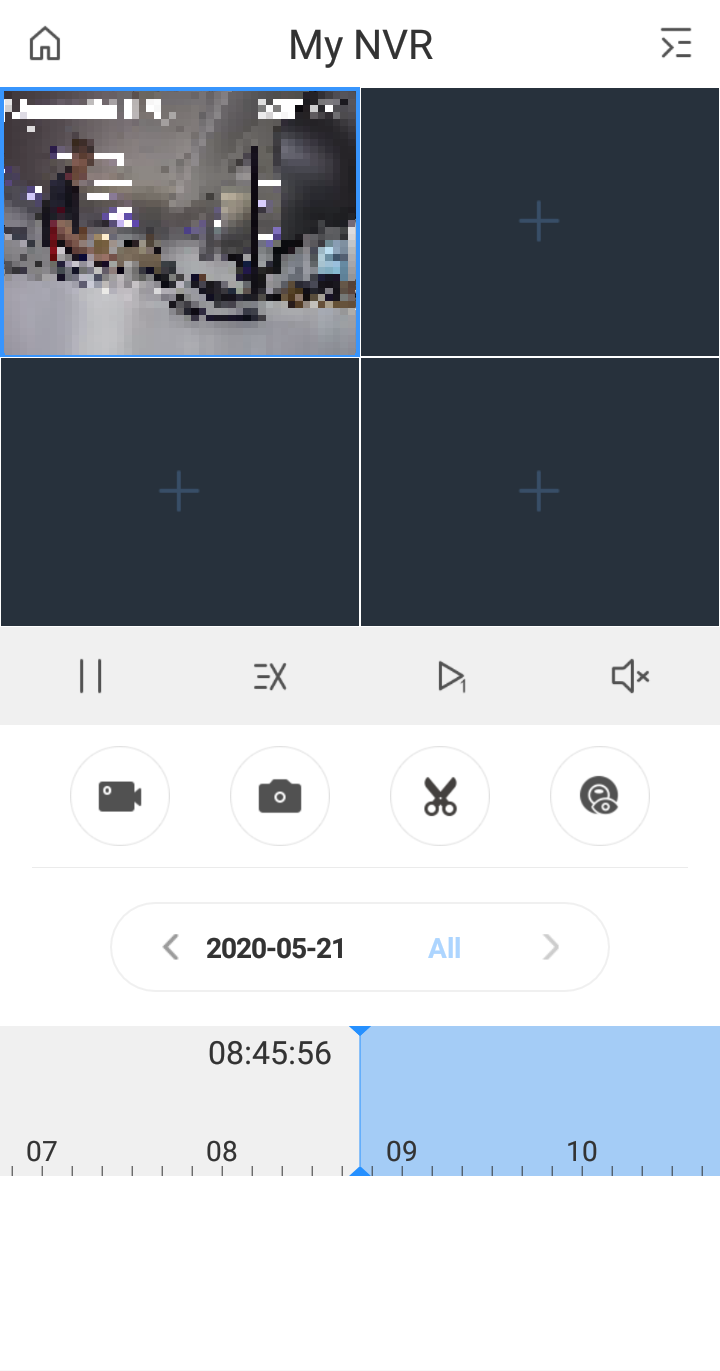 |
The parts of the timeline highlighted in blue are the parts that contain footage. Depending on your network speed, it may take a while for the timeline to load the footage. Drag the  icon to change where footage is being played. icon to change where footage is being played. & &  can be used to Play/Pause Playback can be used to Play/Pause Playback Can be used to adjust the playback speed Can be used to adjust the playback speed is used to play frame by frame is used to play frame by frame is used to mute/unmute audio is used to mute/unmute audio |
Backup
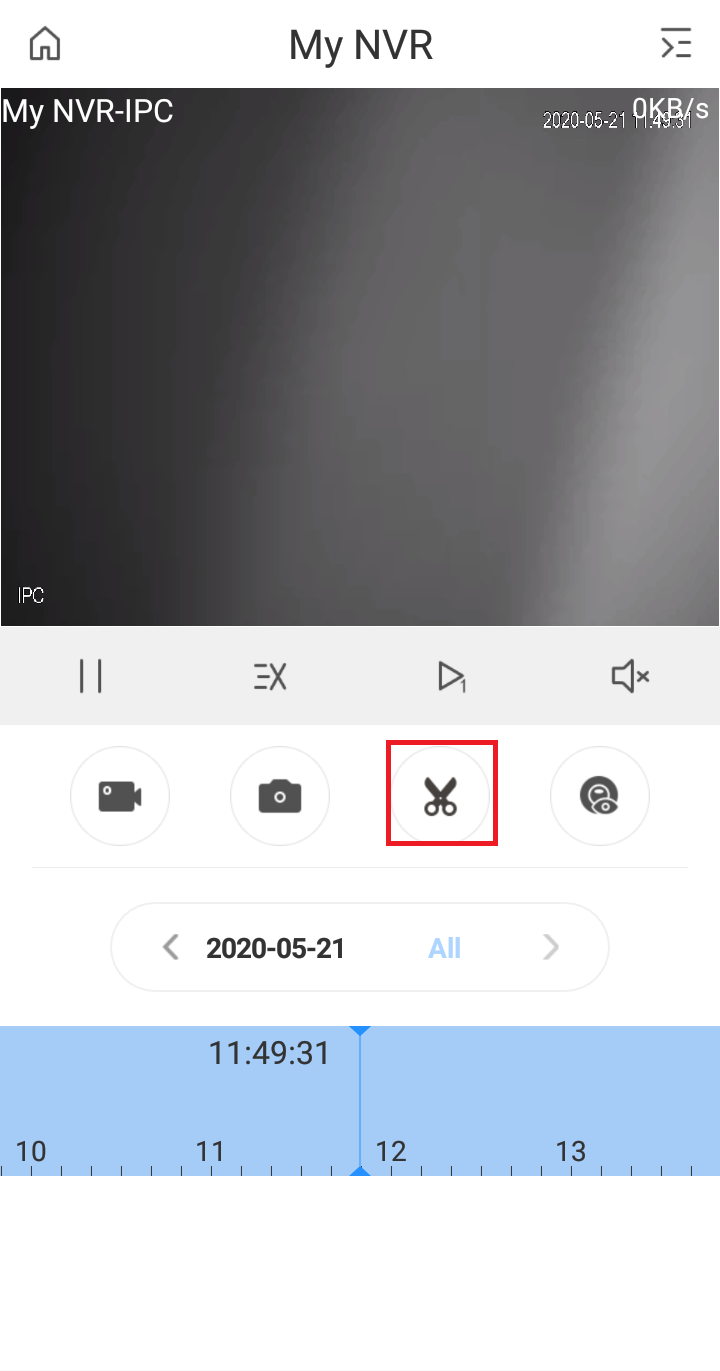 |
Tap on the Scissors  Icon Icon |
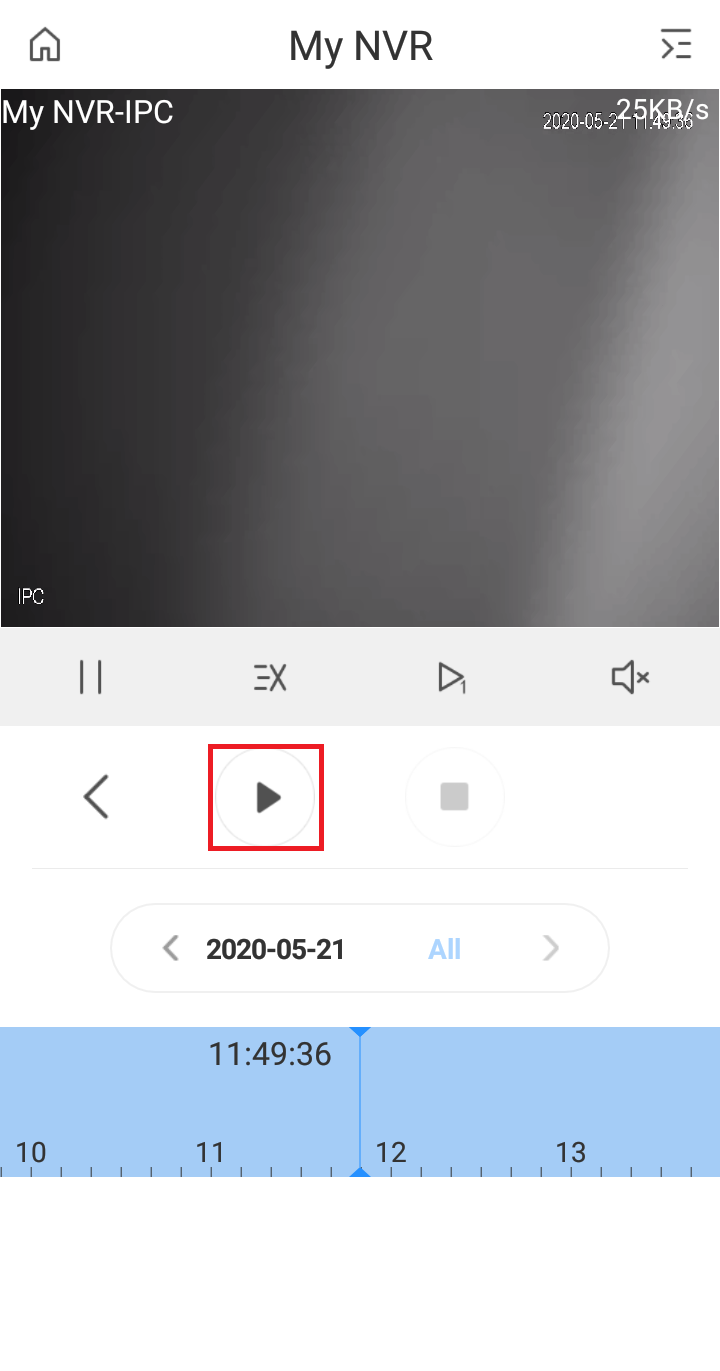 |
Drag the  icon to where you want the clip to start. icon to where you want the clip to start.Tap the Play icon |
 |
Drag the icon to where you want the clip to end. Tap the Stop icon |
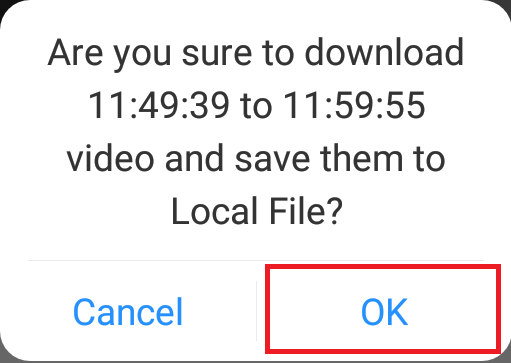 |
Tap OK |
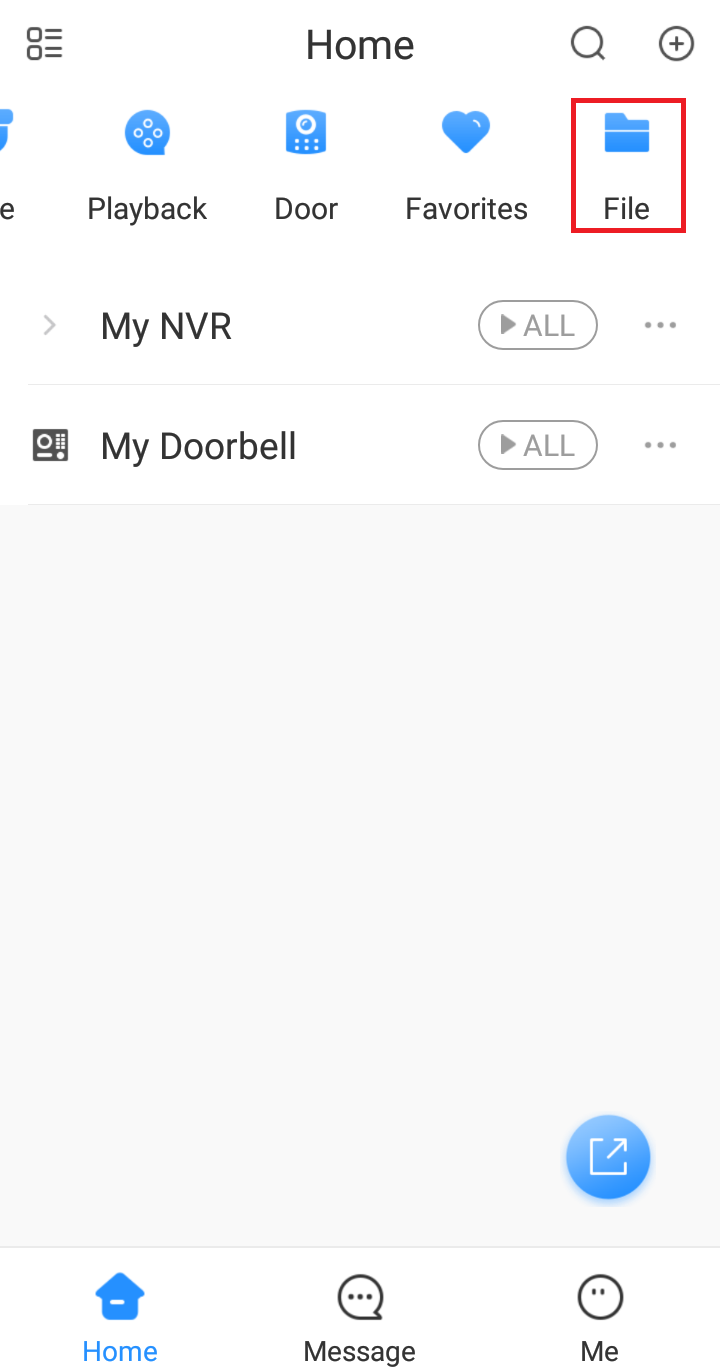 |
On the Home page, Tap on File |
 |
Tap on the  Icon Icon |
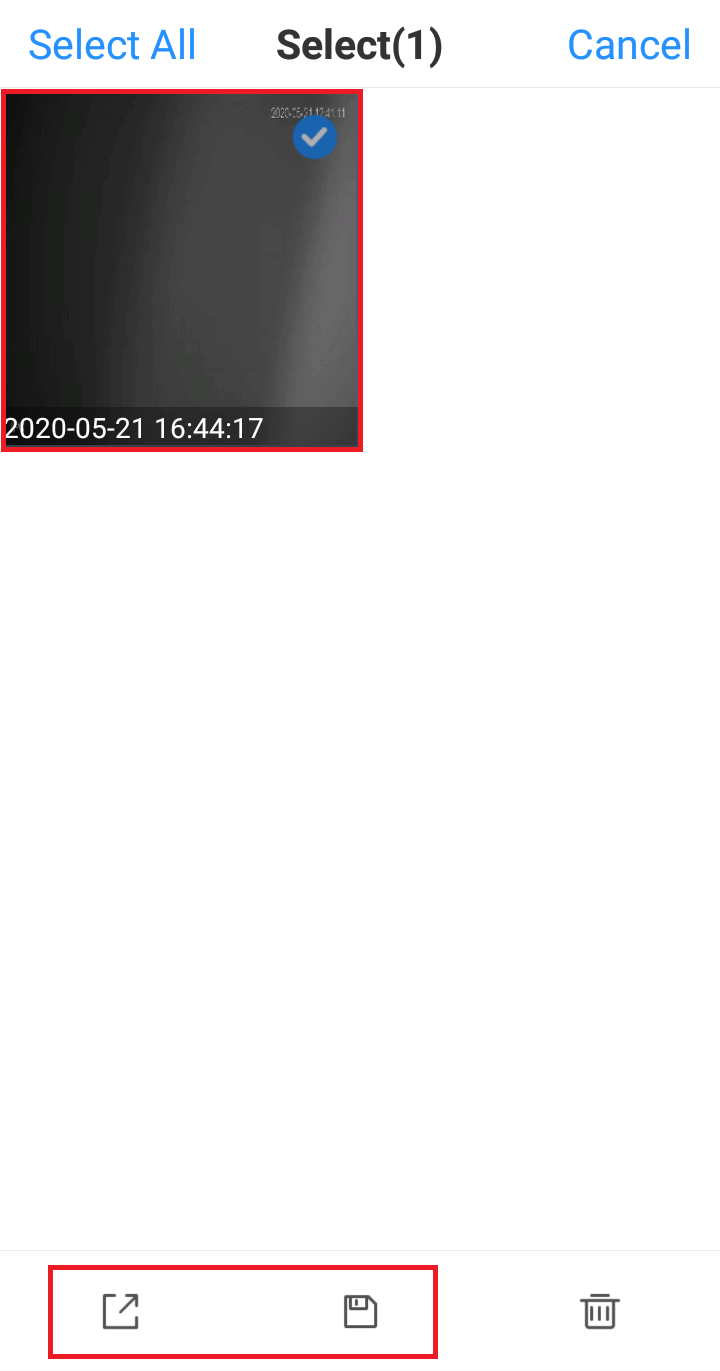 |
Tap on the files to select them. Tap  to share the file to share the fileTap  to save the file to your phone. to save the file to your phone. |
Web Interface (Standalone Camera)
Playback
- Ensure that the SD Card is selected in Source Select.
- Using the Date Select calendar, choose your date for footage playback. A coloured date icon indicates stored footage is available for that day.
- The Footage Timeline should populate with stored footage, indicated by coloured bars in the timeline. Click anywhere on the timeline to begin footage playback.
- For greater precision playback control, zoom in on areas using the Timeline Zoom, up to 30 minutes.
- Using the Playback Controls, you can speed up or slow down playback.
Backup
Backup by Time Stamp
Find start/end points of backup footage by using playback video as a reference.
- As detailed in the Playback section above, locate the footage you wish to backup.
- Using the Footage Timeline, click the approximate desired time for your backup video start point. Click the Clip Button
 on the Backup Controls to set your start point.
 - Again, using the Footage Timeline, click the approximate desired time for your backup video end point. Select the Clip Button
 again to set your end point.
 - Click the Save Button
Backup by File Type
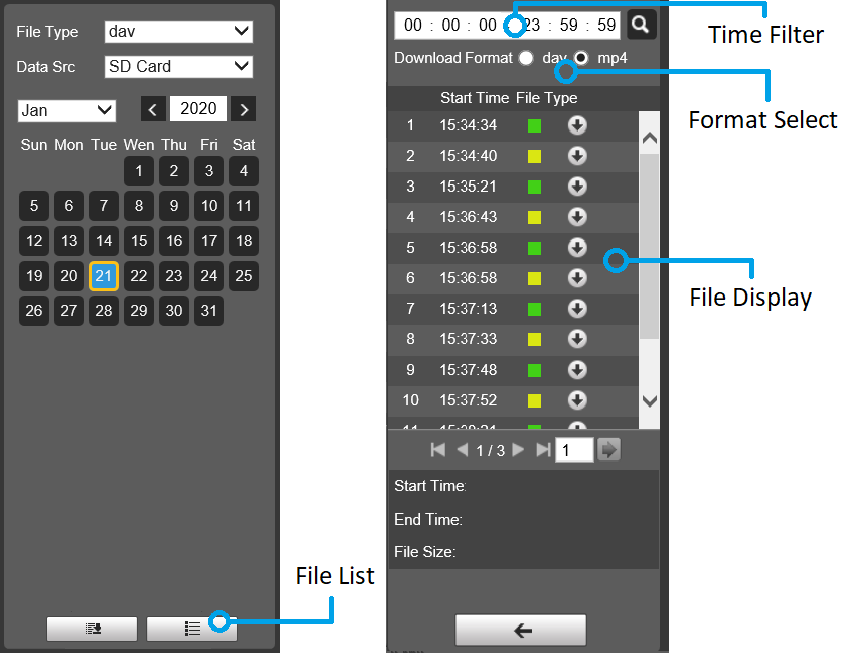
- As detailed in the Playback section above, locate the footage you wish to backup.
- Click the File List Button

- Use the Time Filter to search a specified time period.
- Change the Format by selecting an option in Format Select.
- In File Display, click the Download Arrow to save the footage file.
Batch Backup
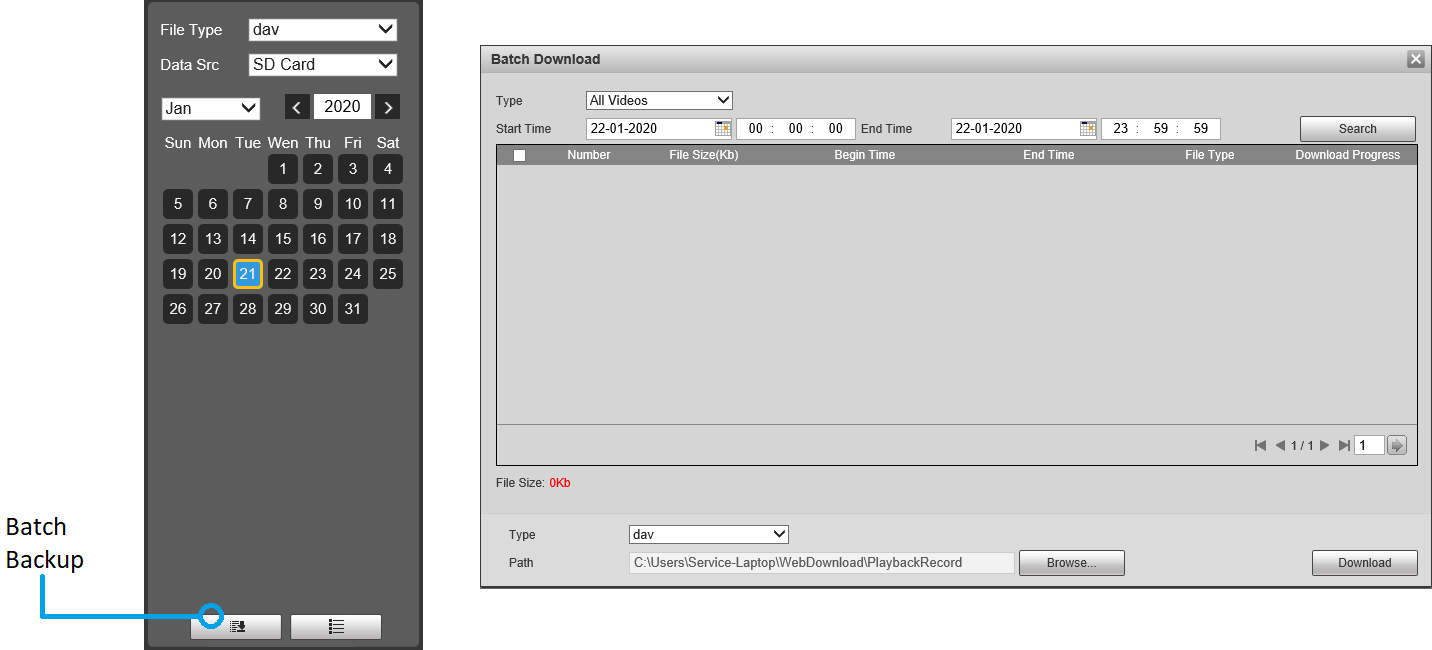
- As detailed in the Playback section above, locate the footage you wish to backup.
- Click on the Batch Backup Button

- Here, you can select the Type of footage to backup (default: All) and the Start Time and End Time.
- Selecting Search will populate the list with individual video clips ready for backup. Clips can be added or removed from the backup process using the check box.
- Select the File Type (default: dav) and Save File Path.
- Select Download to begin backup.
Click here if you want to change where footage is saved
Navigate to Setting > Camera > Video > Path.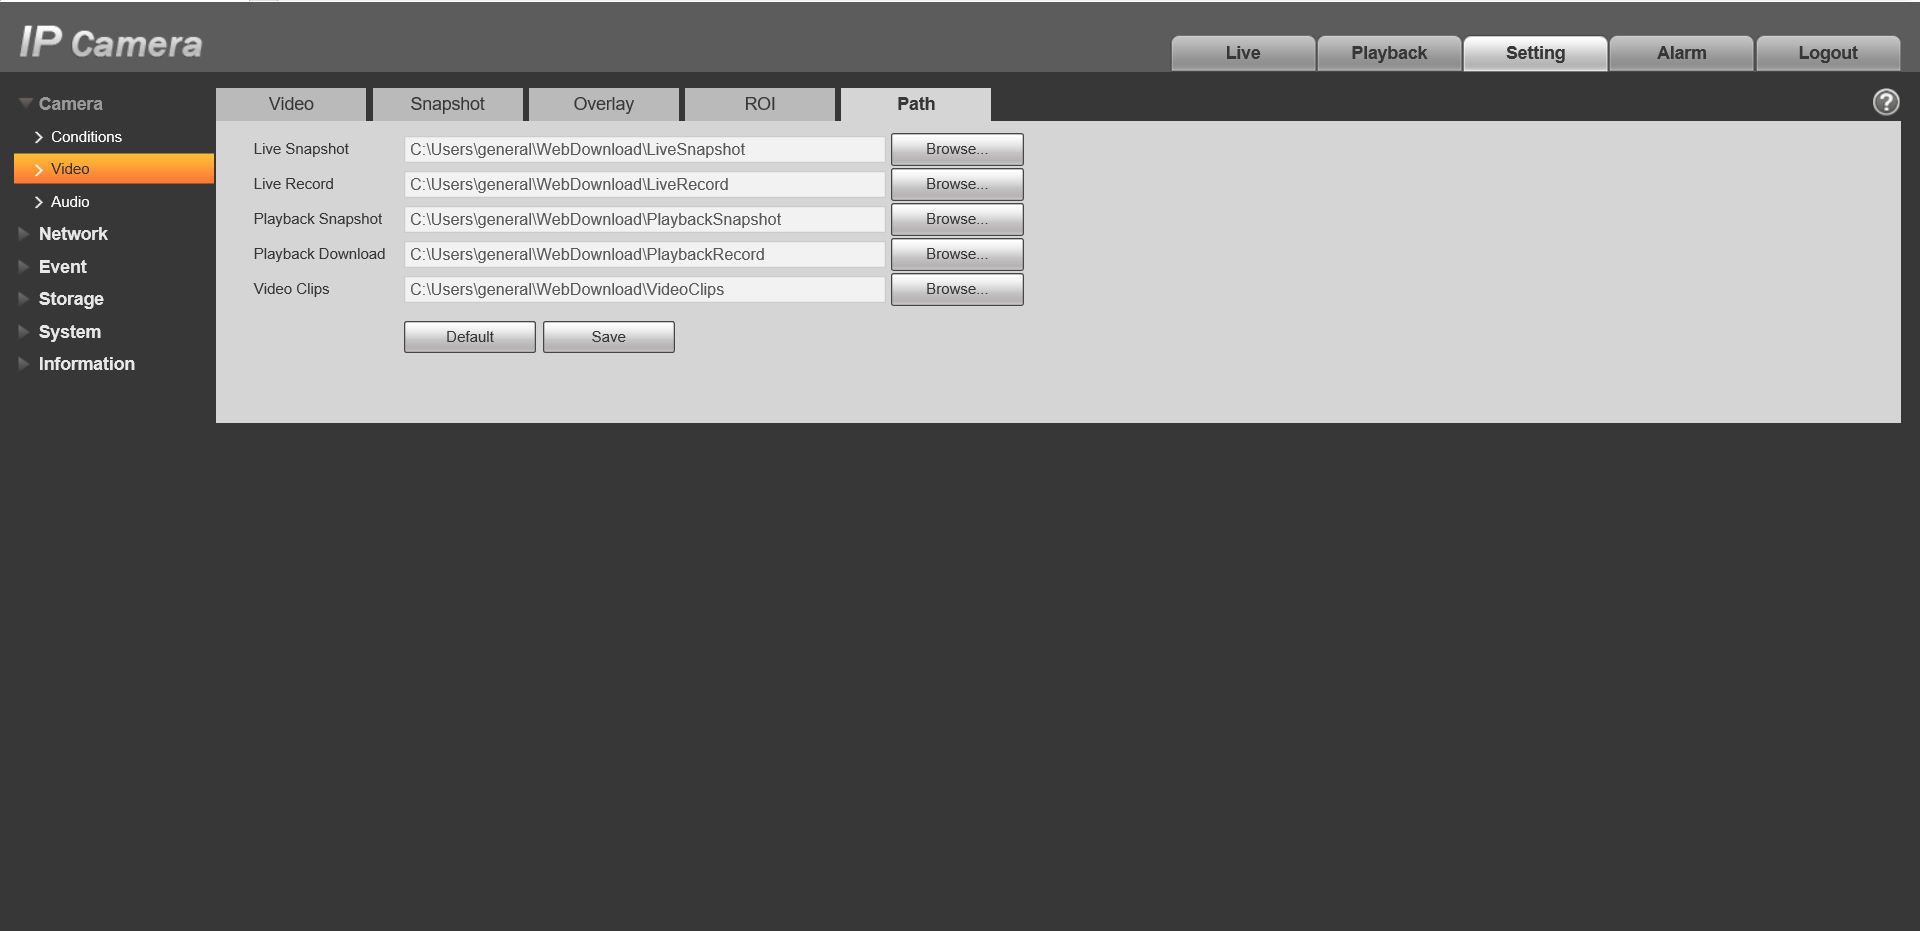
Click Browse next to Playback Download to change where your footage will be saved.