Installation Tips
Before mounting the antennas, please read the below points.
- Use outdoor rated CAT5 shielded cable with a drain wire, and terminate to TIA-568A or TIA-568B with RJ45 shielded connectors.
- When mounting the antennas, ensure there is line of sight between each antenna, meaning you can see each antenna with no obstructions from where the access point is going to be mounted.
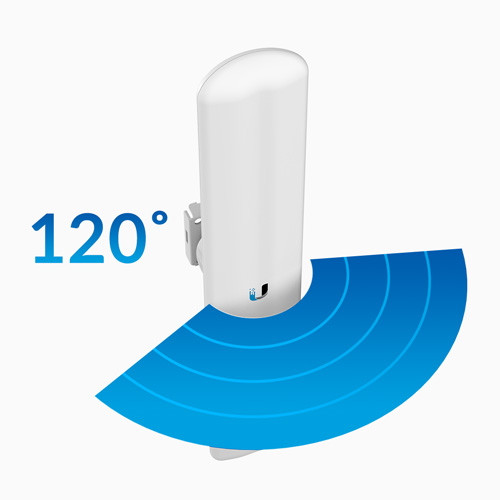
- The maximum angle on the antenna is 120 degrees. When aligning antennas ensure that they are within 120 degrees of each other.
How many cameras can I send over my antennas?
A common question we receive is, "How many cameras can I send over my antennas?".
The answer to this question varies depending on the distance between antennas, and their positioning. The product is rated at 450+ Mbps which is the best case scenario. To know how much data the antennas in your installation can support, it is best to mount them and login to the web interface and view the throughput information. This will tell you how much data you can send over the antennas, in your specific installation. Camera bit rate can be adjusted to suit the installation, depending on the antenna throughput.
There is multiple types of Wi-Fi antenna available for different installation distances. Please contact your sales representative for more information.
Wiring Examples
Standalone Cameras over a pair of WT5-ULBs
.png)
Configuring One Standalone Camera with Motion Detection
Wiring the Devices & Connecting to the Camera
Wiring Guide
.png)
This is how to wire the devices required. The Station and the Access Point need to be facing each other to function as intended.
Accessing the Camera for Setup
You will need to configure the camera though it's web interface. The Camera will need to be connected to the Laptop via an Ethernet cable. If your have wired your setup like the diagram above, you can unplug the cable from the modem and plug it into the laptop.
You can access the Web Interface by entering the camera's IP address into the address bar of Internet Explorer. 192.168.1.108 is the default IP of our cameras. You may need to change the IP address of your laptop to reach it
Changing the IP Address of a Windows PC
Windows 10
- Open Settings.
- Select Network & Internet.
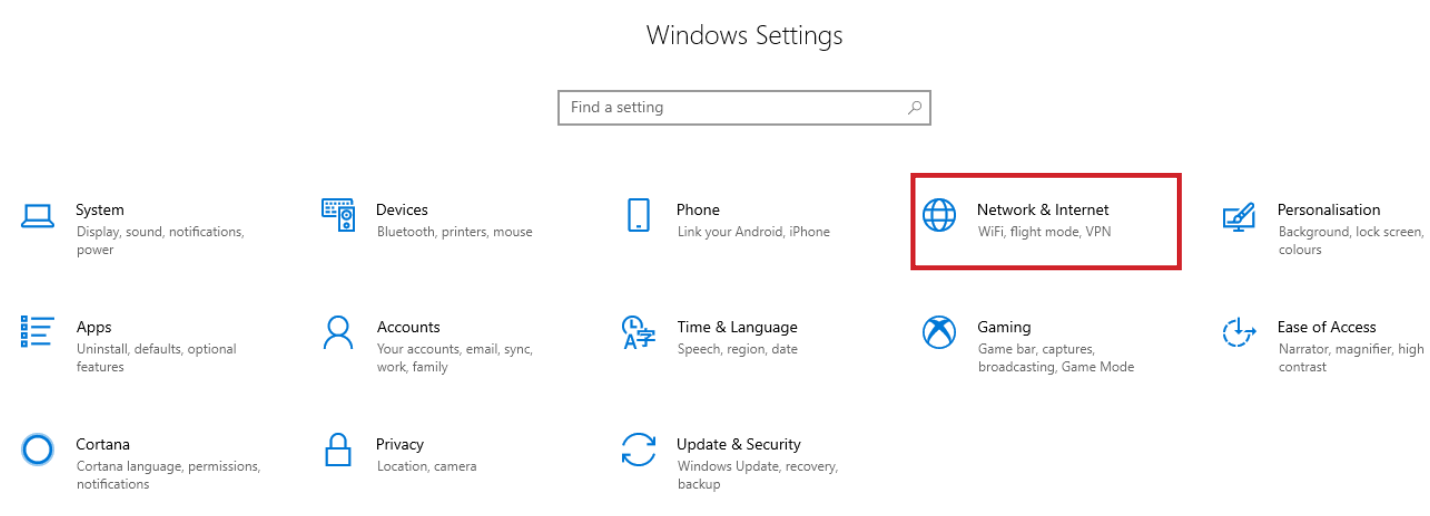
- Select Status, then Change Adapter Options.
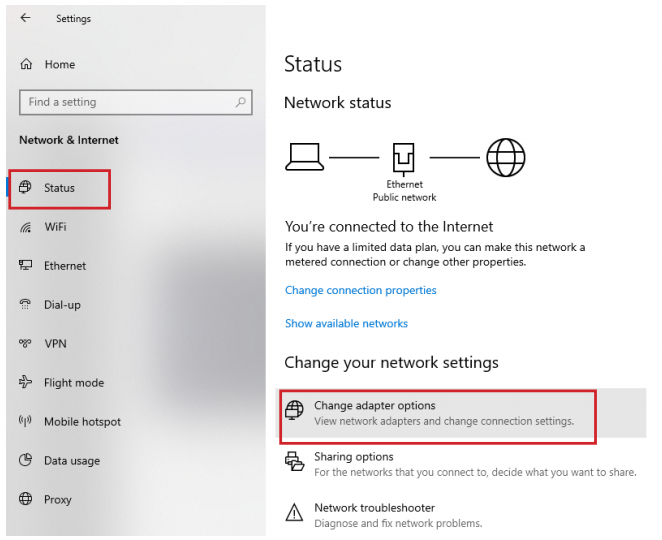
-
Right-click the network adapter you want to change the IP address for, and select Properties.
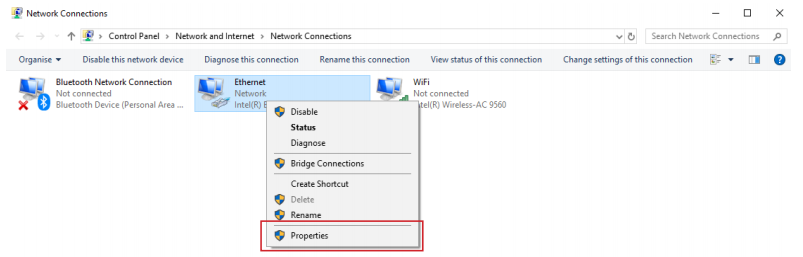
-
Double-click the Internet Protocol Version 4 (TCP/IPv4) item.
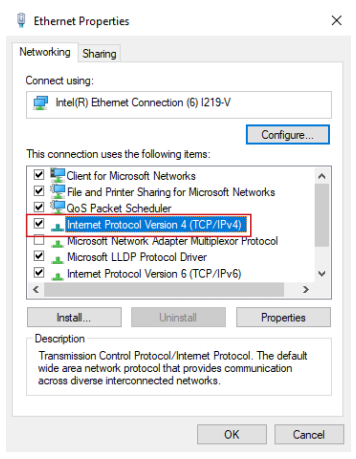
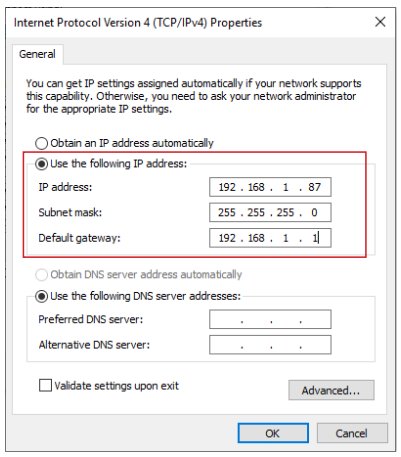
- Click Use the following IP address and enter an IP address in the same range as the device you are trying to access. (E.g when trying to access 192.168.1.108 use a IP address in the 192.168.1.x range.) Note: This cannot be the same as the device you are trying to connect to or any other device on the same network. Save your changes on both windows.
- Type the IP address of the device you are trying to access into the address bar of your web browser.
- Once finished configuring the device, change the adapter settings back to normal by following steps 1-5 and clicking Obtain an IP address automatically.
Windows 11
1. In the Windows search bar at the bottom of the page, type Control Panel and press enter.
2. Select Network and Internet.

3. Select Network and Sharing Centre.

4. Select the link for Connections in the network that you want to change the IP address for.

5. Select Properties.

6. Double-click the Internet Protocol Version 4 (TCP/IPv4) item.

7. Click Use the following IP address and enter an IP address in the same range as the device you are trying to access. (E.g when trying to access 192.168.1.108 use a IP address in the 192.168.1.x range.) Note: This cannot be the same as the device you are trying to connect to or any other device on the same network. Save your changes on both windows.

8. Type the IP address of the device you are trying to access into the address bar of your web browser.
9. Once finished configuring the device, change the adapter settings back to normal by following steps 1-6 and clicking Obtain an IP address automatically.
See the video below for a visual guide of the steps above:
Shortcut
1. In the Windows search bar at the bottom of the page, type Ncpa.cpl and press enter.
2. Right-click the network adapter you want to change the IP address for, and select Properties.
3. Select the Internet Protocol Version 4 (TCP/IPv4) item.

4. Click Use the following IP address and enter an IP address in the same range as the device you are trying to access. (E.g when trying to access 192.168.1.108 use a IP address in the 192.168.1.x range.) Note: This cannot be the same as the device you are trying to connect to or any other device on the same network. Save your changes on both windows.
5. Type the IP address of the device you are trying to access into the address bar of your web browser.
6. Once finished configuring the device, change the adapter settings back to normal by following steps 1-3 and clicking Obtain an IP address automatically.
See the video below for a visual guide of the steps above:
Configuring the Camera
Step 1 - Initialise the Camera
a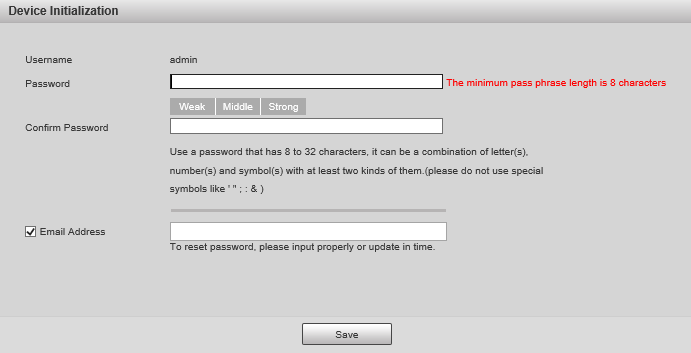
Initialise the camera by entering a new password (It will need to be at least 8 characters long), then click Save.
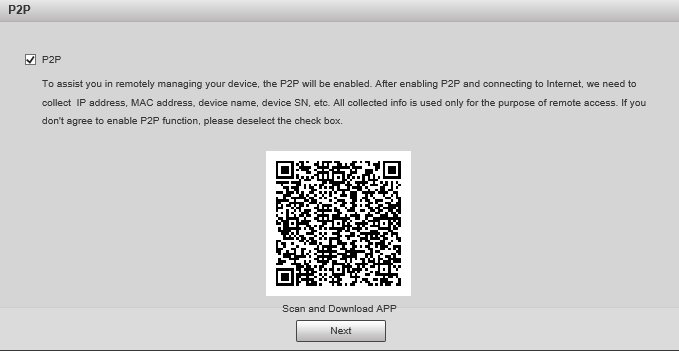
Ensure P2P is enabled and click Next
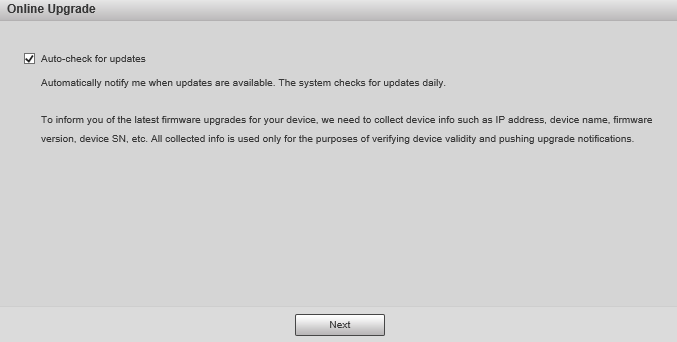
Click Next.
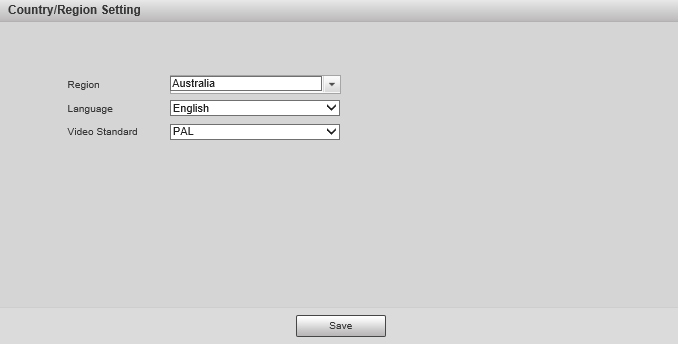
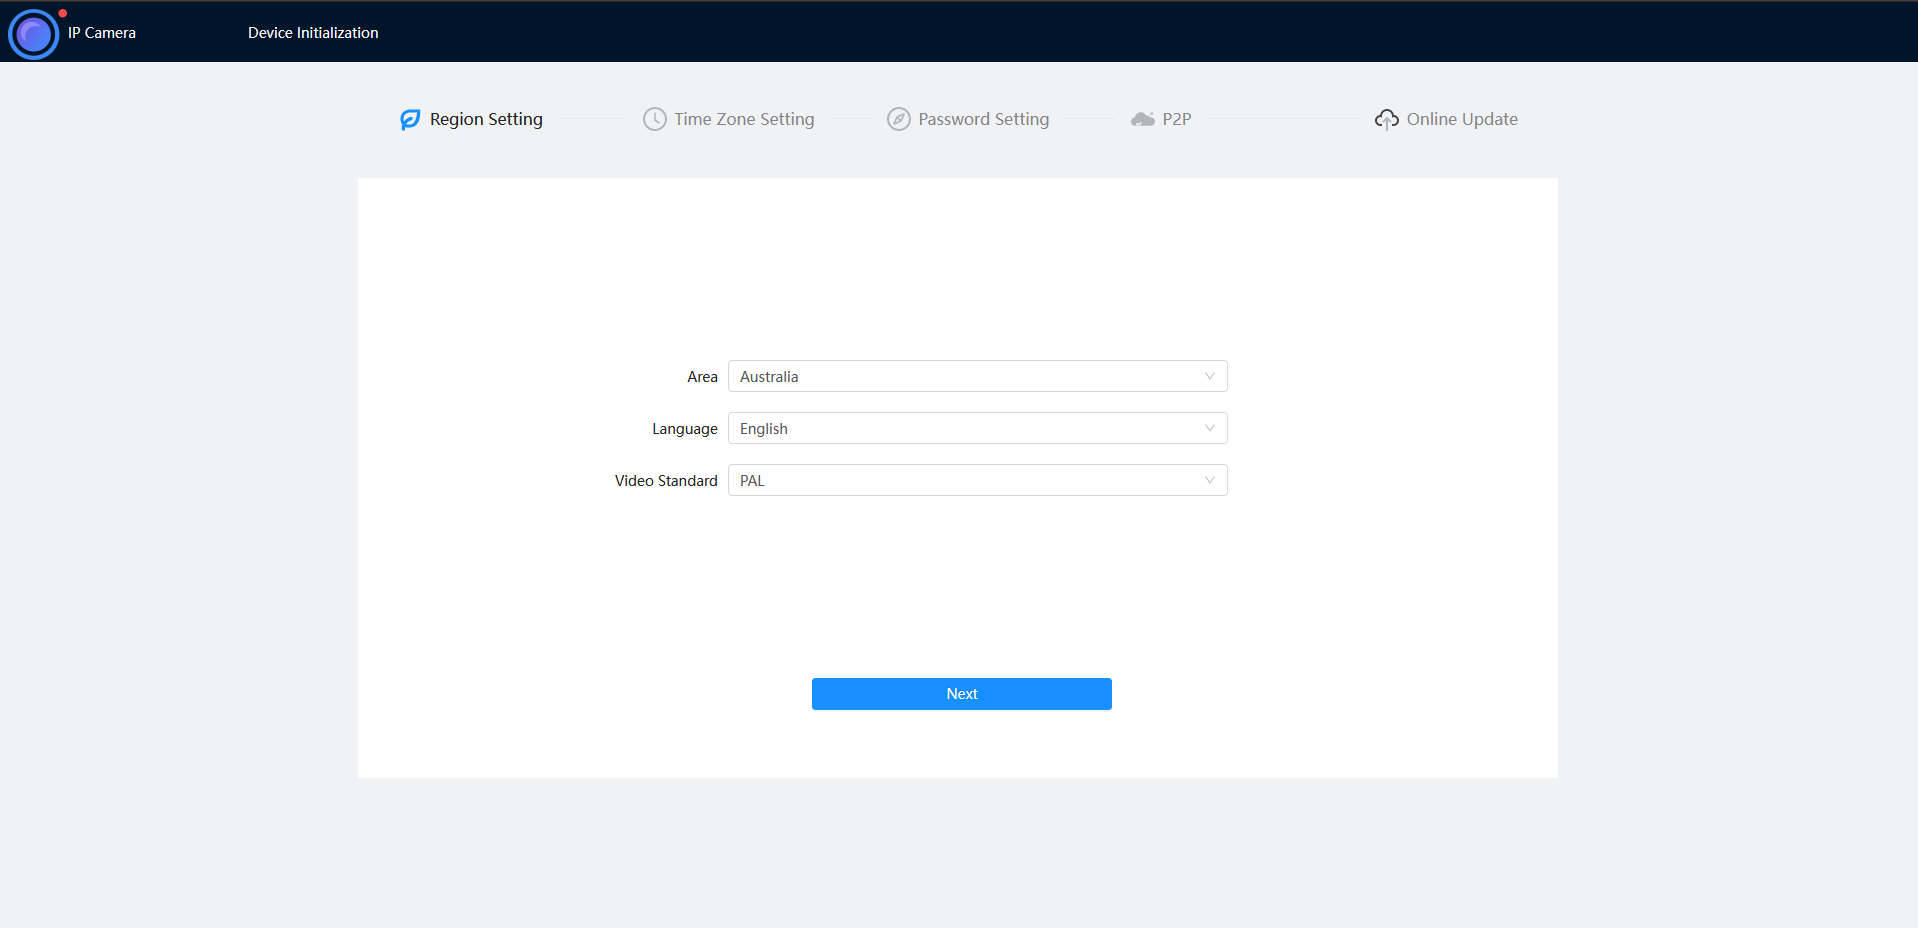
If prompted, select a region and click Save
Step 2 - Set Time & Date
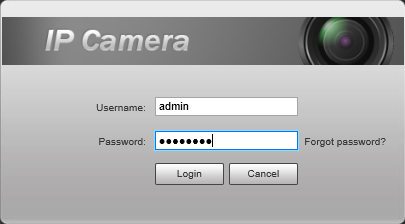
Log into the camera.
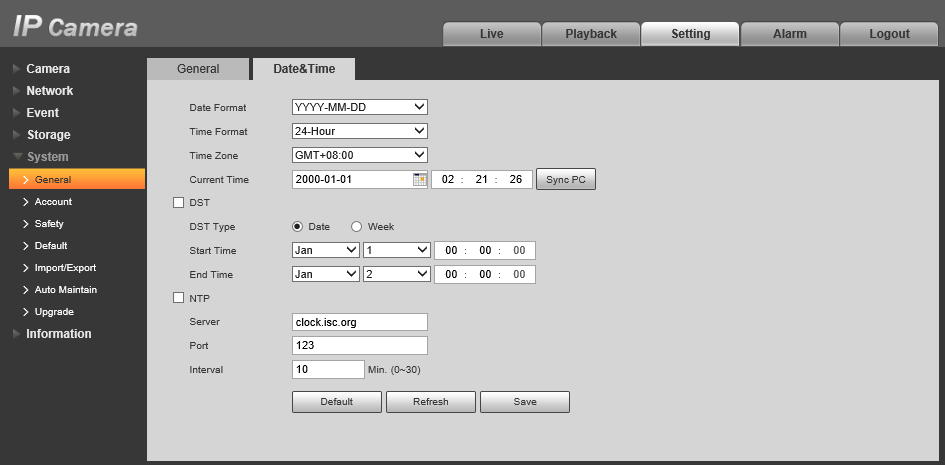
Navigate to Setting > System > General > Date&Time.
Configure the Time & Date settings and click Save
Step 3 - Enable and Schedule Motion.
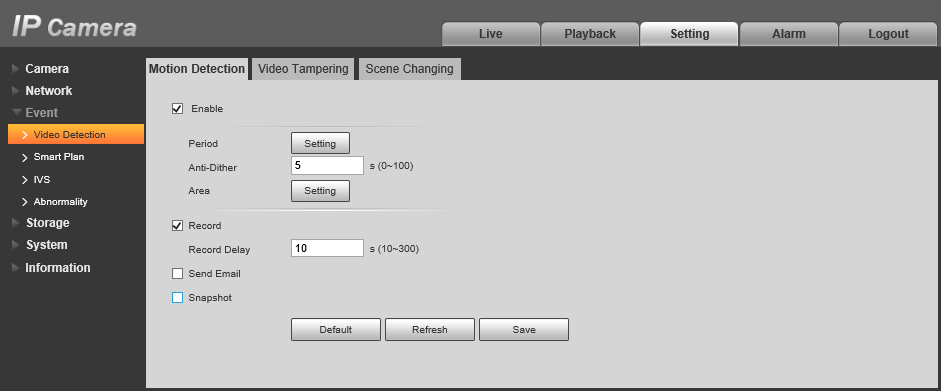
Navigate to Setting > Event > Video Detection > Motion Detection.
Tick Enable and click Save.
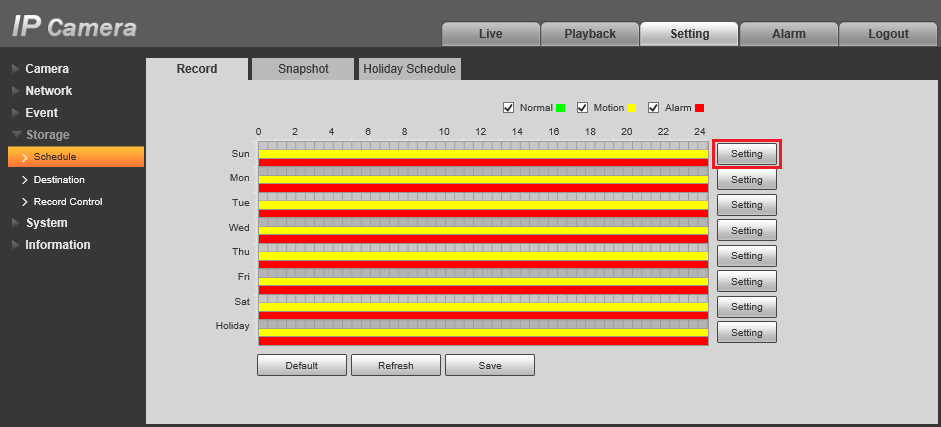
Navigate to Setting > Storage > Schedule > Record.
Click Setting
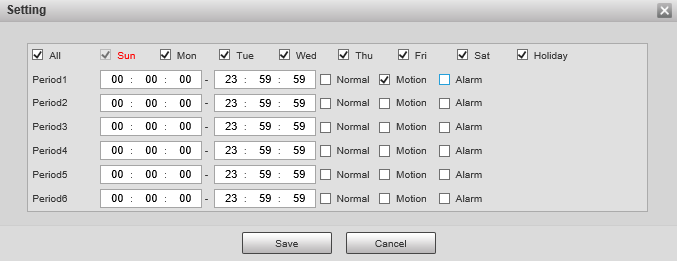
Configure this screen as desired. To record Motion, you will need to have Motion ticked.
If you want to record only Motion events on every day of the week, copy the settings above.
Click Save, and Save again on the previous screen.
Your Camera is now configured to detect and record motion.
Step 4 - Set an IP Address on the Camera
If the IP address of the camera is not in the same range as the network it will be on, you will need to change it's IP address.
Choosing an IP Address
To find the IP range on a network, or to find available IP addresses, follow the steps below.
Windows
Finding the IP Range of a Network
This is useful if you are unsure what the network details are, or if you have requested pre-programming. When pre-programming devices, we require these details.
1. Connect a Windows PC / Laptop, open the start menu and type cmd.
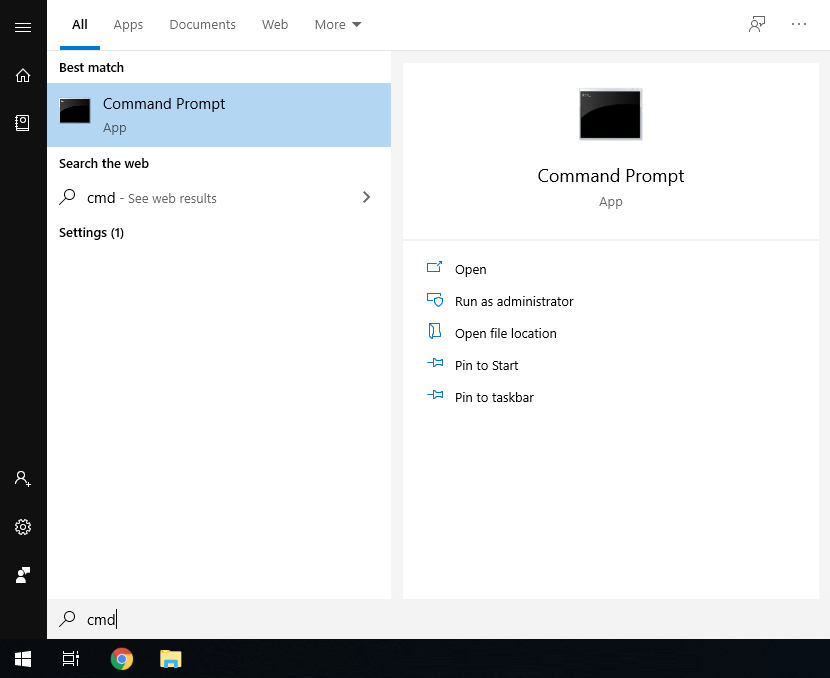
2. Launch the Command Prompt program.
3. Once it opens, enter the command ipconfig and take a screenshot or copy the information as below. We require the IP address, Subnet Mask and Default Gateway.
4. A screenshot can be taken by pressing the Windows + Shift + S keys simultaneously, then paste it into a document/email with Ctrl + V

Finding Available IP Addresses
If you wish to connect devices to the network for remote access, you must give each device an IP address, within your network range. In this example, we will be using a Windows computer which is connected to a modem to find the IP address of the computer, and available IP addresses to use for the devices. If the devices are being installed on a business or managed network, contact an IT representative for assistance.
1. Connect a Windows PC / Laptop, open the start menu and type cmd.

2. Launch the Command Prompt program.
3. Once it opens, enter the command ipconfig and take a screenshot or copy the information as below. Note down the IP Address, Subnet Mask and Default Gateway.
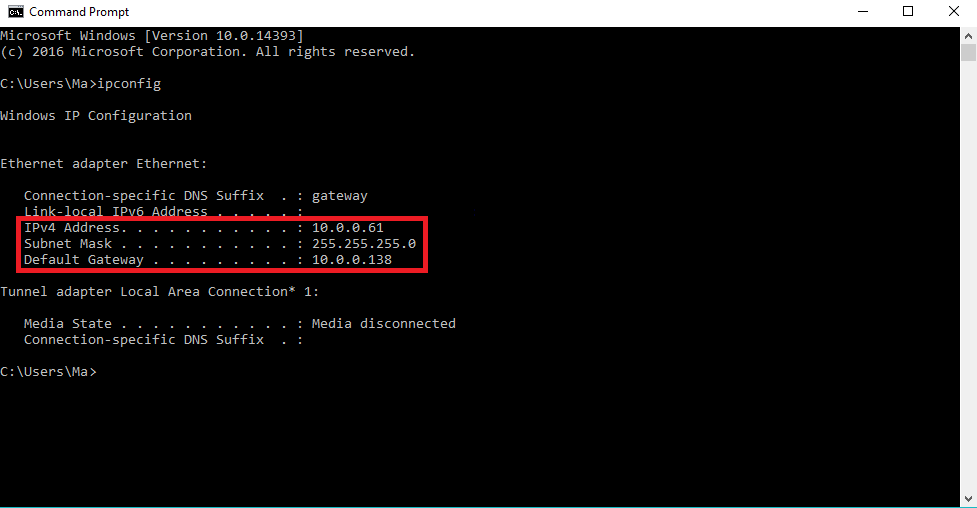
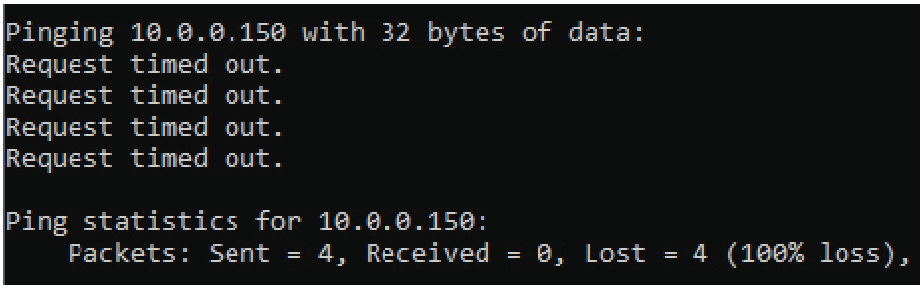
4. In our example, the IP address is 10.0.0.61. To check what IP address is available, type ping 10.0.0.XXX, where XXX is any number between 2 and 254. If Destination host unreachable or Request timed out is show on screen, there is no device using that IP address. Repeat the process to find multiple IP addresses that are available for use. Every devices requires one IP address. 10.0.0.XXX is used as an example, you the IP Address range will vary depending on the network.
5. When configuring the devices, use the IP addresses that you have found that are available, making sure each device has a unique IP address. The Subnet Mask and Default Gateway, will be set the same on each device.
MAC OSX
Finding the IP Range of a Network
This is useful if you are unsure what the network details are, or if you have requested pre-programming. When pre-programming devices, we require these details.
1. Open the Apple Menu ( ) and select System Preferences.
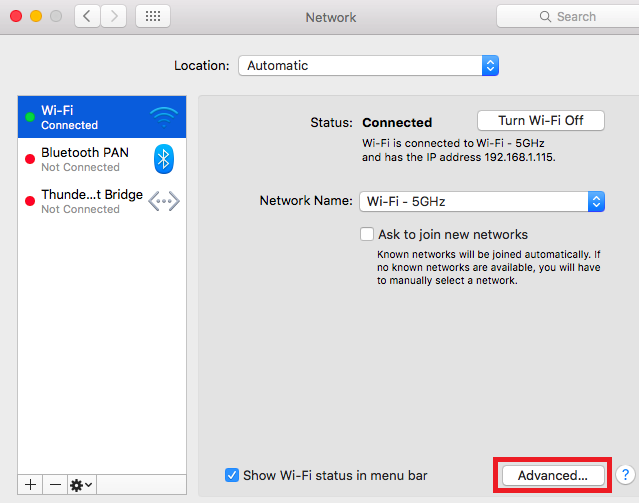
2. Select the Network option.

3. Select either Ethernet (for wired connections) or Wi-Fi (for wireless connections), then select advanced.
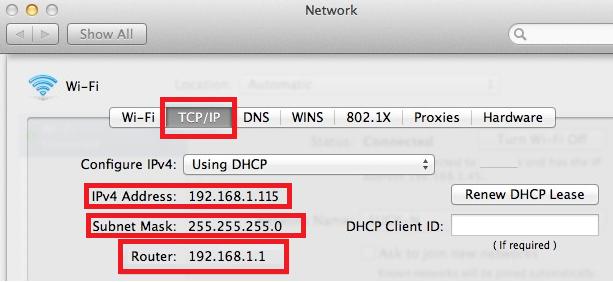
4. Select TCP/IP. The details in red are the network details.
5. A screenshot can be taken by pressing the Command + Shift + 3 keys simultaneously. The screenshot will be saved to the desktop
Finding Available IP Addresses
If you wish to connect devices to the network for remote access, you must give each device an IP address, within your network range. In this example, we will be using a Apple Mac which is connected to a modem to find the IP address of the computer, and available IP addresses to use for the devices. If the devices are being installed on a business or managed network, contact an IT representative for assistance.
1. Follow the steps for Finding the IP Range of a Network - Mac OSX.
2. Press Command + Space bar keys to bring up spotlight.
3. Type Terminal, and double click on the search result.
4. To check what IP address is available, type ping 192.168.1.XXX, where XXX is any number between 2 and 254. If Request timeout is show on screen, there is no device using that IP address. Repeat the process to find multiple IP addresses that are available for use. Every devices requires one IP address. 192.168.1.XXX is used as an example, you the IP Address range will vary depending on the network.
5. When configuring the devices, use the IP addresses that you have found that are available, making sure each device has a unique IP address. The Subnet Mask and Default Gateway, will be set the same on each device.
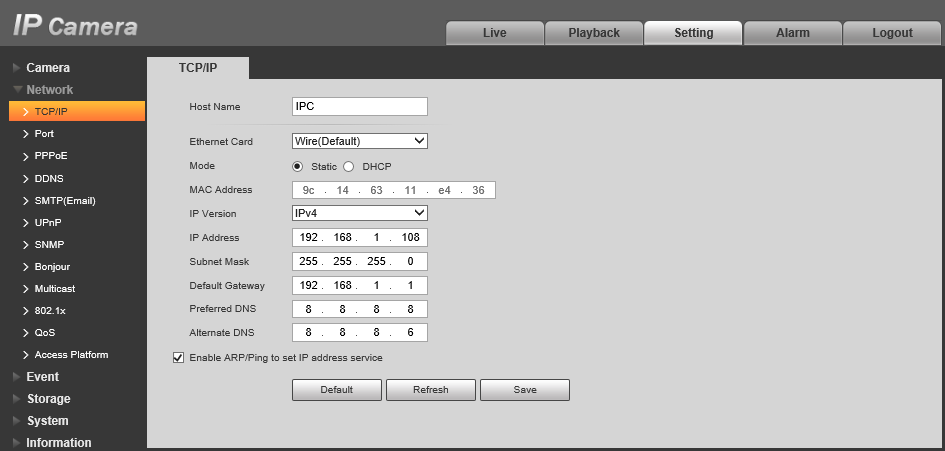
Navigate to Setting > Network > TCP/IP
Change the IP Address, Subnet Mask and Default Gateway.
(You may need to change the Laptop's IP address again to access the camera after you change this setting.)
Step 5 - Connect the Camera to the Modem & Check the P2P Status
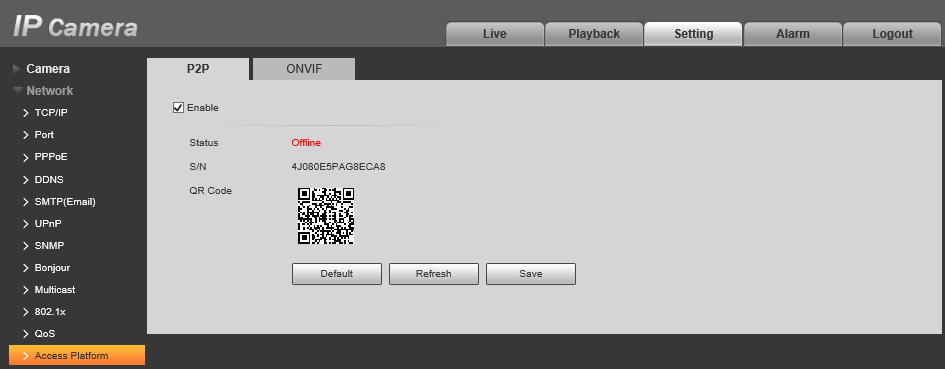
Navigate to Setting > Network > Access Platform > P2P
(At this point you can plug the cable back into the modem and connect to the modem's wifi with the laptop)
Make sure P2P is ticked. When the status on this page says Online you will be able to view the Camera remotely.
If it does not say online, check all of your cables and ensure the IP Address you chose is in the right range and not conflicting with anything.
You can use the S/N and QR code on this screen to add this camera to a remote viewing application.
Adding a Camera to the DMSS App & Enabling Notifications
 DMSS is a remote surveillance app that can be used to view your Devices remotely.
It can be used access Live view, Recorded playback, get event notifications, and receive calls and unlock door stations away from home.
DMSS can be found on the Google Play store and iOS App Store.
How to add devices to DMSS via P2P
1. Select the Plus Icon At the Top Right.

2. If you are Not Logged in DMSS will give you this Message. At which you can either Log In or continue to add the device as a Local Device.

3. Select Scan QR Code

4. Scan the QR code for your Device's Serial Number, then click Next
Info
The QR code can be found at Main Menu > Network > P2P (or Easy4IP) on a recorder AND on the box the device came in.

5. After scanning your Serial Number It Will Appear in the Box.
Note
The Security code Dialog box is for only for certain Devices are not usually associated with NVR's and Cameras and can be Ignored.
Select Next.

6. Select the type of device you wish to add.
NVR for an NVR for a recorder with IP cameras
DVR/XVR for a recorder with CVI cameras
VTO for a Door Station
Wired Camera for a standalone Camera wired to a switch or router

7. Enter In details of the Device
i. Name Device, this is how you'll identify your device (home, office etc. ii. Enter Username of the device. iii. Enter The password of the Device
After you've entered those details select Save.

8. Confirm your Time Zone and DST is Set correctly. Select Next

9. This Is How It Will Appear on Your Home Screen

Adding Devices Via IP/Domain
If you wish to add a device to DMSS via it's IP address you will need to use Port Forwarding.
If you are unfamiliar with Port forwarding, we suggest that you use the P2P method outlined above.
1. Select Plus Button at top Right
2. Select IP/Domain

3. Select Add Mode If you to add via a different mode

4. Select on Which Protocol You Will be Using

5. Enter the NVR Information Address, Name, Username, Device Password and Select Save

Add Device Over Local Network
1. Select Plus Icon At the Top Right.
2. Select Search on LAN

3. Select Your Device From The ones Listed

4 . Select Add Mode And Select P2P or Domain (Note Selecting Domain/IP will allow access while on the same Network as the device)

Video Guide
Sharing Devices to Another Account
1. On Home Menu Select the 3 dots of the device you wish to share.

2. Select Share Device.

3. Enter the DMSS account you want it shared with and select what permissions you want that account to have access to.

4. Have the shared to account fully close and Reopen app. And the device should appear.
Revoking DMSS Shared Devices
If for any reason a shared needs to have their permission revoked follow Steps Below
1. On the Home Screen Select the Device you want to manage.

2. Select Share Device.

3. Select which Account you want to manage.
4. Select Cancel Sharing And Confirm

5. That User will no longer have access to the listed Device.
 |
DMSS is a remote surveillance app that can be used to access your security products remotely. You can configure a whole range of push notifications in the DMSS app.
|
Enabling Notifications On DMSS
1. On the Home Page select the three dots of the device.

2. Then Select Device Details

3. Select Message

4. Select Notification and turn it for its Blue

5. Select Receive Messages and Send Notifications if you want DMSS to log and send Notifications.
Then Select Message Type

6. Select Notification type the you want to receive.
Note you will only receive notifications types that already enabled on your device ( e.g. Intrusion/tripwire is set up and enabled in IVS)

7. Select which Channels you want to get notifications from.

8. Back out to the home screen and select device details again. Ensure that notifications on there is also enabled.

9. An example of a Notification

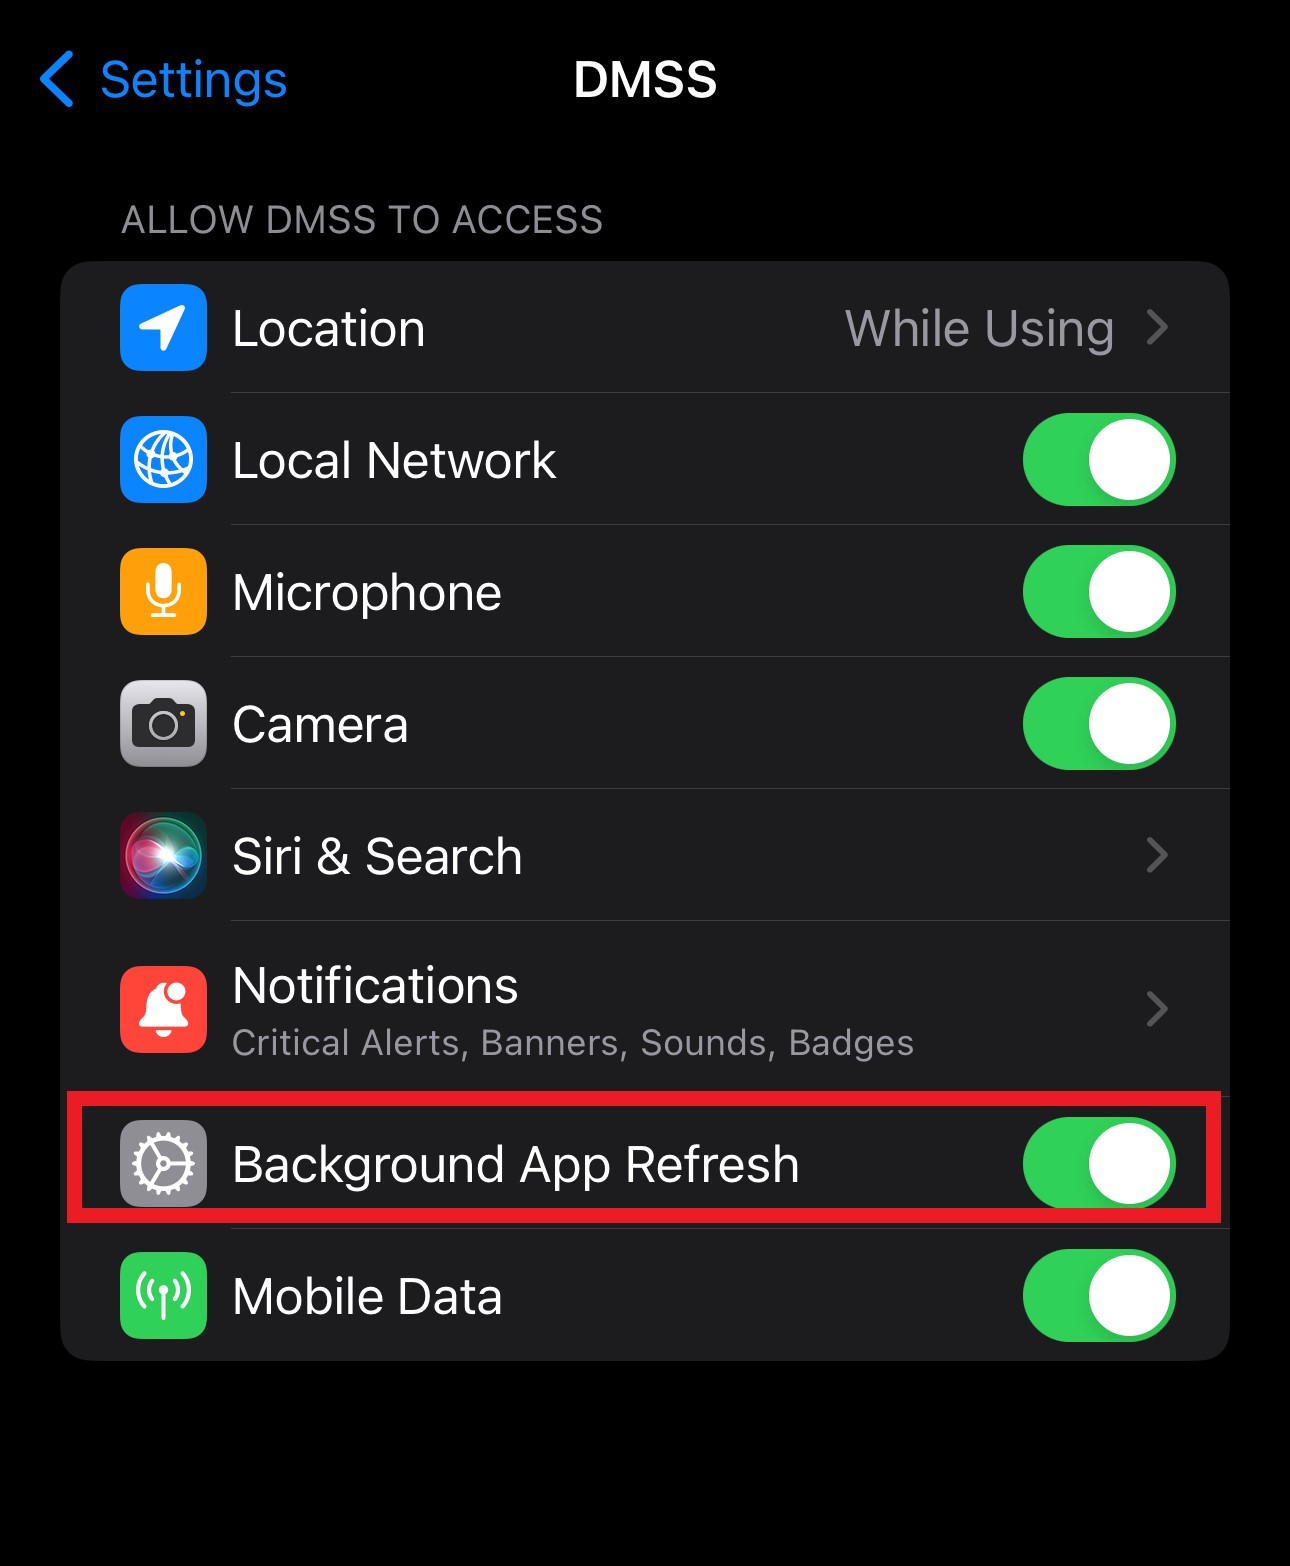
Notification on Intercom
While adding Intercoms to the DMSS app,
The Intercom unit should be added under a DMSS account.
Also, make sure the Background app refresh is 'enabled' and also the show previews is set to 'Always'

Video Guide
Using a Switch between the Camera and the Station's PoE injector will allow you to connect multiple cameras/devices. If you do so, we recommend that the ethernet cable that runs between the Switch and the PoE Injector is plugged into the uplink or gigabit port on the Switch.
Initialising a Camera
Initialising a camera is the process of setting a password on it. All cameras manufactured post 2018 need to be initialised before use.
If connected to the POE Port of an NVR manufacturer post 2018 this process should happen automatically.
Option 1 - Initialisation via the Web Interface
The Camera will need to be connected to the Laptop via an Ethernet cable.
You can access the Web Interface by entering the camera's IP address into the address bar of Internet Explorer. 192.168.1.108 is the default IP of our cameras.
You may need to change the IP address of your computer to reach it.
How to change the IP Address of your computer
Windows 10
- Open Settings.
- Select Network & Internet.
- Select Status, then Change Adapter Options.
-
Right-click the network adapter you want to change the IP address for, and select Properties.
-
Double-click the Internet Protocol Version 4 (TCP/IPv4) item.
- Click Use the following IP address and enter an IP address in the same range as the device you are trying to access. (E.g when trying to access 192.168.1.108 use a IP address in the 192.168.1.x range.) Note: This cannot be the same as the device you are trying to connect to or any other device on the same network. Save your changes on both windows.
- Type the IP address of the device you are trying to access into the address bar of your web browser.
- Once finished configuring the device, change the adapter settings back to normal by following steps 1-5 and clicking Obtain an IP address automatically.
Windows 11
1. In the Windows search bar at the bottom of the page, type Control Panel and press enter.
2. Select Network and Internet.
3. Select Network and Sharing Centre.
4. Select the link for Connections in the network that you want to change the IP address for.
5. Select Properties.
6. Double-click the Internet Protocol Version 4 (TCP/IPv4) item.
7. Click Use the following IP address and enter an IP address in the same range as the device you are trying to access. (E.g when trying to access 192.168.1.108 use a IP address in the 192.168.1.x range.) Note: This cannot be the same as the device you are trying to connect to or any other device on the same network. Save your changes on both windows.
8. Type the IP address of the device you are trying to access into the address bar of your web browser.
9. Once finished configuring the device, change the adapter settings back to normal by following steps 1-6 and clicking Obtain an IP address automatically.
See the video below for a visual guide of the steps above:
Shortcut
1. In the Windows search bar at the bottom of the page, type Ncpa.cpl and press enter.
2. Right-click the network adapter you want to change the IP address for, and select Properties.
3. Select the Internet Protocol Version 4 (TCP/IPv4) item.
4. Click Use the following IP address and enter an IP address in the same range as the device you are trying to access. (E.g when trying to access 192.168.1.108 use a IP address in the 192.168.1.x range.) Note: This cannot be the same as the device you are trying to connect to or any other device on the same network. Save your changes on both windows.
5. Type the IP address of the device you are trying to access into the address bar of your web browser.
6. Once finished configuring the device, change the adapter settings back to normal by following steps 1-3 and clicking Obtain an IP address automatically.
See the video below for a visual guide of the steps above:
Delete
How to initialise a camera via Web interface 5.0
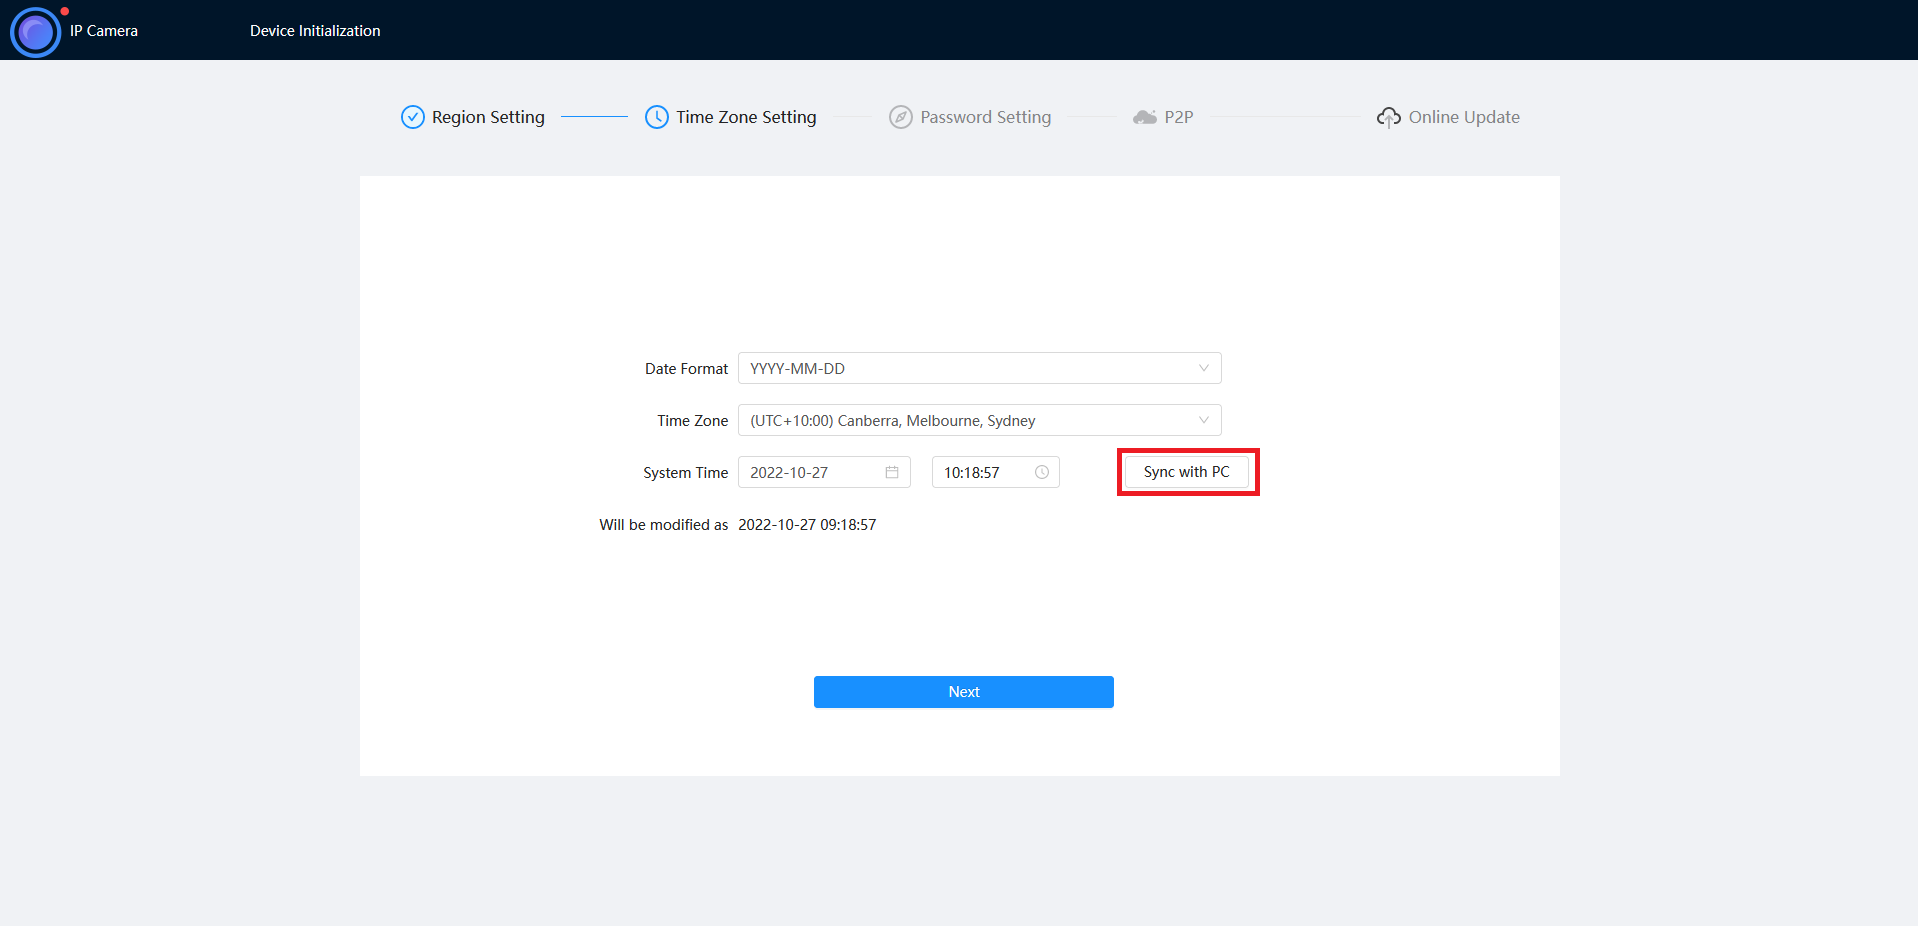
- Select your Region and Language.
- Select your Time Zone, then press Sync with PC to sync your cameras time with the PCs time.
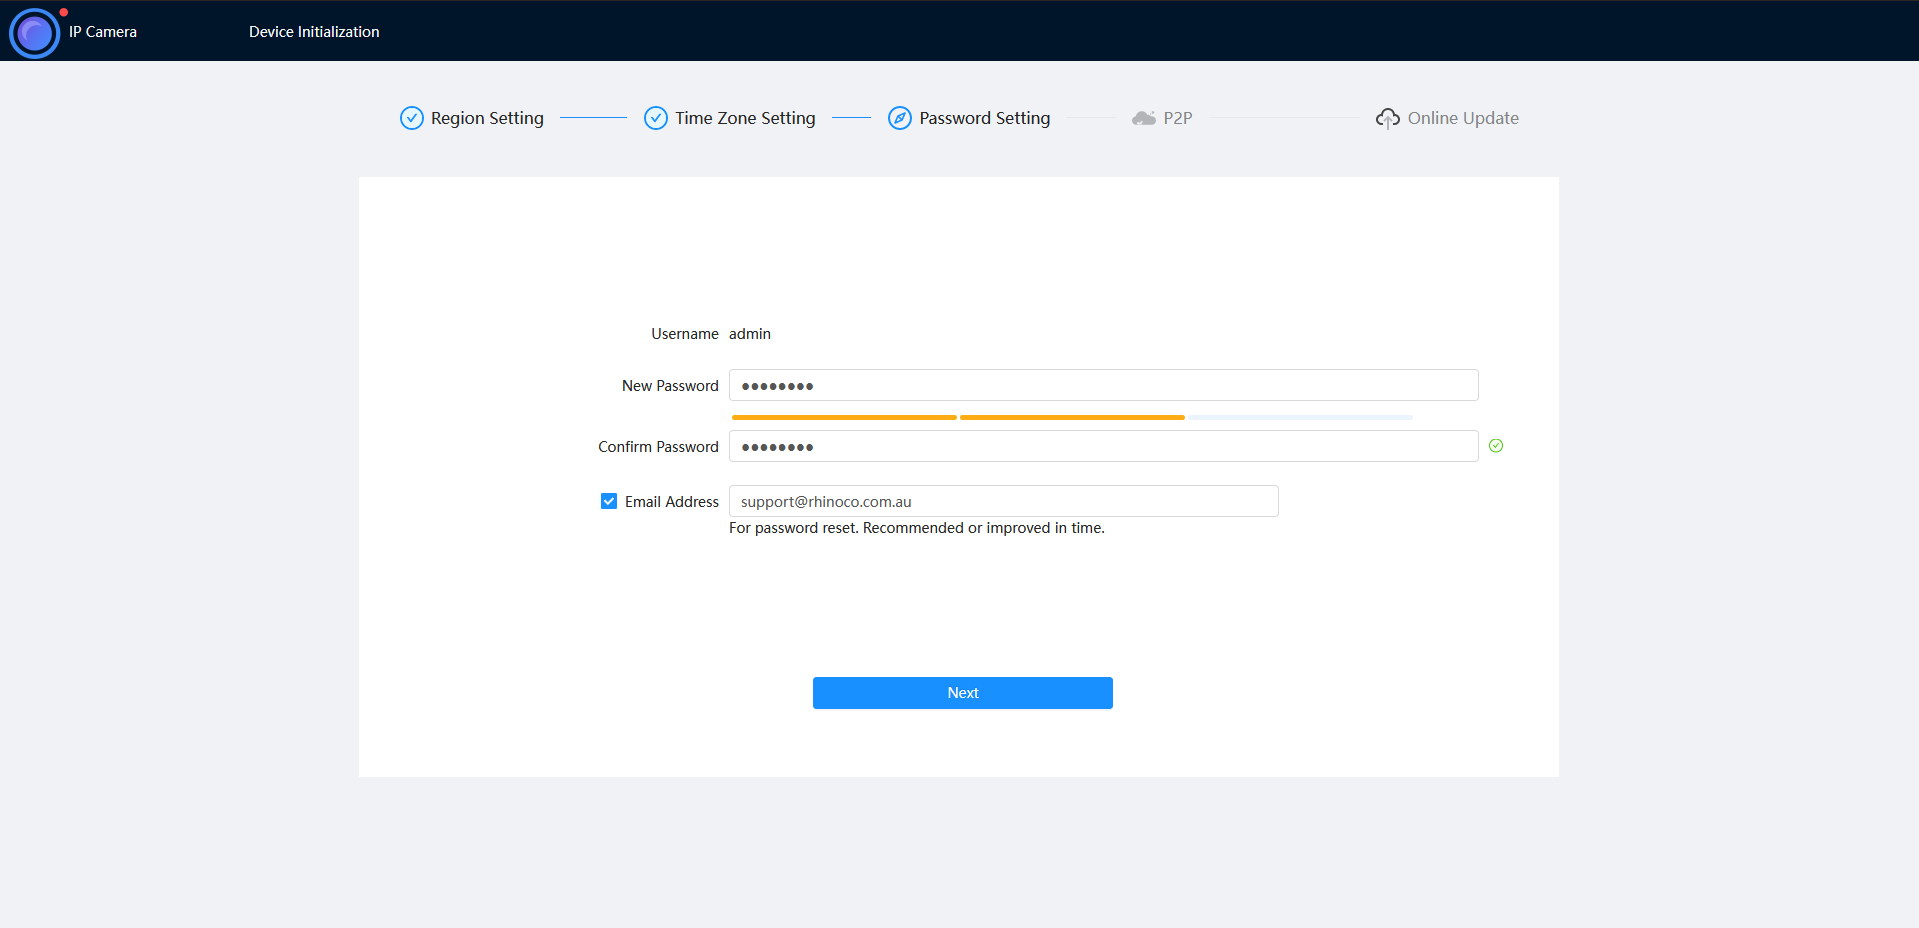
- Enter a password and recovery email.
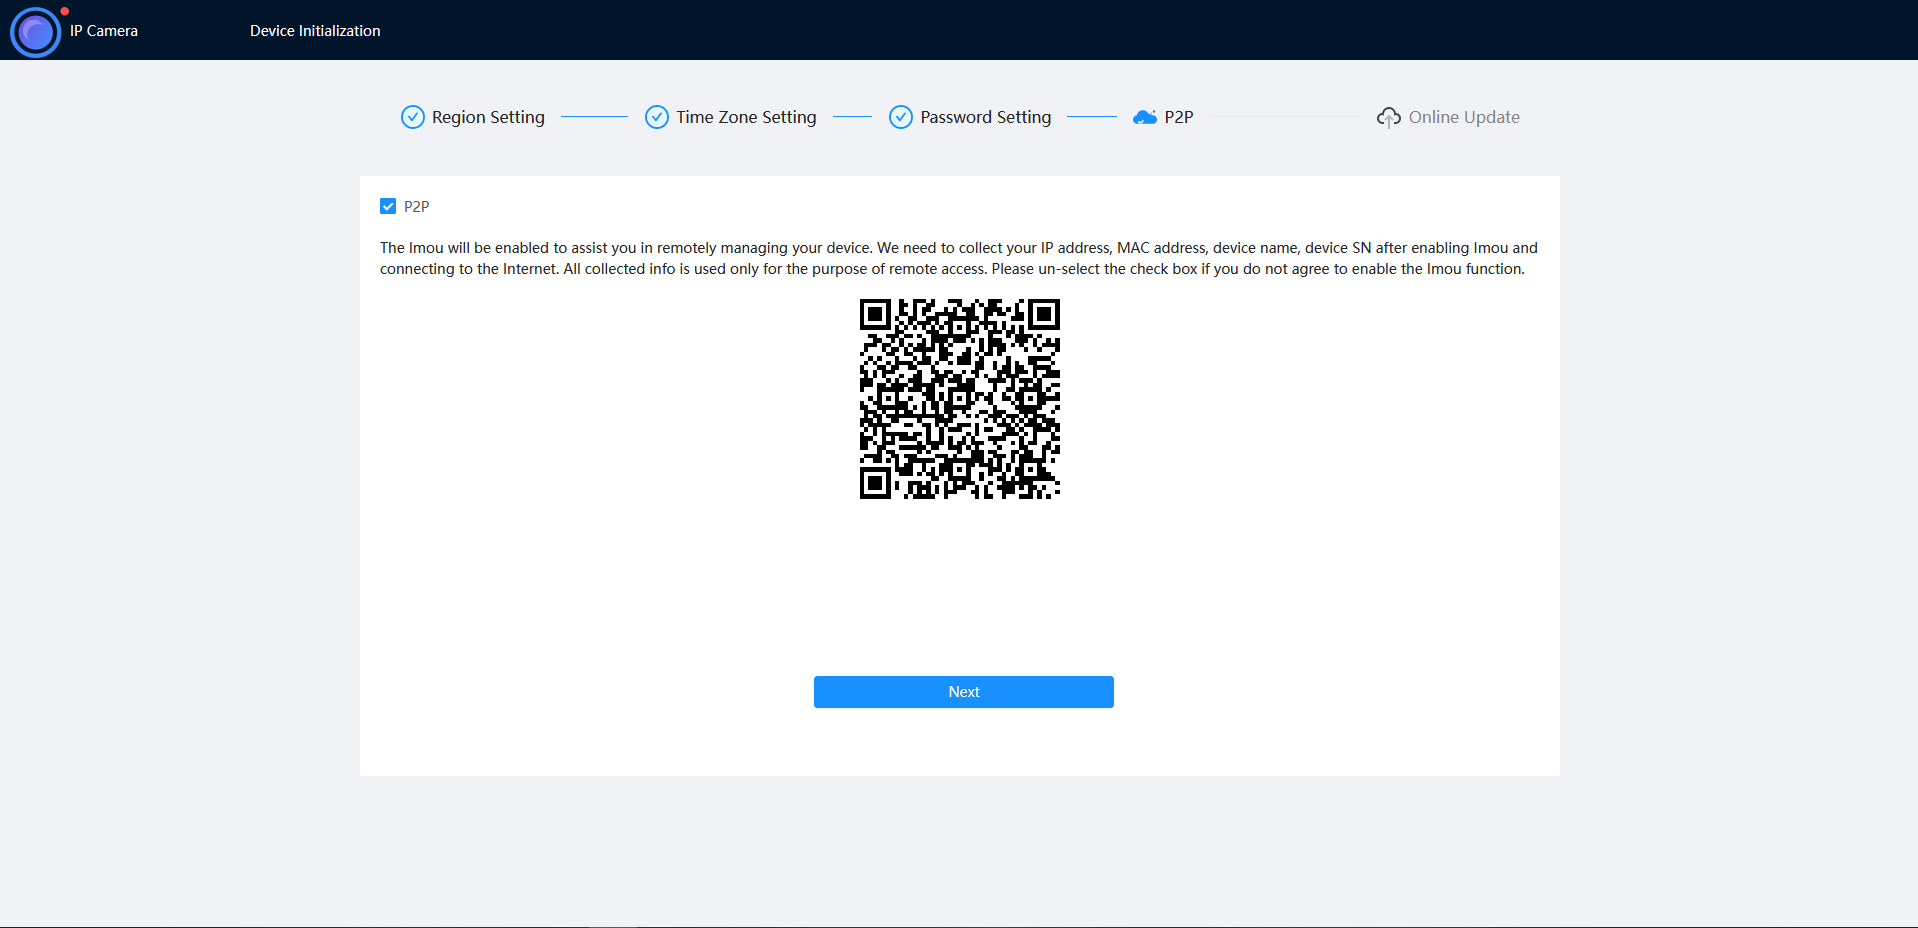
- Ensure P2P is enabled, then press Next.
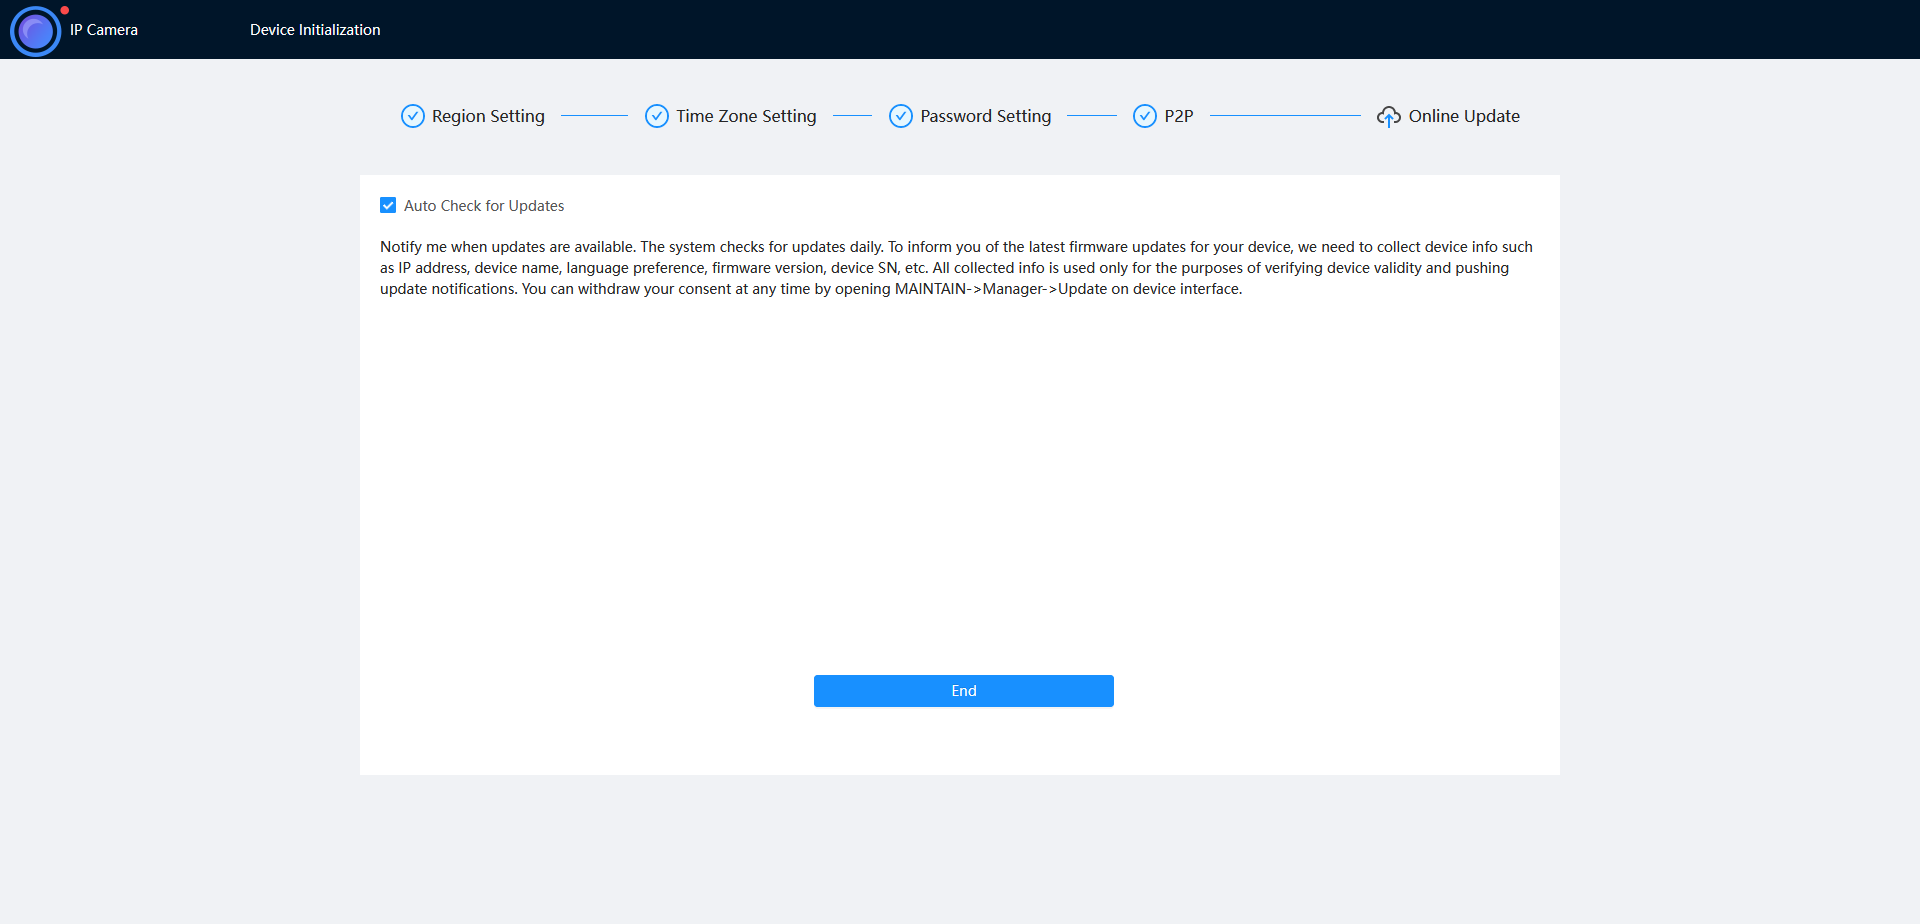
- Click End.
How to initialise a camera via Web interface 3.0
Initialize the camera by entering a new password (It will need to be at least 8 characters long), then click Save.
Ensure P2P is enabled and click Next
Click Next.
If prompted, select a region and click Save
DeleteOption 2 - Initialisation via the Config Tool
The initialisation process can also be performed using the latest version of our Config Tool - Please see the images below showing how this is done. To speed up the process the Config Tool also allows you to initialise multiple cameras at once.
- Download and open Config Tool.
- Put a check in the box
 next to the device you would like to Initialise, and select the Initialize button.
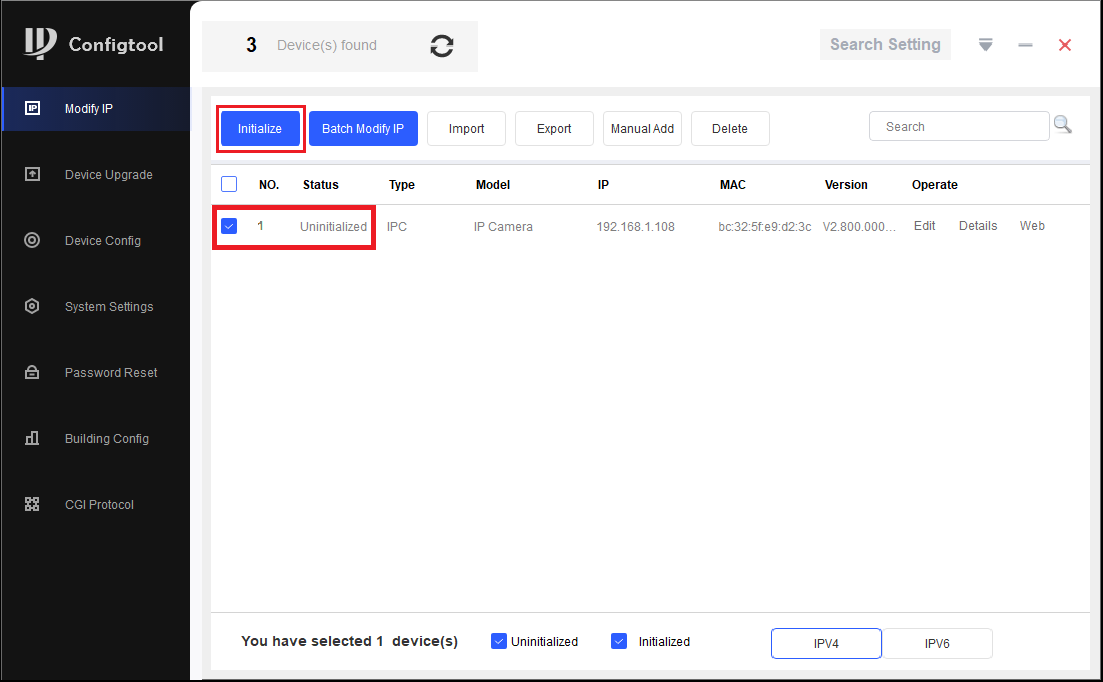
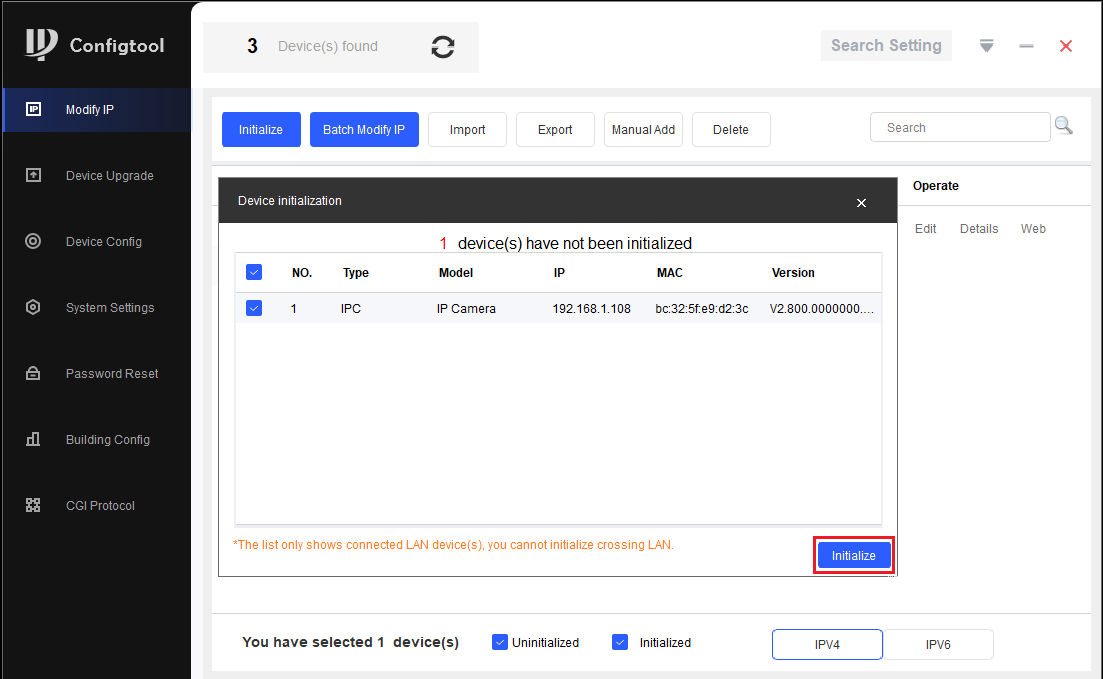
- Select the Initialize button.
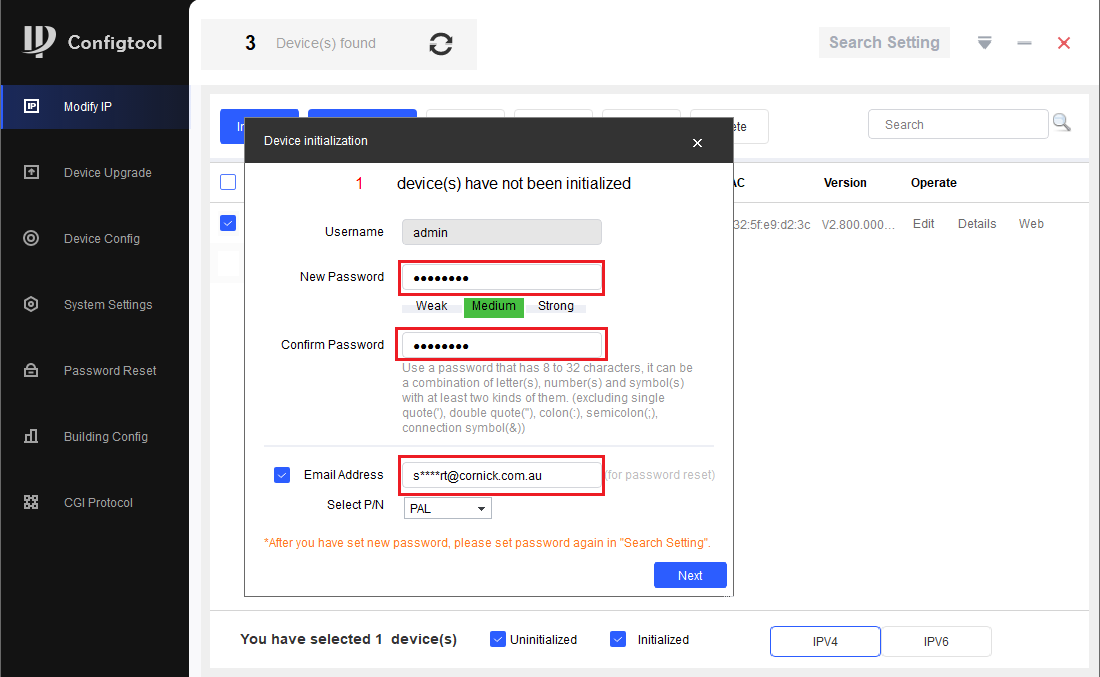
- Enter a password, that is at least 8 characters, and is a mix of letters and numbers. Enter an email address, this will be used if the password is ever forgotten. Select Next.
- Depending on the installation requirements, you can check or uncheck the boxes for Easy4IP (P2P Remote Access) and Auto-check for updates. Select OK.
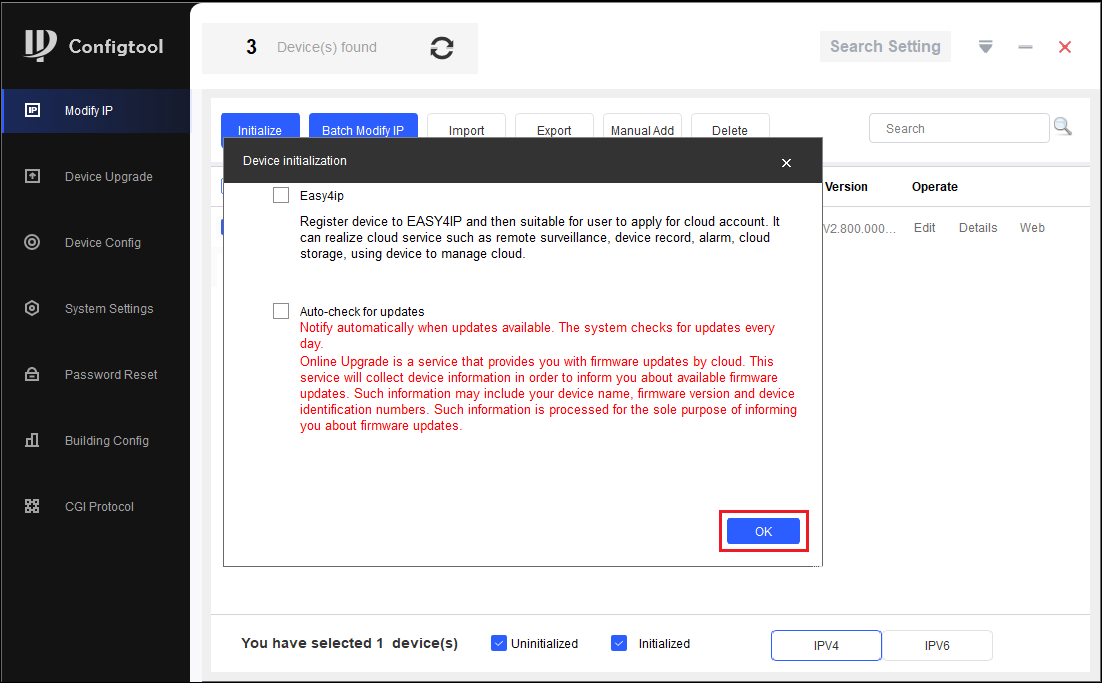
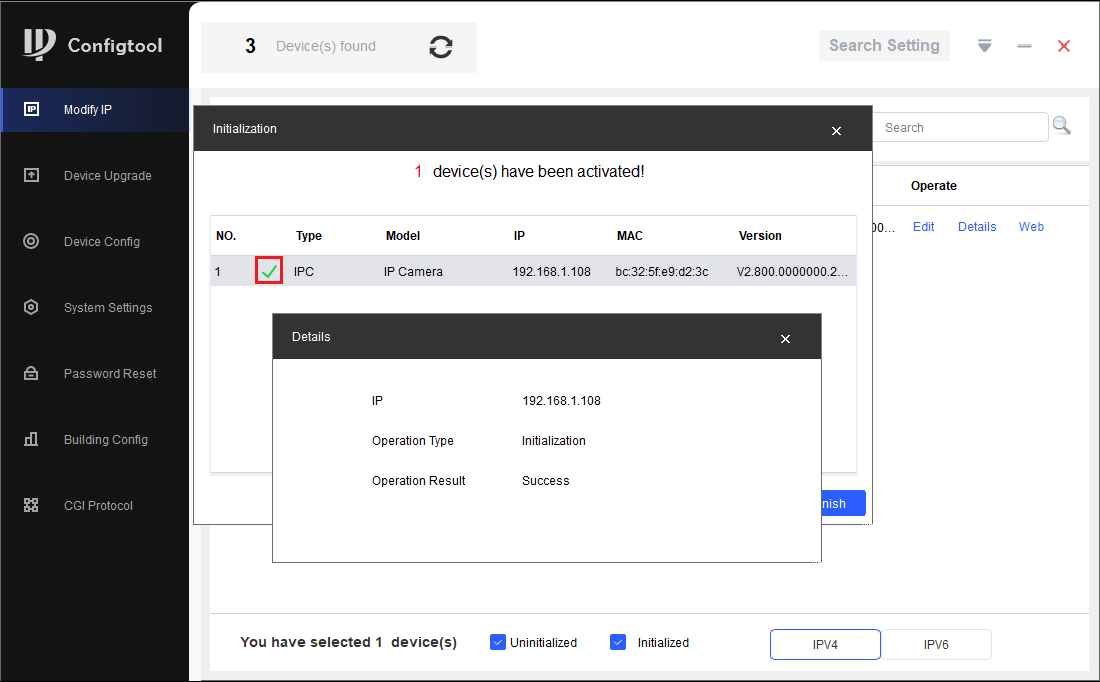
- If the status shows as Initialized, the process was completed successfully.
Cameras connected to an NVR over a pair of WT5-ULBs
 You can have multiple Cameras if you add them to either of the Switches. If you do so, we recommend that the Ethernet cable that runs between the Switch and the PoE Injector is plugged into the uplink or gigabit port on the Switch.
Configuring Remote IP Cameras
Cameras with Manufacturer Dates after 2018 will have to be Initialised before they can be used
Initialise Camera via NVR
Cameras that are connected to the POE of an NVR will be Initialised and configured Automatically

Initialise and Configure Cameras over Network
Some installations may require cameras to be added to the NVR over the network. This may be the case if the NVR doesn't have POE ports, or if a wireless bridge is involved in the installation. In this case the cameras need to be added to the NVR via a different method, see below for details.
Important Note
If this is a business installation, please make sure you consult with the Manager and/or IT department before installing any devices that will need to be connected to the network.
Installing a network device without approval and prior knowledge of how the network is setup, has the potential to cause critical devices to fail, bring down the network and even stop business' server/software from operating.
Please be advised the following instructions are only true for simple networks
Warning
When connecting cameras over the network, they must only connect to the NVR's LAN Port as shown in the above diagram.
Do not connect ANY Network Devices/Switches to the NVR POE Ports
Only Connect 1 IP Camera per channel of the NVR
Configuration via PC is required to address and initialise multiple cameras.
How to see check your IP Address and find available IP Addresses
Step 1 - CMD: Identify and Set an IP Address
If you are currently connected to a router or have internet access, that means a Router/Modem or Other Device is supplying your computer with an IP Address, Subnet Mask and Gateway. This process is Automatic and is called DHCP.
Info
To initialise, configure and connect to a device the computer must be in the same IP Address range.
Two devices on the same network, cannot have the same IP Address. If two devices have the same IP Address, a conflict will occur and both devices will stop working correctly.
Each network is different, and will have a different IP addresses range.
How to see check your IP Address and find available IP Addresses
Network Identification
To find the IP range on a network, or to find available IP addresses, follow the ...
To find the IP range on a network, or to find available IP addresses, follow the steps below.
Windows
Finding the IP Range of a Network
This is useful if you are unsure what the network details are, or if you have requested pre-programming. When pre-programming devices, we require these details.
1. Connect a Windows PC / Laptop, open the start menu and type cmd.
2. Launch the Command Prompt program.
3. Once it opens, enter the command ipconfig and take a screenshot or copy the information as below. We require the IP address, Subnet Mask and Default Gateway.
4. A screenshot can be taken by pressing the Windows + Shift + S keys simultaneously, then paste it into a document/email with Ctrl + V
Finding Available IP Addresses
If you wish to connect devices to the network for remote access, you must give each device an IP address, within your network range. In this example, we will be using a Windows computer which is connected to a modem to find the IP address of the computer, and available IP addresses to use for the devices. If the devices are being installed on a business or managed network, contact an IT representative for assistance.
1. Connect a Windows PC / Laptop, open the start menu and type cmd.
2. Launch the Command Prompt program.
3. Once it opens, enter the command ipconfig and take a screenshot or copy the information as below. Note down the IP Address, Subnet Mask and Default Gateway.
4. In our example, the IP address is 10.0.0.61. To check what IP address is available, type ping 10.0.0.XXX, where XXX is any number between 2 and 254. If Destination host unreachable or Request timed out is show on screen, there is no device using that IP address. Repeat the process to find multiple IP addresses that are available for use. Every devices requires one IP address. 10.0.0.XXX is used as an example, you the IP Address range will vary depending on the network.
5. When configuring the devices, use the IP addresses that you have found that are available, making sure each device has a unique IP address. The Subnet Mask and Default Gateway, will be set the same on each device.
MAC OSX
Finding the IP Range of a Network
This is useful if you are unsure what the network details are, or if you have requested pre-programming. When pre-programming devices, we require these details.
1. Open the Apple Menu ( ) and select System Preferences.
2. Select the Network option.
3. Select either Ethernet (for wired connections) or Wi-Fi (for wireless connections), then select advanced.
4. Select TCP/IP. The details in red are the network details.
5. A screenshot can be taken by pressing the Command + Shift + 3 keys simultaneously. The screenshot will be saved to the desktop
Finding Available IP Addresses
If you wish to connect devices to the network for remote access, you must give each device an IP address, within your network range. In this example, we will be using a Apple Mac which is connected to a modem to find the IP address of the computer, and available IP addresses to use for the devices. If the devices are being installed on a business or managed network, contact an IT representative for assistance.
1. Follow the steps for Finding the IP Range of a Network - Mac OSX.
2. Press Command + Space bar keys to bring up spotlight.
3. Type Terminal, and double click on the search result.
4. To check what IP address is available, type ping 192.168.1.XXX, where XXX is any number between 2 and 254. If Request timeout is show on screen, there is no device using that IP address. Repeat the process to find multiple IP addresses that are available for use. Every devices requires one IP address. 192.168.1.XXX is used as an example, you the IP Address range will vary depending on the network.
5. When configuring the devices, use the IP addresses that you have found that are available, making sure each device has a unique IP address. The Subnet Mask and Default Gateway, will be set the same on each device.
To access the devices you will need to be in the same range as them. See the guide below for how to change the IP Address of a Windows Computer.
Changing the IP Address of your Computer
Changing the IP address on a Windows Computer
1. Open Settings. 2. Select Network & Internet. 3. Select Status. 4. Select C...
Windows 10
- Open Settings.
- Select Network & Internet.
- Select Status, then Change Adapter Options.
-
Right-click the network adapter you want to change the IP address for, and select Properties.
-
Double-click the Internet Protocol Version 4 (TCP/IPv4) item.
- Click Use the following IP address and enter an IP address in the same range as the device you are trying to access. (E.g when trying to access 192.168.1.108 use a IP address in the 192.168.1.x range.) Note: This cannot be the same as the device you are trying to connect to or any other device on the same network. Save your changes on both windows.
- Type the IP address of the device you are trying to access into the address bar of your web browser.
- Once finished configuring the device, change the adapter settings back to normal by following steps 1-5 and clicking Obtain an IP address automatically.
Windows 11
1. In the Windows search bar at the bottom of the page, type Control Panel and press enter.
2. Select Network and Internet.
3. Select Network and Sharing Centre.
4. Select the link for Connections in the network that you want to change the IP address for.
5. Select Properties.
6. Double-click the Internet Protocol Version 4 (TCP/IPv4) item.
7. Click Use the following IP address and enter an IP address in the same range as the device you are trying to access. (E.g when trying to access 192.168.1.108 use a IP address in the 192.168.1.x range.) Note: This cannot be the same as the device you are trying to connect to or any other device on the same network. Save your changes on both windows.
8. Type the IP address of the device you are trying to access into the address bar of your web browser.
9. Once finished configuring the device, change the adapter settings back to normal by following steps 1-6 and clicking Obtain an IP address automatically.
See the video below for a visual guide of the steps above:
Shortcut
1. In the Windows search bar at the bottom of the page, type Ncpa.cpl and press enter.
2. Right-click the network adapter you want to change the IP address for, and select Properties.
3. Select the Internet Protocol Version 4 (TCP/IPv4) item.
4. Click Use the following IP address and enter an IP address in the same range as the device you are trying to access. (E.g when trying to access 192.168.1.108 use a IP address in the 192.168.1.x range.) Note: This cannot be the same as the device you are trying to connect to or any other device on the same network. Save your changes on both windows.
5. Type the IP address of the device you are trying to access into the address bar of your web browser.
6. Once finished configuring the device, change the adapter settings back to normal by following steps 1-3 and clicking Obtain an IP address automatically.
See the video below for a visual guide of the steps above:
Initialise the cameras
The camera(s) will need to be connected to a computer via ethernet into a POE switch or powered by 12 volt.


You can access the Web interface by entering the cameras default IP address of (192.168.1.108) into a web browser.
You may need to change the IP address of your Computer to be able to reach the IP address of the camera.
Changing IP of Windows Computer
Changing the IP address on a Windows Computer
Windows 10
- Open Settings.
- Select Network & Internet.
- Select Status, then Change Adapter Options.
-
Right-click the network adapter you want to change the IP address for, and select Properties.
-
Double-click the Internet Protocol Version 4 (TCP/IPv4) item.
- Click Use the following IP address and enter an IP address in the same range as the device you are trying to access. (E.g when trying to access 192.168.1.108 use a IP address in the 192.168.1.x range.) Note: This cannot be the same as the device you are trying to connect to or any other device on the same network. Save your changes on both windows.
- Type the IP address of the device you are trying to access into the address bar of your web browser.
- Once finished configuring the device, change the adapter settings back to normal by following steps 1-5 and clicking Obtain an IP address automatically.
Windows 11
1. In the Windows search bar at the bottom of the page, type Control Panel and press enter.
2. Select Network and Internet.
3. Select Network and Sharing Centre.
4. Select the link for Connections in the network that you want to change the IP address for.
5. Select Properties.
6. Double-click the Internet Protocol Version 4 (TCP/IPv4) item.
7. Click Use the following IP address and enter an IP address in the same range as the device you are trying to access. (E.g when trying to access 192.168.1.108 use a IP address in the 192.168.1.x range.) Note: This cannot be the same as the device you are trying to connect to or any other device on the same network. Save your changes on both windows.
8. Type the IP address of the device you are trying to access into the address bar of your web browser.
9. Once finished configuring the device, change the adapter settings back to normal by following steps 1-6 and clicking Obtain an IP address automatically.
See the video below for a visual guide of the steps above:
Shortcut
1. In the Windows search bar at the bottom of the page, type Ncpa.cpl and press enter.
2. Right-click the network adapter you want to change the IP address for, and select Properties.
3. Select the Internet Protocol Version 4 (TCP/IPv4) item.
4. Click Use the following IP address and enter an IP address in the same range as the device you are trying to access. (E.g when trying to access 192.168.1.108 use a IP address in the 192.168.1.x range.) Note: This cannot be the same as the device you are trying to connect to or any other device on the same network. Save your changes on both windows.
5. Type the IP address of the device you are trying to access into the address bar of your web browser.
6. Once finished configuring the device, change the adapter settings back to normal by following steps 1-3 and clicking Obtain an IP address automatically.
See the video below for a visual guide of the steps above:
Initialise camera via Web interface 5.0
- Select your Region and Language.

- Select your Time Zone, then press Sync with PC to sync your cameras time with the PCs time.

- Enter a password and recovery email.

- Ensure P2P is enabled, then press Next.

- Click End.

Initialise camera Via Web Interface 3.0
1. Initialize the camera by entering a new password (It will need to be at least 8 characters long), then click Save.

2. Ensure P2P is enabled and click Next

3. Click Next.

4. If prompted, select a region and click Save

Initialise Camera Via Config Tool
The Initialisation process can also be performed using the latest version of our Config Tool - Please see the images below showing how this is done. To speed up the process the Config Tool also allows you to initialise multiple cameras at once.
- Download and open Config Tool.
- Put a check in the box next to the device you would like to Initialise, and select the Initialize button.
- Select the Initialize button.
- Enter a password, that is at least 8 characters, and is a mix of letters and numbers. Enter an email address, this will be used if the password is ever forgotten. Select Next.
- Depending on the installation requirements, you can check or uncheck the boxes for Easy4IP (P2P Remote Access) and Auto-check for updates. Select OK.
- If the status shows as Initialized, the process was completed successfully.
Optional - Initializing Network Cameras via the NVR
In some installations you may find it easier to initialize cameras directly from the recorder, this method works best when adding a few camera.
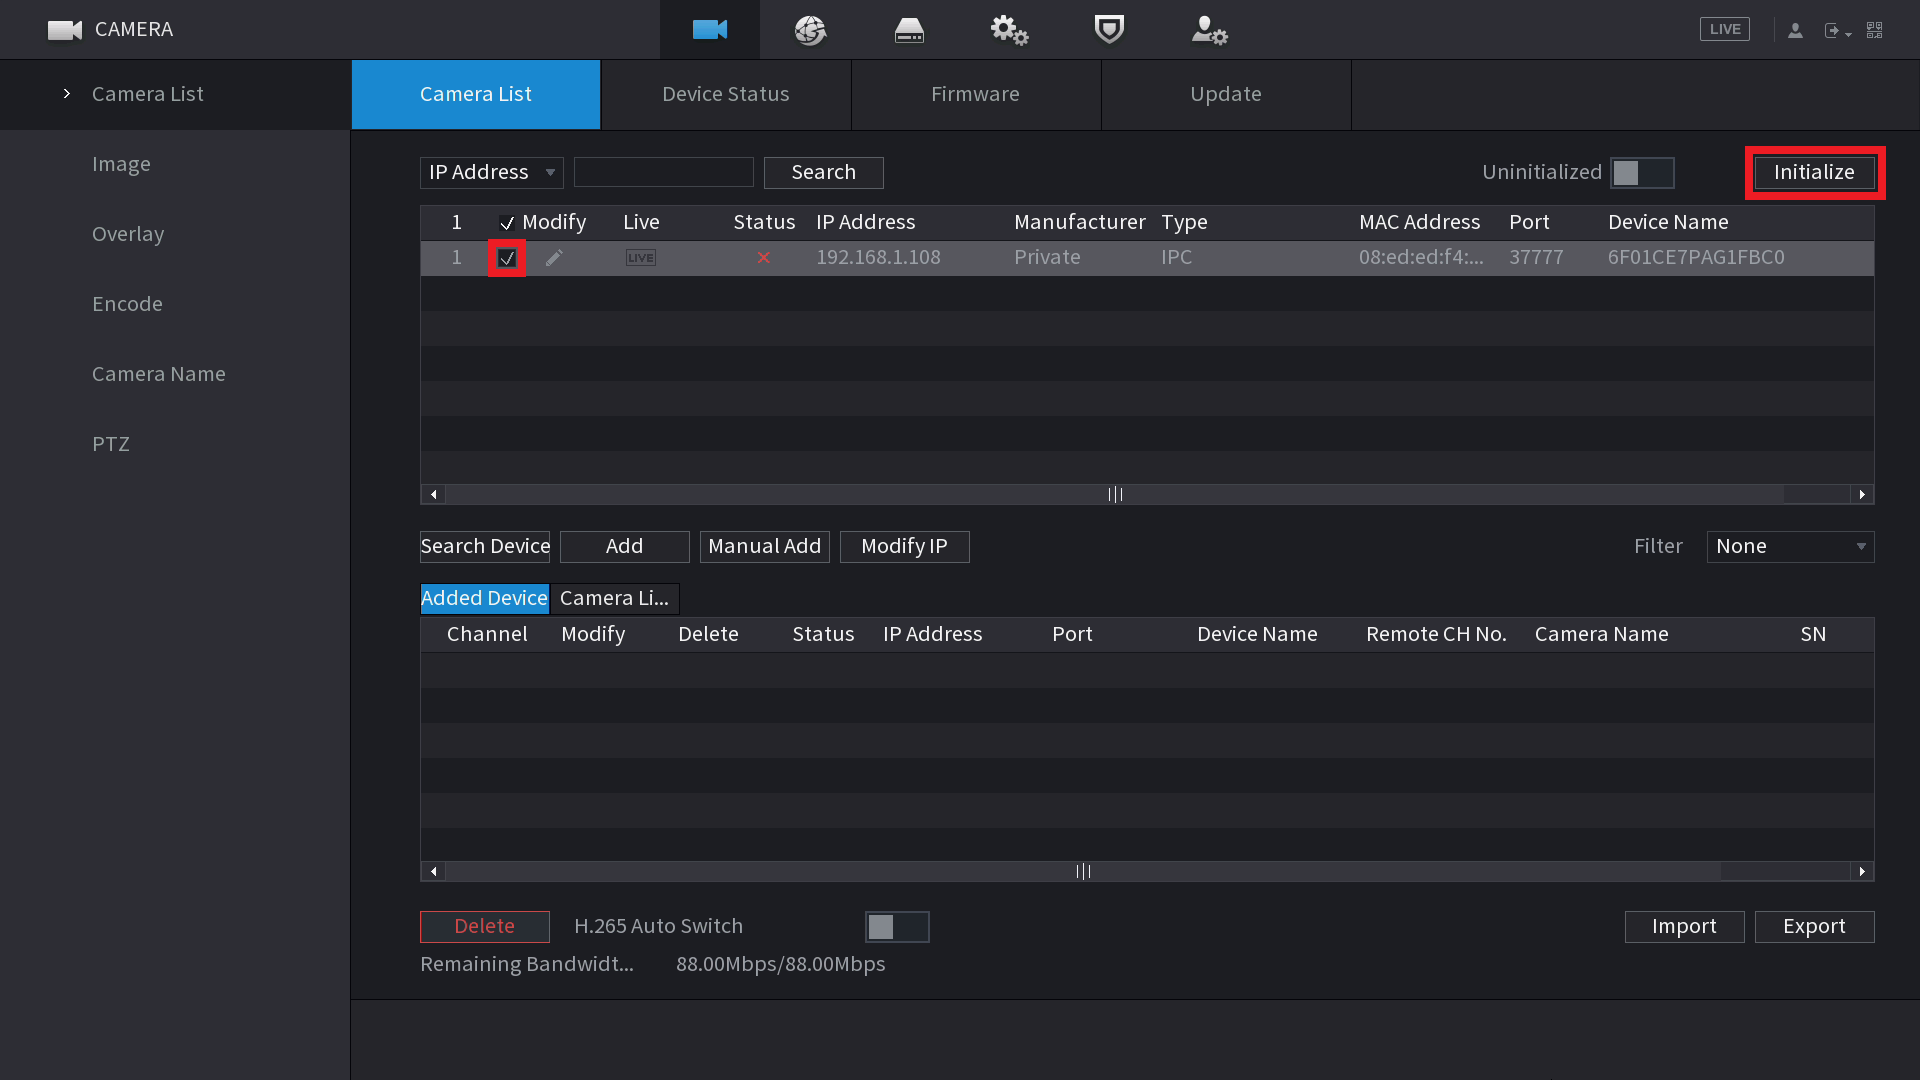
- Right click and select Main Menu, then Camera.
- Select Device Search.
- Select the cameras you wish to initialise, then click Initialize.
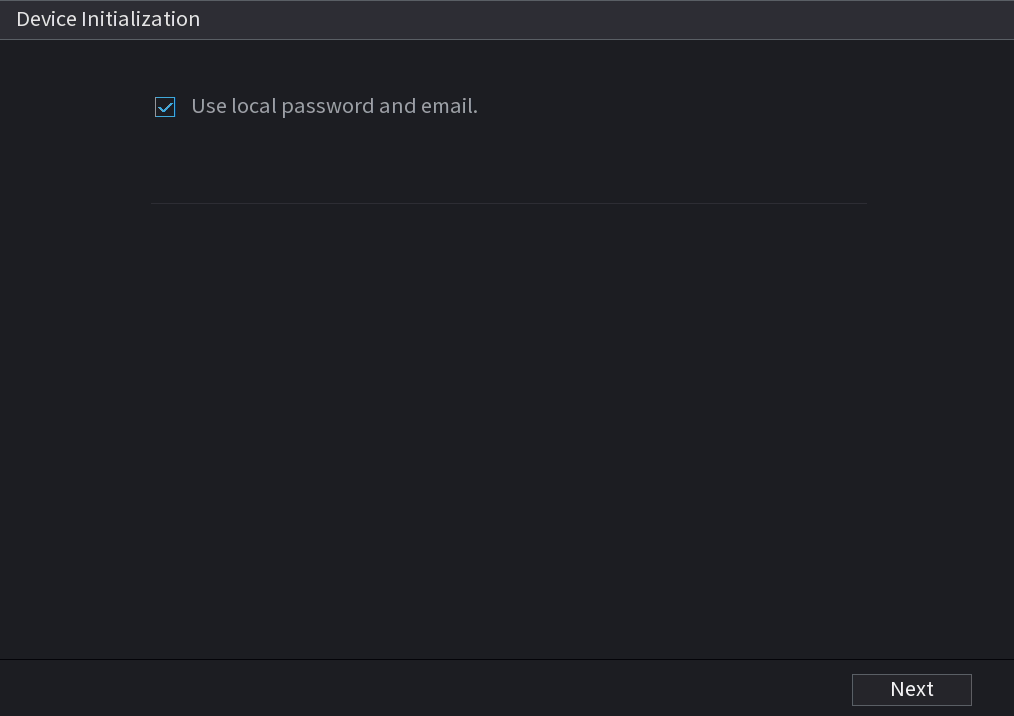
- Select Next.
- Enter the IP Address, Subnet Mask and Default Gateway, then click Next.
NOTE: When Initialising more than one camera, the last section of the IP address will be incremented by the Incremental Value.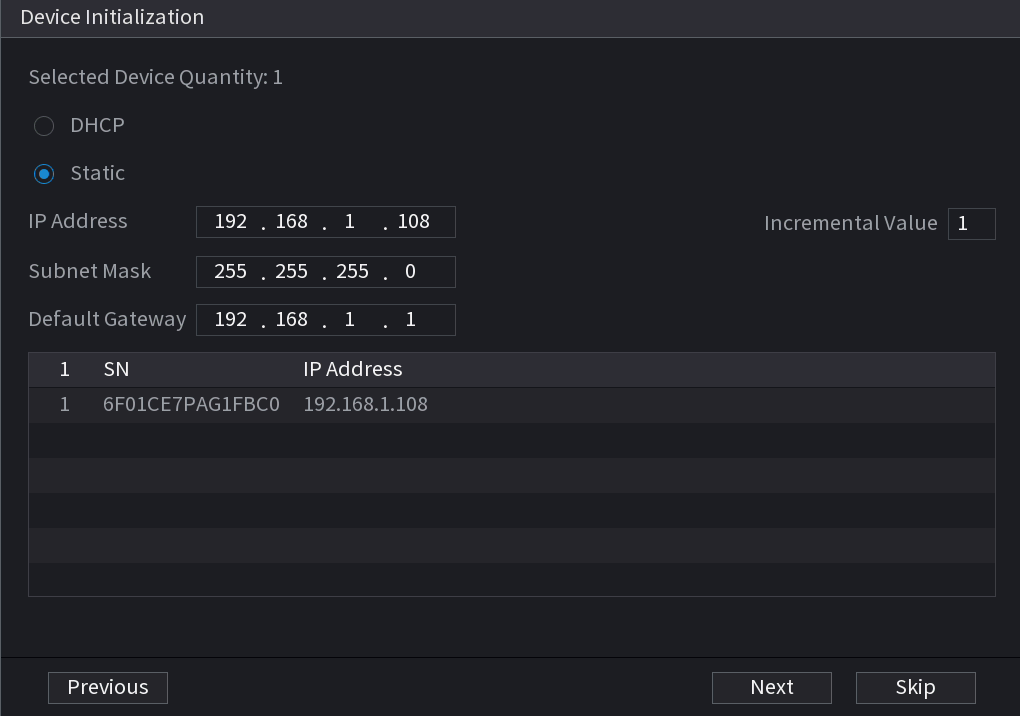
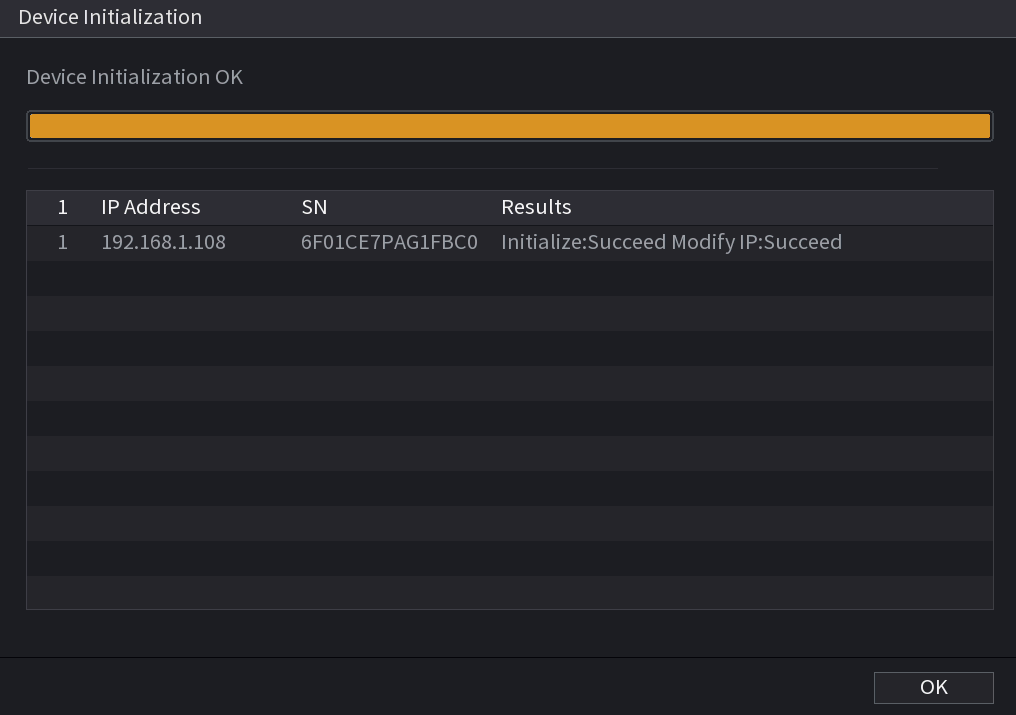
- Select OK.
- Select the Cameras you wish to add, then select Add.
Change IP address of a Camera
Changing IP through Web Interface
- Log Into Camera Web interface By entering IP into a browser
- From Main Menu Go to Network Settings

- Change Network Settings to suit network that camera will be connected to and hit apply.

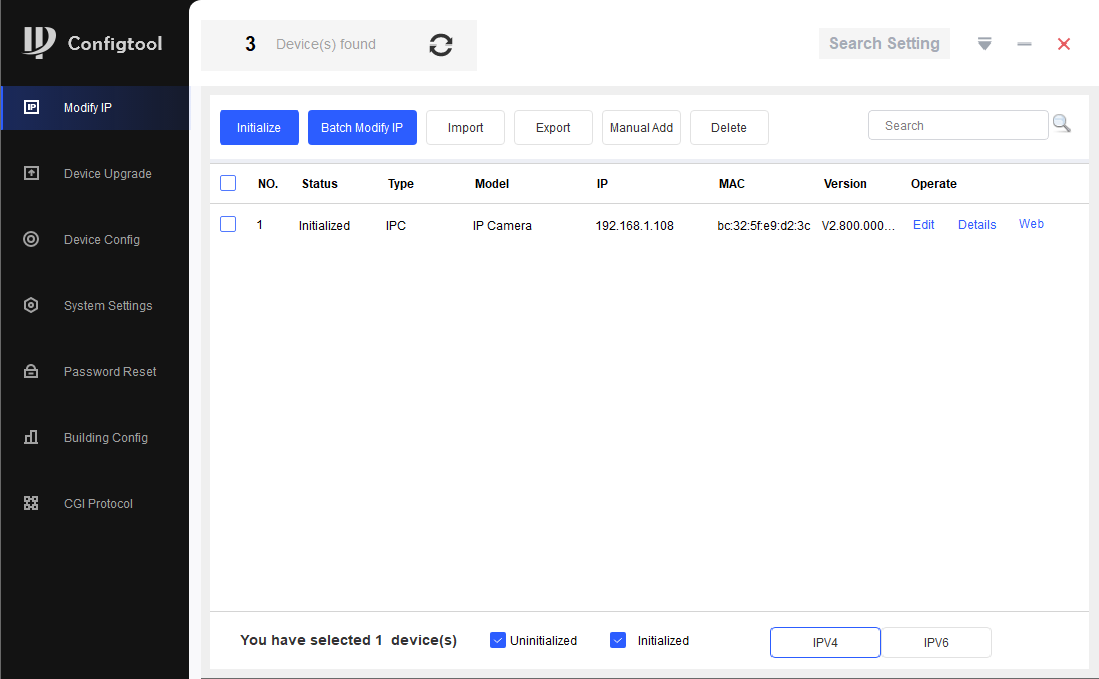
Change IP Address With Config Tool
-
Select Search Setting, and enter the password for the device. Select OK.

-
Put a tick the box
 next to the device(s) you would like to change the IP address of, and select Batch Modify IP.
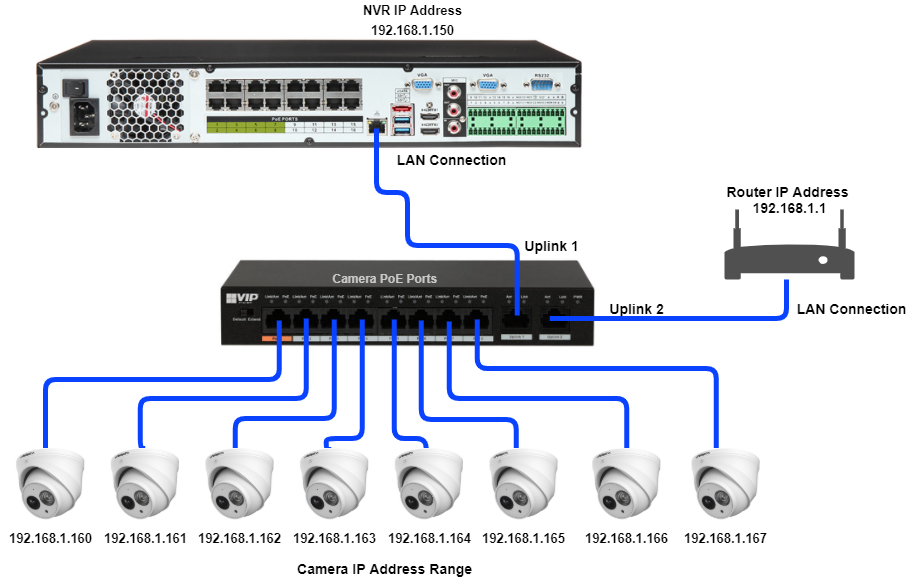
- Enter the Start IP address, Subnet Mask and Default Gateway for the device, in this example we are going to start from 192.168.1.160. If you have multiple devices selected, the first device will be addressed as 192.168.1.160, the second 192.168.1.161, the third 192.168.1.162, and so on. Select OK.

- The IP address of the device will now be set. If you encounter any errors, ensure the password in Search Setting is correct, and there are no errors in the IP Address.

Recorder Network Configuration
To Ensure the Recorder Network Settings Are correct follow Steps Below.
- Right click and select Main Menu. Login to the recorder's using your username and password.
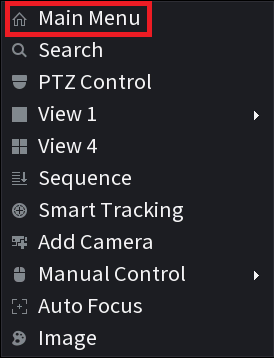
- Select Network, then TCP/IP. Select the pencil icon next to the network port, on some recorders there will be the option to select from multiple network ports, select the one that the cameras are going to be connected to.
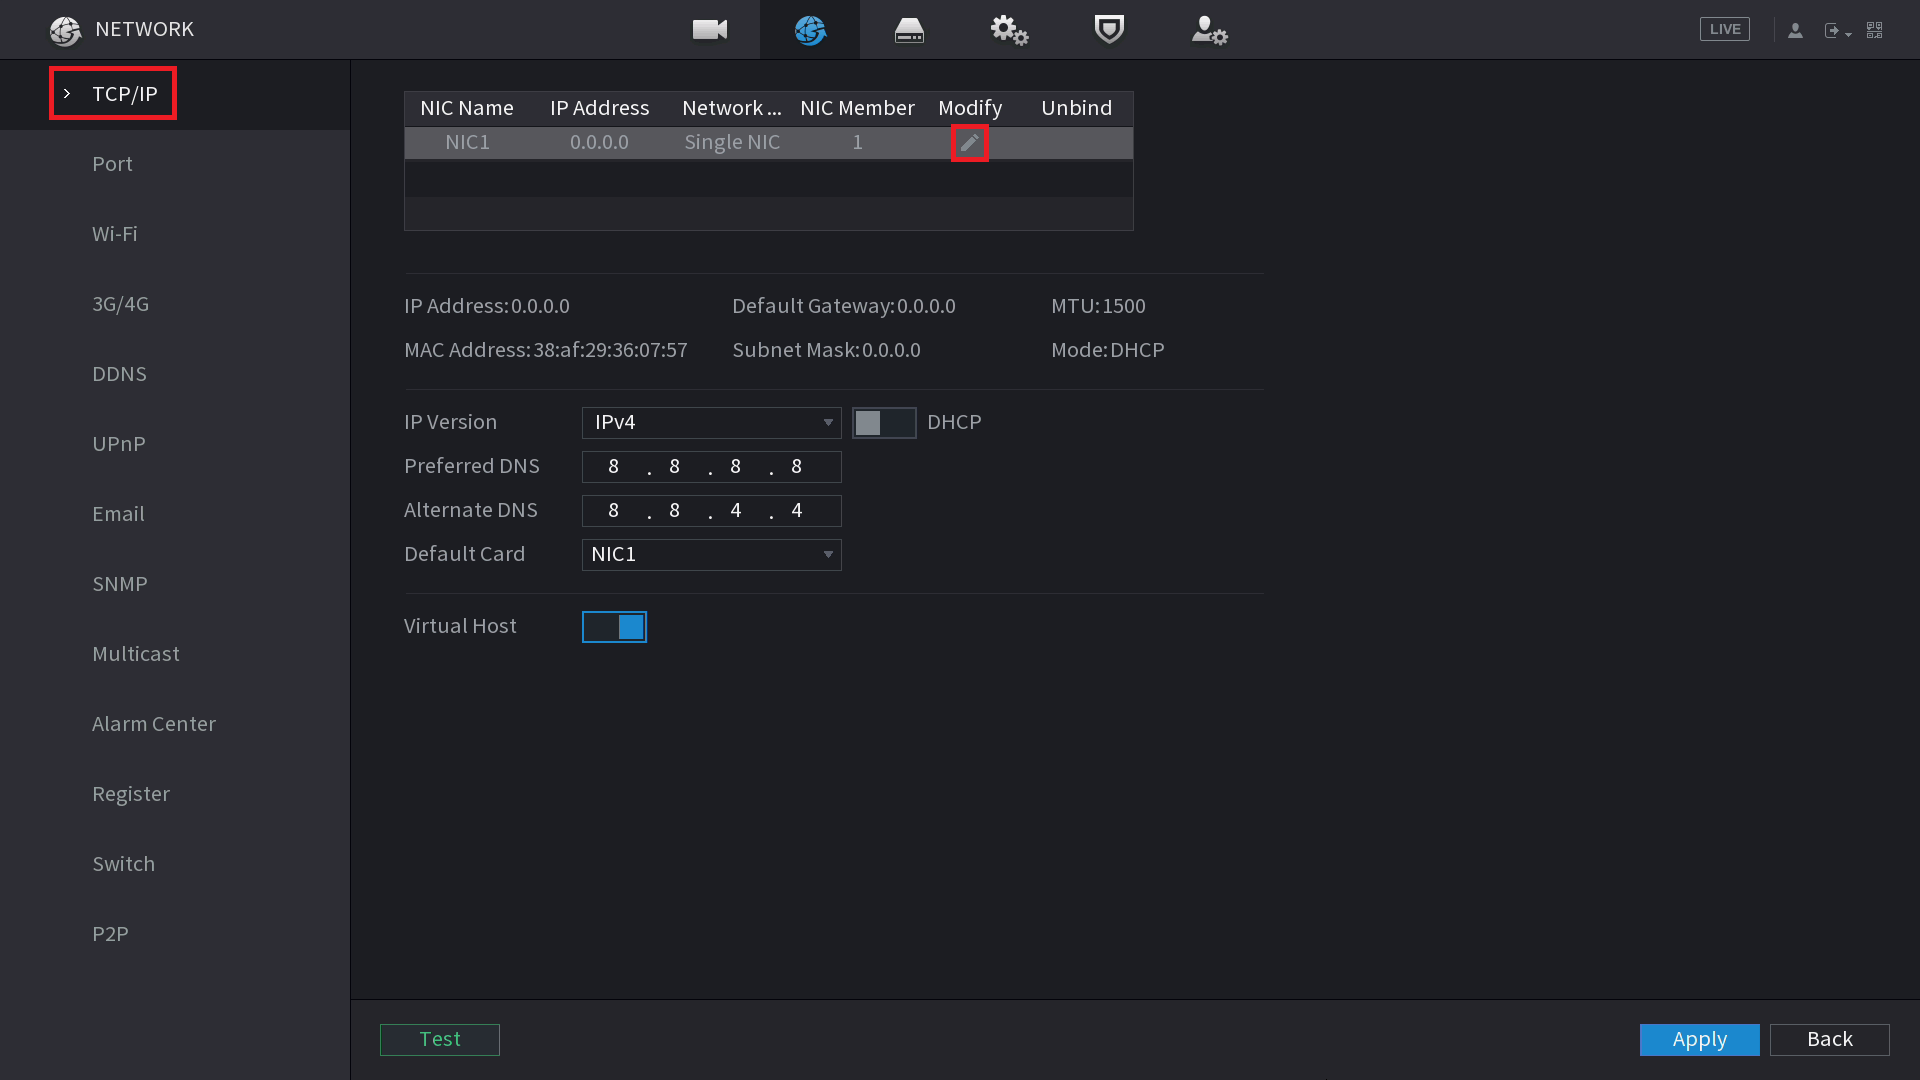
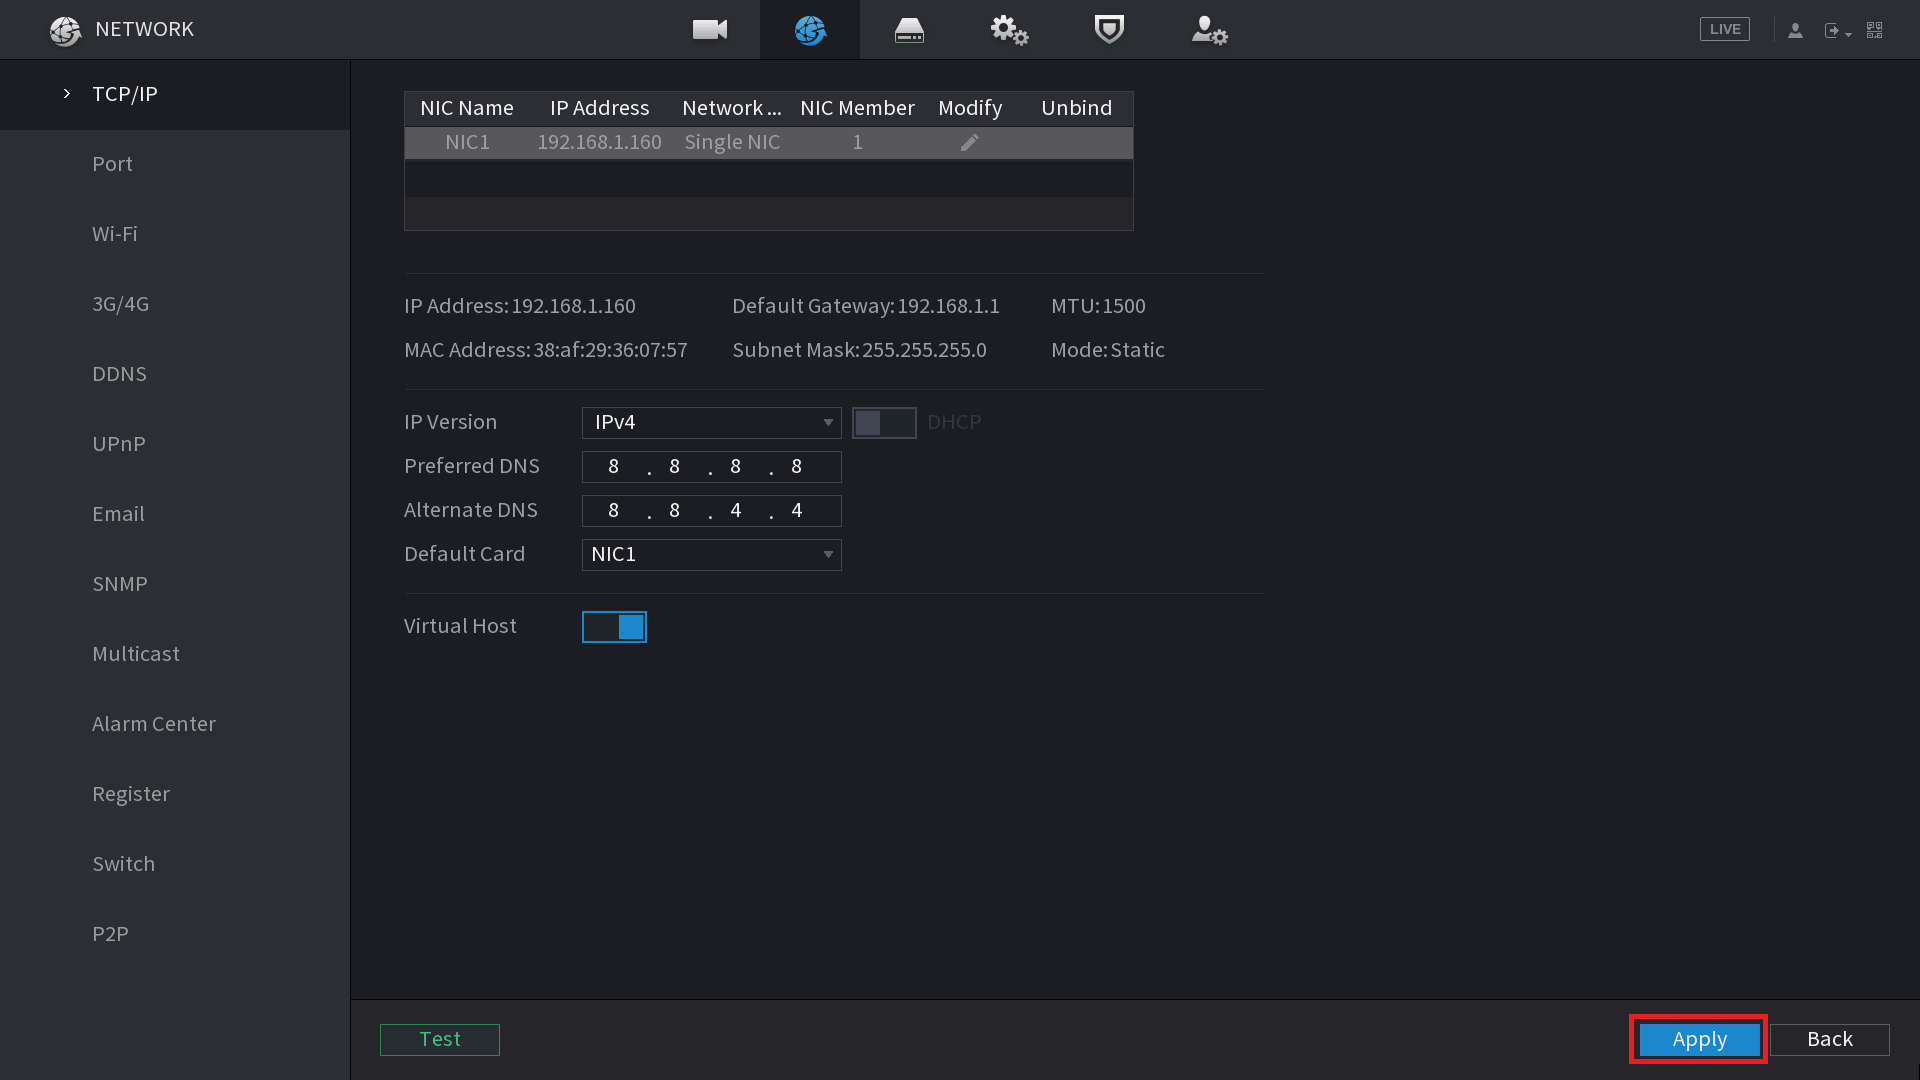
- Ensure DHCP is turned off, and enter the IP Address, Subnet Mask, and Default Gateway for the recorder. In our example we are using 192.168.1.150 for the IP address, 255.255.255.0 for the Subnet Mask, and 192.168.1.1 for the Default Gateway. Select OK.

- Select Apply to save your changes. The IP address of the recorder is now set.
Adding Cameras to the Recorder
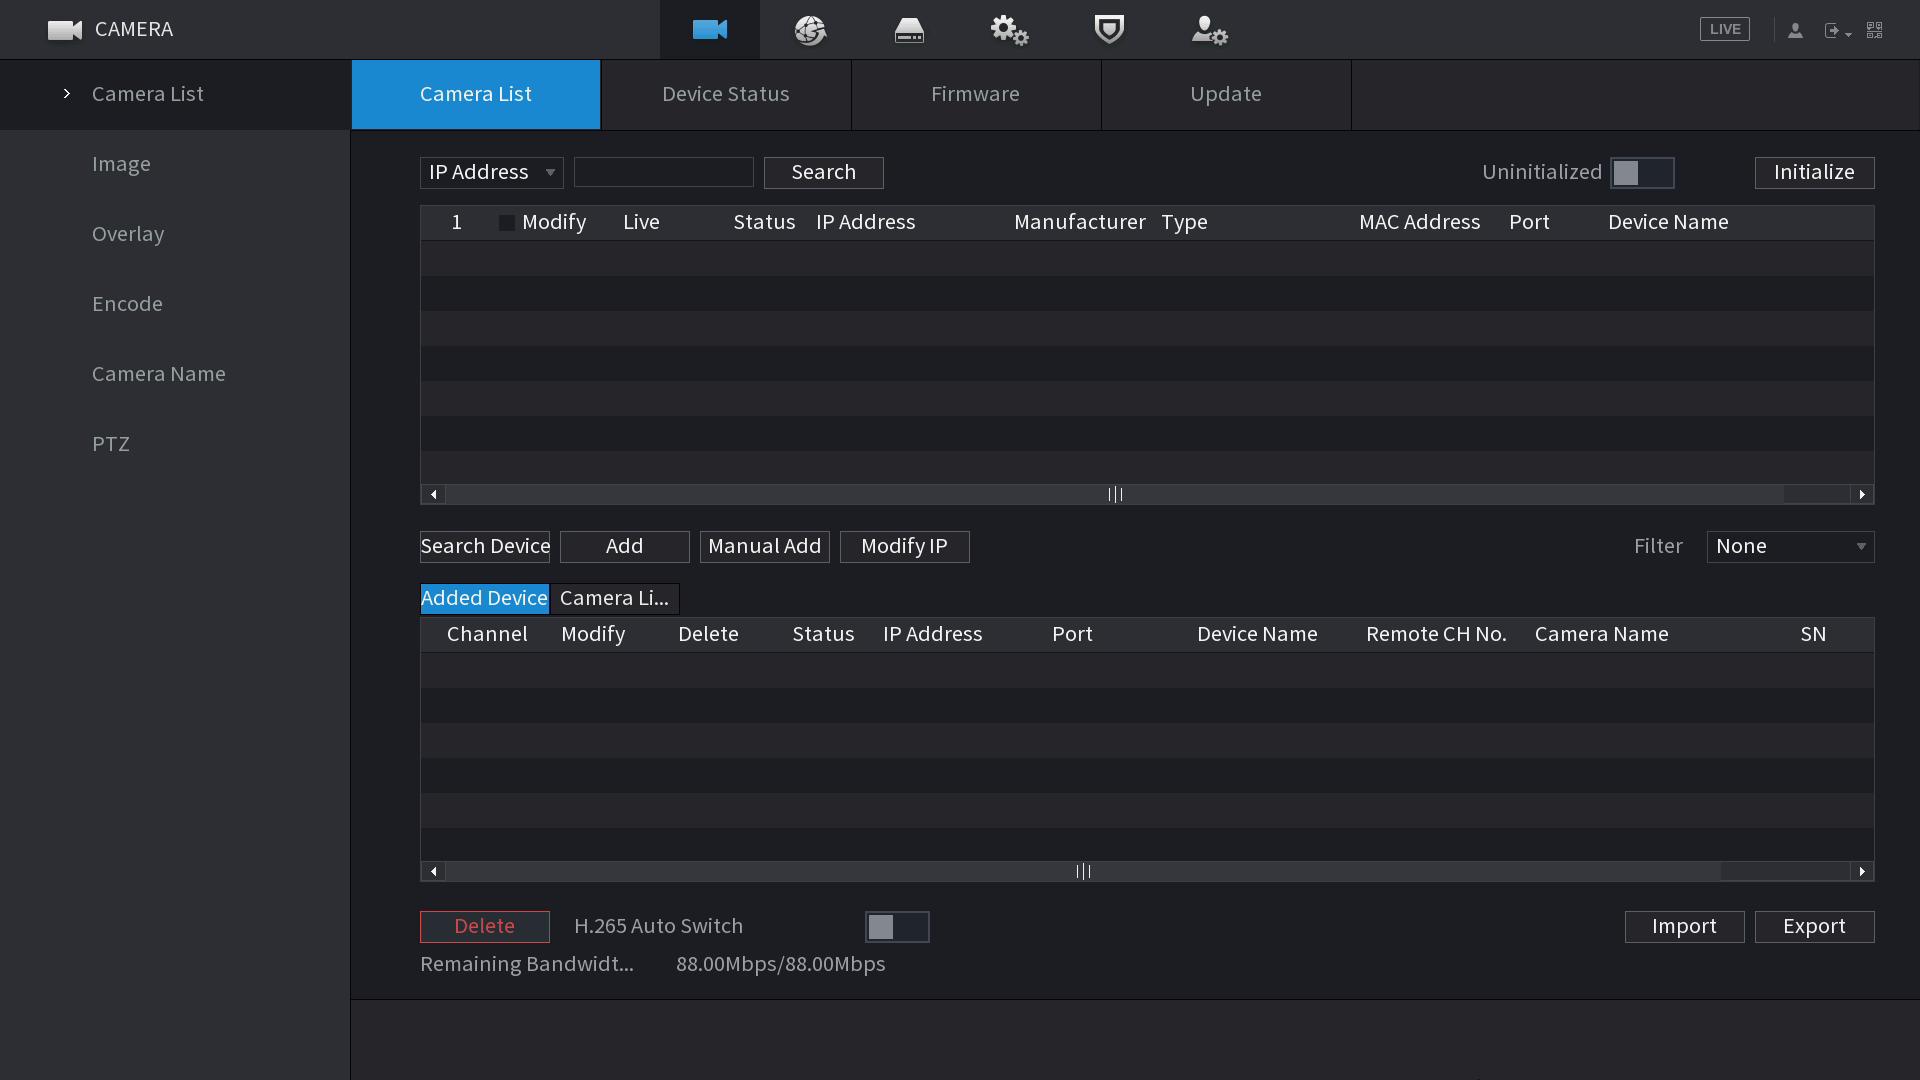
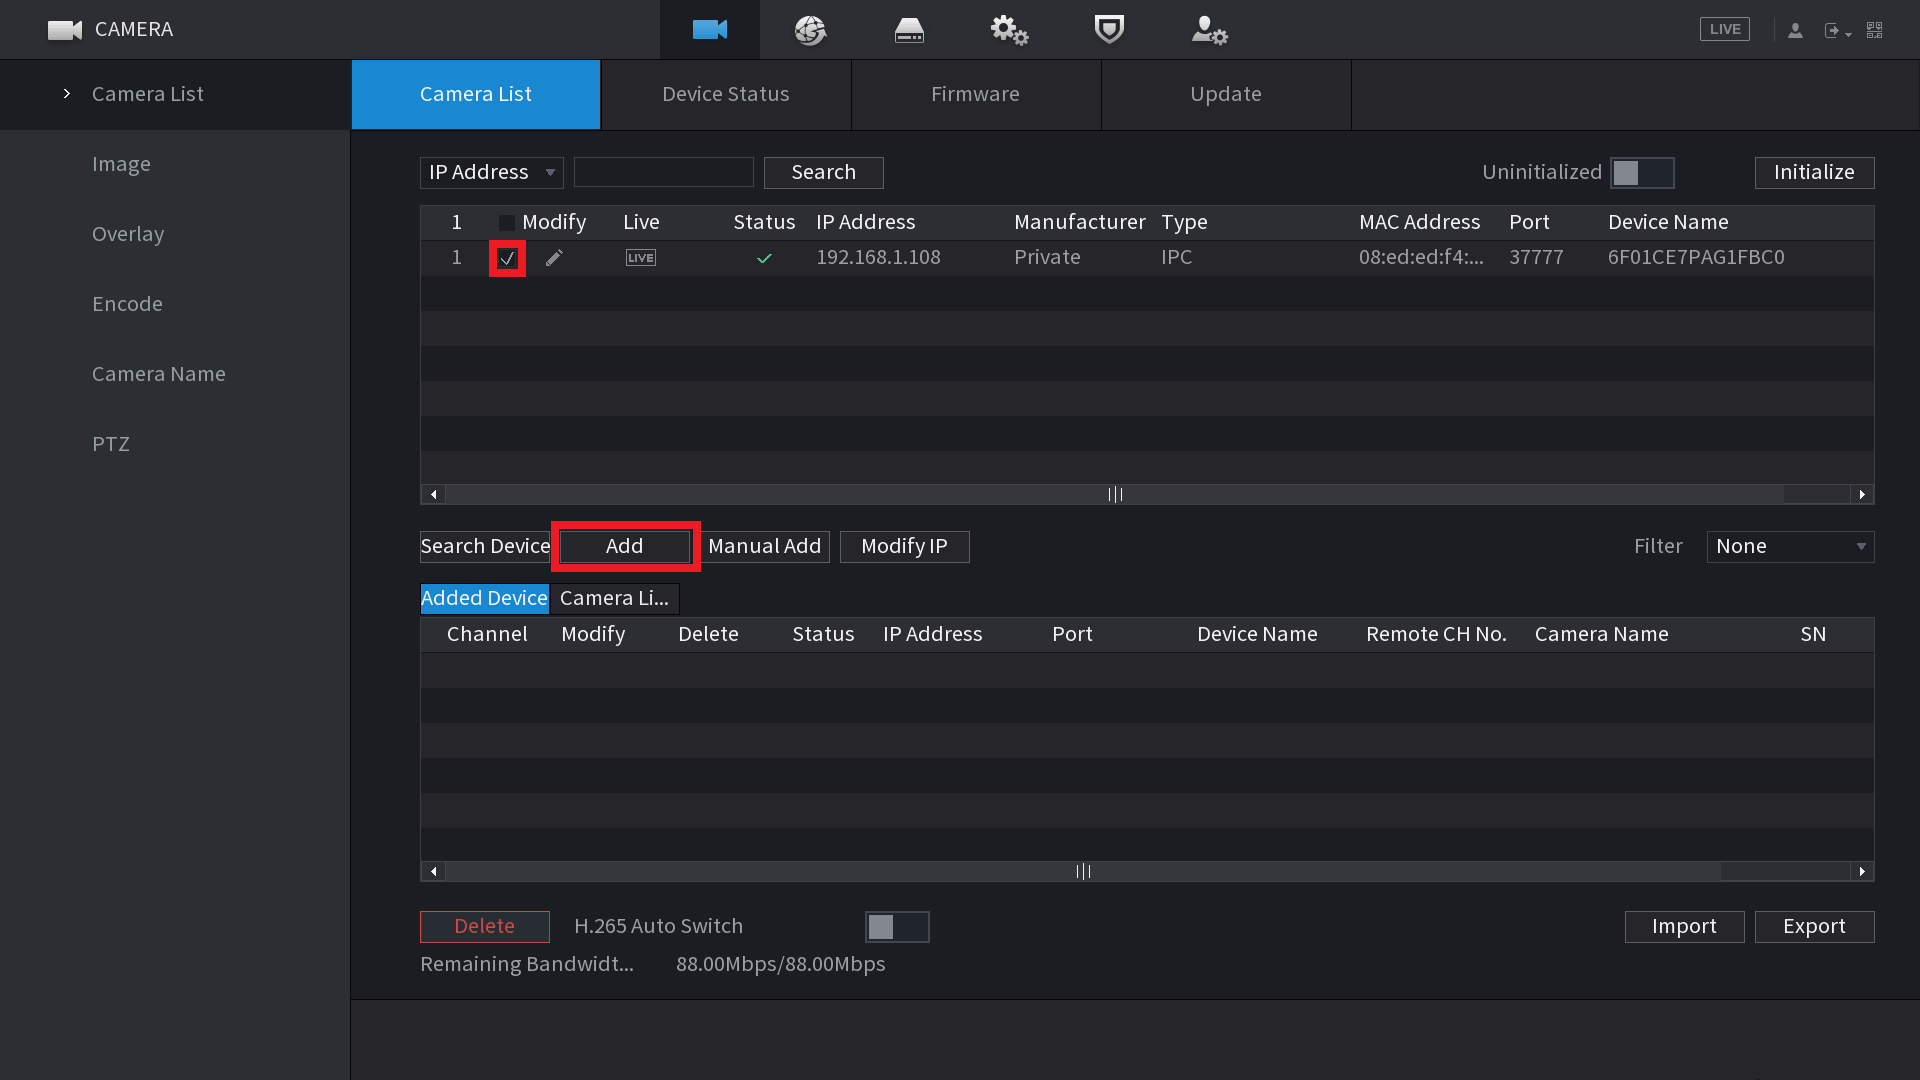
- Login to Main Menu of NVR, then Select Camera, then Camera List.
- Select Search Device. The cameras that are connected should be listed in the top list.
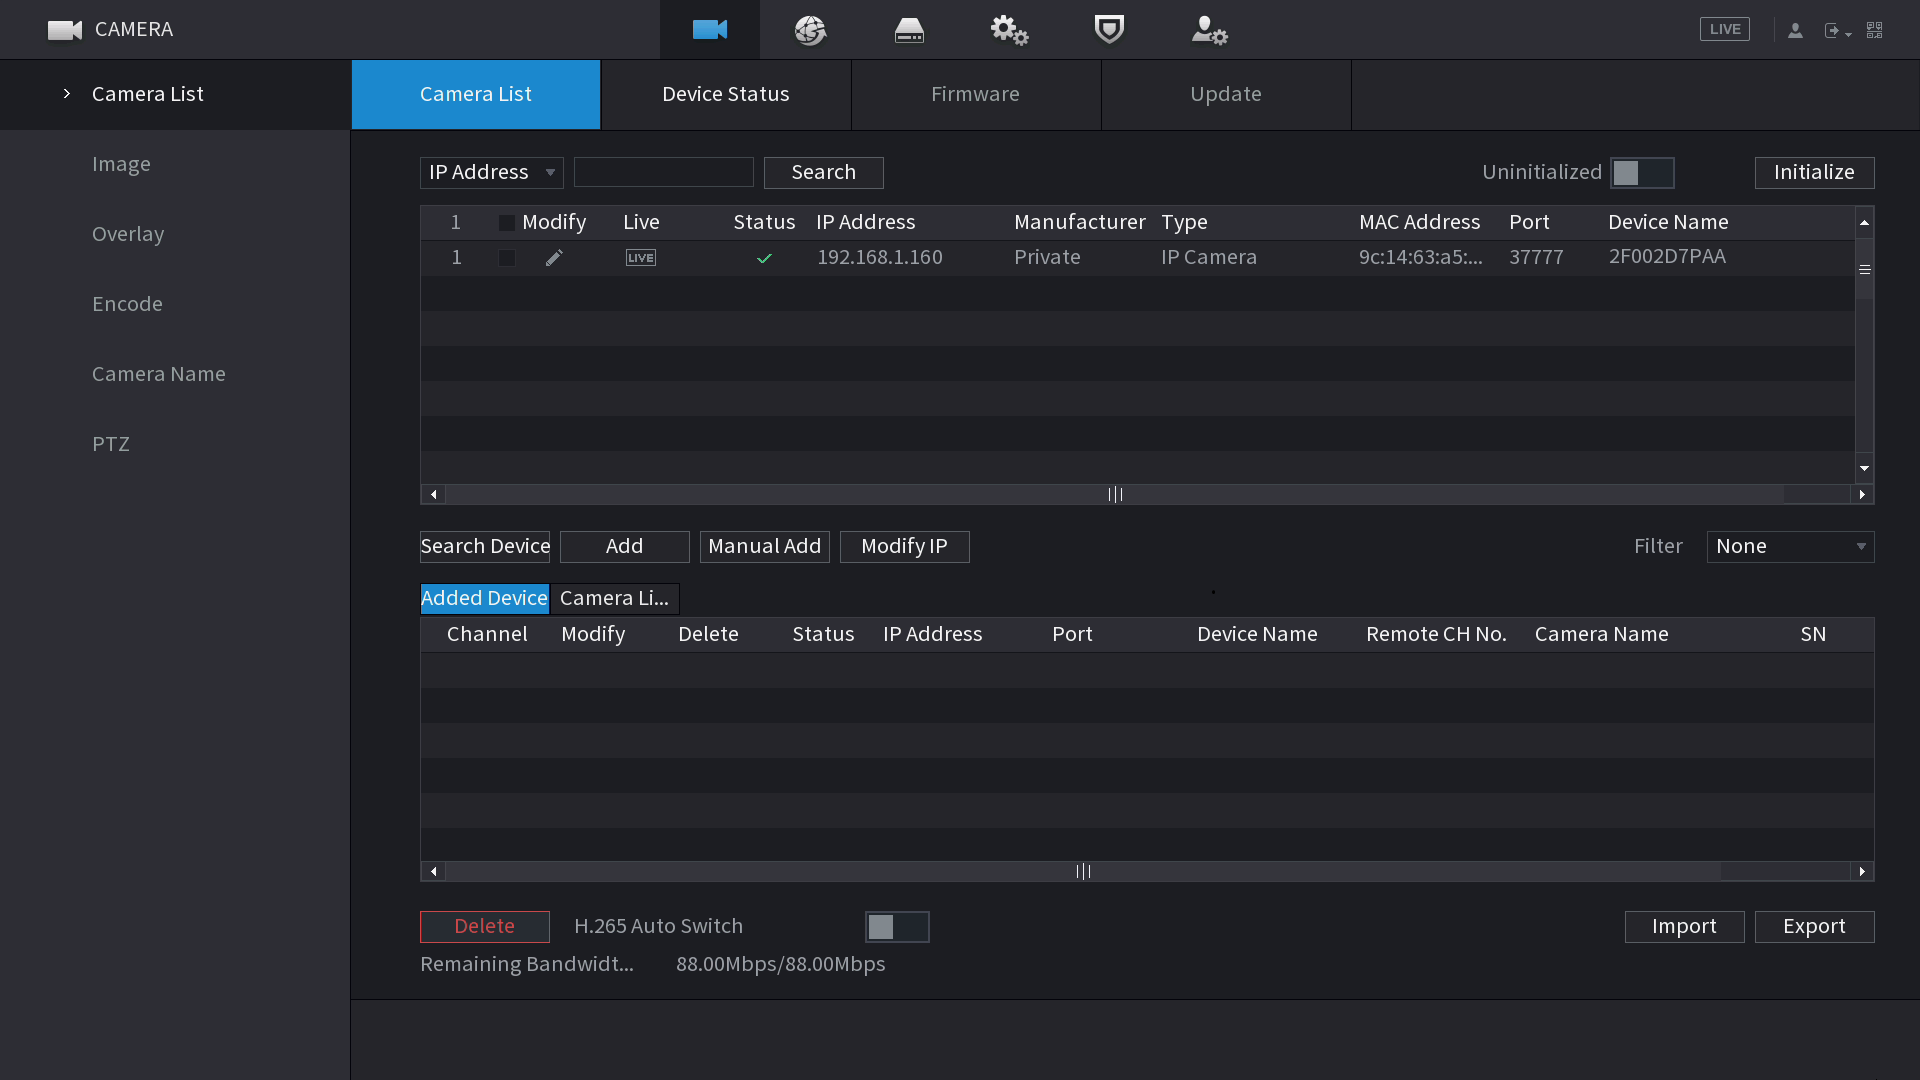
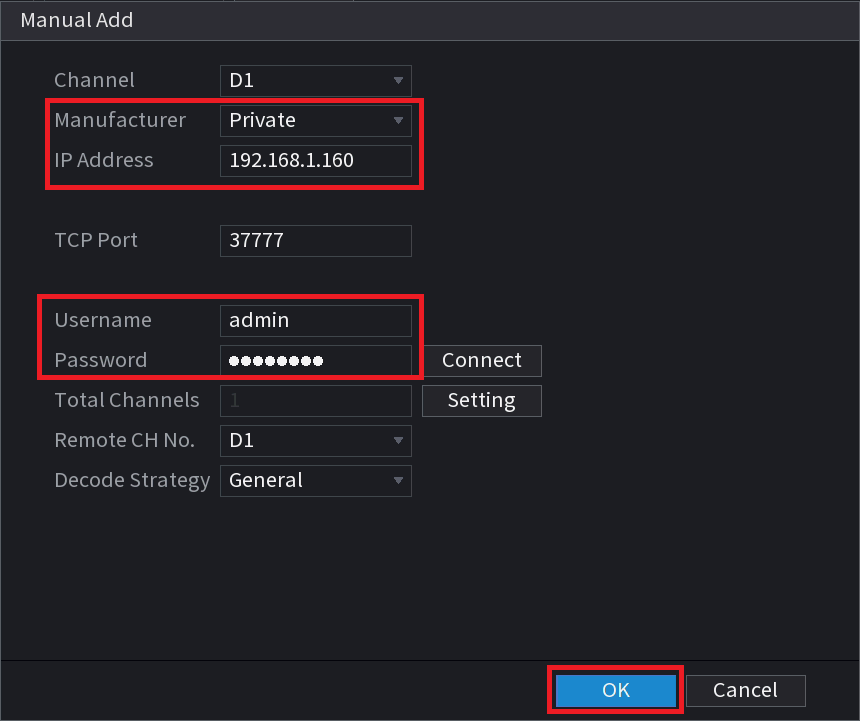
- Select the check box next to the camera/s, then select Add. If you cannot see any cameras, select Manual Add, and enter the IP Address, username and password and select OK.
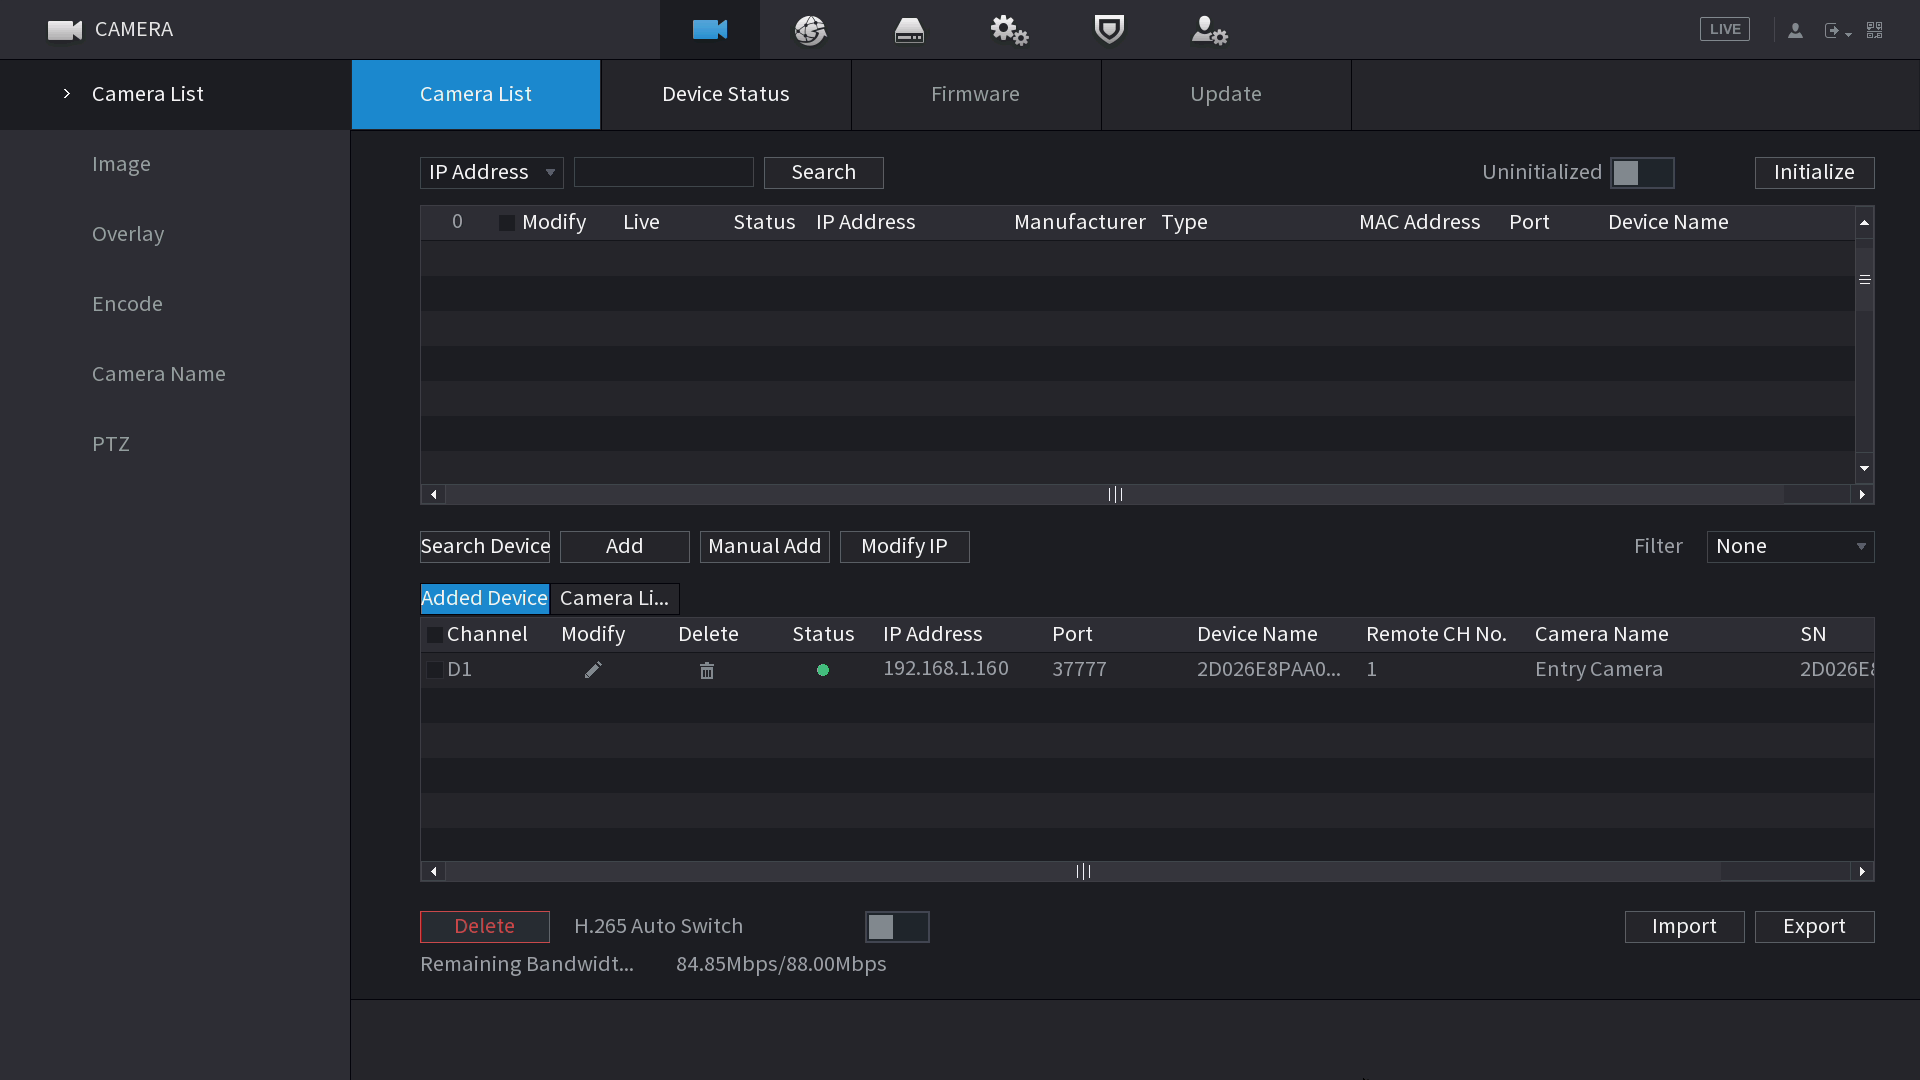
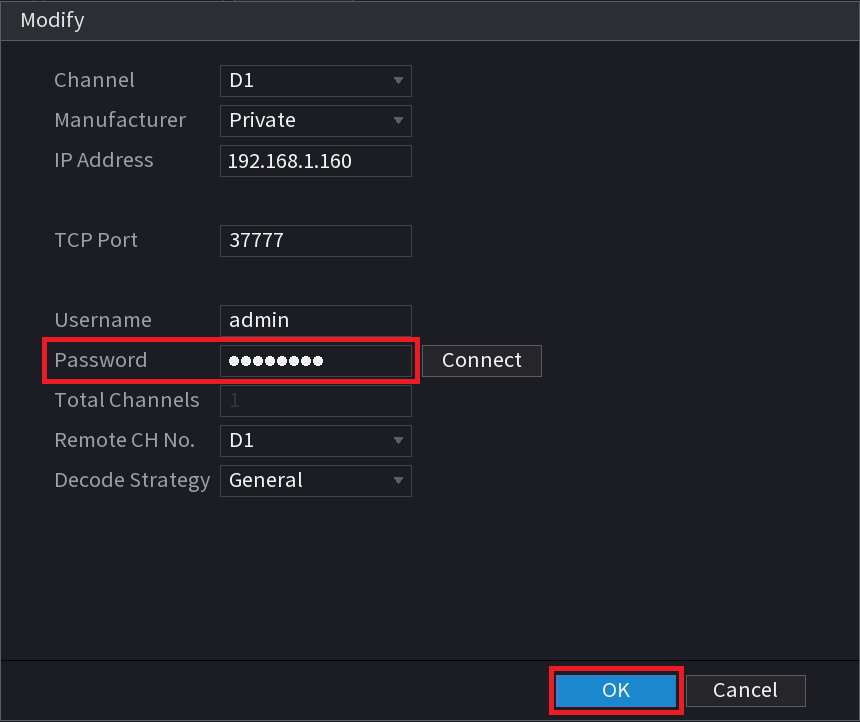
- The camera/s should now be added to the bottom list, and the status green. If the status is red, select the modify button, and ensure the password is entered correctly and select OK.
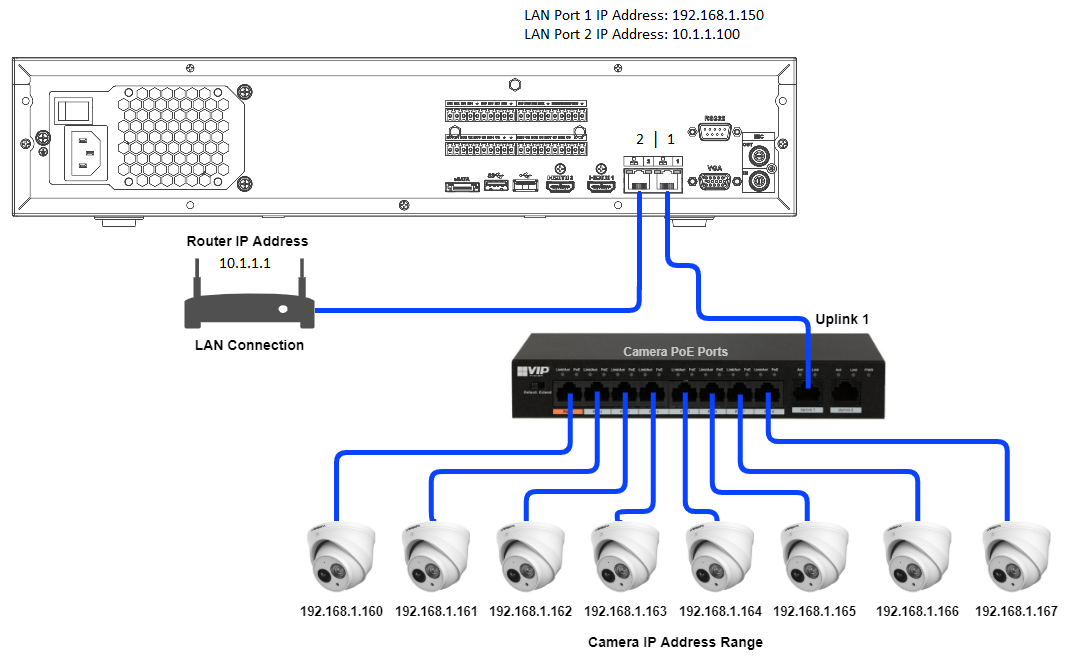
Wiring a NVR with 2x LAN Ports
The below example shows a NVR with 2 LAN ports. In this example LAN 1 is being used to connect to a PoE switch with cameras on it, and LAN 2 is being connecting to the modem to provide network access to the recorder.
Additional Initialisation Steps
conf.LoginErrorNo-18 or Config Error 18
Config Error 18 or conf.LoginErrorNo-18 means that a camera needs to be initialised before it can be used on the NVR.
Follow the Steps above to Initialise the Camera.
conf.LoginErrorNo-20 or Config Error 20
On some older model recorders, the "Config Error 20"/"conf.LoginErrorNo-20" error may be seen on the Live-View Page when trying to add a new camera. The cameras will need to have Compatibility mode enabled via its web interface.
Accessing Web Interface
Cameras Plugged into NVR
Cameras Plugged directly into NVR can be Accessed in two different ways, Through the NVR's Web interface or by putting a computer into the NVR's Internal Switch Range.
NVR Web Interface
1. Make sure you have a Connection to the NVR like below

2. On your Computer enter the address of the recorder in your browser.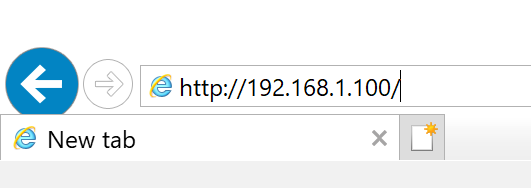
3. Enter the recorders username and password.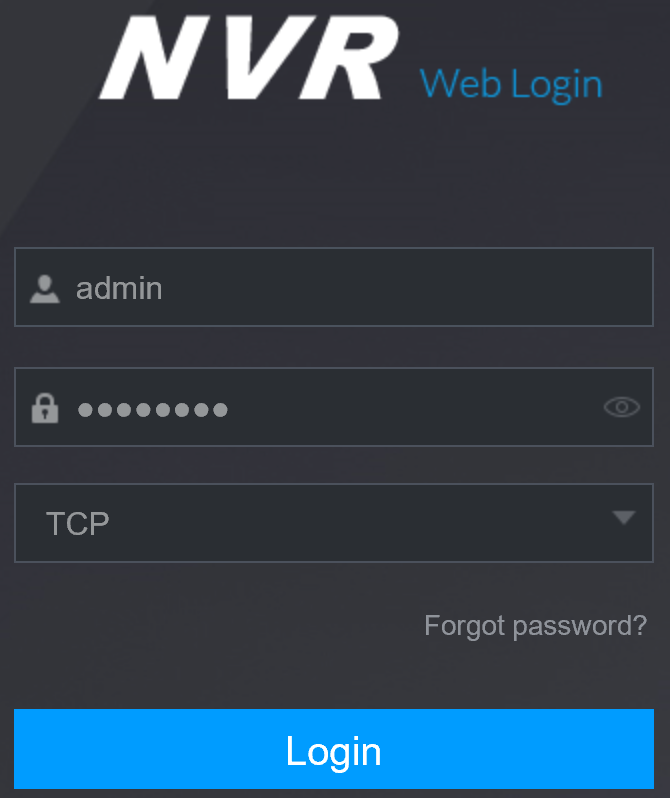
4. Select Setting > Camera > Camera List.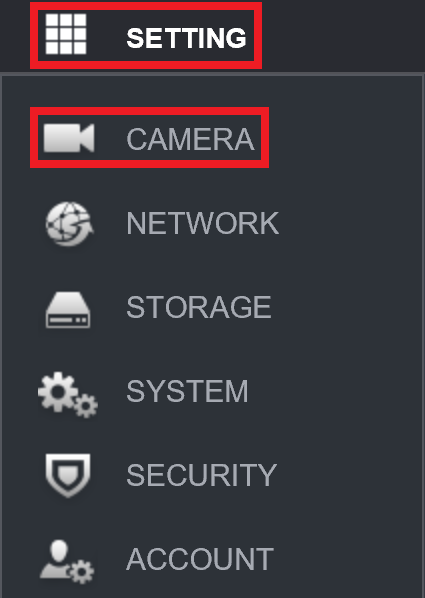
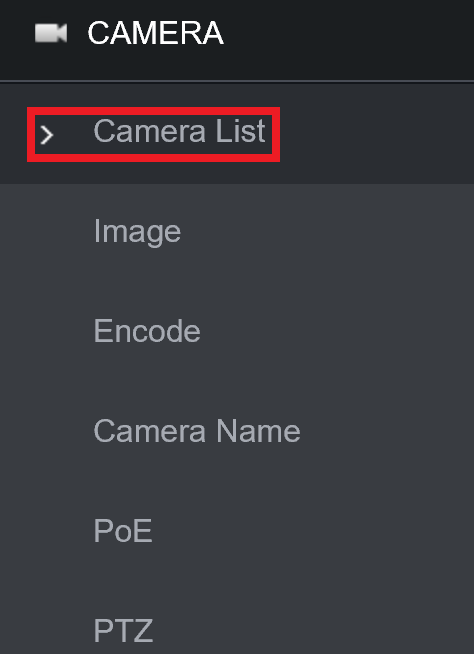
5. Next to each camera, there will be a  icon. Select the icon next to the camera you wish to connect to.
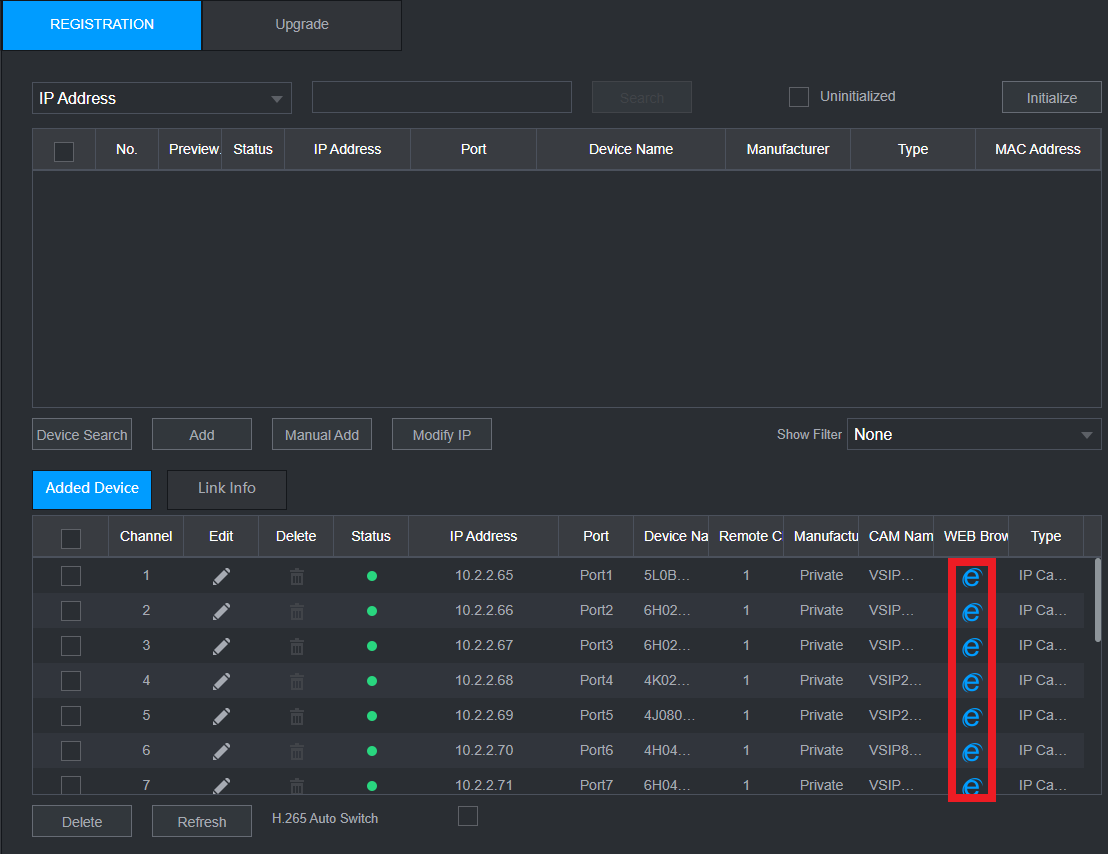
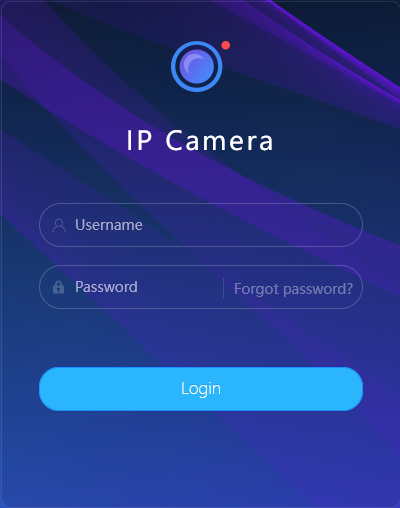
6. A new tab will open, Bringing up the Login page for the Cameras Web interface.
NVR Internal Switch
Network Setup with Pc going into NVR internal Switch.

1. Change Computers IP to be in same range of NVR (Usually 10.1.1.X) This can also be found in
Main Menu > Network > Switch

2. Log into Camera Web Interface Be Entering Ip Address into Browser (10.1.1.60)


Network Camera
1. Log into Cameras Web interface by typing it into your browser (e.g. 192.168.1.100)
2. Enter In Username And Password of the Camera

Enable Compatibility Mode - New GUI (white/Blue)
1. Navigate to Setting > Network > Basic Services.
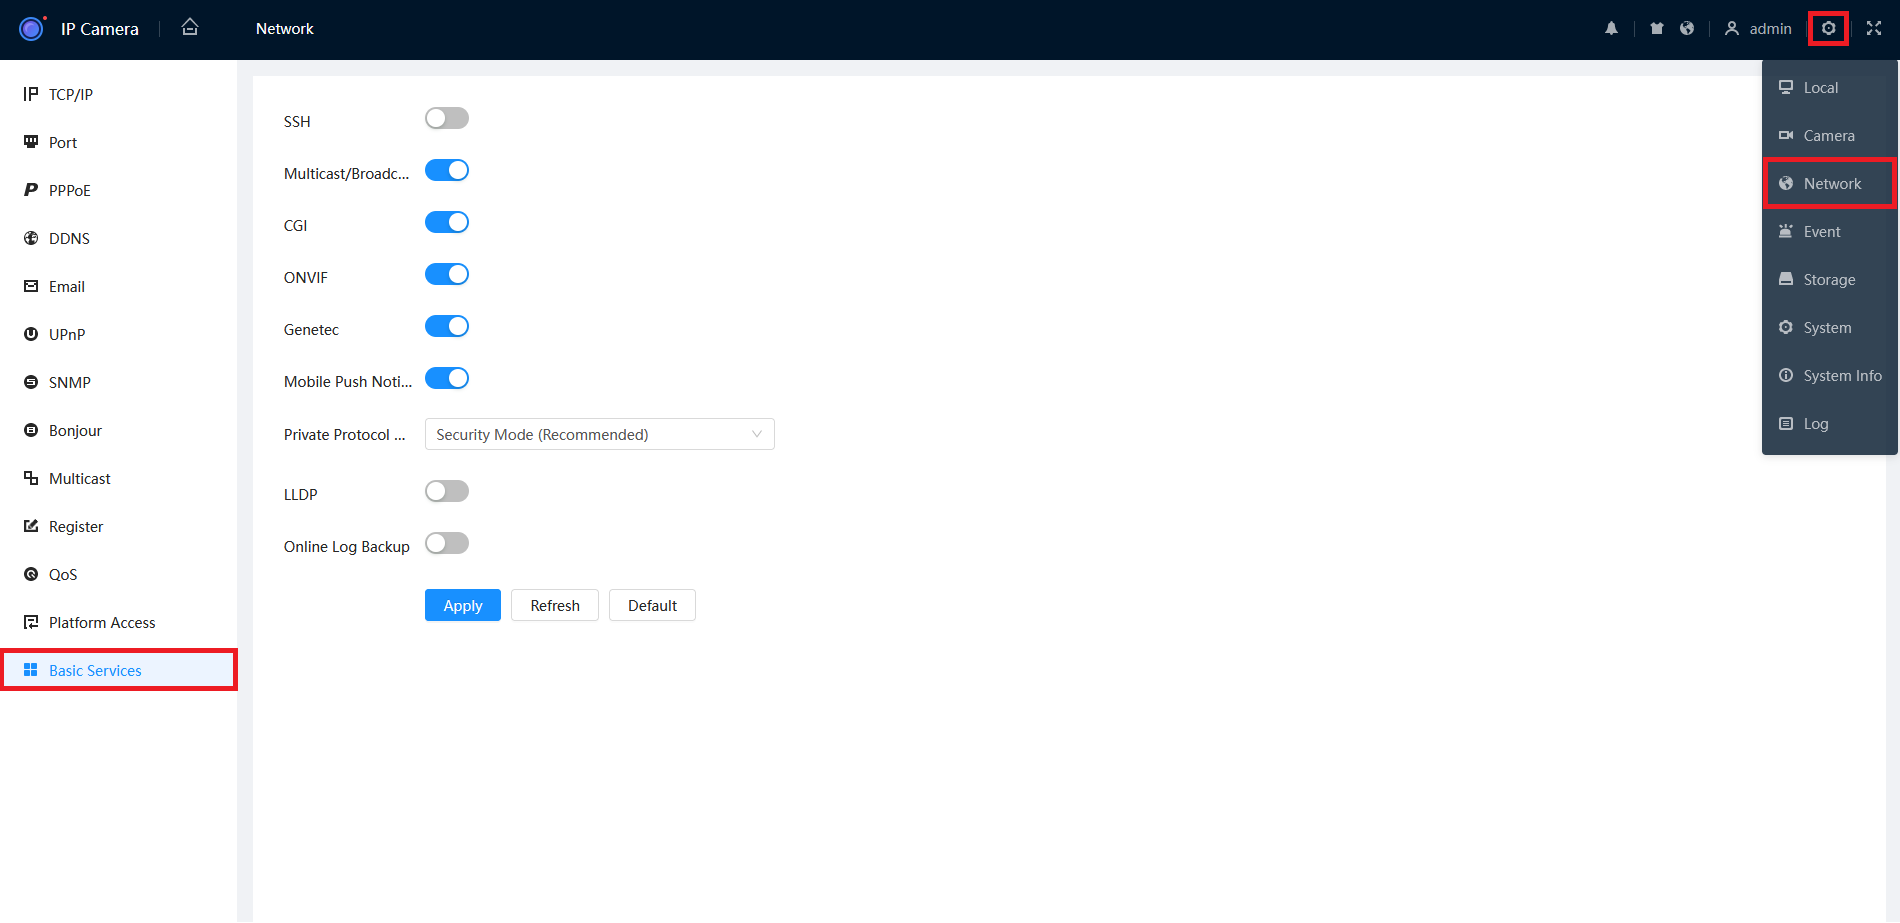
2. Set the Private Protocol to Compatibility Mode, then press Apply.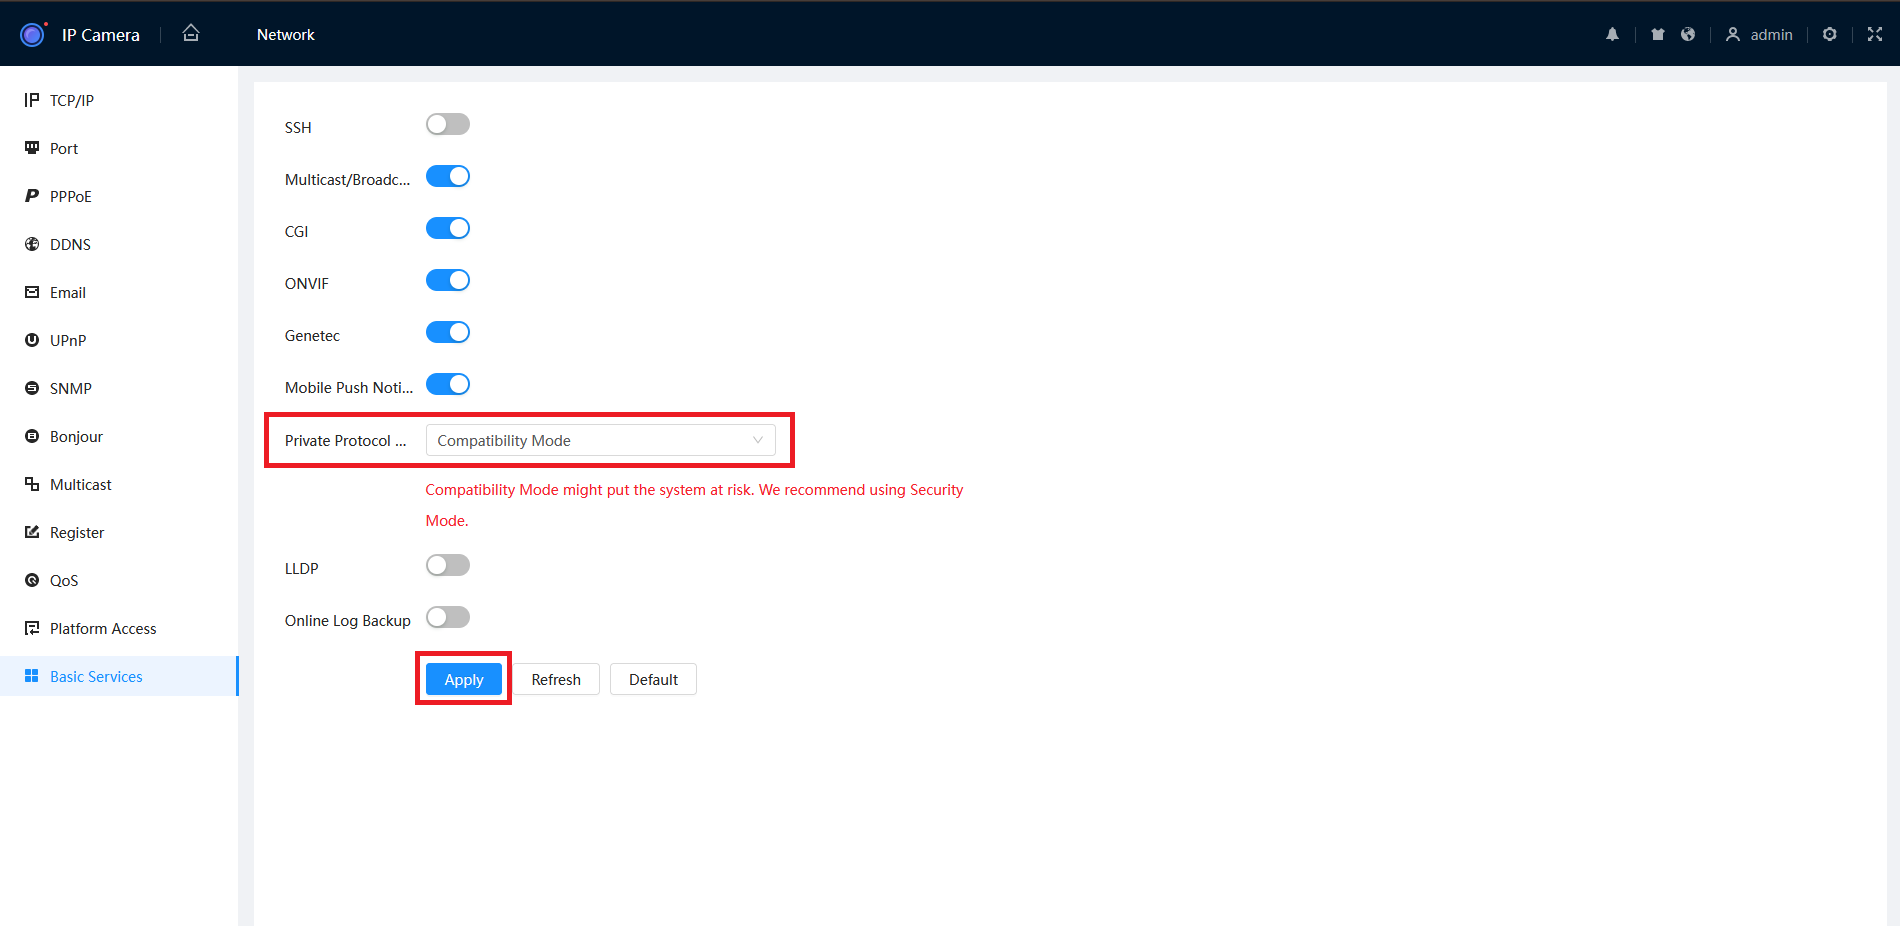
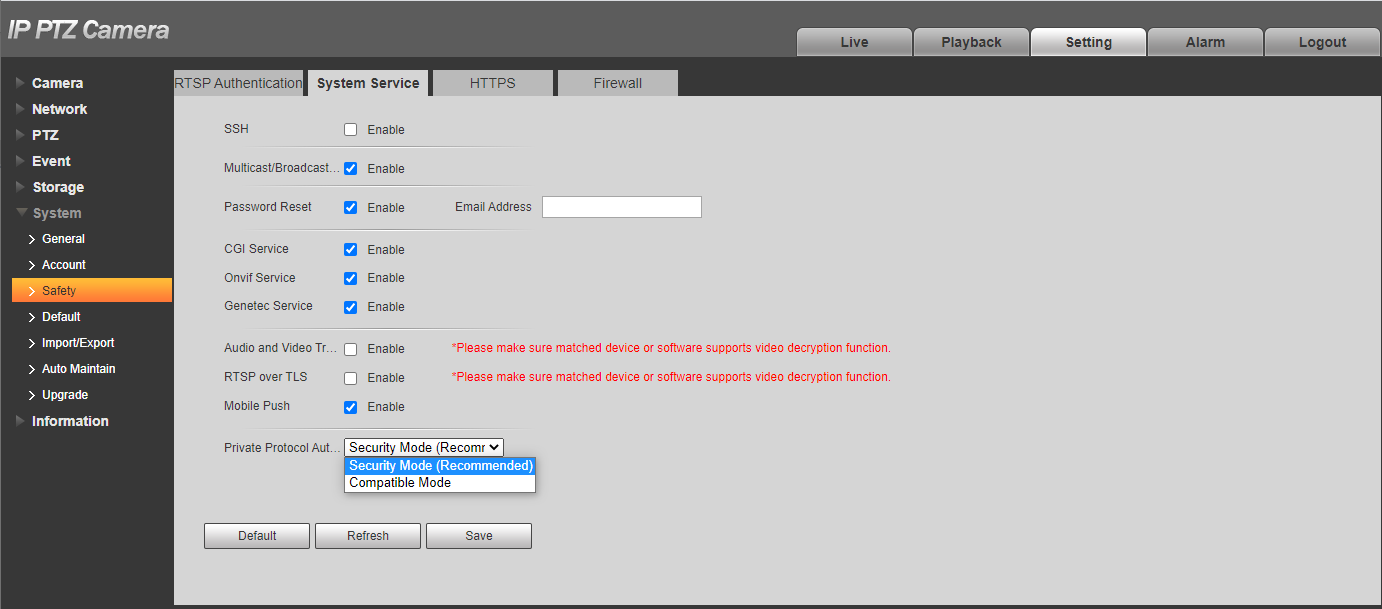
Enabling Compatibility Mode - Old GUI (Grey)
1. Navigate to Settings > System > Safety > System Service.
2. Set Private Protocol Authentication Mode to Select Compatible Mode.
NVR Compatibility Mode
Compatibility mode may be required when adding older IP cameras to a new NVR. 
1. From the Main Menu, select Security.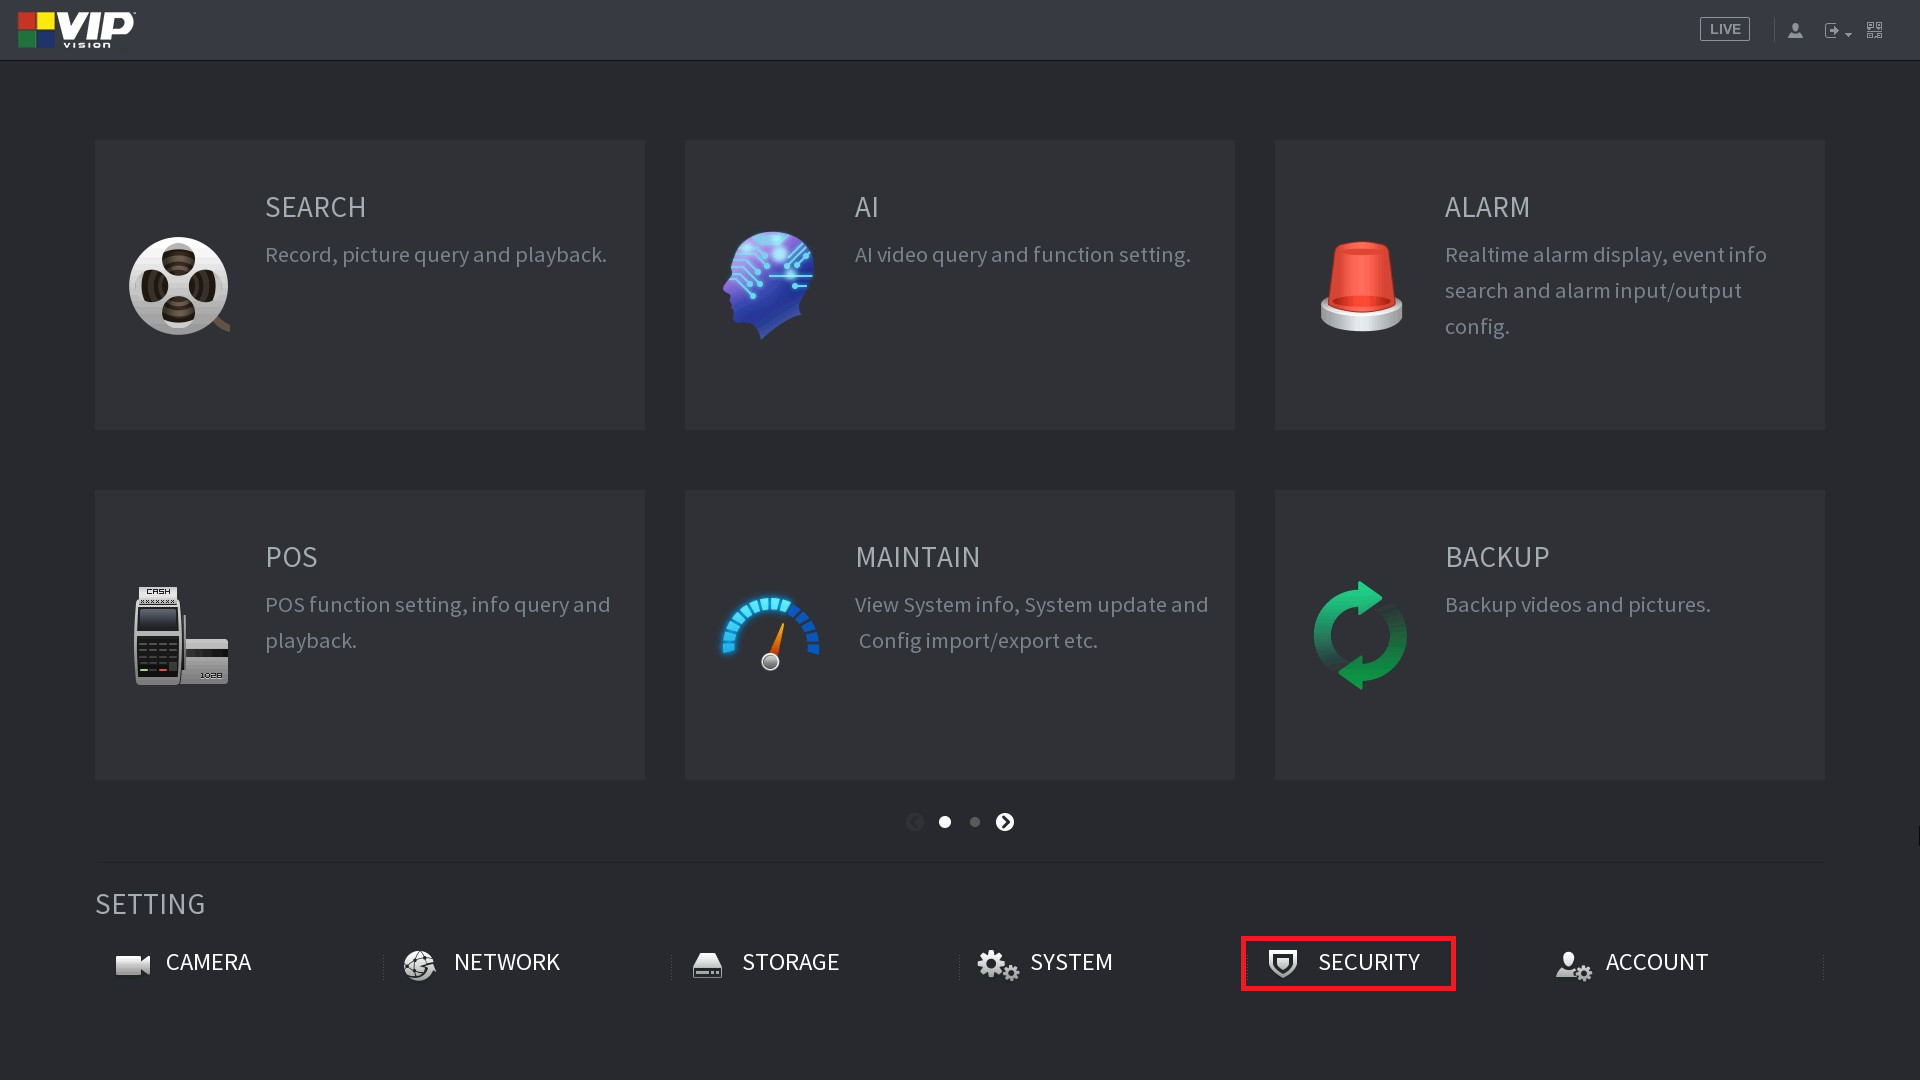
2. Select System Service

3. Change Private Protocol Authentication from Security mode to Compatible Mode. Select Apply/

Changing Encode Settings
When adding newer camera to older recorders, the cameras encode settings may have to be changed in order for the recorder to display and record video of that camera. Refer to the Data sheet of your devices for reference.


1. Navigate Main Menu > Camera Settings > Encode Settings.


2. Change Compression and Resolutions Setting of both Main Stream and Sub Stream to match Specifications of your Recorder.
(Sub stream resolution is generally fine to leave as default.)

Multiple Cameras connected to an NVR over multiple WT5-ULBs
In this example, there are multiple stations sending data back to one access point. This is useful if you have multiple buildings in the 120 degree field of view from the access point. The same steps as above are followed for configuration.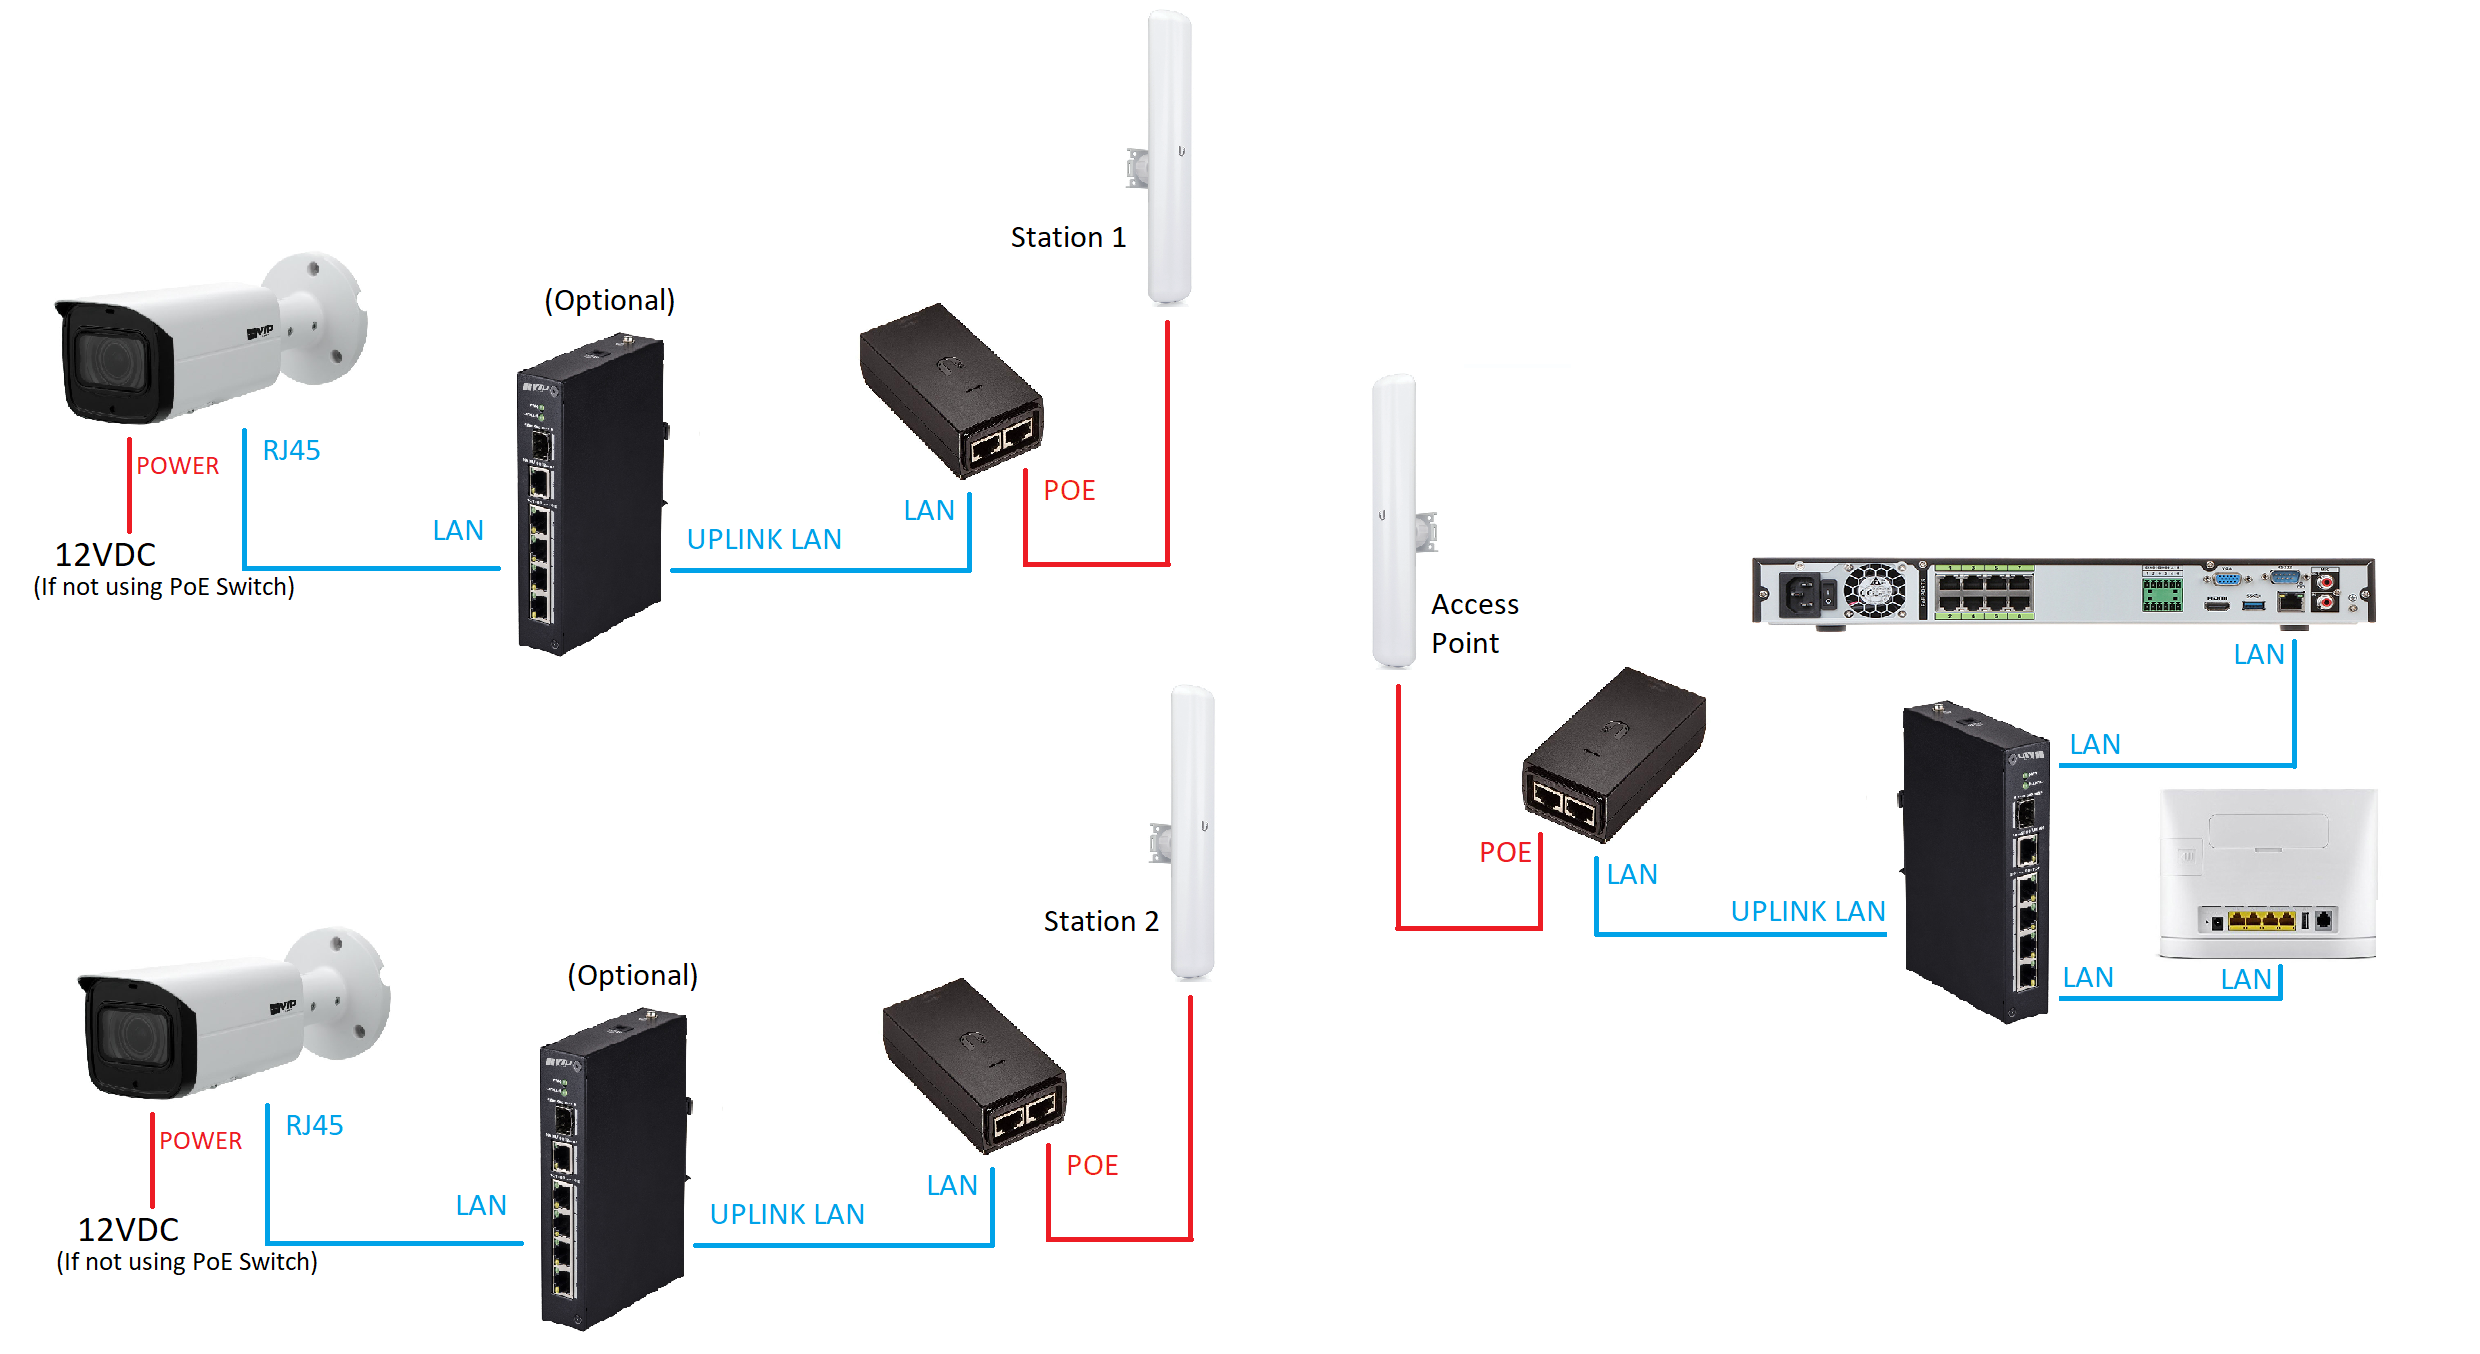
Configuring Remote IP Cameras
Cameras with Manufacturer Dates after 2018 will have to be Initialised before they can be used
Initialise Camera via NVR
Cameras that are connected to the POE of an NVR will be Initialised and configured Automatically
Initialise and Configure Cameras over Network
Some installations may require cameras to be added to the NVR over the network. This may be the case if the NVR doesn't have POE ports, or if a wireless bridge is involved in the installation. In this case the cameras need to be added to the NVR via a different method, see below for details.
Important Note
If this is a business installation, please make sure you consult with the Manager and/or IT department before installing any devices that will need to be connected to the network.
Installing a network device without approval and prior knowledge of how the network is setup, has the potential to cause critical devices to fail, bring down the network and even stop business' server/software from operating.
Please be advised the following instructions are only true for simple networks
Warning
When connecting cameras over the network, they must only connect to the NVR's LAN Port as shown in the above diagram.
Do not connect ANY Network Devices/Switches to the NVR POE Ports
Only Connect 1 IP Camera per channel of the NVR
Configuration via PC is required to address and initialise multiple cameras.
How to see check your IP Address and find available IP Addresses
Step 1 - CMD: Identify and Set an IP Address
If you are currently connected to a router or have internet access, that means a Router/Modem or Other Device is supplying your computer with an IP Address, Subnet Mask and Gateway. This process is Automatic and is called DHCP.
Info
To initialise, configure and connect to a device the computer must be in the same IP Address range.
Two devices on the same network, cannot have the same IP Address. If two devices have the same IP Address, a conflict will occur and both devices will stop working correctly.
Each network is different, and will have a different IP addresses range.
How to see check your IP Address and find available IP Addresses
Network Identification
To find the IP range on a network, or to find available IP addresses, follow the ...
To find the IP range on a network, or to find available IP addresses, follow the steps below.
Windows
Finding the IP Range of a Network
This is useful if you are unsure what the network details are, or if you have requested pre-programming. When pre-programming devices, we require these details.
1. Connect a Windows PC / Laptop, open the start menu and type cmd.
2. Launch the Command Prompt program.
3. Once it opens, enter the command ipconfig and take a screenshot or copy the information as below. We require the IP address, Subnet Mask and Default Gateway.
4. A screenshot can be taken by pressing the Windows + Shift + S keys simultaneously, then paste it into a document/email with Ctrl + V
Finding Available IP Addresses
If you wish to connect devices to the network for remote access, you must give each device an IP address, within your network range. In this example, we will be using a Windows computer which is connected to a modem to find the IP address of the computer, and available IP addresses to use for the devices. If the devices are being installed on a business or managed network, contact an IT representative for assistance.
1. Connect a Windows PC / Laptop, open the start menu and type cmd.
2. Launch the Command Prompt program.
3. Once it opens, enter the command ipconfig and take a screenshot or copy the information as below. Note down the IP Address, Subnet Mask and Default Gateway.
4. In our example, the IP address is 10.0.0.61. To check what IP address is available, type ping 10.0.0.XXX, where XXX is any number between 2 and 254. If Destination host unreachable or Request timed out is show on screen, there is no device using that IP address. Repeat the process to find multiple IP addresses that are available for use. Every devices requires one IP address. 10.0.0.XXX is used as an example, you the IP Address range will vary depending on the network.
5. When configuring the devices, use the IP addresses that you have found that are available, making sure each device has a unique IP address. The Subnet Mask and Default Gateway, will be set the same on each device.
MAC OSX
Finding the IP Range of a Network
This is useful if you are unsure what the network details are, or if you have requested pre-programming. When pre-programming devices, we require these details.
1. Open the Apple Menu ( ) and select System Preferences.
2. Select the Network option.
3. Select either Ethernet (for wired connections) or Wi-Fi (for wireless connections), then select advanced.
4. Select TCP/IP. The details in red are the network details.
5. A screenshot can be taken by pressing the Command + Shift + 3 keys simultaneously. The screenshot will be saved to the desktop
Finding Available IP Addresses
If you wish to connect devices to the network for remote access, you must give each device an IP address, within your network range. In this example, we will be using a Apple Mac which is connected to a modem to find the IP address of the computer, and available IP addresses to use for the devices. If the devices are being installed on a business or managed network, contact an IT representative for assistance.
1. Follow the steps for Finding the IP Range of a Network - Mac OSX.
2. Press Command + Space bar keys to bring up spotlight.
3. Type Terminal, and double click on the search result.
4. To check what IP address is available, type ping 192.168.1.XXX, where XXX is any number between 2 and 254. If Request timeout is show on screen, there is no device using that IP address. Repeat the process to find multiple IP addresses that are available for use. Every devices requires one IP address. 192.168.1.XXX is used as an example, you the IP Address range will vary depending on the network.
5. When configuring the devices, use the IP addresses that you have found that are available, making sure each device has a unique IP address. The Subnet Mask and Default Gateway, will be set the same on each device.
To access the devices you will need to be in the same range as them. See the guide below for how to change the IP Address of a Windows Computer.
Changing the IP Address of your Computer
Changing the IP address on a Windows Computer
1. Open Settings. 2. Select Network & Internet. 3. Select Status. 4. Select C...
Windows 10
- Open Settings.
- Select Network & Internet.
- Select Status, then Change Adapter Options.
-
Right-click the network adapter you want to change the IP address for, and select Properties.
-
Double-click the Internet Protocol Version 4 (TCP/IPv4) item.
- Click Use the following IP address and enter an IP address in the same range as the device you are trying to access. (E.g when trying to access 192.168.1.108 use a IP address in the 192.168.1.x range.) Note: This cannot be the same as the device you are trying to connect to or any other device on the same network. Save your changes on both windows.
- Type the IP address of the device you are trying to access into the address bar of your web browser.
- Once finished configuring the device, change the adapter settings back to normal by following steps 1-5 and clicking Obtain an IP address automatically.
Windows 11
1. In the Windows search bar at the bottom of the page, type Control Panel and press enter.
2. Select Network and Internet.
3. Select Network and Sharing Centre.
4. Select the link for Connections in the network that you want to change the IP address for.
5. Select Properties.
6. Double-click the Internet Protocol Version 4 (TCP/IPv4) item.
7. Click Use the following IP address and enter an IP address in the same range as the device you are trying to access. (E.g when trying to access 192.168.1.108 use a IP address in the 192.168.1.x range.) Note: This cannot be the same as the device you are trying to connect to or any other device on the same network. Save your changes on both windows.
8. Type the IP address of the device you are trying to access into the address bar of your web browser.
9. Once finished configuring the device, change the adapter settings back to normal by following steps 1-6 and clicking Obtain an IP address automatically.
See the video below for a visual guide of the steps above:
Shortcut
1. In the Windows search bar at the bottom of the page, type Ncpa.cpl and press enter.
2. Right-click the network adapter you want to change the IP address for, and select Properties.
3. Select the Internet Protocol Version 4 (TCP/IPv4) item.
4. Click Use the following IP address and enter an IP address in the same range as the device you are trying to access. (E.g when trying to access 192.168.1.108 use a IP address in the 192.168.1.x range.) Note: This cannot be the same as the device you are trying to connect to or any other device on the same network. Save your changes on both windows.
5. Type the IP address of the device you are trying to access into the address bar of your web browser.
6. Once finished configuring the device, change the adapter settings back to normal by following steps 1-3 and clicking Obtain an IP address automatically.
See the video below for a visual guide of the steps above:
Initialise the cameras
The camera(s) will need to be connected to a computer via ethernet into a POE switch or powered by 12 volt.
You can access the Web interface by entering the cameras default IP address of (192.168.1.108) into a web browser.
You may need to change the IP address of your Computer to be able to reach the IP address of the camera.
Changing IP of Windows Computer
Changing the IP address on a Windows Computer
Windows 10
- Open Settings.
- Select Network & Internet.
- Select Status, then Change Adapter Options.
-
Right-click the network adapter you want to change the IP address for, and select Properties.
-
Double-click the Internet Protocol Version 4 (TCP/IPv4) item.
- Click Use the following IP address and enter an IP address in the same range as the device you are trying to access. (E.g when trying to access 192.168.1.108 use a IP address in the 192.168.1.x range.) Note: This cannot be the same as the device you are trying to connect to or any other device on the same network. Save your changes on both windows.
- Type the IP address of the device you are trying to access into the address bar of your web browser.
- Once finished configuring the device, change the adapter settings back to normal by following steps 1-5 and clicking Obtain an IP address automatically.
Windows 11
1. In the Windows search bar at the bottom of the page, type Control Panel and press enter.
2. Select Network and Internet.
3. Select Network and Sharing Centre.
4. Select the link for Connections in the network that you want to change the IP address for.
5. Select Properties.
6. Double-click the Internet Protocol Version 4 (TCP/IPv4) item.
7. Click Use the following IP address and enter an IP address in the same range as the device you are trying to access. (E.g when trying to access 192.168.1.108 use a IP address in the 192.168.1.x range.) Note: This cannot be the same as the device you are trying to connect to or any other device on the same network. Save your changes on both windows.
8. Type the IP address of the device you are trying to access into the address bar of your web browser.
9. Once finished configuring the device, change the adapter settings back to normal by following steps 1-6 and clicking Obtain an IP address automatically.
See the video below for a visual guide of the steps above:
Shortcut
1. In the Windows search bar at the bottom of the page, type Ncpa.cpl and press enter.
2. Right-click the network adapter you want to change the IP address for, and select Properties.
3. Select the Internet Protocol Version 4 (TCP/IPv4) item.
4. Click Use the following IP address and enter an IP address in the same range as the device you are trying to access. (E.g when trying to access 192.168.1.108 use a IP address in the 192.168.1.x range.) Note: This cannot be the same as the device you are trying to connect to or any other device on the same network. Save your changes on both windows.
5. Type the IP address of the device you are trying to access into the address bar of your web browser.
6. Once finished configuring the device, change the adapter settings back to normal by following steps 1-3 and clicking Obtain an IP address automatically.
See the video below for a visual guide of the steps above:
Initialise camera via Web interface 5.0
- Select your Region and Language.
- Select your Time Zone, then press Sync with PC to sync your cameras time with the PCs time.
- Enter a password and recovery email.
- Ensure P2P is enabled, then press Next.
- Click End.
Initialise camera Via Web Interface 3.0
1. Initialize the camera by entering a new password (It will need to be at least 8 characters long), then click Save.
2. Ensure P2P is enabled and click Next
3. Click Next.
4. If prompted, select a region and click Save
Initialise Camera Via Config Tool
The Initialisation process can also be performed using the latest version of our Config Tool - Please see the images below showing how this is done. To speed up the process the Config Tool also allows you to initialise multiple cameras at once.
- Download and open Config Tool.
- Put a check in the box next to the device you would like to Initialise, and select the Initialize button.
- Select the Initialize button.
- Enter a password, that is at least 8 characters, and is a mix of letters and numbers. Enter an email address, this will be used if the password is ever forgotten. Select Next.
- Depending on the installation requirements, you can check or uncheck the boxes for Easy4IP (P2P Remote Access) and Auto-check for updates. Select OK.
- If the status shows as Initialized, the process was completed successfully.
Optional - Initializing Network Cameras via the NVR
In some installations you may find it easier to initialize cameras directly from the recorder, this method works best when adding a few camera.
- Right click and select Main Menu, then Camera.
- Select Device Search.
- Select the cameras you wish to initialise, then click Initialize.
- Select Next.
- Enter the IP Address, Subnet Mask and Default Gateway, then click Next.
NOTE: When Initialising more than one camera, the last section of the IP address will be incremented by the Incremental Value.
- Select OK.
- Select the Cameras you wish to add, then select Add.
Change IP address of a Camera
Changing IP through Web Interface
- Log Into Camera Web interface By entering IP into a browser
- From Main Menu Go to Network Settings
- Change Network Settings to suit network that camera will be connected to and hit apply.
Change IP Address With Config Tool
-
Select Search Setting, and enter the password for the device. Select OK.
-
Put a tick the box next to the device(s) you would like to change the IP address of, and select Batch Modify IP.
- Enter the Start IP address, Subnet Mask and Default Gateway for the device, in this example we are going to start from 192.168.1.160. If you have multiple devices selected, the first device will be addressed as 192.168.1.160, the second 192.168.1.161, the third 192.168.1.162, and so on. Select OK.
- The IP address of the device will now be set. If you encounter any errors, ensure the password in Search Setting is correct, and there are no errors in the IP Address.
Recorder Network Configuration
To Ensure the Recorder Network Settings Are correct follow Steps Below.
- Right click and select Main Menu. Login to the recorder's using your username and password.
- Select Network, then TCP/IP. Select the pencil icon next to the network port, on some recorders there will be the option to select from multiple network ports, select the one that the cameras are going to be connected to.
- Ensure DHCP is turned off, and enter the IP Address, Subnet Mask, and Default Gateway for the recorder. In our example we are using 192.168.1.150 for the IP address, 255.255.255.0 for the Subnet Mask, and 192.168.1.1 for the Default Gateway. Select OK.
- Select Apply to save your changes. The IP address of the recorder is now set.
Adding Cameras to the Recorder
- Login to Main Menu of NVR, then Select Camera, then Camera List.
- Select Search Device. The cameras that are connected should be listed in the top list.
- Select the check box next to the camera/s, then select Add. If you cannot see any cameras, select Manual Add, and enter the IP Address, username and password and select OK.
- The camera/s should now be added to the bottom list, and the status green. If the status is red, select the modify button, and ensure the password is entered correctly and select OK.
Wiring a NVR with 2x LAN Ports
The below example shows a NVR with 2 LAN ports. In this example LAN 1 is being used to connect to a PoE switch with cameras on it, and LAN 2 is being connecting to the modem to provide network access to the recorder.
Additional Initialisation Steps
conf.LoginErrorNo-18 or Config Error 18
Config Error 18 or conf.LoginErrorNo-18 means that a camera needs to be initialised before it can be used on the NVR.
Follow the Steps above to Initialise the Camera.
conf.LoginErrorNo-20 or Config Error 20
On some older model recorders, the "Config Error 20"/"conf.LoginErrorNo-20" error may be seen on the Live-View Page when trying to add a new camera. The cameras will need to have Compatibility mode enabled via its web interface.
Accessing Web Interface
Cameras Plugged into NVR
Cameras Plugged directly into NVR can be Accessed in two different ways, Through the NVR's Web interface or by putting a computer into the NVR's Internal Switch Range.
NVR Web Interface
1. Make sure you have a Connection to the NVR like below
2. On your Computer enter the address of the recorder in your browser.
3. Enter the recorders username and password.
4. Select Setting > Camera > Camera List.
5. Next to each camera, there will be a icon. Select the icon next to the camera you wish to connect to.
6. A new tab will open, Bringing up the Login page for the Cameras Web interface.
NVR Internal Switch
Network Setup with Pc going into NVR internal Switch.
1. Change Computers IP to be in same range of NVR (Usually 10.1.1.X) This can also be found in
Main Menu > Network > Switch
2. Log into Camera Web Interface Be Entering Ip Address into Browser (10.1.1.60)
Network Camera
1. Log into Cameras Web interface by typing it into your browser (e.g. 192.168.1.100)
2. Enter In Username And Password of the Camera
Enable Compatibility Mode - New GUI (white/Blue)
1. Navigate to Setting > Network > Basic Services.
2. Set the Private Protocol to Compatibility Mode, then press Apply.
Enabling Compatibility Mode - Old GUI (Grey)
1. Navigate to Settings > System > Safety > System Service.
2. Set Private Protocol Authentication Mode to Select Compatible Mode.
NVR Compatibility Mode
Compatibility mode may be required when adding older IP cameras to a new NVR.
1. From the Main Menu, select Security.
2. Select System Service
3. Change Private Protocol Authentication from Security mode to Compatible Mode. Select Apply/
Changing Encode Settings
When adding newer camera to older recorders, the cameras encode settings may have to be changed in order for the recorder to display and record video of that camera. Refer to the Data sheet of your devices for reference.
1. Navigate Main Menu > Camera Settings > Encode Settings.
2. Change Compression and Resolutions Setting of both Main Stream and Sub Stream to match Specifications of your Recorder.
(Sub stream resolution is generally fine to leave as default.)
WiFi via an Access Point across a pair of WT5-ULBs
Using a Switch between the AP's POE injector and the Station's PoE injector will allow you to connect multiple cameras/devices. If you do so, we recommend that the ethernet cable that runs between the Switch and the PoE Injector is plugged into the uplink or gigabit port on the Switch.
