 |
DMSS is a remote surveillance app that can be used to access your security products remotely. You can configure a whole range of push notifications in the DMSS app.
|
DMSS Account
As of July 2025 Each user must Create a DMSS account with an unique email. The Devices added by this account are bounded and cannot be added by another user, this is to strengthen security and better control who is able to view said device. Each New Account who wishes to view the cameras will need to have the device shared to them by the original account it was bound to.
Adding/Removing Devices To DMSS
How to add devices to DMSS via P2P
1. Select the Plus Icon At the Top Right.

2. Select Scan QR Code

3. Scan the QR code for your Device's Serial Number, then click Next
Finder Serial Number
Finding Serial Number/QR Code for P2P access
A Products Serial Number/QR code can be Found in two ways. Either on the Devices Box.

Or through the Devices Interface.
NVR/CVR
A Recorder Serial Number Can be Found Via Main Menu > Network > P2P And it is the QR code on the RIght.


VTO
Old GUI
A VTO Serial Number can be found logging into Web Interface > Network


New GUI
A VTO Serial Number can be found logging into Web Interface > Network > Cloud Access


If you don't have a QR code, Select Manually Enter SN button and enter the serial number of your device manually.

4. After scanning your be prompted to enter the device password

5. Wait for Binding to Finish

7. Give the Device a Name and adjust Time Zone, when finished tap get started to be taken back to home screen.

8. This Is How It Will Appear on Your Home Screen

Adding Devices Via IP/Domain
If you wish to add a device to DMSS via it's IP address out side of the local network you will need to use Port Forwarding.
If you are unfamiliar with Port forwarding, we suggest that you use the P2P method outlined above.
1. Select Plus Button at top Right

2. Select IP/Domain

3. Select Device Type.
NVR for an NVR for a recorder with IP cameras
DVR/XVR for a recorder with CVI cameras
VTO for a Door Station
Wired Camera for a standalone Camera connected to a switch or router

4. Select on Which Protocol/ Add Mode You Will be Using

5. Enter the NVR Information Address, Name, Username, Device Password and Select Save

Add Device Over Local Network
1. Select Plus Icon At the Top Right.

2. Devices on the Same Network will Appear here.

3. Select Your Device From The ones Listed

4 . Select Add Mode And Select P2P or Domain (Note Selecting Domain/IP will allow access while on the same Network as the device)

Video Guide
|
|
Sharing Devices to Another Account
1. On Home Menu Select the 3 dots of the device you wish to share.

2. Select Share Device.

3. Select if you want to share the Entire Device or Just share Particular Channels.

4. If Sharing Entire Device, enter the target DMSS account you want it shared with and select what permissions you want that account to have access to.


5. If Sharing Channels Select the Channel(s) you want to share.

6. Select what permissions they will have and hit save.

7. Enter in the Target DMSS account you want it shared to

8. Successfully Shared Devices

Revoking/Changing Permissions for DMSS Shared Devices
If for any reason a shared needs to have their permission revoked follow Steps Below
1. On the Home Screen Select the Device you want to manage.
2. Select Share Device.

3. Select Devices and then the User you want to manage. 

4. If want to change permission, Select Edit Permissions and Hit Save.


5. To Revoke Access and Cancel Sharing Tap on the Cancel Sharing Button and Confirm, the device will be immediatly removed from the users Device and they will no longer have access.


Deleting Devices of DMSS
1. On the Device List Tap on the Three Dots on the device you wish to delete.
2. Tap on Device Details

3. Tap on the Arrow at the top right

4. scroll down the bottom and select Delete

5. Confirm and the device will no longer be listed or bound to your account.

Enabling Notifications on DMSS
1. On the Home Page select the three dots of the device.
2. Then Top on Device Details

3. Select Message

4. Select Notification and turn it for its Blue and Select Receive Messages and Send Notifications if you want want both messages and notifications. and Select Alarm Message Type

5. Select Notification type the you want to receive.
Note you will only receive notifications types that already enabled on your device ( e.g. Intrusion/tripwire is set up and enabled in IVS)

6. Select which Channels you want to get notifications from.

7. you can easily turn off notification per channel form the main view.

8. An example of a Notification

Video Guide
|
|
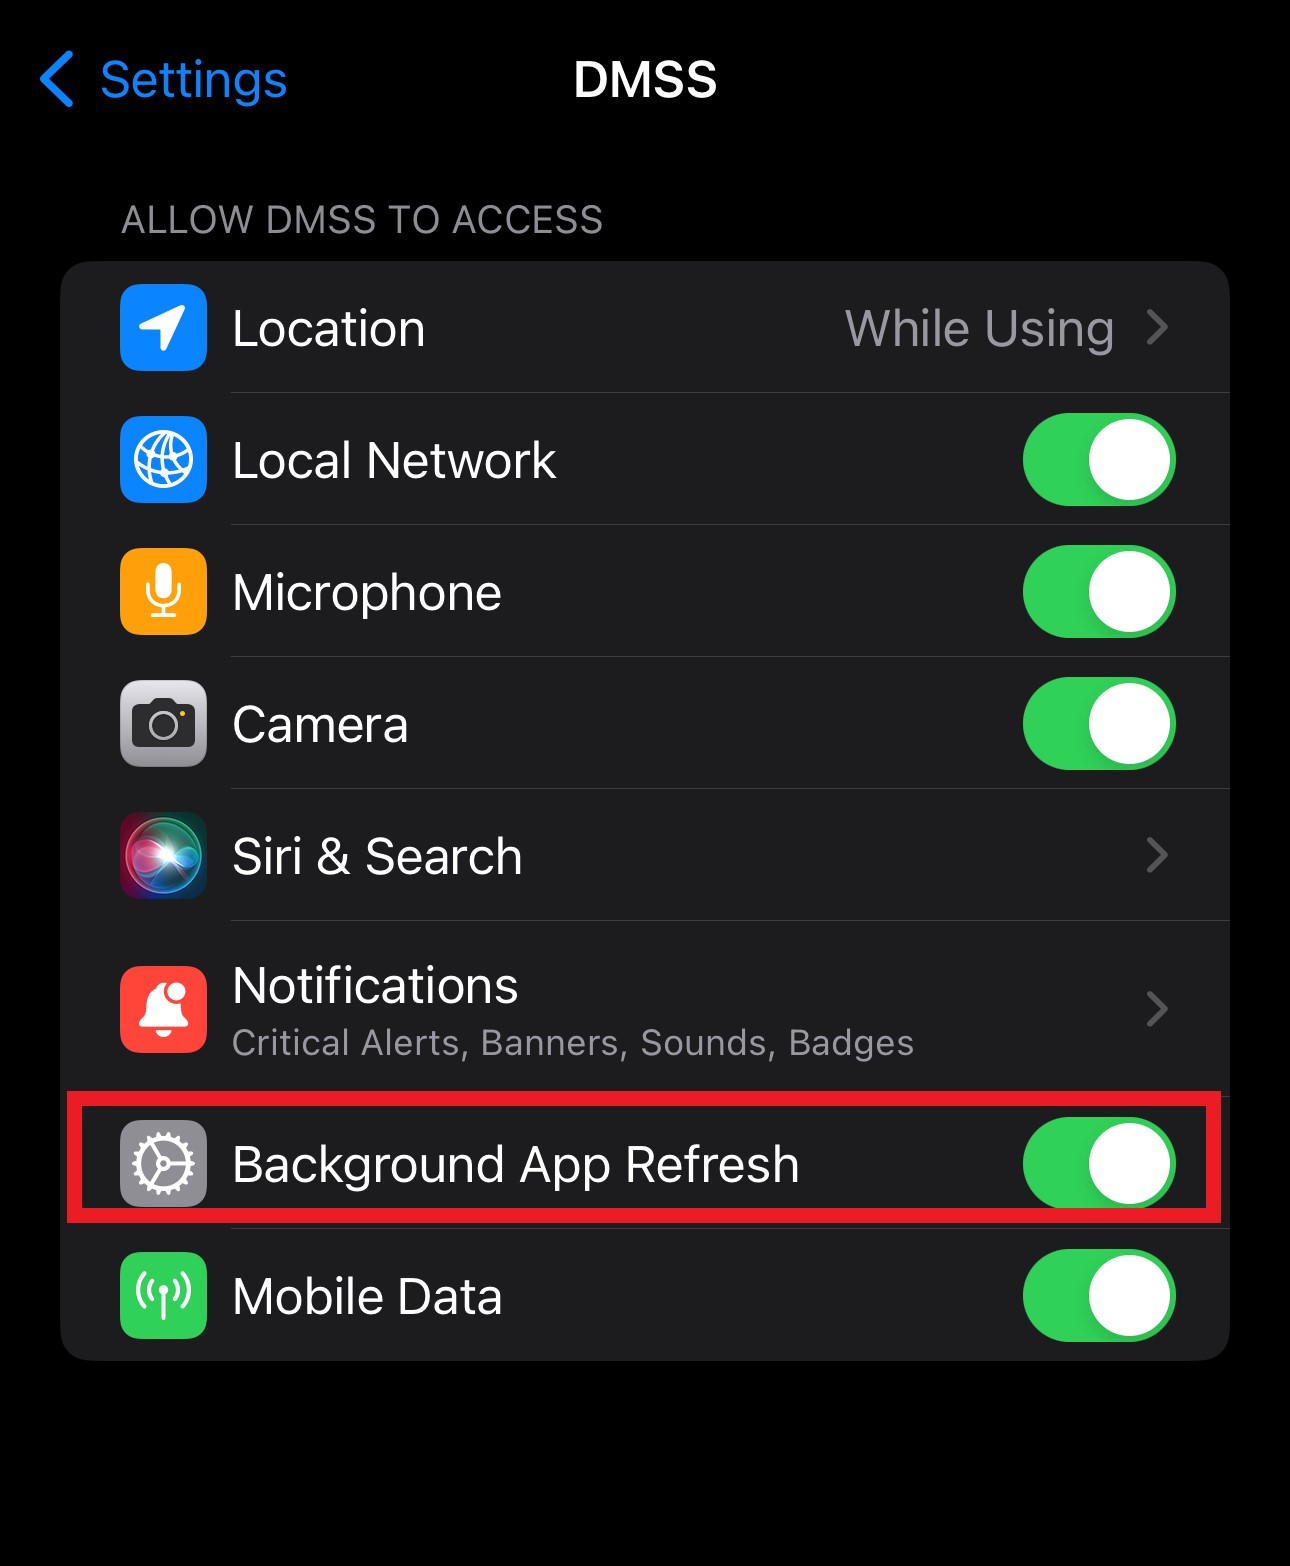
Notifications from Intercom devices
While adding Intercoms to the DMSS app,
The Intercom unit should be added under a DMSS account.
Also, make sure the Background app refresh is 'enabled' and also the show previews is set to 'Always'

Live View
To live View on DMSS follow steps below.
1. On Home Screen, Tap on the Play of the device you want to play.
you can also tap on the device name to expand all the channels if only wanting to view one channel.
2. Your will be taken to the live view page where you can live view channels (The Buttons Below May Change Dependent in the Model Of Camera Currently Viewing.)

(Different Camera Model's options)

I. Double tapping on the channel will focus on that channel
ii. Tapping on the rotate button will rotate the screen and Fullscreen the channel

iii. This Unmutes the channel is the the channel has audio enabled
iv. This Changed how many channels are shown in the split

V. This changes the Steam from either Sub Stream (SD), or Main Stream (HD), please keep note of the change in data usage from SD to HD is substantial.
Playback
To View Previous Footage Follow Step Below.
1. Tap on the play button of the device or the channel you wish to playback on
2. On the live view Tap Playback

3. the playback menu will then show.

I. You can swipe to scroll through the playback footage and any events that occurred.
II. You can change the Date of the playback footage. Dates with footage will have blue dots.

III. You can filter by Footage type. 
IV. This changes the view from timeline to Blocks os time with Events.

V. This will Show only Events in Block View

Backup
On live view you can take a screenshot or start a recording for a short clip.

I. Takes a snapshot
II. Starts a stops a recording.
On the Playback View you can also take a snapshot or a short video

I. Take a Snapshot.

II. Starts a stops a recording.
III. Shows footage an hour blocks and any events that happened between those hours for quick download. 
IV. Opens up the quick Snippet menu.

1. Swipe through footage to get the period of footage you want
2. Adjust the start and end times for more precise timings.
3. Tap Download to start the download.
You Must first Export Images and Recordings From DMSS to be used with you device's photo gallery etc.
Saved Images and videos get saved into the Albums Folder.
1. On the Home Screen, tap Me. 
2. Then Tap on My Files

3. Saved Recording and Images are stored here.

4. Long Press on an image or press select button to select the ones you want to export.

5. Tap on the Save To export, or Share straight from DMSS.
Troubleshooting
Notifications
1. If Notifications have been set up correctly and are enabled in the device settings. Check if notifications are enabled by channel as well.


2. Check Permissions.
Android
1. On your Android Device go
System Settings > Apps > DMSS > Notifications. 
2. Enable Notifications,
Allow sound and Vibration,
Allow all notifications types
change lock screen notifications to Show content.

IOS
1. On your IOS device go
Settings > Notifications > DMSS 
2. Enable Notifications
Allow Critical Alerts
Allow Notification Types
Change Show Previews to Always

Account Binding
If trying to add the device and you get the error screen the device is already bound to another account.

1. If it is a Shared Device, such as in a home, Have the other user Share the Device to your DMSS account.
2. If it is a known Email you can Request for them to delete the device off thier account, this will unbind automatically.
3. you can also request to unbinding the device, this will unbind and delete the device from the bounded account.

1. Enter in Device Password
2. select to unbind Immediately
3. If Successful you will get a message that the device has been unbound, you can then add the device normally.

Sometimes you may also be asked to take a picture of the QR on the back of the Device as well as a 4 digit code written on a piece of paper
Remote Configuration
Some Remote Configuration of a Device can be done through DMSS, Below are some Examples of most common
Arming/Disarming
1. In Either Device Details Or Remote Configuration tap Arming Settings/ Arm/Disarm By Period.


2 . Change Arming State Arm, Disarm or Arm by Period,

3. Tap on Period to change arm by period time.

Checking Disk Status/Recording period
1. In Device Details Select More.

2. Select Remote Configuration.

3. Select Storage Manager to view Status of storage device(s)


4. Select Recording Plan

5. Select Pencil top right, Adjust Record Plan as needed.


Video Stream/Image Settings
1. In Remote Configuration tap on Camera Settings, Video Stream.

2. Select Channel

3. Adjust Settings as Required

4 . In Remote Configuration tap on Image Adjustment

5. Select Channel
6. Adjust Settings as needed
Zoom

Rotation/Flipping

Image Settings (Brightness, contrast etc.)
