When installing IP cameras and Network Video Recorders, it is good practice to bring a Window’s laptop or computer to site so you are able to troubleshoot, test and reconfigure devices, as this will give you the best chance to identify any potential problems, as well as allow a technician to assist.
Below is a list of some of the more common issues you may come across and what you can do to fix them.
No Image or "Decode Disable" Displayed on NVR
This refers to the screen displaying "Decode Disable" or not displaying anything at all. If you can still use the NVR, login and access he main menu, but cannot see your cameras, please go to the next section, No Camera Image.
If the NVR powers up but only displays the words "Decode Disable", the HDMI/VGA cable is in the wrong port. For example, if the NVR has 2 HDMI ports, make sure the monitor is connected to HDMI1.
If you can see the white start-up page when the NVR is powering on, then it goes blank, the connected monitor or TV's resolution does not match the NVR's currently selected resolution.
If the NVR has a SHIFT button on the front panel, power off the NVR, hold the shift button down and turn the power on while continuing to hold the shift button until you see the camera screen. If this doesn't work, or there is no shift button, try the same process with the middle mouse button/scroll wheel button.
If after 2 minutes there is still no image, verify the screen is still working properly by displaying video from another device (PC, Laptop, game console). Alternatively try and connect the NVR to another monitor, preferably with a higher resolution.
If the above steps do not work, you can login to the NVR's Web Interface with a PC to change the display settings.
Accessing the Web Interface of an NVR
There are 3 ways to access the web interface of an NVR.
- Logging in directly using the IP address.
- Logging in via SmartPSS
- Logging in via SmartPSS Lite
Logging in to NVR Directly
Connect your device to the same network as your NVR Either through a Switch or directly to the LAN port of the NVR.

Depending on how your network and NVR are Configured you may have to change the IP of the device so it is the same IP range of the NVR.
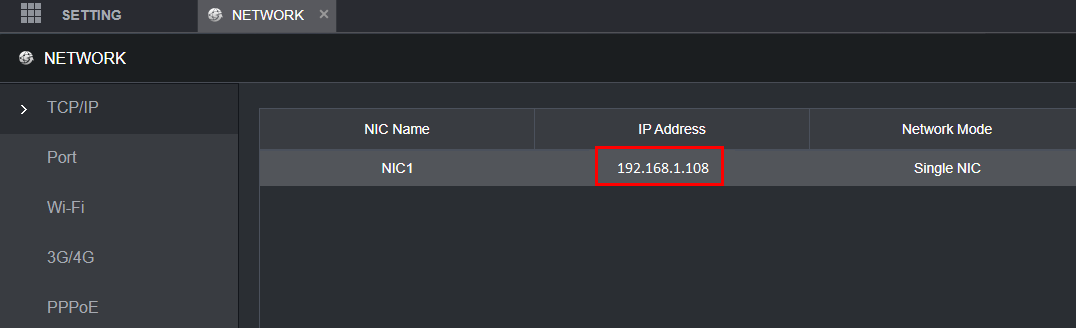
To Find IP of Recorder, got to Main Menu > Network > TCP/IP and note down the IP of your NVR.
Changing the IP address on a Windows Computer
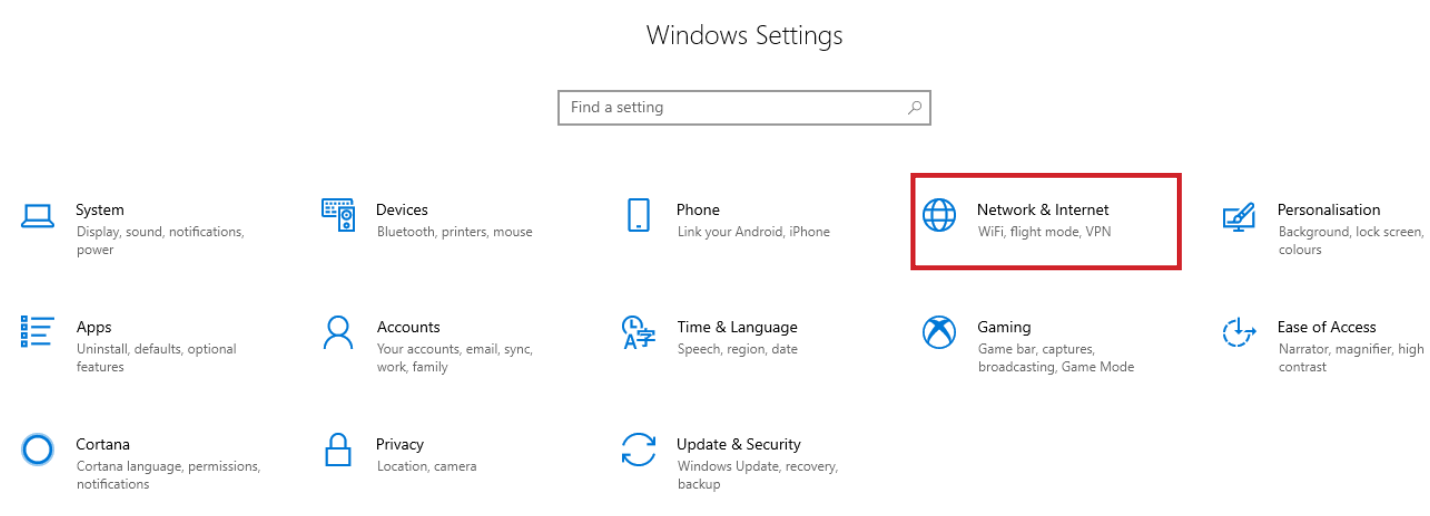
Windows 10
- Open Settings.
- Select Network & Internet.
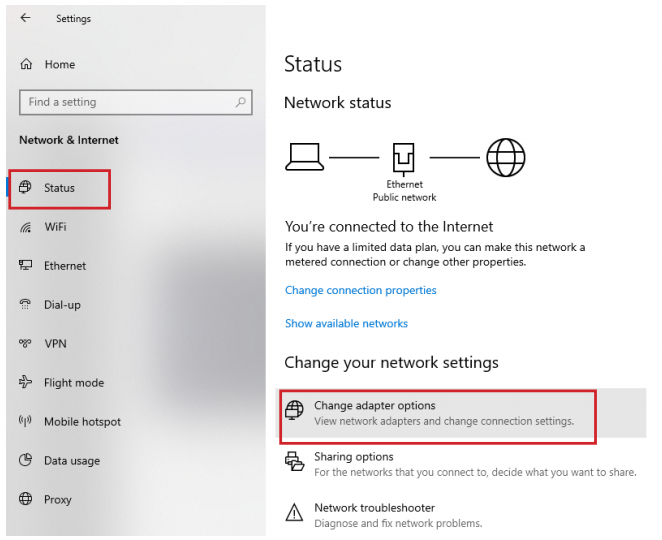
- Select Status, then Change Adapter Options.
-
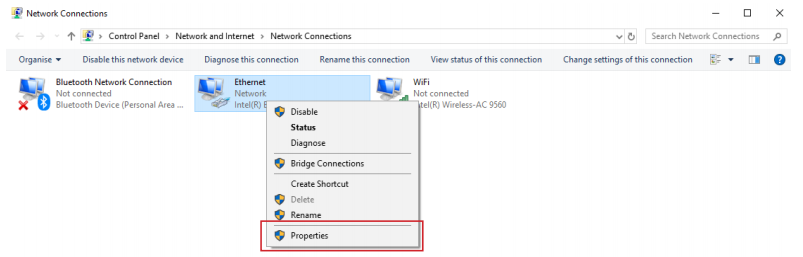
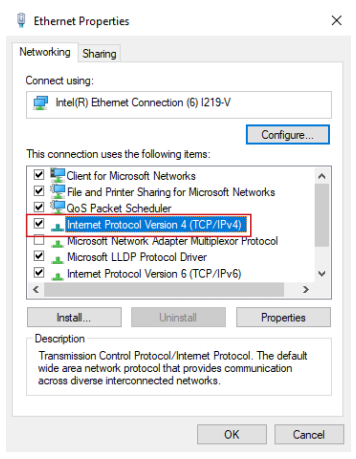
Right-click the network adapter you want to change the IP address for, and select Properties.
-
Double-click the Internet Protocol Version 4 (TCP/IPv4) item.
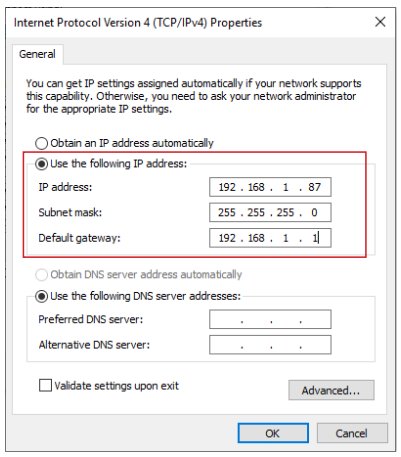
- Click Use the following IP address and enter an IP address in the same range as the device you are trying to access. (E.g when trying to access 192.168.1.108 use a IP address in the 192.168.1.x range.) Note: This cannot be the same as the device you are trying to connect to or any other device on the same network. Save your changes on both windows.
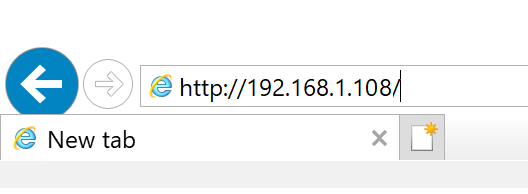
- Type the IP address of the device you are trying to access into the address bar of your web browser.
- Once finished configuring the device, change the adapter settings back to normal by following steps 1-5 and clicking Obtain an IP address automatically.
Windows 11
1. In the Windows search bar at the bottom of the page, type Control Panel and press enter.
2. Select Network and Internet.

3. Select Network and Sharing Centre.

4. Select the link for Connections in the network that you want to change the IP address for.

5. Select Properties.

6. Double-click the Internet Protocol Version 4 (TCP/IPv4) item.

7. Click Use the following IP address and enter an IP address in the same range as the device you are trying to access. (E.g when trying to access 192.168.1.108 use a IP address in the 192.168.1.x range.) Note: This cannot be the same as the device you are trying to connect to or any other device on the same network. Save your changes on both windows.

8. Type the IP address of the device you are trying to access into the address bar of your web browser.
9. Once finished configuring the device, change the adapter settings back to normal by following steps 1-6 and clicking Obtain an IP address automatically.
See the video below for a visual guide of the steps above:
Shortcut
1. In the Windows search bar at the bottom of the page, type Ncpa.cpl and press enter.
2. Right-click the network adapter you want to change the IP address for, and select Properties.
3. Select the Internet Protocol Version 4 (TCP/IPv4) item.

4. Click Use the following IP address and enter an IP address in the same range as the device you are trying to access. (E.g when trying to access 192.168.1.108 use a IP address in the 192.168.1.x range.) Note: This cannot be the same as the device you are trying to connect to or any other device on the same network. Save your changes on both windows.
5. Type the IP address of the device you are trying to access into the address bar of your web browser.
6. Once finished configuring the device, change the adapter settings back to normal by following steps 1-3 and clicking Obtain an IP address automatically.
See the video below for a visual guide of the steps above:
Once Device is in Same Range of the NVR. On the computer, open Internet Explorer and enter the IP address of the recorder.
If Device is in same range and the IP Address is correct, you will be Prompted with a login page.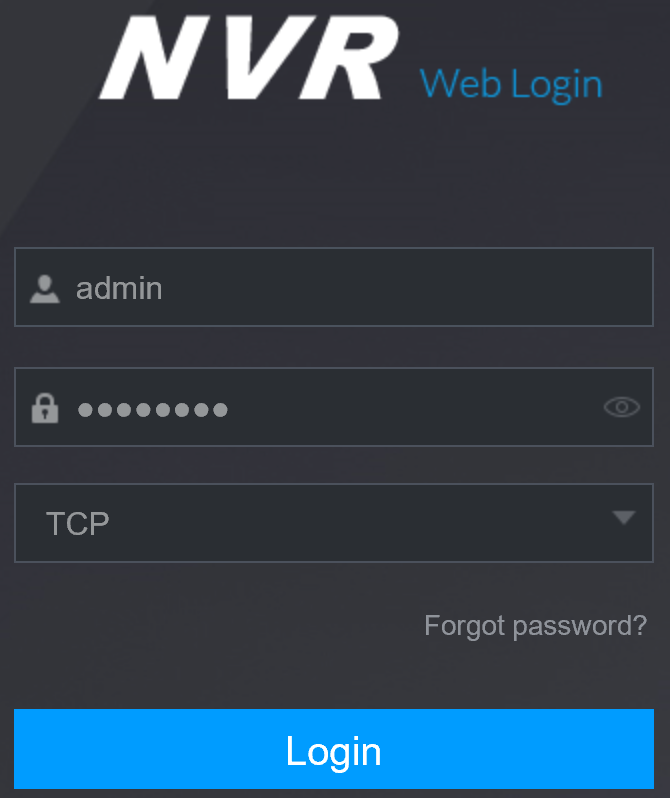
After Login The NVR web Interface will be Shown as below.
Accessing the Web Interface via SmartPSS
Open Smart PSS and select Device CFG.
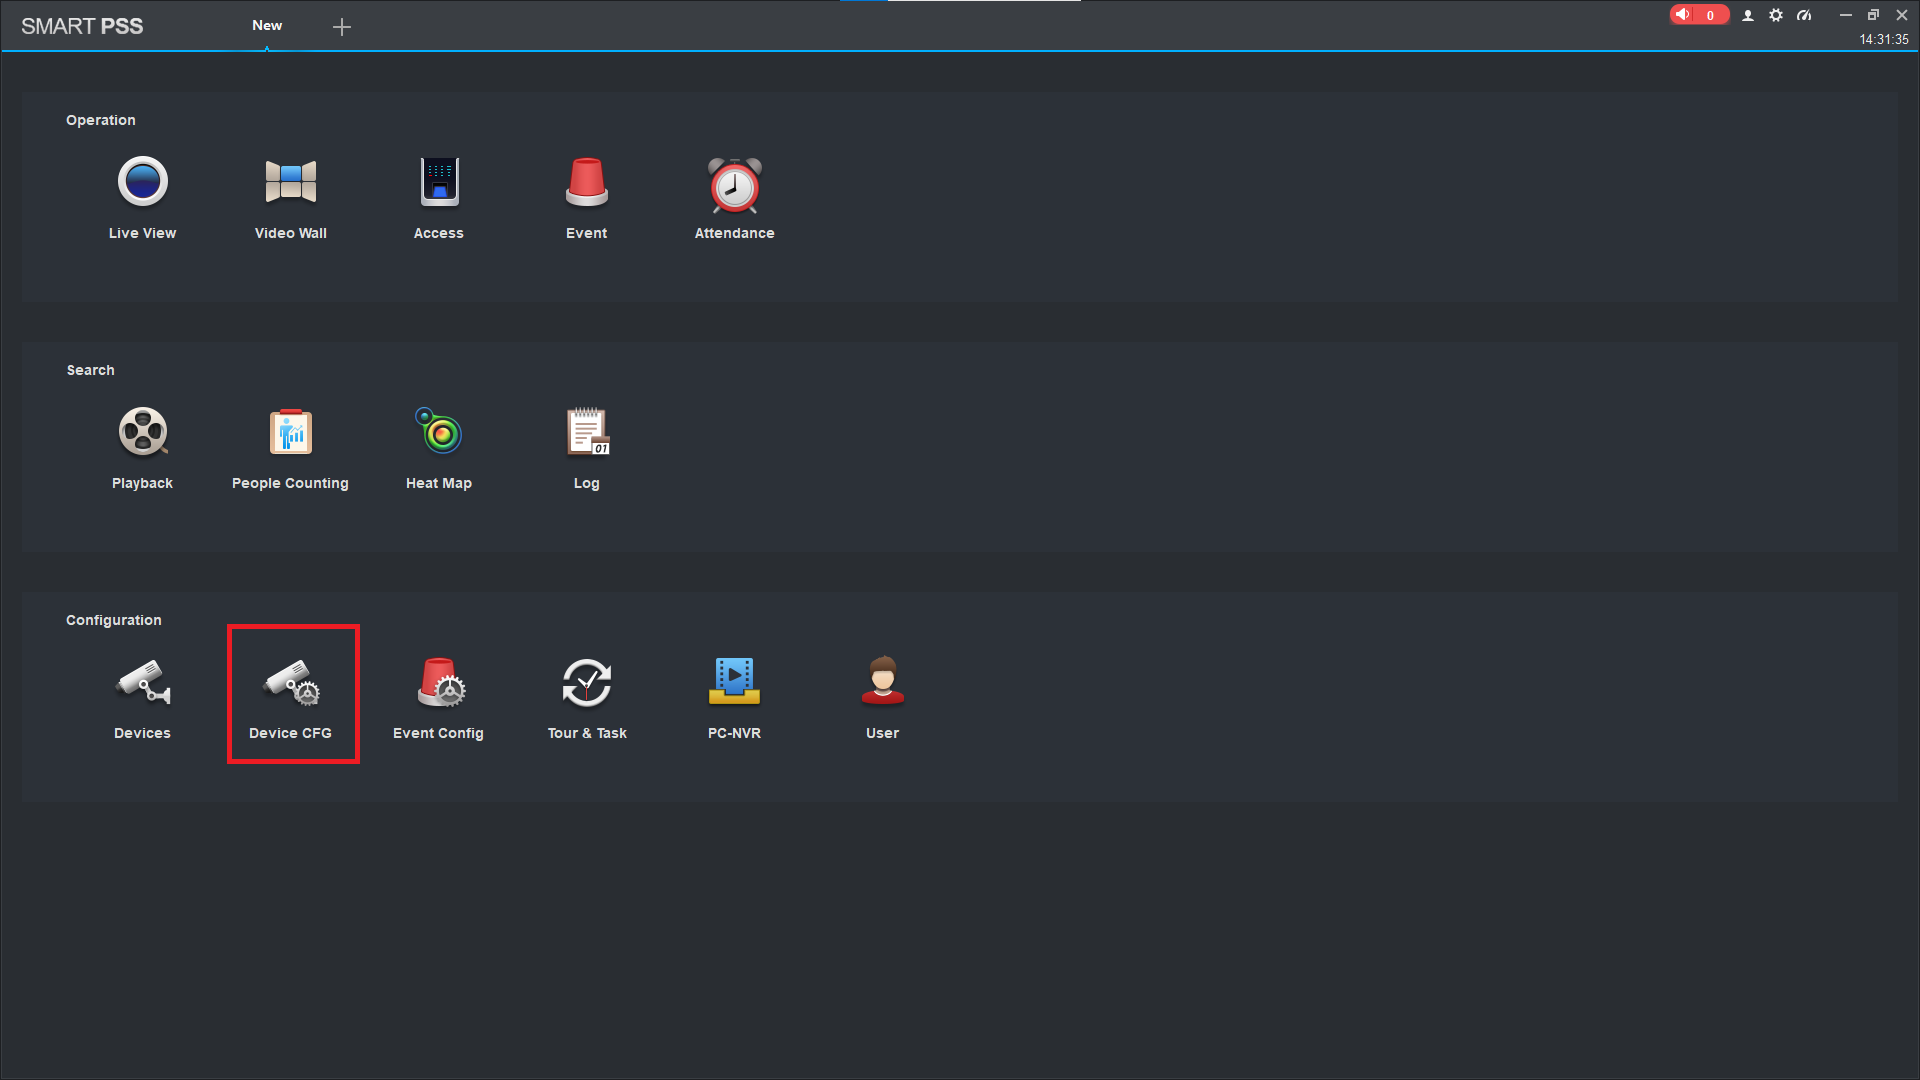
Select your device.

Select Link to WEB.

A Browser will open with the login page. Once Logged in the NVR web interface will appear as below
Accessing the Web Interface via SmartPSS Lite
- Open SmartPSS Lite and select Devices.

2. For the device you want to access the web interface of, select the Globe Icon.
This will direct you to the login page of your device, allowing you to enter the username and password.

If everything is done correctly but the web interface doesn't load, see below.
Web Interface Troubleshooting
Web Interface Troubleshooting
If directly accessing the device using the IP address, ensure that the IP address of your PC is in the same range as the device you are trying to access
If you get an error that says "Unable to open the search page", "This page can't be displayed" or something similar, your PC might not be in the correct IP range. If you are trying to log into a camera with the IP Address of 192.168.1.108, your PC's IP address should be in the 192.168.1.x range.
How to change your Computer's IP Address
Windows 10
- Open Settings.
- Select Network & Internet.
- Select Status, then Change Adapter Options.
-
Right-click the network adapter you want to change the IP address for, and select Properties.
-
Double-click the Internet Protocol Version 4 (TCP/IPv4) item.
- Click Use the following IP address and enter an IP address in the same range as the device you are trying to access. (E.g when trying to access 192.168.1.108 use a IP address in the 192.168.1.x range.) Note: This cannot be the same as the device you are trying to connect to or any other device on the same network. Save your changes on both windows.
- Type the IP address of the device you are trying to access into the address bar of your web browser.
- Once finished configuring the device, change the adapter settings back to normal by following steps 1-5 and clicking Obtain an IP address automatically.
Windows 11
1. In the Windows search bar at the bottom of the page, type Control Panel and press enter.
2. Select Network and Internet.
3. Select Network and Sharing Centre.
4. Select the link for Connections in the network that you want to change the IP address for.
5. Select Properties.
6. Double-click the Internet Protocol Version 4 (TCP/IPv4) item.
7. Click Use the following IP address and enter an IP address in the same range as the device you are trying to access. (E.g when trying to access 192.168.1.108 use a IP address in the 192.168.1.x range.) Note: This cannot be the same as the device you are trying to connect to or any other device on the same network. Save your changes on both windows.
8. Type the IP address of the device you are trying to access into the address bar of your web browser.
9. Once finished configuring the device, change the adapter settings back to normal by following steps 1-6 and clicking Obtain an IP address automatically.
See the video below for a visual guide of the steps above:
Shortcut
1. In the Windows search bar at the bottom of the page, type Ncpa.cpl and press enter.
2. Right-click the network adapter you want to change the IP address for, and select Properties.
3. Select the Internet Protocol Version 4 (TCP/IPv4) item.
4. Click Use the following IP address and enter an IP address in the same range as the device you are trying to access. (E.g when trying to access 192.168.1.108 use a IP address in the 192.168.1.x range.) Note: This cannot be the same as the device you are trying to connect to or any other device on the same network. Save your changes on both windows.
5. Type the IP address of the device you are trying to access into the address bar of your web browser.
6. Once finished configuring the device, change the adapter settings back to normal by following steps 1-3 and clicking Obtain an IP address automatically.
See the video below for a visual guide of the steps above:
Reload the page in Internet Explorer or Microsoft Edge in Internet Explorer mode.
The plugins for our products are designed for Internet explorer, so you may run into issues using another web browser.
The icon for Internet Explorer looks like this  , whereas the icon for Microsoft Edge looks like this
  .
.
Reloading Microsoft Edge in Internet Explorer Mode
- select the 3 dots(
 ) in the top right corner.
 - Select Reload in Internet Explorer Mode.

If the Reload in Internet Explorer Mode option isn't there, follow the steps below:
- Open Microsoft Edge and select the 3 dots(
 ) in the top right corner.
 - Select Settings.
- Select Default Browser.
- Change “Allow sites to be reloaded in Internet Explorer mode (IE mode)” to Allow.

Clear your Browsing History
If using Internet Explorer and the web interface has "sys." or "com." in front of text or it doesn't load some elements correctly, you will need to delete your browsing history to fix it.
Press CTRL + SHIFT + DELETE.
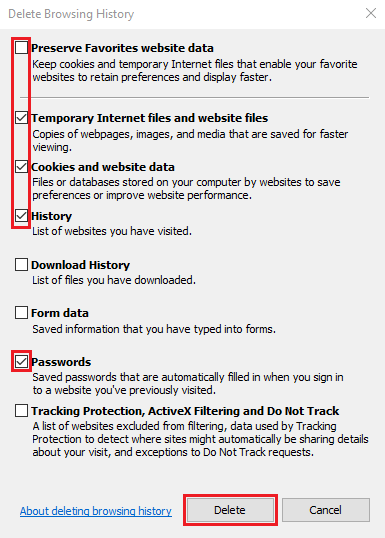
Untick Preserve Favourites website data and Tick Temporary Internet files and website files, Cookies and website data, History and Passwords, then click Delete.

Internet explorer will prompt you when it has finished deleting your browser history. Refresh the page
Delete Internet Explorer's Plugins
Our cameras and NVRs use a plugin made for Internet Explorer and, depending on the firmware of the device, may present a different version of the plugin which can cause conflicts.
To resolve this, close Internet Explorer then find the directory below and delete the webrec folder containing the plugins.
C:\Program Files\webrec\ or C:\Program Files (x86)\webrec\
If you have tried all of the above with no success, the video output may be faulty.
DeleteNo Camera Image
1. In Live View, If there is no error message on the screen and the channel is blank, check if there are any icons inside the box (recording icon, ethernet port icon)?
If so, does the camera work if viewed in full screen by double clicking it? This usually means that Sub Stream is disabled for this camera or the sub stream settings aren't compatible with the NVR.
To check these settings, go to Main Menu > Camera > Encode. on the right side, under Sub Stream, make sure Video is enabled.
if it is already enabled, check that the settings below (e.g. compression, resolution) are compatible with the NVR. If Sub Stream is enabled and all the settings are okay, the camera may need a firmware update.

2. Check what error message you are getting on the channel. If there is no error message, check if the camera works with a short patch lead and/or verify the cable integrity.
Below is a list of the potential error messages you can see in the camera channel.
Config error (18): This is displayed when a camera is not initialised. You will see this on some recorders with older firmware. Upgrade the firmware on the NVR (if the model supports initialisation) or manually initialise the camera with a laptop/PC, by logging into the web interface of the camera or using ConfigTool.
Config error (20): Authentication mode on the camera needs to be set to "Compatibility Mode" using a PC.
Account Locked: Incorrect password has been used. The camera will be locked until the device is removed from power for at least 10 seconds. If the password is unknown the camera will need to be reset. Alternatively, try the password of the admin account of the NVR.
Login Return Timeout: NVR cannot connect to the camera. Potentially a camera or cable fault, check if the camera works with a short patch lead and/or verify the cable integrity.
Cannot Find Network Host/Network Disconnected: Device is offline or not discoverable. Check that the correct IP address is assigned to the device. Potentially a camera or cable fault, check if the camera works with a short patch lead and/or verify the cable integrity.
Other Network Errors: There is an issue with the connection to the camera, Potentially a camera or cable fault, check if the camera works with a patch lead and/or verify the cable integrity.
Video/Audio Issues
Video not smooth or stuttering: Potential issue with cable or available network bandwidth or the Hard Drive may be faulty.
For example, the NVR8COM2 has a total of 80mpbs for the incoming bandwidth/receive speed. To find out your devices specifications, Google the Model Number to find the product page. Make sure you do not exceed this value otherwise you will not have all your footage saved and will have issues with playback and live view.
To check network bandwidth, see below:
Blue GUI:
Main Menu > Info > Network > Load 
Black GUI:
Main Menu > Maintenance/Operation > Network > Network Load

No Microphone Audio / Background noise: Audio Playback is disabled by default.
Blue GUI: To enable audio, navigate to Main Menu > Camera > Encode. Enable the checkbox at the bottom for Audio.
Black GUI: To enable audio, navigate to Main Menu > Camera > Encode and click More at the bottom.
This Will bring up a small window with the audio settings. Check Audio to be on.


You will need to login to the Camera’s web interface to set Noise Reduction on to filter out background noise. For best quality set Compression to ACC and set sampling to 64,000khz
Be sure to check the laws in your area regarding voice recording as each state has different laws and requirement for signage.
DeleteHard Drive Check
If you believe the hard drive inside your NVR may be faulty, you can check it's health status through the NVR settings.
To do a HDD health check, see below.
Blue GUI:
Main Menu > Storage > HDD Detect 
Select the HDD (e.g. sata1), then click Start Detect. If all sections are green then the HDD is OK. If there are red sections, you will more than likely have a faulty drive. If so, contact tech support for instructions.
Black GUI:
Main Menu > Storage > Disk Check

Select the HDD you want to test (e.g. Cabinet-1), then click Start Check. If all sections are green then the HDD is OK. If there are red sections, you will more than likely have a faulty drive. If so, contact tech support for instructions.
To format the hard drive or check the health status, see below:
Blue GUI:
Main Menu > Storage > HDD Manage 
Black GUI:
Main Menu > Storage > Disk Manager

Hard Drive Storage Filling up too Fast
If you notice that your Hard drive is filling up too fast and you only have a few days of footage, you may have snapshots on.
By default snapshots are off, but if they are turned on, a snapshot will be taken every second. Having this on for multiple cameras can fill your hard drive up quite quickly, leaving less space to be used for recording.
To turn snapshots off, go to Main Menu > Storage > Record Mode and select Off under Snapshot for all cameras.

Testing and Configuring IP Addresses
To test a device’s network connectivity, verify you can access the device from a Windows PC.
1. Firstly, you need to configure your PC IP Address to match the device you intend to connect to. You can use the Config Tool to locate all device’s on the connected network to find the IP address of the device.
2. Assign your computer an IP address in the same range as the device you're trying to connect to. For example, if the IP of the device you found was 192.168.0.108, you would assign an address between 2-254 for the last digit. For Example, 192.168.0.150
Changing the IP Address on a Windows Computer
Windows 10
- Open Settings.
- Select Network & Internet.
- Select Status, then Change Adapter Options.
-
Right-click the network adapter you want to change the IP address for, and select Properties.
-
Double-click the Internet Protocol Version 4 (TCP/IPv4) item.
- Click Use the following IP address and enter an IP address in the same range as the device you are trying to access. (E.g when trying to access 192.168.1.108 use a IP address in the 192.168.1.x range.) Note: This cannot be the same as the device you are trying to connect to or any other device on the same network. Save your changes on both windows.
- Type the IP address of the device you are trying to access into the address bar of your web browser.
- Once finished configuring the device, change the adapter settings back to normal by following steps 1-5 and clicking Obtain an IP address automatically.
Windows 11
1. In the Windows search bar at the bottom of the page, type Control Panel and press enter.
2. Select Network and Internet.
3. Select Network and Sharing Centre.
4. Select the link for Connections in the network that you want to change the IP address for.
5. Select Properties.
6. Double-click the Internet Protocol Version 4 (TCP/IPv4) item.
7. Click Use the following IP address and enter an IP address in the same range as the device you are trying to access. (E.g when trying to access 192.168.1.108 use a IP address in the 192.168.1.x range.) Note: This cannot be the same as the device you are trying to connect to or any other device on the same network. Save your changes on both windows.
8. Type the IP address of the device you are trying to access into the address bar of your web browser.
9. Once finished configuring the device, change the adapter settings back to normal by following steps 1-6 and clicking Obtain an IP address automatically.
See the video below for a visual guide of the steps above:
Shortcut
1. In the Windows search bar at the bottom of the page, type Ncpa.cpl and press enter.
2. Right-click the network adapter you want to change the IP address for, and select Properties.
3. Select the Internet Protocol Version 4 (TCP/IPv4) item.
4. Click Use the following IP address and enter an IP address in the same range as the device you are trying to access. (E.g when trying to access 192.168.1.108 use a IP address in the 192.168.1.x range.) Note: This cannot be the same as the device you are trying to connect to or any other device on the same network. Save your changes on both windows.
5. Type the IP address of the device you are trying to access into the address bar of your web browser.
6. Once finished configuring the device, change the adapter settings back to normal by following steps 1-3 and clicking Obtain an IP address automatically.
See the video below for a visual guide of the steps above:
3. Type in the IP address of the device into a browser's search engine and log in. It is recommended to use Internet explorer or Microsoft Edge in IE Mode (Internet Explorer Mode) as you may run into some issue using other browsers such as Chrome or Firefox.
Testing Device Connection
To verify a good connection to the device, you can use the “ping” command from a Windows PC. Open the start menu and enter "cmd", click on command prompt to open. Once there you can type in ping and then the IP address of the device you want to test.

You want to see the time at less than < 10ms. This means the device has a 10ms delay.
If this number changes dramatically or sometimes does not get a reply, there may be an issue with the cable or camera.
Attempt to replace the cable and run the test again to verify where the issue is. If there are still problems the device or the network devices may be faulty.
Delete"Exceeded maximum connections" on web-interface
To resolve this error please follow the steps below:
1. Navigate to the Network page under main menu.
2. Go to the port page by selecting the option from the left window.
3. Ensure users are set to a high enough value and increment value if needed to allow more connections.

4. Click on apply to save the settings
DeleteOver Decode Ability
If adding many high resolution cameras to a system, it is possible to encounter the Over decode ability error, this error is a results of the limitation of available bandwidth when recording to the device, even less so when AI is enabled by machine. (e.g. NVR8PRO-I, has 256Mbps with 180Mbps with AI enabled) for confirmation please refer to the website For the incoming bandwidth details.
If this is the Case there Is a few options to bring the bandwidth usage down.
1. Change AI by recorder to AI by camera. If you have an AI enabled Recorder, setting all cameras to AI by camera will allow that extra bandwidth to be available.
Resetting a Recorder
If you know the password of the recorder and can access the main menu, the steps are as follows:
Blue GUI: Go to Main Menu > System > Default. Select Factory Reset to reset device to default settings.
Black GUI: Go to Main Menu > Maintenance/Operation > Manager > Default. Select Factory Defaults to reset the device to default settings.
If you don't know the password of the recorder or can't access the main menu, follow the guide below.
To reset the Password of a recorder, follow the steps below
(Black GUI) Recorder Password Reset
Click on the "Forgot Password Option"
Note. If an Email was not entered during initial setup of the NVR, you will be prompted to add an email that will then be used in the following steps.
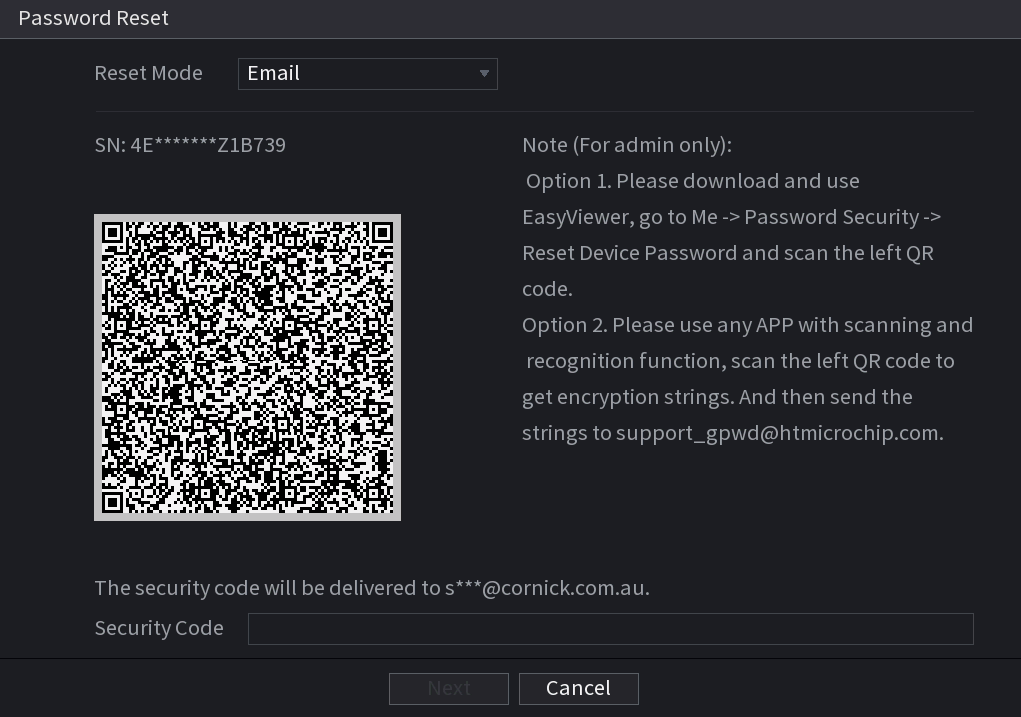 |
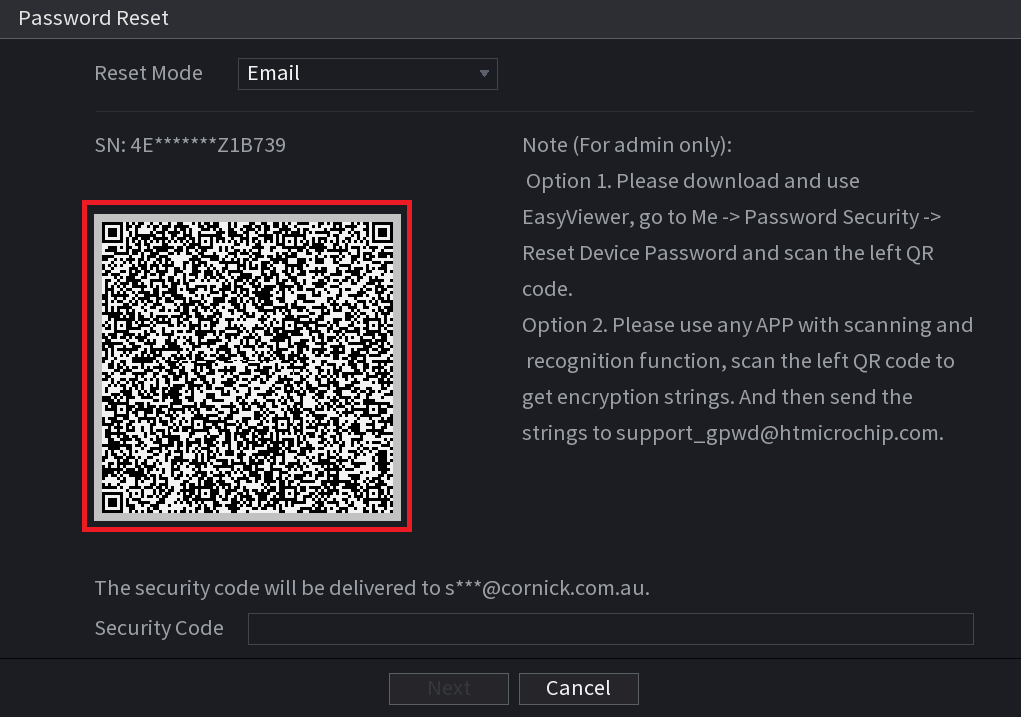
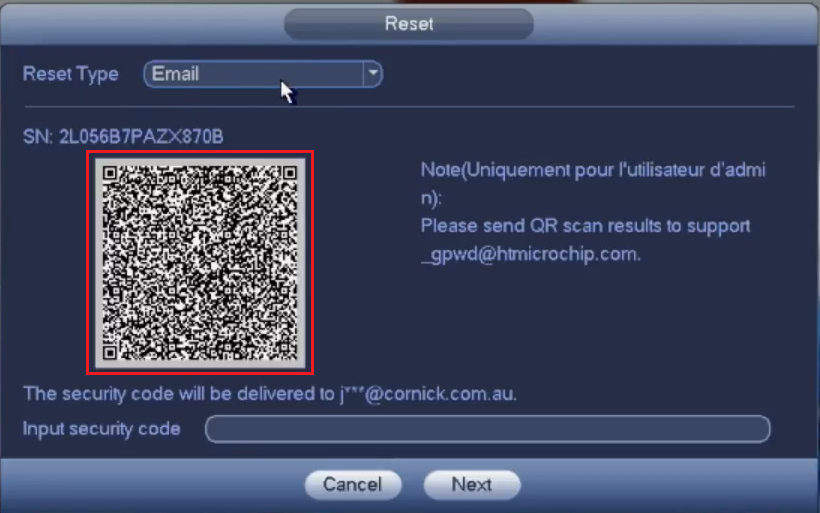
Set the reset type to "Email" and check that your email address has been entered correctly
(Note: If you do not have access to the email address or have typed it incorrectly please contact RhinoCo Tech Support) |
 |
Open the DMSS application and tap on the Me icon (If your application looks different, ensure you are using DMSS, and it is up to date.) |
 |
Tap on "Tool Manager" |
 |
Tap on "Password Resetting" |
 |
(Note you may have to push + on the top right if scanner does not come up right away) Scan the QR code that is on the recorder
|
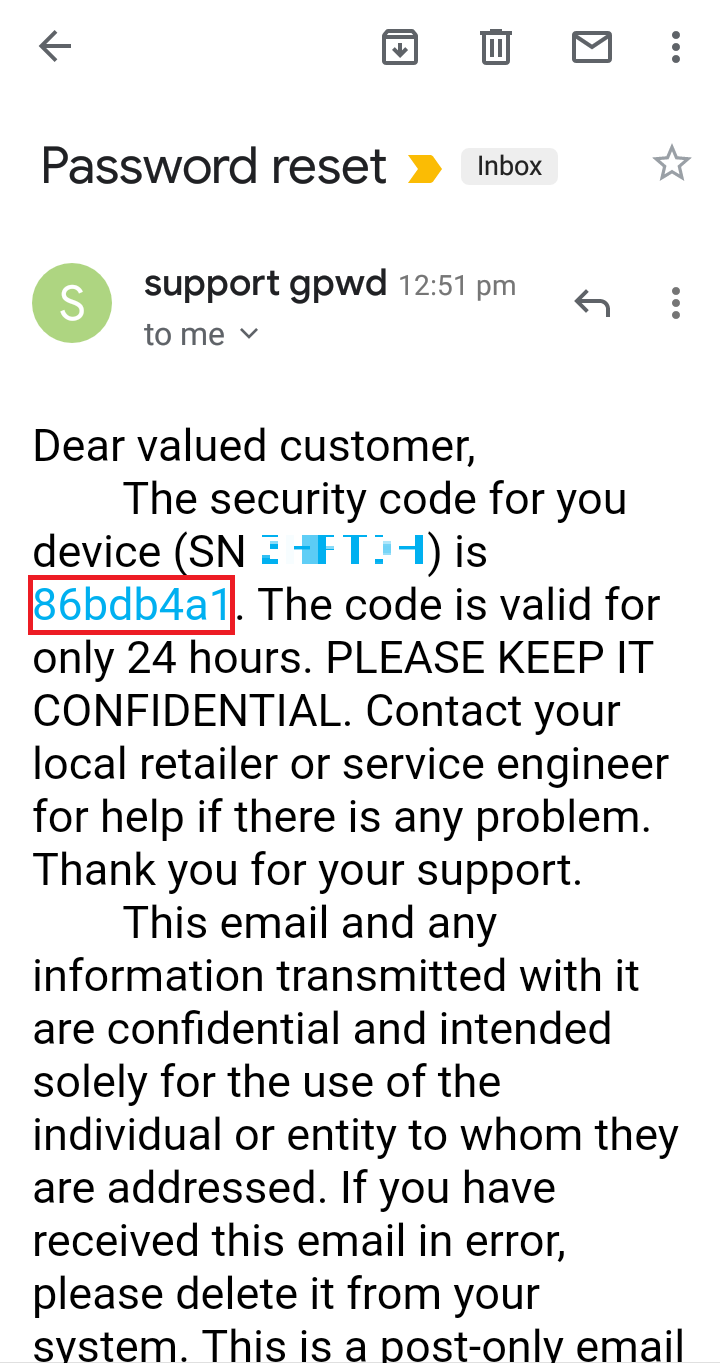 |
You will shortly receive an email from "support gpwd" that contains a reset code |
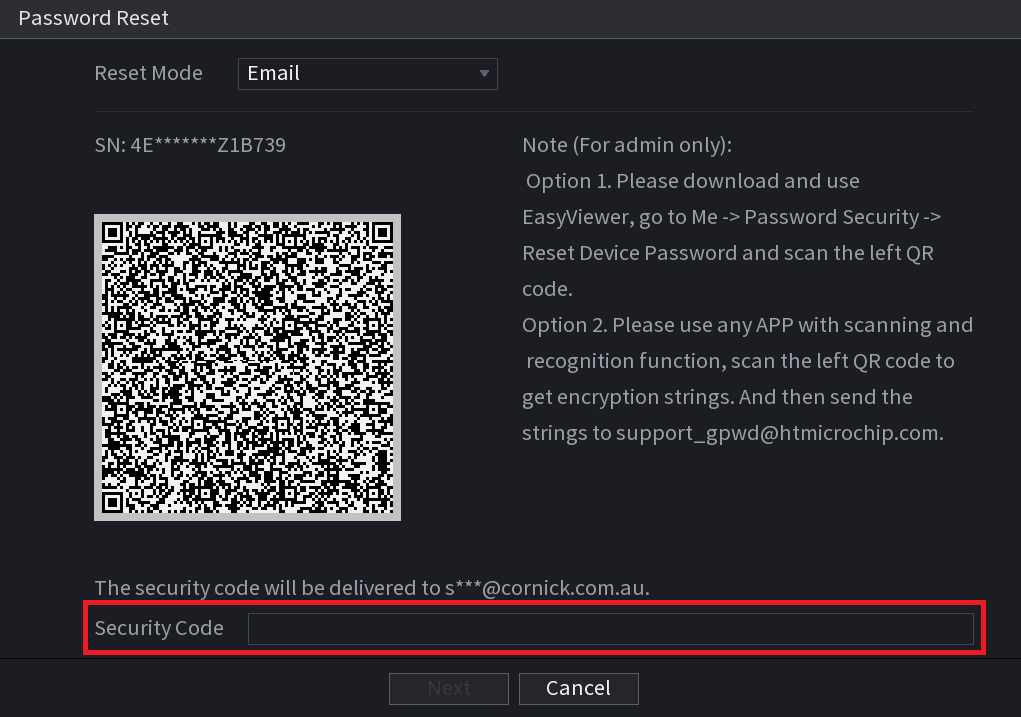 |
Enter the security code and select "next" |
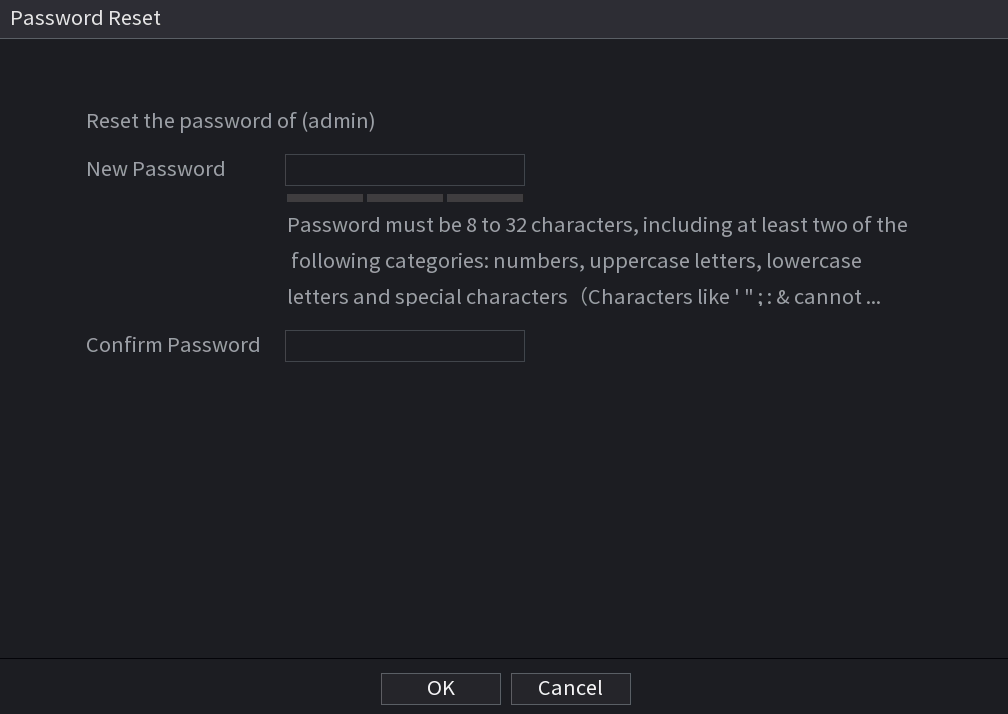 |
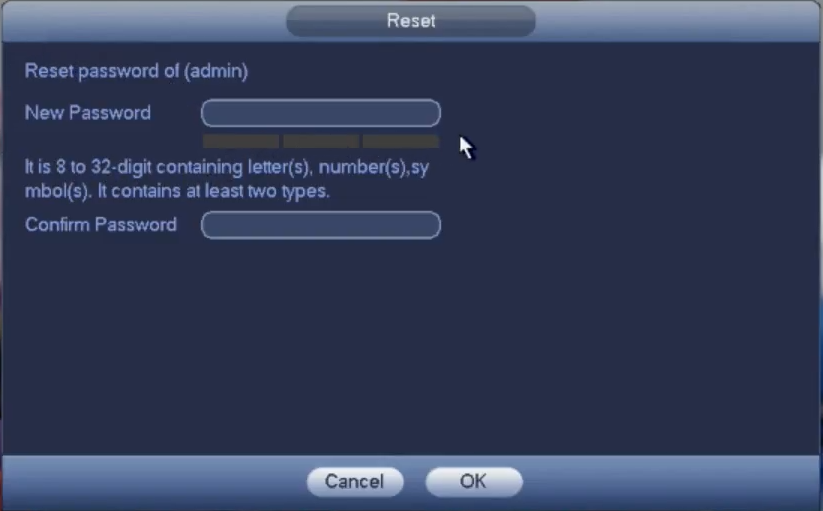
Enter a new password and select "OK" |
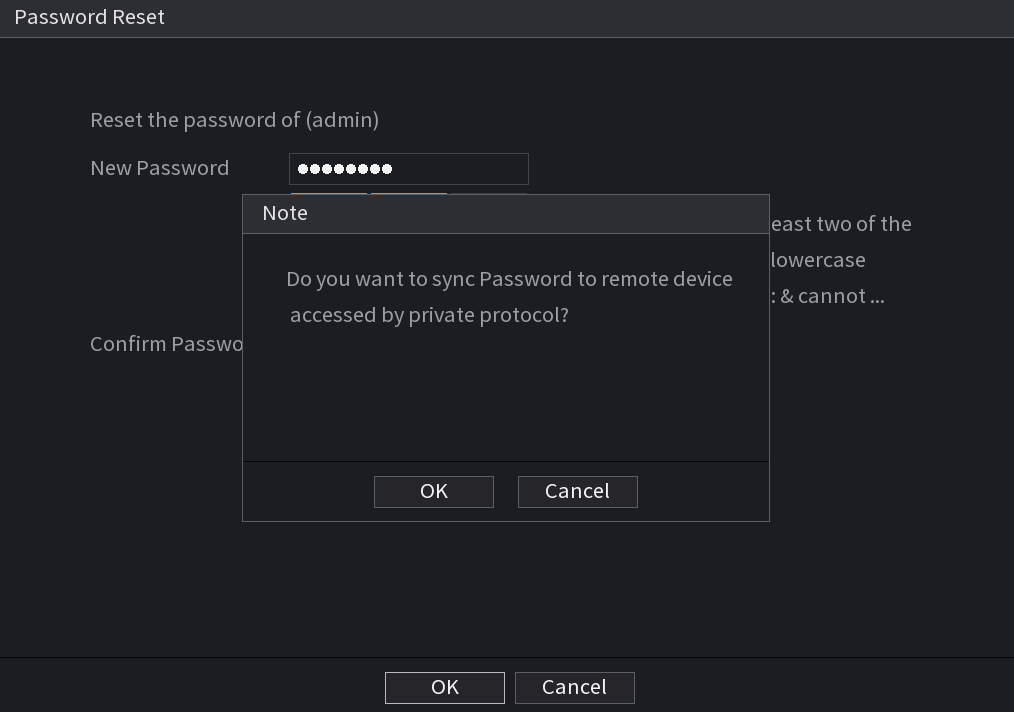 |
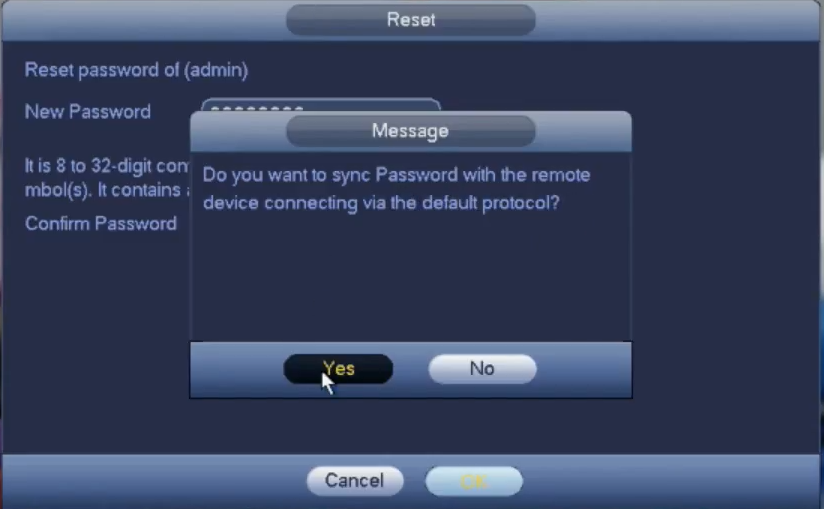
Your recorder may now ask you if you want to sync your Password. Select "Yes" and wait for it to finish |
(Blue GUI) Recorder Password Reset
For a video walkthrough, please see the link below.
https://www.youtube.com/watch?v=taObZ3r12ks
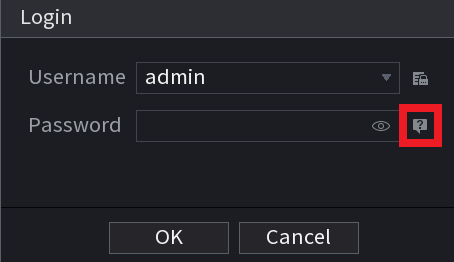
This process will only work if you have the "Forgot password" or a padlock option on the System Login page like in the image below.
If your recorder does not have this option, please contact Technical Support.
 |
Click on the "Forgot Password Option"
You will be presented with the option to provide your secret question answers or enter your email address.
|
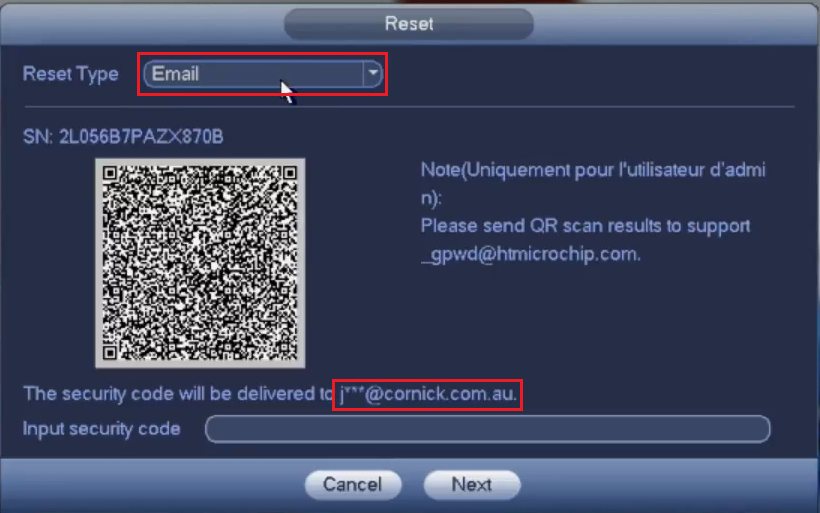 |
Set the reset type to "Email" and check that your email address has been entered correctly
(Note: If the Device was never initially set up with the email option or If you do not have access to the email address or have typed it |
 |
Open the DMSS application and tap on the Me icon (If your application looks different, ensure you are using DMSS, and it is up to date.) |
 |
Tap on "Tool Manager" |
 |
Tap on "Password Resetting"
(Note you may have to push + on the top right if scanner does not come up right away) |
 |
(Note you may have to push + on the top right if scanner does not come up right away) Scan the QR code that is on the recorder
|
|
You will shortly receive an email from "support gpwd" that contains a reset code |
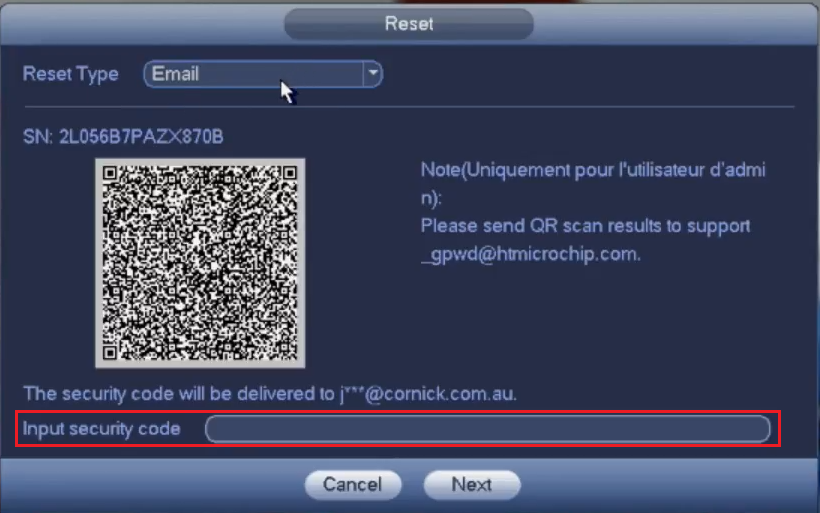 |
Enter the security code and select "next" |
 |
Enter a new password and select "OK" |
 |
Your recorder may now ask you if you want to sync your Password. Select "Yes" and wait for it to f |
Pre 2018 Firmware
If you cannot access the email associated with this device and you have the option to login to an account with username of “888888”, please contact our support team who may be able to assist you further.
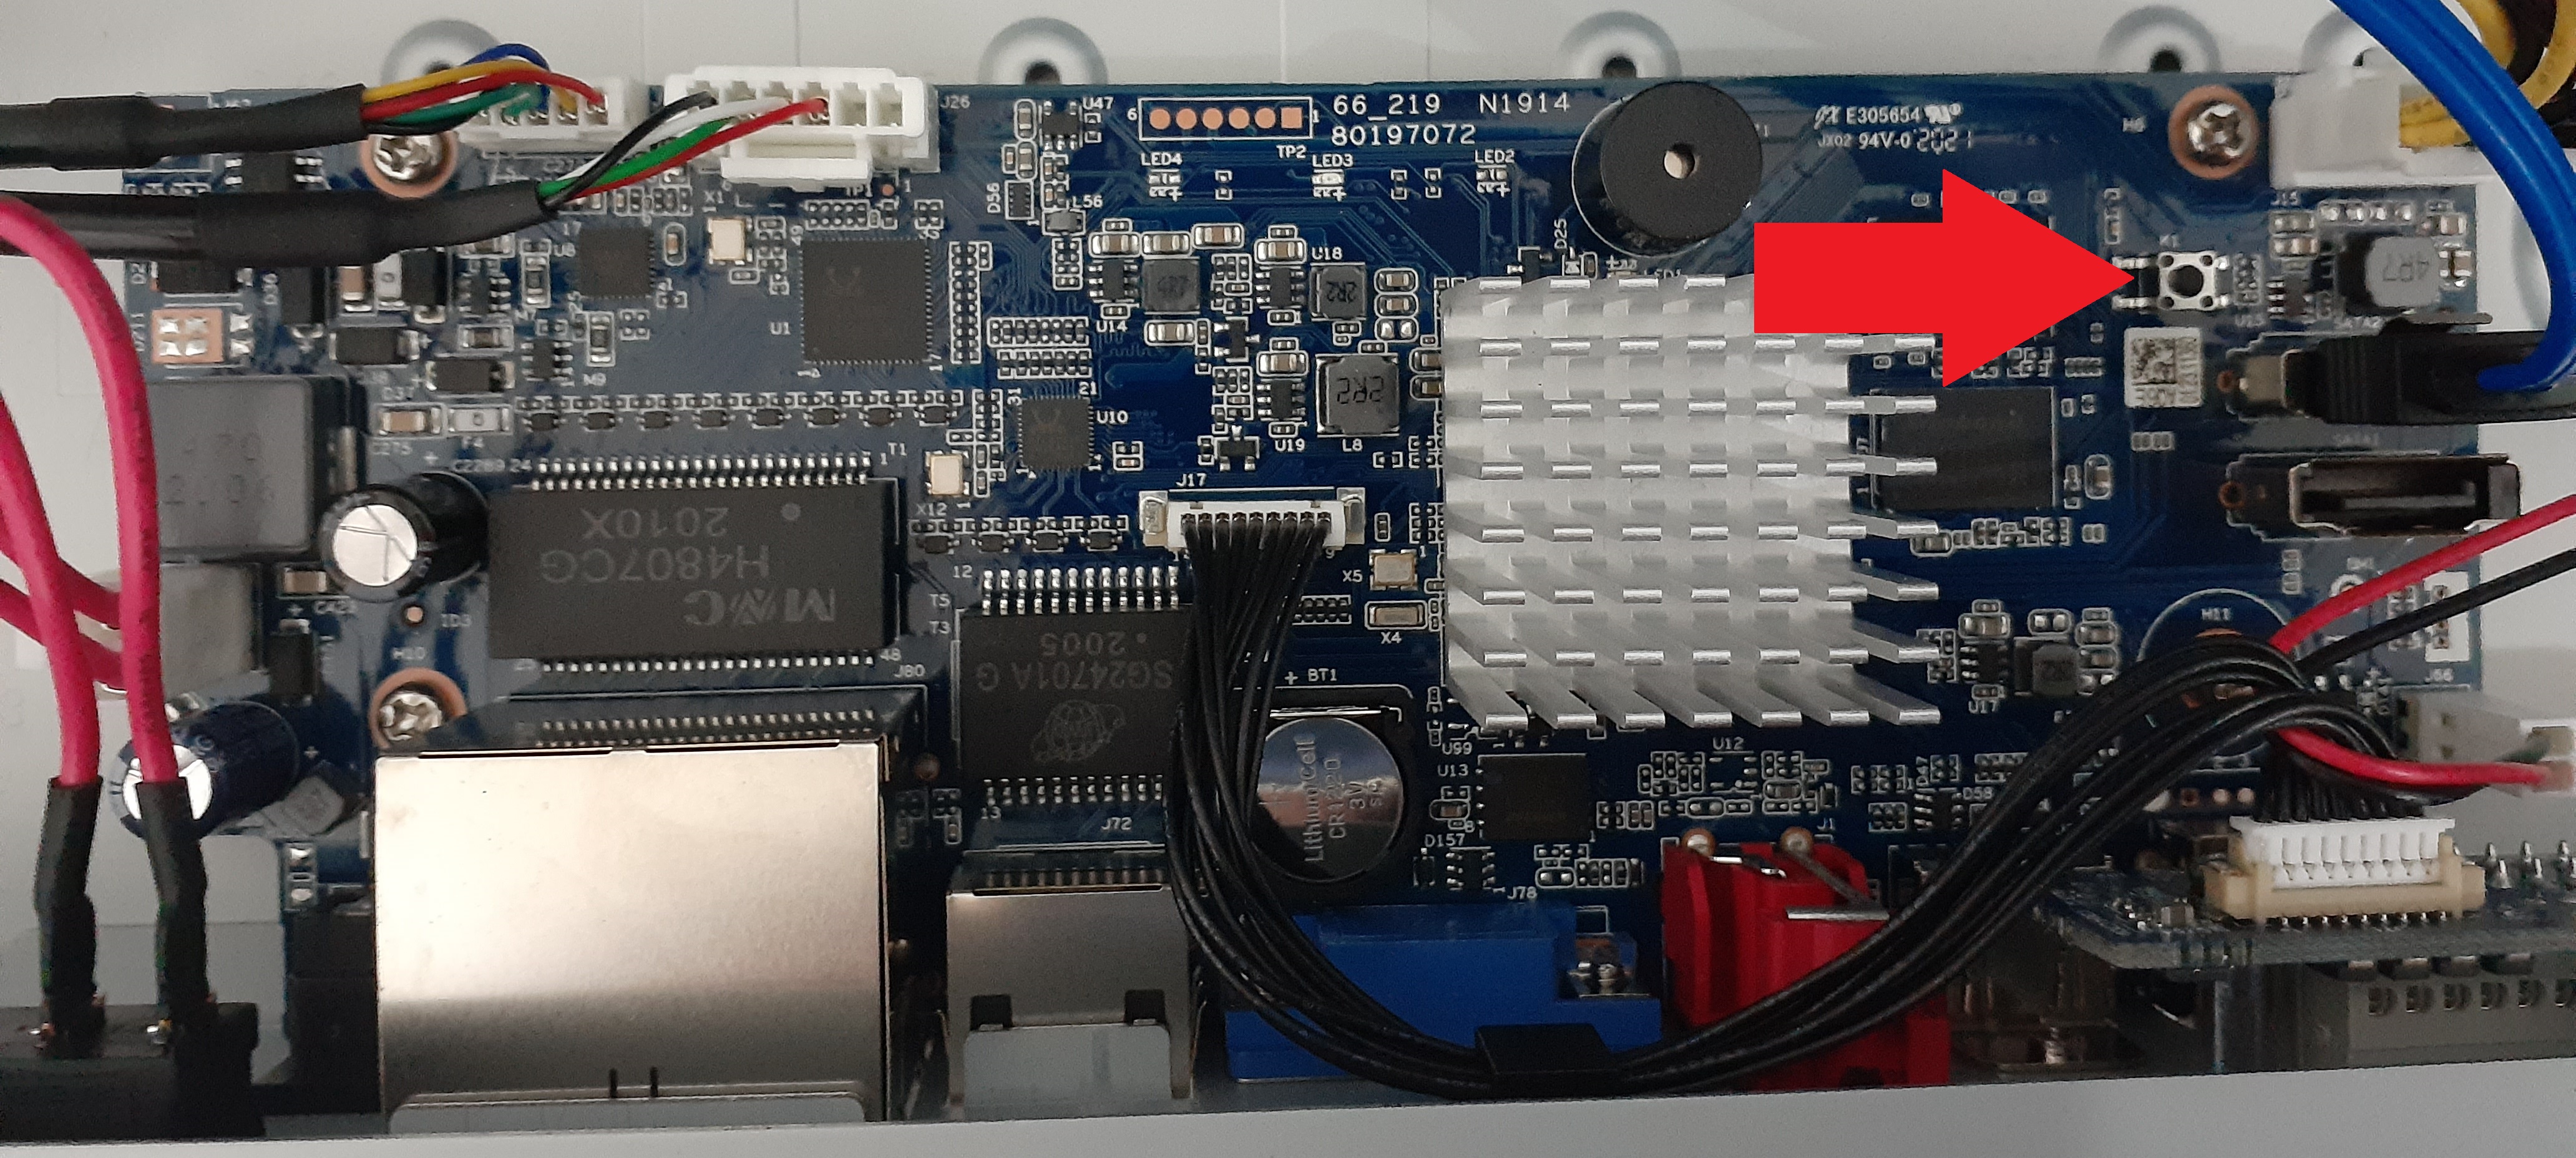
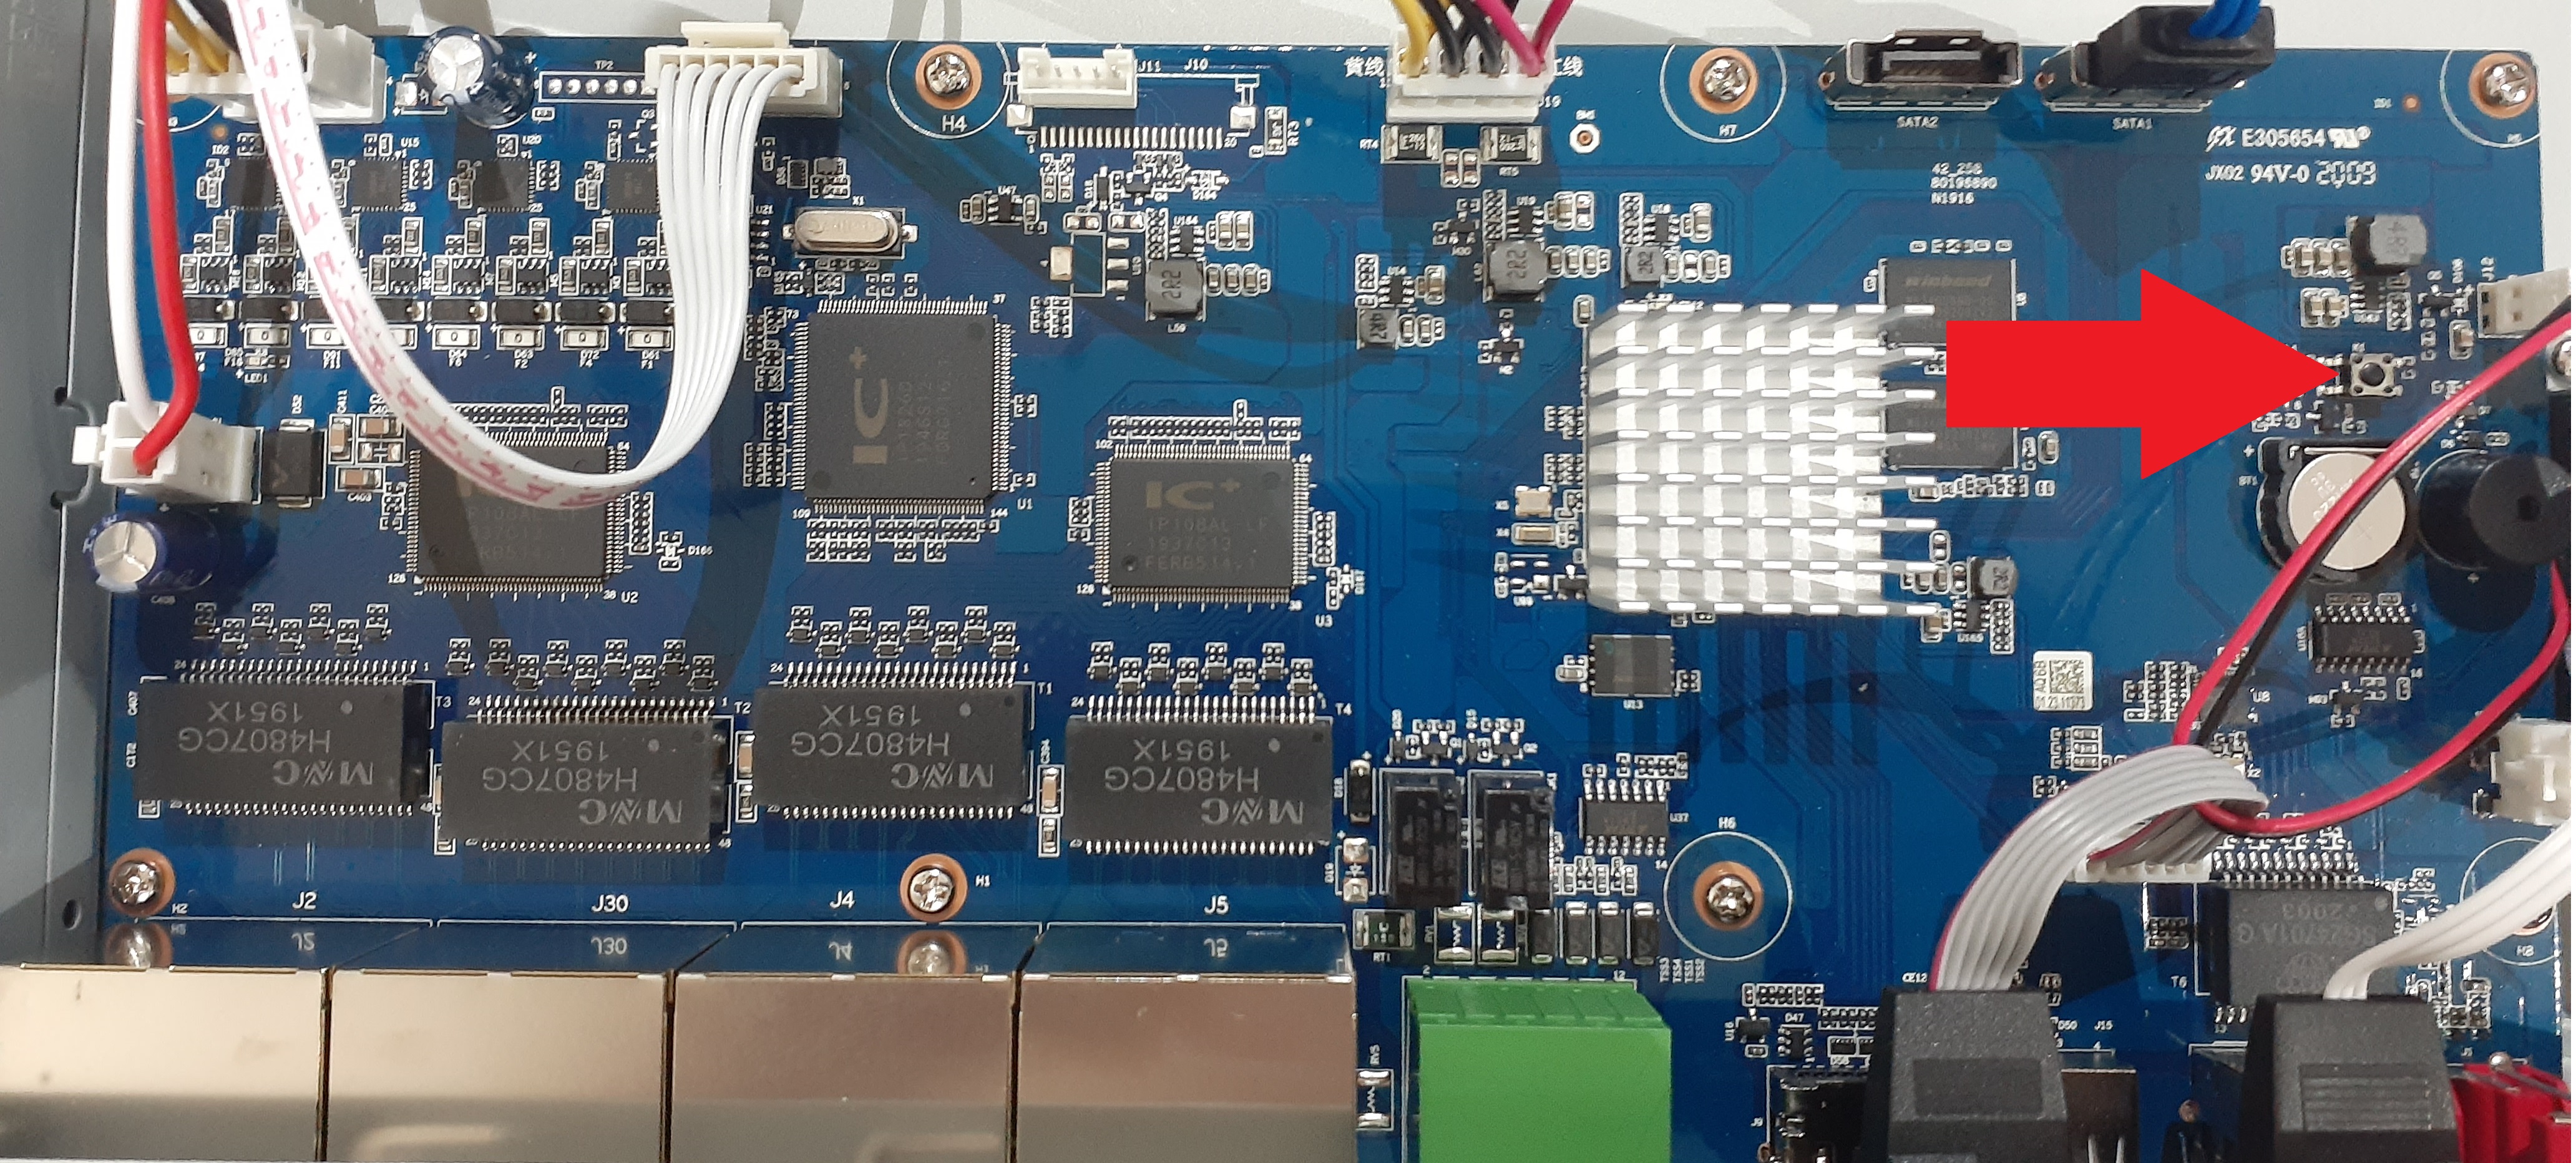
Using the Reset Button (Select Recorders Only)
Some recorders have a reset button on the PCB. Turn the recorder off then press and hold down the reset button, while holding the button down turn the recorder on. Once you hear a beep, release the button.
When defaulting recorder in this way and there are POE cameras that were initialized by the recorder, the cameras also have to be defaulted. This is Because the Cameras password is set to the recorders password.
Resetting IP Cameras
NVR4PRO4
NVR16COM3
NVR-L81
