If you're not receiving IVS (Intelligent Video System)/Motion alerts such as tripwire ,intrusion or SMD notifications, it’s important to narrow down whether the issue lies in the rule setup, scheduling, or notification configuration. Below are the key steps to troubleshoot and ensure your IVS alerts work as expected.
Confirm the IVS/Motion rules are triggering
For smart event recordings to be present Intelligent and motion recording schedules must be turned on. Go to Storage > Schedule and ensure that it is enabled for the desired times and channels.
- Go to Playback on the NVR or via the camera's web interface.
- Select the relevant channel and filter for motion and intelligent (not general recording).
- Look for IVS event markers (often in a different colour. Blue - Intelligent. Yellow - Motion.) on the timeline.

Alternatively . you can also check for IVS triggers using AI Search.
- On the NVR, go to AI > AI Search.
- Select the channel and time range, then search by IVS rule type (e.g. Tripwire, Intrusion).
Note that AI Search only works if the hard drive was formatted at the time the AI camera was first installed. If this wasn’t done, AI metadata may not be saved to the disk and AI Search will return no results.
If no events are showing up in the step above the issue is likely with the rule configuration — not the notifications. Please proceed to the next steps to check the setup.
Check Rule Setup
IVS alerts will not work unless the rule is properly configured:
On the NVR
1. Navigate to AI > Parameters > Smart Plan
2. Each Channel you wish to have IVS one Enable the IVS light bulb.
3. Hit Apply

- Then navigate to AI >Parameters> IVS.
- Make sure the IVS rule is enabled.
- Check the rule for the rule type (Tripwire, Intrusion, etc.), and draw the detection line or area if not already present.
- Cross check the parameters such as action , direction , effective target etc. Adjust the direction, object filters (if applicable), and make sure it's saved.

Check Minimum and Maximum Object Size (IVS)
Incorrect object size filtering can also prevent detection.
- Navigate to AI >Parameters> IVS.
- Select Max/Min size and resize the box. The min size box is usually a few pixel box in the center . Meanwhile , the max size box is a large box outlining the frame.

Schedule the IVS Period Correctly
- Navigate to AI >Parameters> IVS
- Check the schedule settings and make sure the schedule covers the hours you want the rule to be active.

Multiple Rules with Different Schedules
Be aware that having multiple rules with different schedules can sometimes lead to conflictions with a camera's arming period, if this occurs please set schedules for IVS in the cameras web interface.
Check Disarming Settings
- On the NVR, go to Alarm > Disarming and make sure disarming is not active(disarmed) during your desired alert times.
- In DMSS App: Go to Device Details > Disable Alarm Linkage and ensure it’s turned off.
Adjust SMD/Motion Detection Settings
- Navigate to AI > Parameters > SMD
- Check the effective target settings.
- Changing the sensitivity between low/medium/high can affect how often SMD triggers. if you are missing Some triggers Upping Sensitivity will allow SMD to trigger easier.
- Check Schedule for correct period settings.
- For region Adjustment, SMD and Motion detection share region settings, see below.

For Motion detection configuration go to Main Menu > Alarm > Video Detection.
- Click on Setting.
- Adjust Region as necessary, Red highlighted areas is the region where motion will be detected. (this will change both SMD and motion detection)
- Adjust the sensitivity (how easily motion triggers) and threshold (how much motion is needed to trigger) .


If all the rules are configured properly and triggering , the issue is likely in the notification setup (DMSS settings or Phone notification settings). Please have a look at the guide below to resolve such issues
Troubleshooting DMSS Push Notifications
Troubleshooting DMSS Push Notifications
If you're experiencing issues receiving push notifications from DMSS for your device.
Ensure you are using the correct App
The App is DMSS for iOS and Android.
Check that DMSS is Up to Date
Android - Check for Updates
- Open the Google Play Store app Google Play.
- At the top right, tap the profile icon.
- Tap Manage apps & device.
- Tap Updates Available.
- Tap Update next to DMSS
If DMSS is not listed on this page, it is already updated to the latest version.
iOS - Check for Updates
 |
If DMSS is not listed on this page, it is already updated to the latest version. |
Check if Notifications have been configured correctly
Configure Notification in DMSS
How to subscribe to notifications in the DMSS Mobile App
DMSS can be found on the Google Play store and iOS App Store. If you haven't ad...
 |
DMSS is a remote surveillance app that can be used to access your security products remotely. You can configure a whole range of push notifications in the DMSS app.
|
Enabling Notifications On DMSS
1. On the Home Page select the three dots of the device.

2. Then Select Device Details

3. Select Message

4. Select Notification and turn it for its Blue

5. Select Receive Messages and Send Notifications if you want DMSS to log and send Notifications.
Then Select Message Type

6. Select Notification type the you want to receive.
Note you will only receive notifications types that already enabled on your device ( e.g. Intrusion/tripwire is set up and enabled in IVS)

7. Select which Channels you want to get notifications from.

8. Back out to the home screen and select device details again. Ensure that notifications on there is also enabled.

9. An example of a Notification

Notification on Intercom
While adding Intercoms to the DMSS app,
The Intercom unit should be added under a DMSS account.
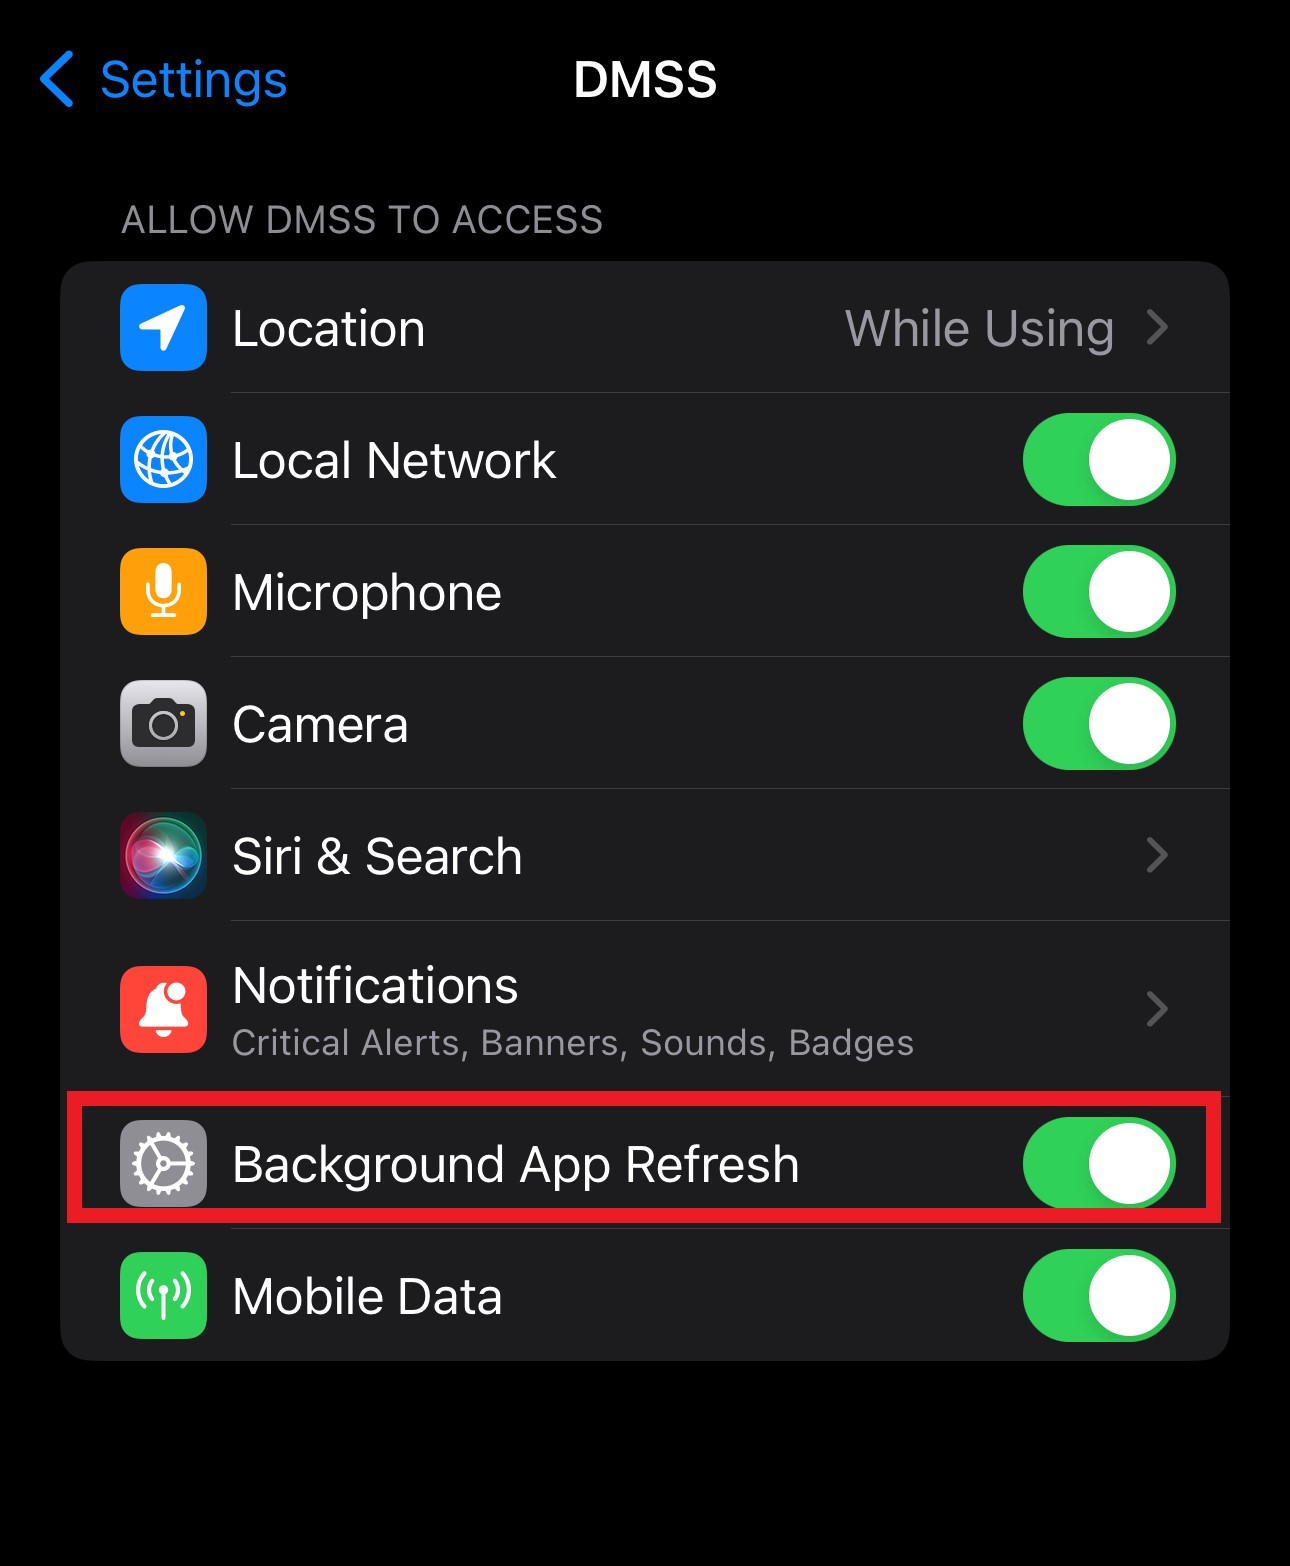
Also, make sure the Background app refresh is 'enabled' and also the show previews is set to 'Always'

Video Guide
Check that all permissions are allowed in your Phone's settings
Android Permissions
 |
Steps may vary depending on what android version you are running
|
DMSSAlarm & DMSSVTO
 |
The below settings may vary depending on what android version you are running In Settings > Apps > DMSS > Notifications there may be an option for DMSSAlarm and DMSSVTO
|
iOS Permissions and Focus
|
|

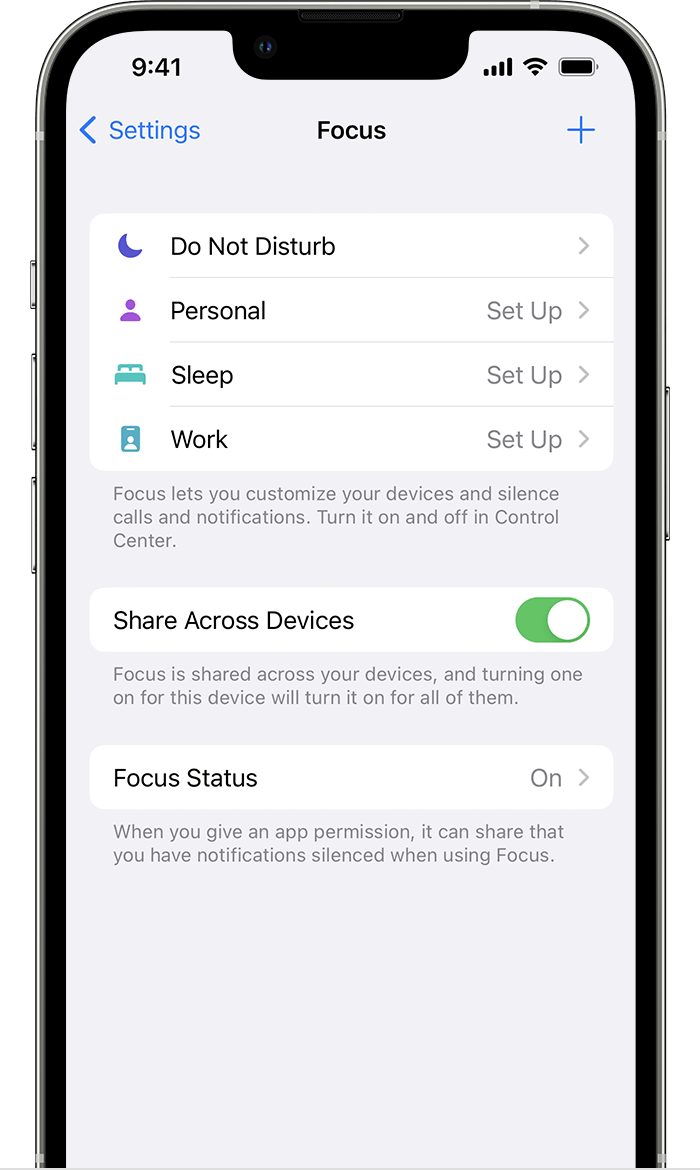 1. Go to Settings
2. Tap a provided Focus option — such as Do Not Disturb, Personal, Sleep or Work — then tap Customise Focus.
3. Turn off if there is any focus mode set up for DMSS
Additional Steps for IOS Notification issues
1.Once you have DMSS open ,click the 3 dots on the top right next to the name of your VTO device.
2.Then , press on notification settings of the device.

3.Then next to the device name ,toggle the notification button so that it is blue (on).


4. Open up your iPhone settings app. Then press on notifications.

5.Locate the DMSS app icon . Once you find it, click on the dmss option.

6.Now , you should see a list of available notification options for DMSS. Try and set the settings to be similar to the ones in the image below.

7. After this has been done, whenever someone calls from the VTO there will be a push notification and ringing sound on your iPhone. To answer/decline and unlock the door slide/click the notification tab and press on open. Then you will be prompted with a screen to answer/decline the call.


Check Sleep/Standby Settings (Android Only)
Sleep Settings on Android
Android
Steps may vary depending on what android version you are running
- Open the Settings app and find Battery Optimization in the Apps section.
- At the top of the screen, tap Not Optimized and then tap All apps. You should now see a list of all the apps on your phone. Each app is marked Allowed or Not allowed. Allowed means that your phone is allowed to put the app to sleep when it's in the background.
- Tap DMSS.
- In the pop-up, choose Don't allow and confirm your choice by tapping OK.
Samsung
Steps may vary depending on what android version you are running
- Open Settings and go to Battery and device care.
- Tap on Background Usage Limits.
- Tap on Never Sleeping Apps.
- Tap on the + in the top-right.
- Select DMSS, then tap Add.
Allow Network Permission (iOS 14+ Only)
Allowing network permission on iOS
 |
|
Check Time & Date is set correctly on the device
NVR
On an NVR you can set the time & date under Main Menu > System > General > Date&Time
Set the System Time, Time Zone and DST (if applicable).

Intercom
On an Intercom Door Station you can set the time & date under Local Config > System
Set the System Time, Time Zone and DST (if applicable).
Turn Notifications Off, then Back on.
Turn notifications Off, then Back On.
Follow the steps below to configure notifications.
When you reach the section when you turn on the Enable option, turn it off, then back on. Then click Save.
How to configure notifications
How to subscribe to notifications in the DMSS Mobile App
DMSS can be found on the Google Play store and iOS App Store. If you haven't ad...
|
DMSS is a remote surveillance app that can be used to access your security products remotely. You can configure a whole range of push notifications in the DMSS app.
|
Enabling Notifications On DMSS
1. On the Home Page select the three dots of the device.
2. Then Select Device Details
3. Select Message
4. Select Notification and turn it for its Blue
5. Select Receive Messages and Send Notifications if you want DMSS to log and send Notifications.
Then Select Message Type
6. Select Notification type the you want to receive.
Note you will only receive notifications types that already enabled on your device ( e.g. Intrusion/tripwire is set up and enabled in IVS)
7. Select which Channels you want to get notifications from.
8. Back out to the home screen and select device details again. Ensure that notifications on there is also enabled.
9. An example of a Notification
Notification on Intercom
While adding Intercoms to the DMSS app,
The Intercom unit should be added under a DMSS account.
Also, make sure the Background app refresh is 'enabled' and also the show previews is set to 'Always'
Video Guide
Check that the device was added correctly
Door Stations should be added as a VTO, NVRs as an NVR,CVRs as a DVR/XVR and Standalone cameras as Wired Camera.
Adding Devices to DMSS
How to add devices to DMSS mobile app
Info If you're experiencing issues live-viewing your cameras on a 4G connection p...
 DMSS is a remote surveillance app that can be used to view your Devices remotely.
It can be used access Live view, Recorded playback, get event notifications, and receive calls and unlock door stations away from home.
DMSS can be found on the Google Play store and iOS App Store.
How to add devices to DMSS via P2P
1. Select the Plus Icon At the Top Right.

2. If you are Not Logged in DMSS will give you this Message. At which you can either Log In or continue to add the device as a Local Device.

3. Select Scan QR Code

4. Scan the QR code for your Device's Serial Number, then click Next
Info
The QR code can be found at Main Menu > Network > P2P (or Easy4IP) on a recorder AND on the box the device came in.

5. After scanning your Serial Number It Will Appear in the Box.
Note
The Security code Dialog box is for only for certain Devices are not usually associated with NVR's and Cameras and can be Ignored.
Select Next.

6. Select the type of device you wish to add.
NVR for an NVR for a recorder with IP cameras
DVR/XVR for a recorder with CVI cameras
VTO for a Door Station
Wired Camera for a standalone Camera wired to a switch or router

7. Enter In details of the Device
i. Name Device, this is how you'll identify your device (home, office etc. ii. Enter Username of the device. iii. Enter The password of the Device
After you've entered those details select Save.

8. Confirm your Time Zone and DST is Set correctly. Select Next

9. This Is How It Will Appear on Your Home Screen

Adding Devices Via IP/Domain
If you wish to add a device to DMSS via it's IP address you will need to use Port Forwarding.
If you are unfamiliar with Port forwarding, we suggest that you use the P2P method outlined above.
1. Select Plus Button at top Right
2. Select IP/Domain

3. Select Add Mode If you to add via a different mode

4. Select on Which Protocol You Will be Using

5. Enter the NVR Information Address, Name, Username, Device Password and Select Save

Add Device Over Local Network
1. Select Plus Icon At the Top Right.
2. Select Search on LAN

3. Select Your Device From The ones Listed

4 . Select Add Mode And Select P2P or Domain (Note Selecting Domain/IP will allow access while on the same Network as the device)

Video Guide
Sharing Devices to Another Account
1. On Home Menu Select the 3 dots of the device you wish to share.

2. Select Share Device.

3. Enter the DMSS account you want it shared with and select what permissions you want that account to have access to.

4. Have the shared to account fully close and Reopen app. And the device should appear.
Revoking DMSS Shared Devices
If for any reason a shared needs to have their permission revoked follow Steps Below
1. On the Home Screen Select the Device you want to manage.

2. Select Share Device.

3. Select which Account you want to manage.
4. Select Cancel Sharing And Confirm

5. That User will no longer have access to the listed Device.
Set the DNS Server to match the Default Gateway
NVR
- Navigate to Main Menu > Network > TCP/IP
- Set the Preferred DNS to match the Default Gateway
- Click Apply

Intercom (OC 2.2)
On a laptop that is connected to the same network as the Door Station (Via Wifi or plugged into the same switch as the Door Station) open Internet Explorer and type the IP Address of the Door Station into the address bar at the top. The default IP Address is 192.168.1.110.
Log in and navigate to System Config > Network Config > TCP/IP
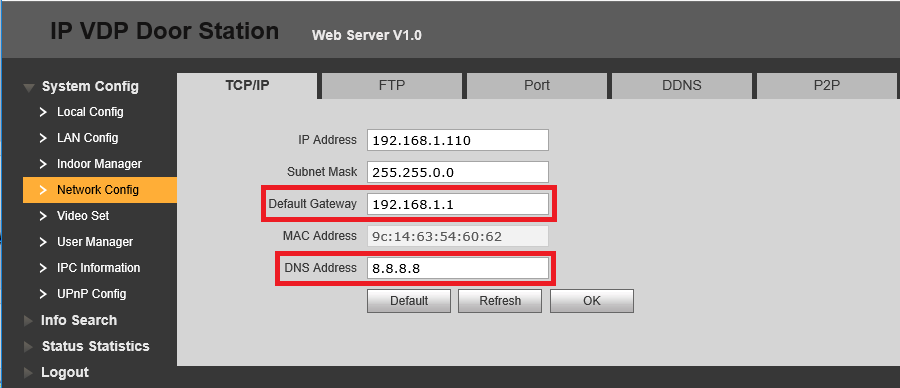
If the DNS Address is 8.8.8.8, set it to be the same as the Default Gateway.
If the DNS Address is the same as the Default Gateway, set it to 8.8.8.8.
Intercom (SIP)
Log in and Navigate to Network Setting > Basic
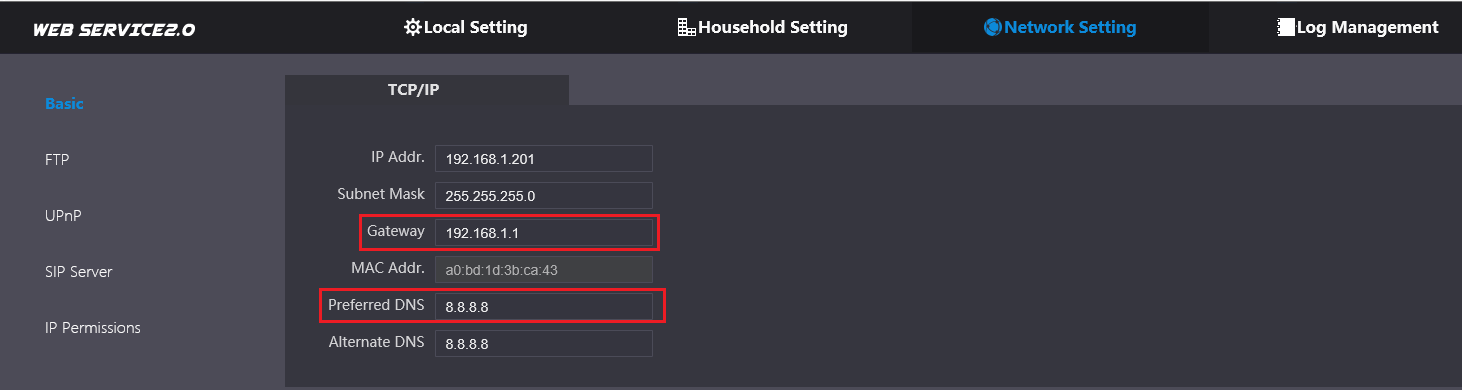
If the Preferred DNS is 8.8.8.8, set it to be the same as the Gateway.
If the Preferred DNS is the same as the Gateway, set it to 8.8.8.8.
Check to see if there is an iOS/Android update
Check for updates on Android
- Open your phone's Settings app.
- Near the bottom, tap System And then Advanced And then System update.
Check for updates on iOS
 |
|
Re-install the App
How to uninstall and reinstall DMSS
How to uninstall and reinstall DMSS
Step 1 - Backup the Devices on your App Tap on Tap on Tap the devices you wish to...
How to configure notifications
You will need to configure notifications again after reinstalling the app. See the Instructions below.
How to subscribe to notifications in the DMSS Mobile App
DMSS can be found on the Google Play store and iOS App Store. If you haven't ad...
|
DMSS is a remote surveillance app that can be used to access your security products remotely. You can configure a whole range of push notifications in the DMSS app.
|
Enabling Notifications On DMSS
1. On the Home Page select the three dots of the device.
2. Then Select Device Details
3. Select Message
4. Select Notification and turn it for its Blue
5. Select Receive Messages and Send Notifications if you want DMSS to log and send Notifications.
Then Select Message Type
6. Select Notification type the you want to receive.
Note you will only receive notifications types that already enabled on your device ( e.g. Intrusion/tripwire is set up and enabled in IVS)
7. Select which Channels you want to get notifications from.
8. Back out to the home screen and select device details again. Ensure that notifications on there is also enabled.
9. An example of a Notification
Notification on Intercom
While adding Intercoms to the DMSS app,
The Intercom unit should be added under a DMSS account.
Also, make sure the Background app refresh is 'enabled' and also the show previews is set to 'Always'
Video Guide