Below are some problems that can be encountered with IP Cameras, and ways to resolve them.
No cameras appearing on screen and not showing in camera registration
Check the network cable is wired correctly and is not damaged. Use a cable tester to verify cable integrity.
Ensure the cable is terminated to T-568A on both ends, or T-568B on both ends.
Do not terminate T-568A on one end, and T-568B on the other, as this will create a Crossover cable which is not suitable in this application.
When using terminating cable, it is not a matter of wiring them in any order as long as its the same on both ends. This will not work. This is a common problem that is encountered on new installations.

Below is a video which covers in depth troubleshooting.
Cameras are shown in registration with a connected status, but cannot live view
If cameras are added to the recorder and show as connected, but you are unable to view them live or on playback, check the below things.

- Check the camera model and the recorder model, to ensure that the recorder can handle the camera's resolution.
- Ensure the image settings are set correctly. Right click on the live view of the camera and select Image.
- Default the camera encode settings.
Invalid Username or Password
If you see this error, it means Camera Registration is trying to access your camera with the incorrect login information.
Cameras plugged into a Switch
If you know the password of the camera, you will just need to update the password of the camera in Camera Registration.
(Black GUI) Update Password in Camera List
Open Camera Registration by right clicking and selecting Main Menu > Camera > Camera List
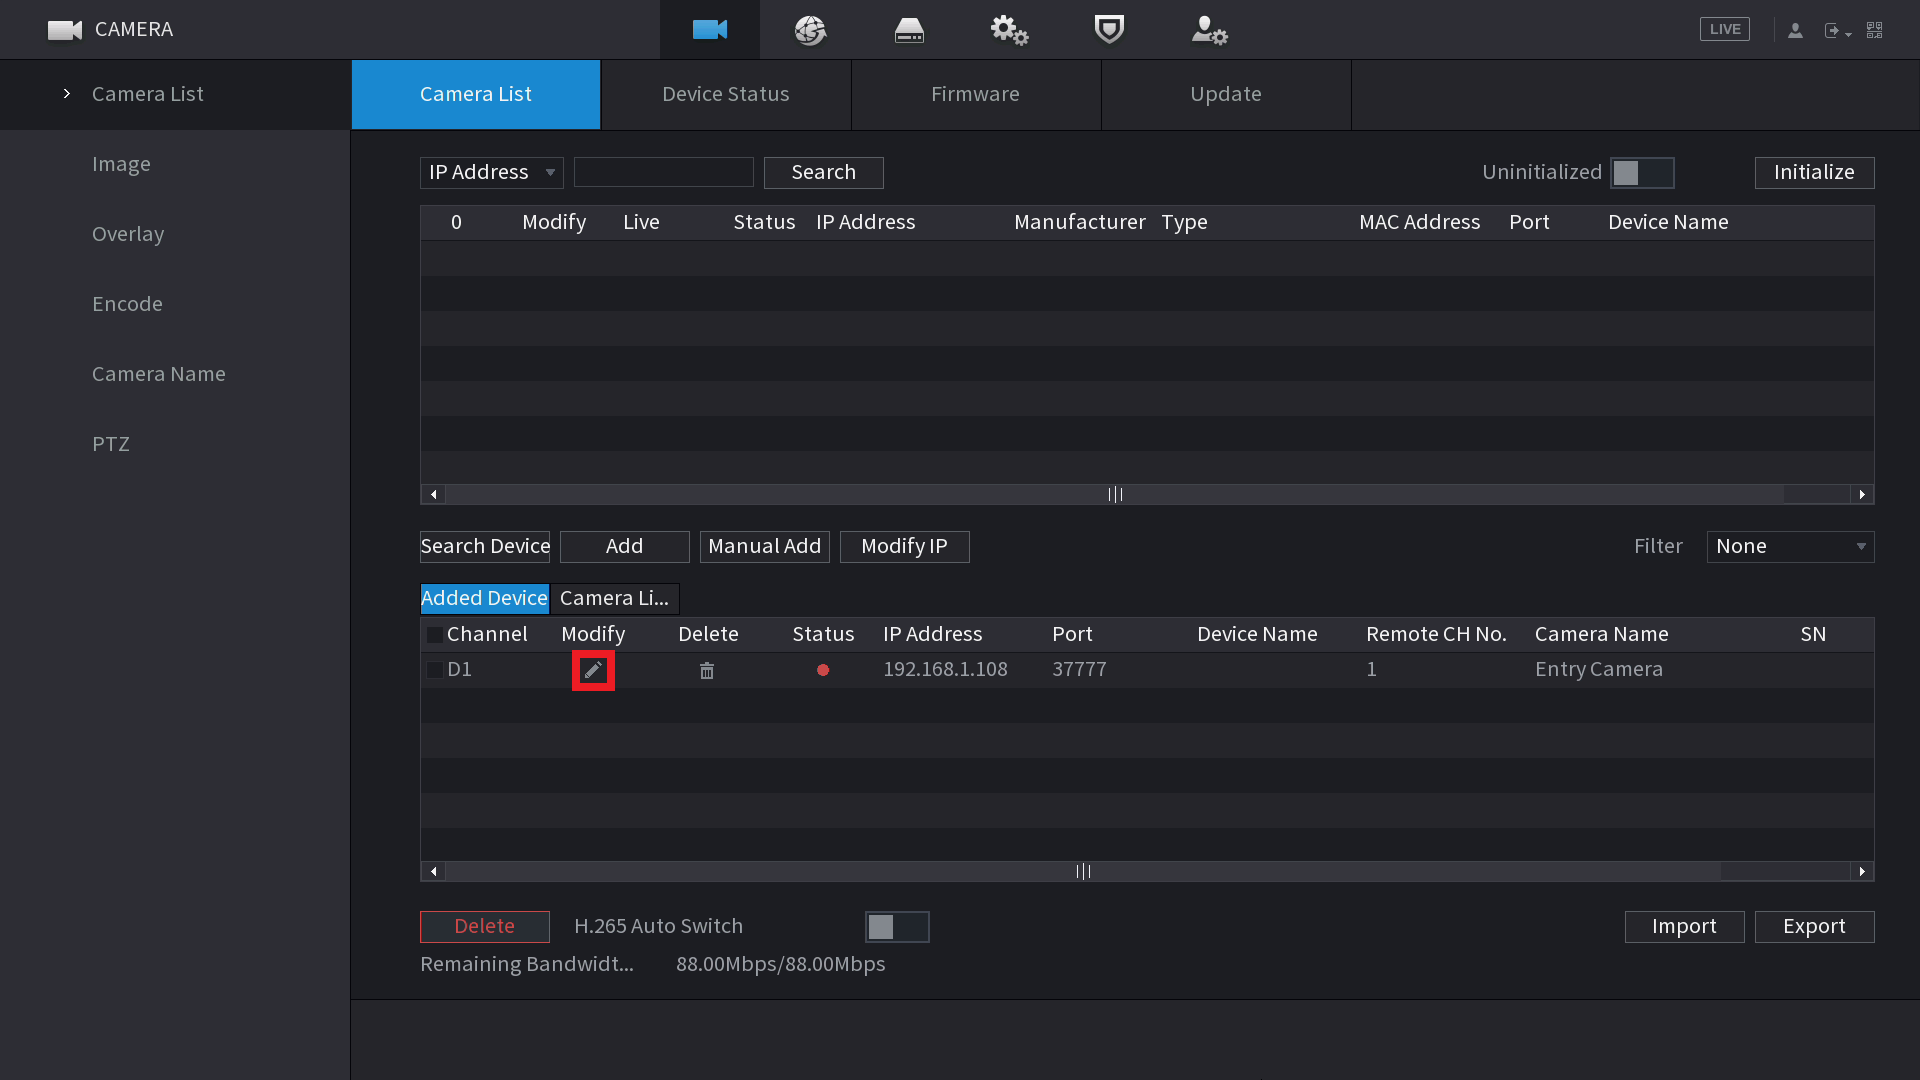
Click on the Modify pencil  of the camera with the error. It's Status will likely be red.
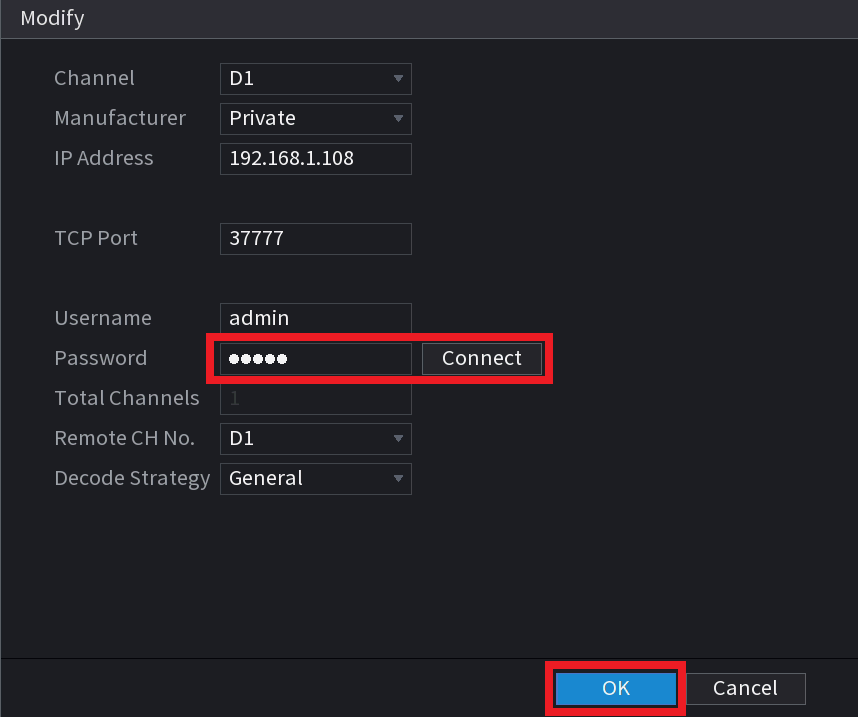
Enter the password of the Camera (You would have set this during the initialisation process in Config Tool) and click Connect, then OK.
If you still see the Account Locked error, you may need to reboot the camera by unplugging it briefly.
(Blue GUI) Update Password in Camera Registration
Open Camera Registration by right clicking and selecting Camera Registration OR by Navigating to Main Menu > Camera > Registration
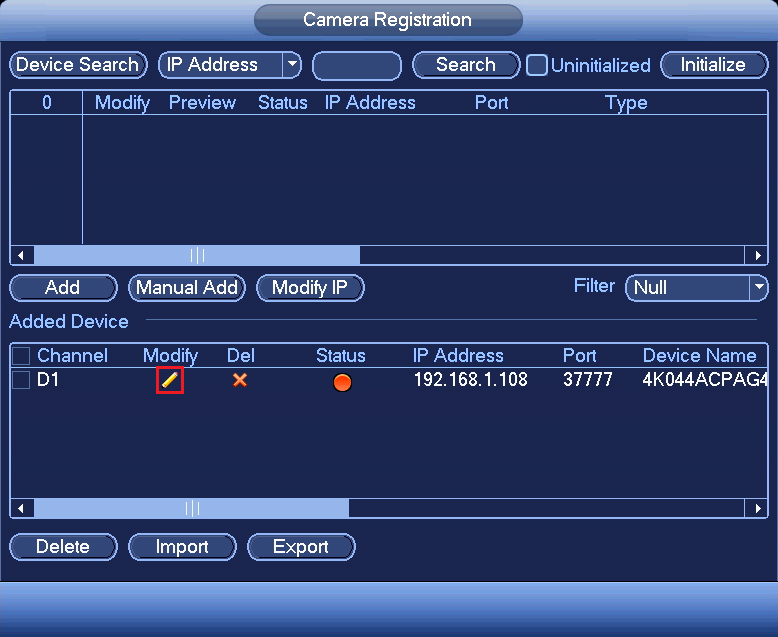
Click on the Modify pencil  of the camera with the error. It's Status will likely be red.
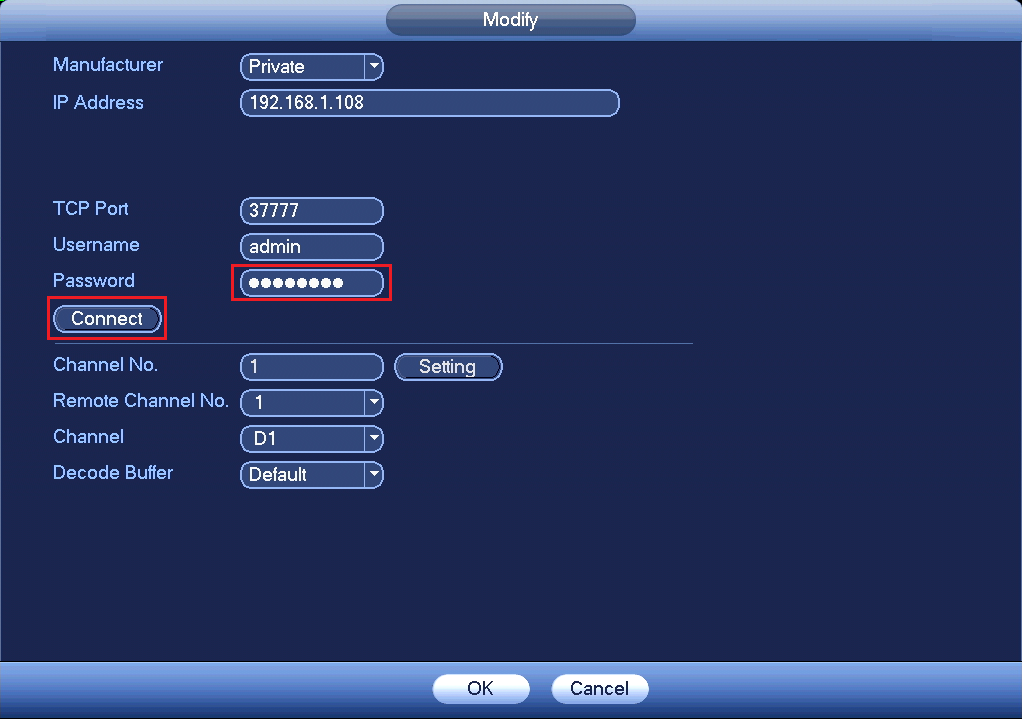
Enter the password of the Camera (You would have set this during the initialisation process in Config Tool) and click Connect, then OK.
If you still see the Account Locked error, you may need to reboot the camera by unplugging it briefly.
If you don't know the password of the Camera you will have to reset it.
Reset IP Camera Guide
Turret Cameras
Reset Button under Flap
AI turret cameras, or turret cameras built post 2021 usually have their reset button located under a flap next to the MicroSD card slot. Press and hold the reset button for 30 seconds while the camera is powered on to reset the camera.

Reset Button on Mainboard
Cameras built pre-2021 require the camera to be opened to expose the mainboard.
Once opened, the button will on the edge of the mainboard (see left image), press and hold this button for 30 seconds while the camera is powered on. In some cases you may need to undo two screws holding the mainboard in place, as the the button may be on the underside or on the second board.
When no button can be found, the reset may be performed by shorting two copper pads (see right image) for 30 seconds using a paperclip while the camera is powered on.

Turret Camera reset locations for specific models
|
VSIPC-4DIRMG You will need to undo some screws to lift up the mainboard to access this reset button. |
 |
|
VSIP1MPVDMINIIRC VSIP3MPVDMINIIRC |
 |
|
VSIP4MPVDMINIIRCA3.6 You will have to undo 2x screws on the metal plate in order to lift up the mainboard to find this reset. |
 |
|
VSIPE4MPVDMINIIRCB2.8 VSIPE6MPVDMINIIRC3.6 VSIPC-6DIRC |
 |
| VSIPE8MPVDIRMG |  |
|
VSIP4MPVDIRME |
 |
Vandal Dome Cameras
To access the reset button on large vandal dome cameras, you will need to first remove the vandal dome (see left image) by removing 3 screws.
The most common style of reset button will be the one in the middle image. Press and hold it for 30 seconds while the camera is powered on to reset it.
If there is no button, there may be copper pads you can short out for 30 seconds to reset the camera (right side of right image). There may also be four silver pads located where the reset button would usually be (left side of right image) you can short out two of vertically or diagonally for 30 seconds to reset the camera. Do not attempt to short any other part of the camera as you may cause irreversible damage.

Large Vandal Dome Cameras
To access the reset button on large vandal dome cameras, you will need to first remove the vandal dome (see left image) by removing 3 screws.
The reset button will then be located toward the edge of the housing, recessed into the plastic (see right image). Press and hold the button for 30 seconds to reset the camera.

Vandal Dome Camera reset locations for specific models
|
VSIPC-4DIRD Short out the two silver pins (E.g. by using a paperclip) for 30 seconds while the camera is powered on. OR short out the two copper coloured holes (Right side of image) |
 |
|
VSIPC-4DIRMD Press and hold the button for 30 seconds OR if no button exists, short out 2 silver pins diagonally with wire for 30 seconds |
 |
| VSIP4MPVDIRMD |  |
| VSIP3MPVDIRM2.8-12 |  |
|
VSIP3MPVDMINIIR (Mainboard may be black instead of green) VSIP4MPVDMINIIR |
 |
| VSIP2MPVDIRLV2 VSIPE8MPVDIRM |
 |
Bullet Cameras
Most Bullet Cameras will have a flap that will reveal the MicroSD card slot and reset button. Press and hold the button for 30 seconds to reset the camera. Some cameras will not have a reset button, instead they will have two copper pads (see right image) which you can short out with a paperclip for 30 seconds to reset the camera.

Bullet cameras without a flap
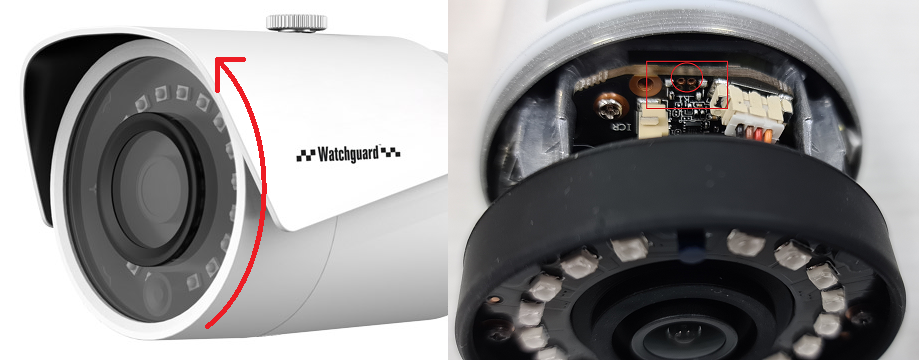
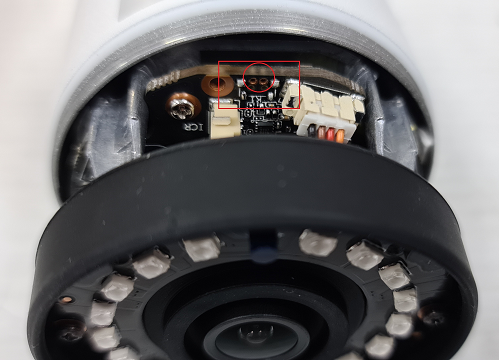
For cameras without a reset flap you will need to remove the front of the camera (e.g by unscrewing it for cylindrical cameras) to access the reset button. Some cameras will have a physical button to press and hold for 30 seconds to reset it. Other cameras (see right image) will have copper pads to short out for 30 seconds to reset the camera.
Bullet Camera reset locations for specific models
|
VSIPC-4BIRS Short out two of the copper pads (E.g by using a paperclip) for 30 seconds while the camera is powered on. |
 |
|
VSIP3MPFBIRM2.8-12 Short out two of the copper pads (E.g by using a paperclip) for 30 seconds while the camera is powered on. |
 |
|
VSIP4MPFBIRM2.8-12 Short out two of the silver pins (E.g by using a paperclip) for 30 seconds while the camera is powered on. |
 |
|
VSIP4MPFBIRMD VSIP8MPFBIRMD |
 |
| VSIPE2MPFBMINIIR |
 |
PTZ Cameras
PTZ Camera reset locations for specific models
|
VIP2MPPTZIRW You will have to undo 4 screws on the back to get access. |
 |
|
VSIP2MPPTZCV3 Remove the outer shell and round lens cover (4 x Phillips screws) Press & hold button for 30 seconds. |
 |
|
VSIP2MPPTZV3 There will be two screws on opposite sides that you will need to remove to take the plastic housing off. Then Press & hold the gold button for 30 seconds to reset the camera. |
 
|
Fisheye Cameras
To reset a fisheye camera, you will need to undo three screws on the base of the camera to expose the mainboard.
Once the Mainboard is exposed, press and hold the reset button for 30 seconds to reset the camera.

You will then need to initialise and add the camera to the recorder again.
Camera Initialisation Guide
Initialising a camera is the process of setting a password on it. All cameras manufactured post 2018 need to be initialised before use.
If connected to the POE Port of an NVR manufacturer post 2018 this process should happen automatically.
Option 1 - Initialisation via the Web Interface
The Camera will need to be connected to the Laptop via an Ethernet cable.
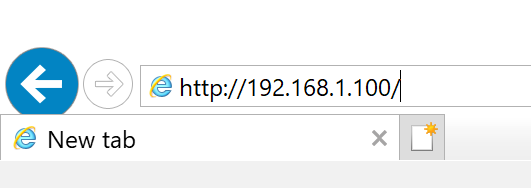
You can access the Web Interface by entering the camera's IP address into the address bar of Internet Explorer. 192.168.1.108 is the default IP of our cameras.
You may need to change the IP address of your computer to reach it.
How to change the IP Address of your computer
Windows 10
- Open Settings.
- Select Network & Internet.
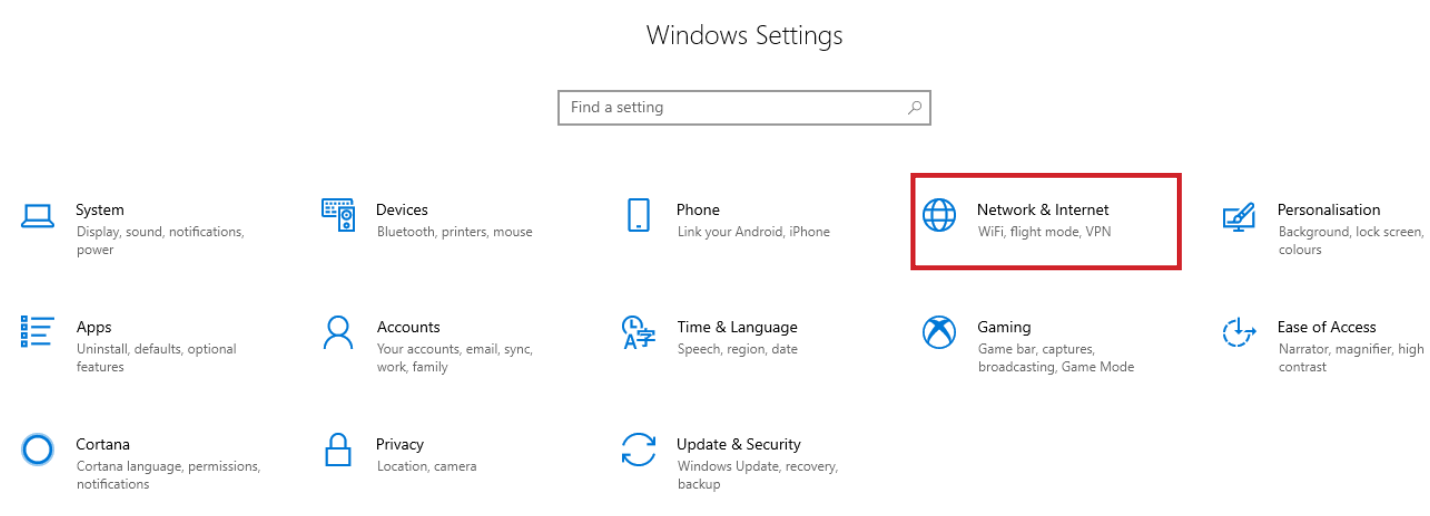
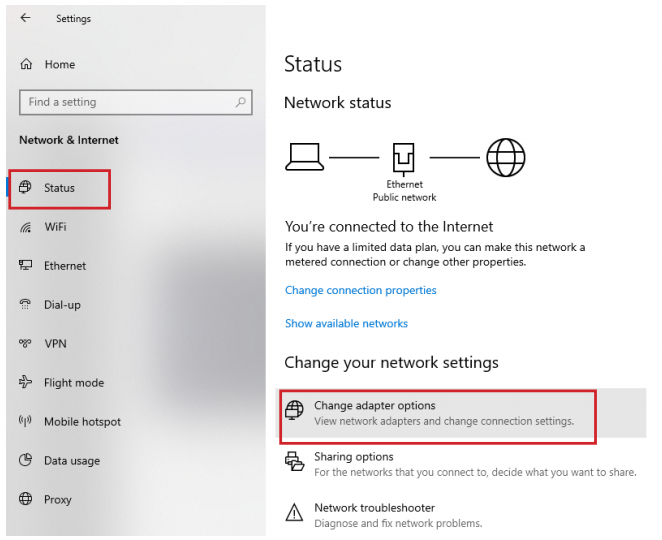
- Select Status, then Change Adapter Options.
-
Right-click the network adapter you want to change the IP address for, and select Properties.
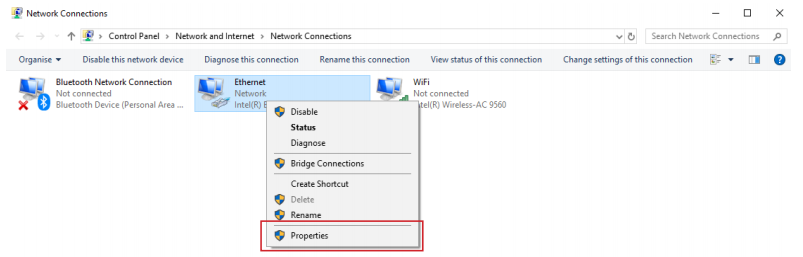
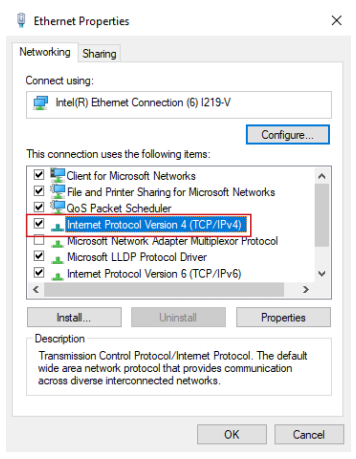
-
Double-click the Internet Protocol Version 4 (TCP/IPv4) item.
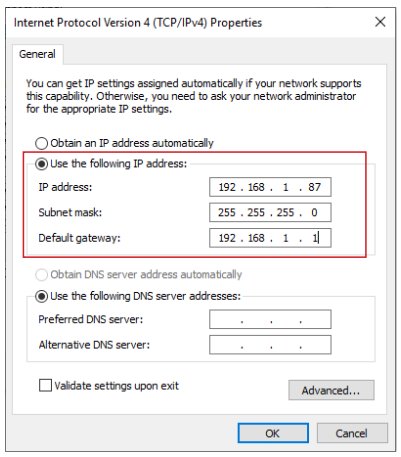
- Click Use the following IP address and enter an IP address in the same range as the device you are trying to access. (E.g when trying to access 192.168.1.108 use a IP address in the 192.168.1.x range.) Note: This cannot be the same as the device you are trying to connect to or any other device on the same network. Save your changes on both windows.
- Type the IP address of the device you are trying to access into the address bar of your web browser.
- Once finished configuring the device, change the adapter settings back to normal by following steps 1-5 and clicking Obtain an IP address automatically.
Windows 11
1. In the Windows search bar at the bottom of the page, type Control Panel and press enter.
2. Select Network and Internet.

3. Select Network and Sharing Centre.

4. Select the link for Connections in the network that you want to change the IP address for.

5. Select Properties.

6. Double-click the Internet Protocol Version 4 (TCP/IPv4) item.

7. Click Use the following IP address and enter an IP address in the same range as the device you are trying to access. (E.g when trying to access 192.168.1.108 use a IP address in the 192.168.1.x range.) Note: This cannot be the same as the device you are trying to connect to or any other device on the same network. Save your changes on both windows.

8. Type the IP address of the device you are trying to access into the address bar of your web browser.
9. Once finished configuring the device, change the adapter settings back to normal by following steps 1-6 and clicking Obtain an IP address automatically.
See the video below for a visual guide of the steps above:
Shortcut
1. In the Windows search bar at the bottom of the page, type Ncpa.cpl and press enter.
2. Right-click the network adapter you want to change the IP address for, and select Properties.
3. Select the Internet Protocol Version 4 (TCP/IPv4) item.

4. Click Use the following IP address and enter an IP address in the same range as the device you are trying to access. (E.g when trying to access 192.168.1.108 use a IP address in the 192.168.1.x range.) Note: This cannot be the same as the device you are trying to connect to or any other device on the same network. Save your changes on both windows.
5. Type the IP address of the device you are trying to access into the address bar of your web browser.
6. Once finished configuring the device, change the adapter settings back to normal by following steps 1-3 and clicking Obtain an IP address automatically.
See the video below for a visual guide of the steps above:
Delete
How to initialise a camera via Web interface 5.0
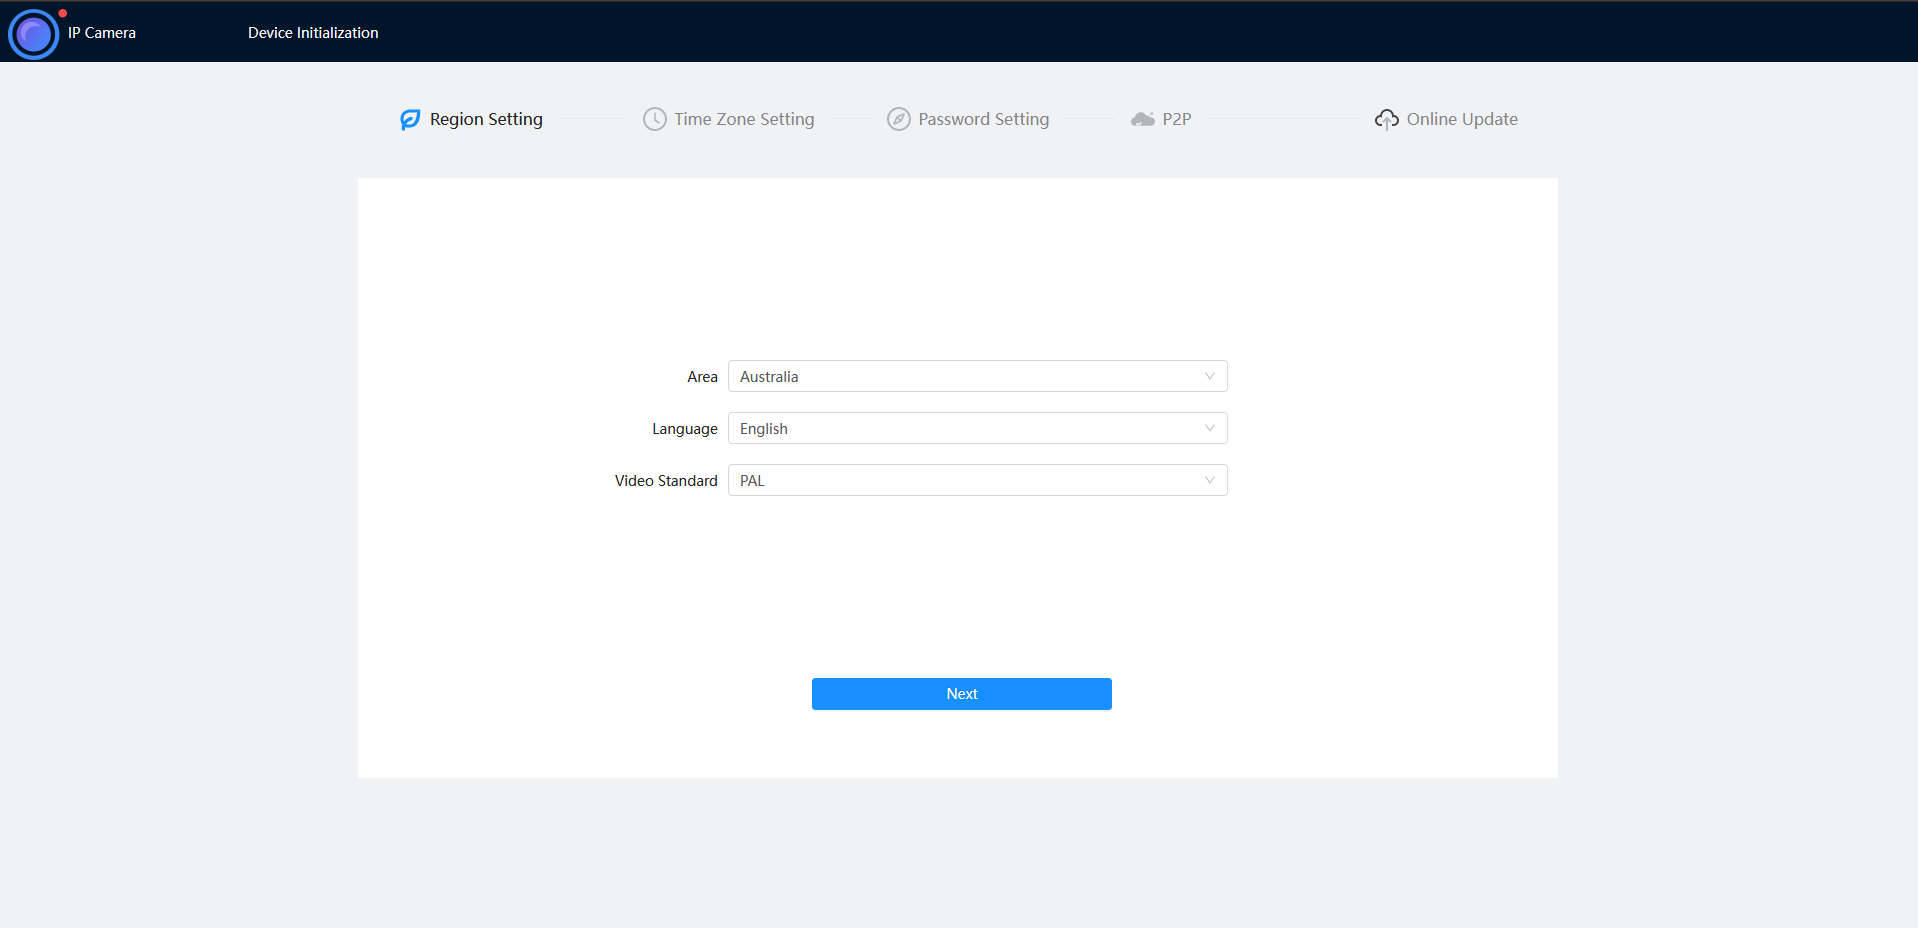
- Select your Region and Language.
- Select your Time Zone, then press Sync with PC to sync your cameras time with the PCs time.
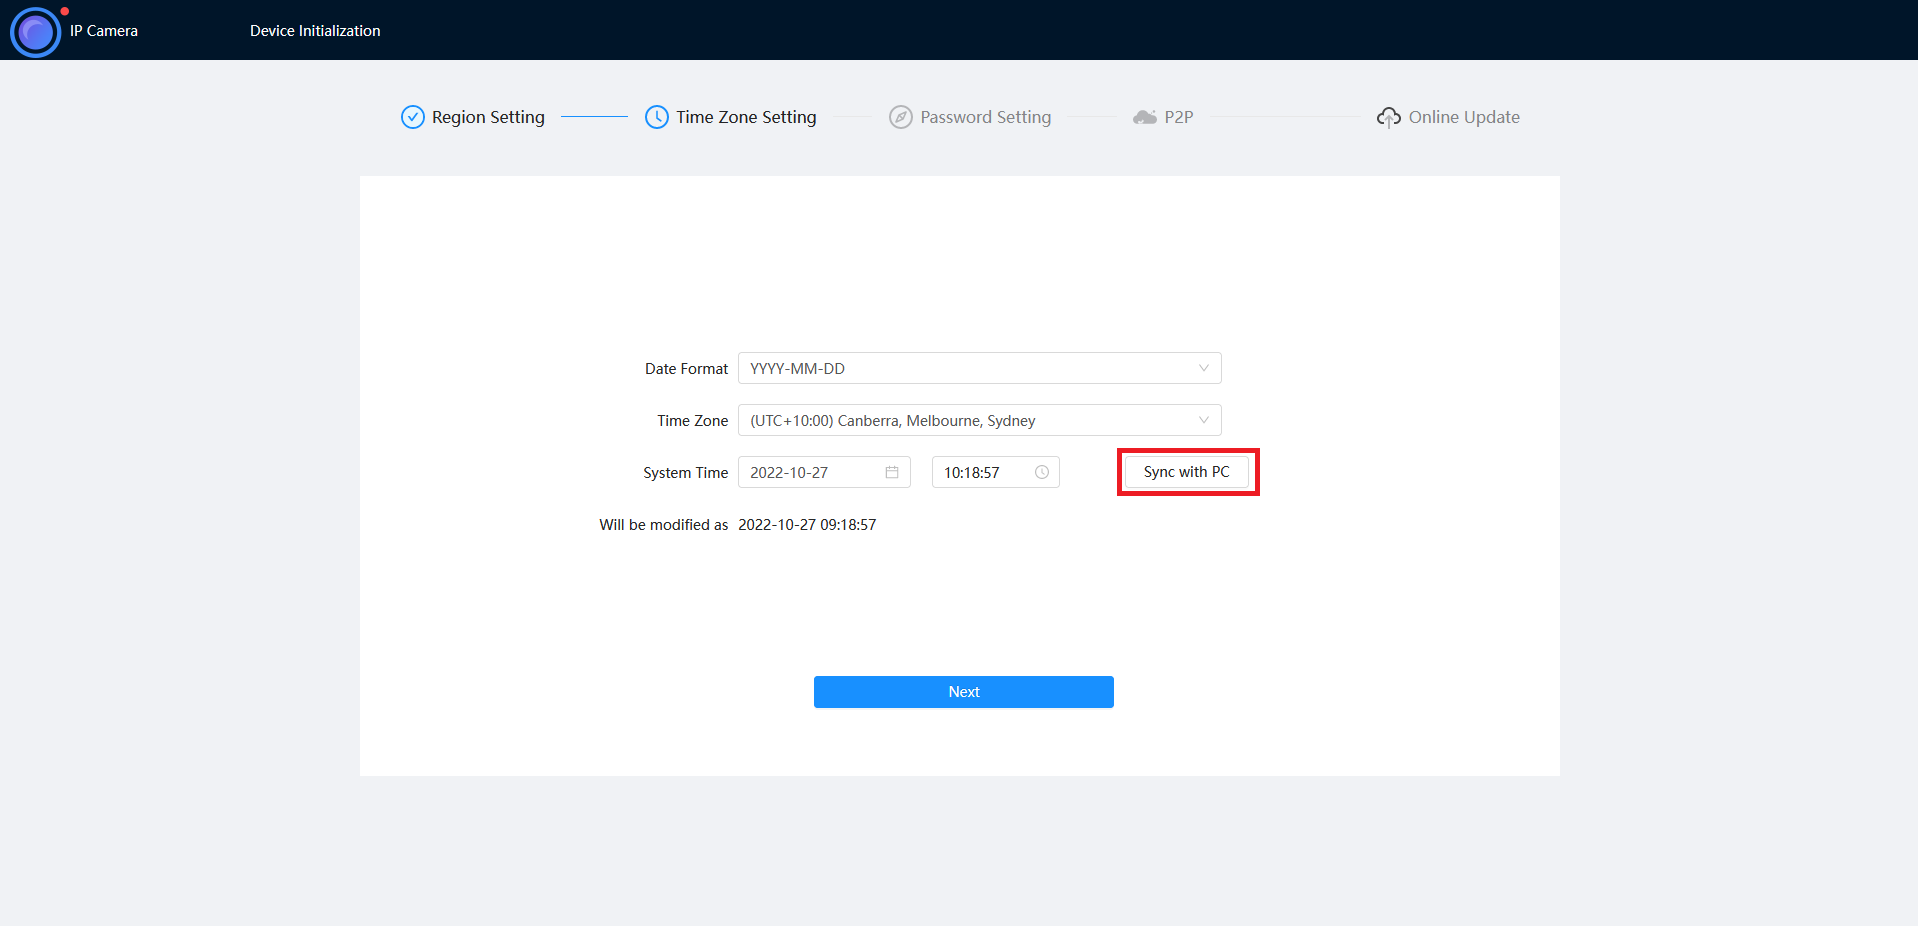
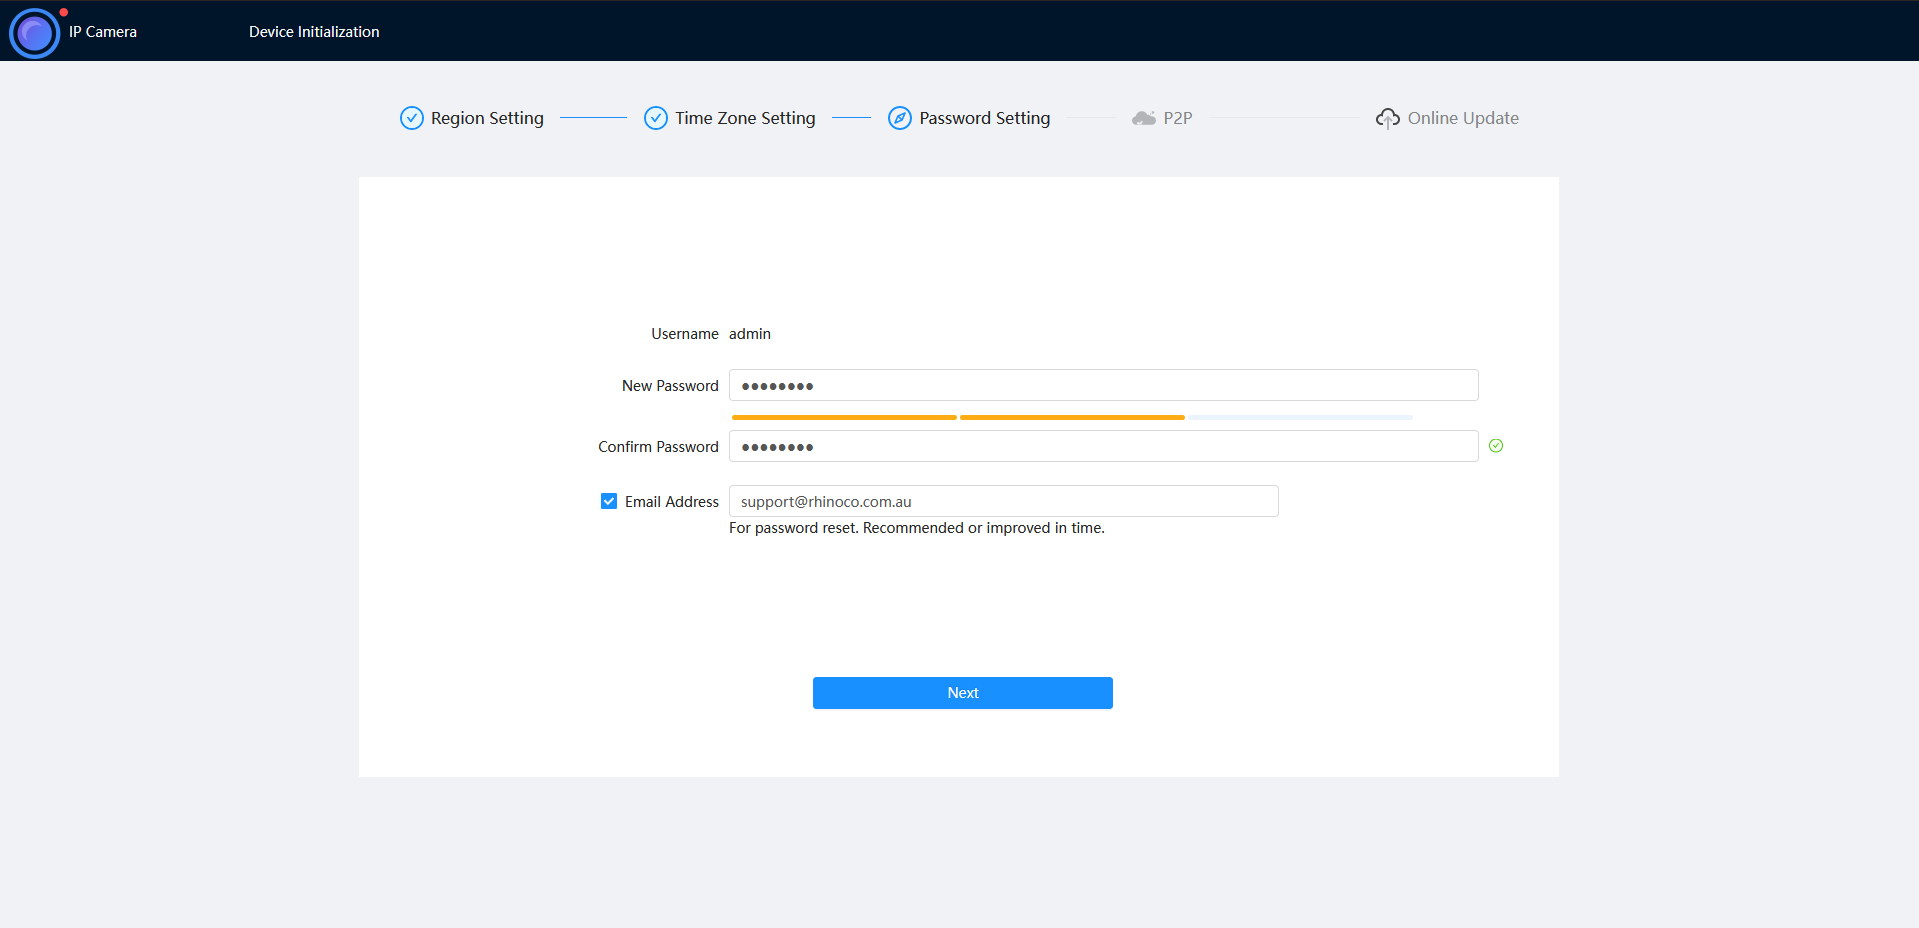
- Enter a password and recovery email.
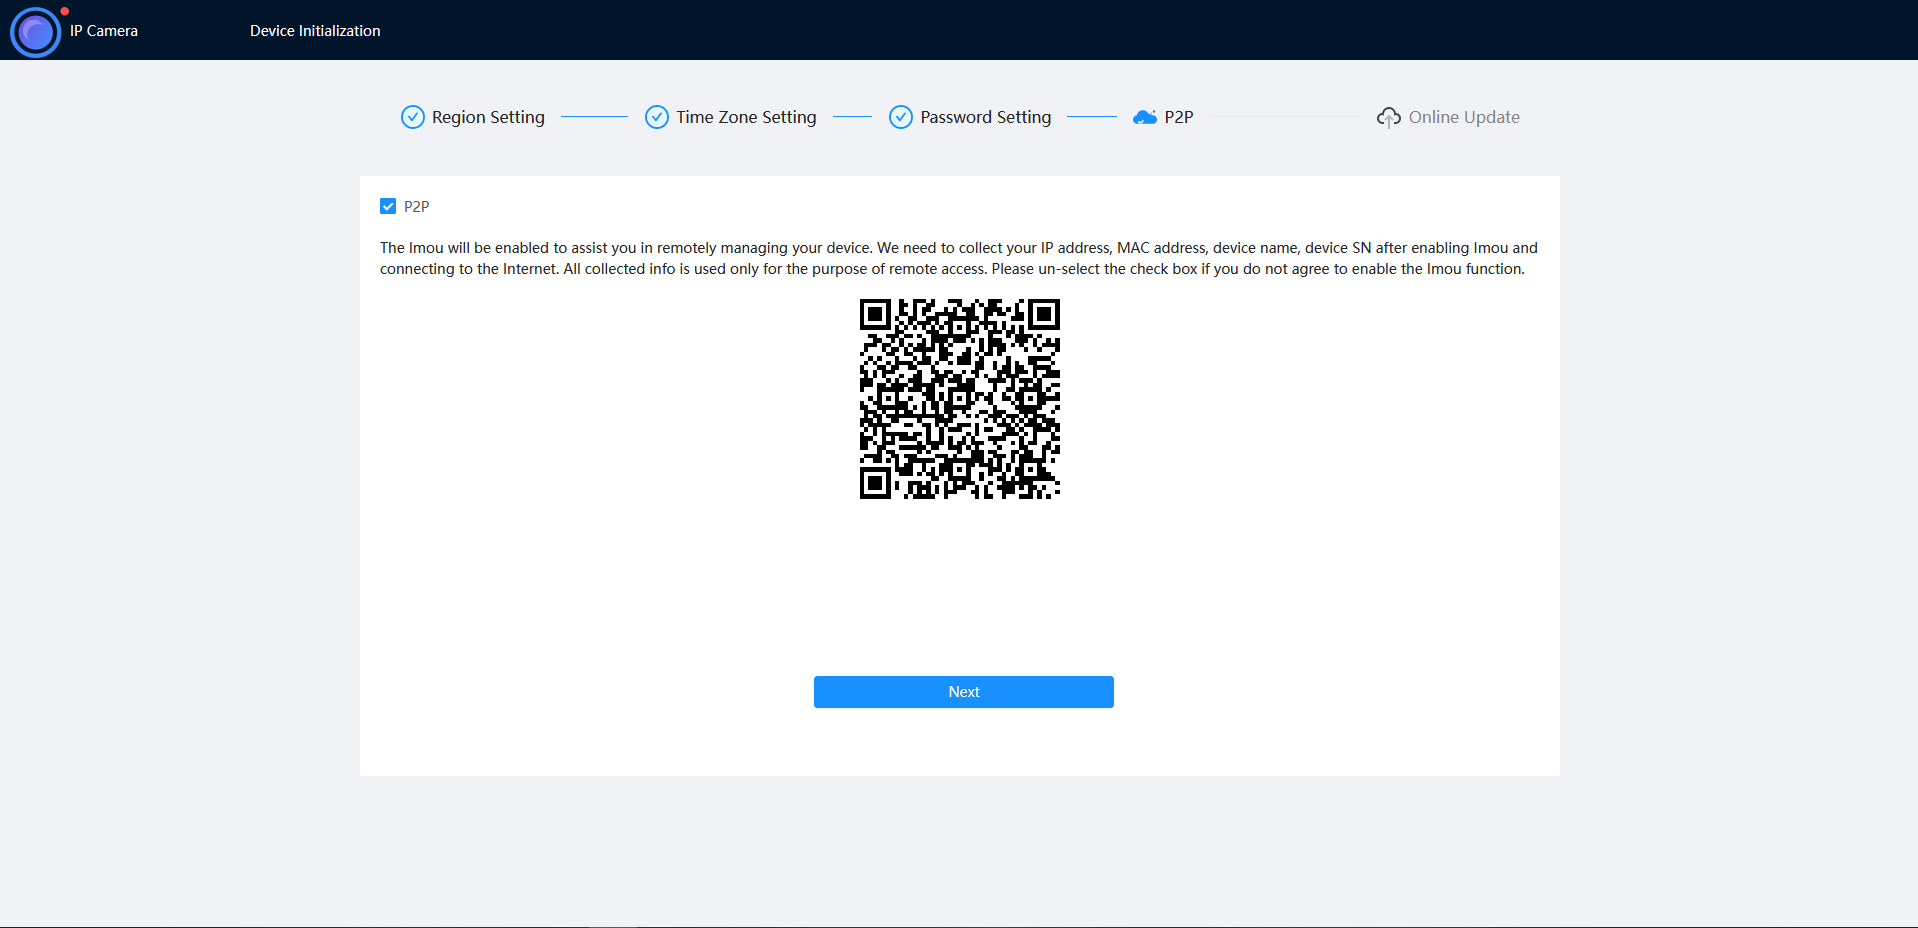
- Ensure P2P is enabled, then press Next.
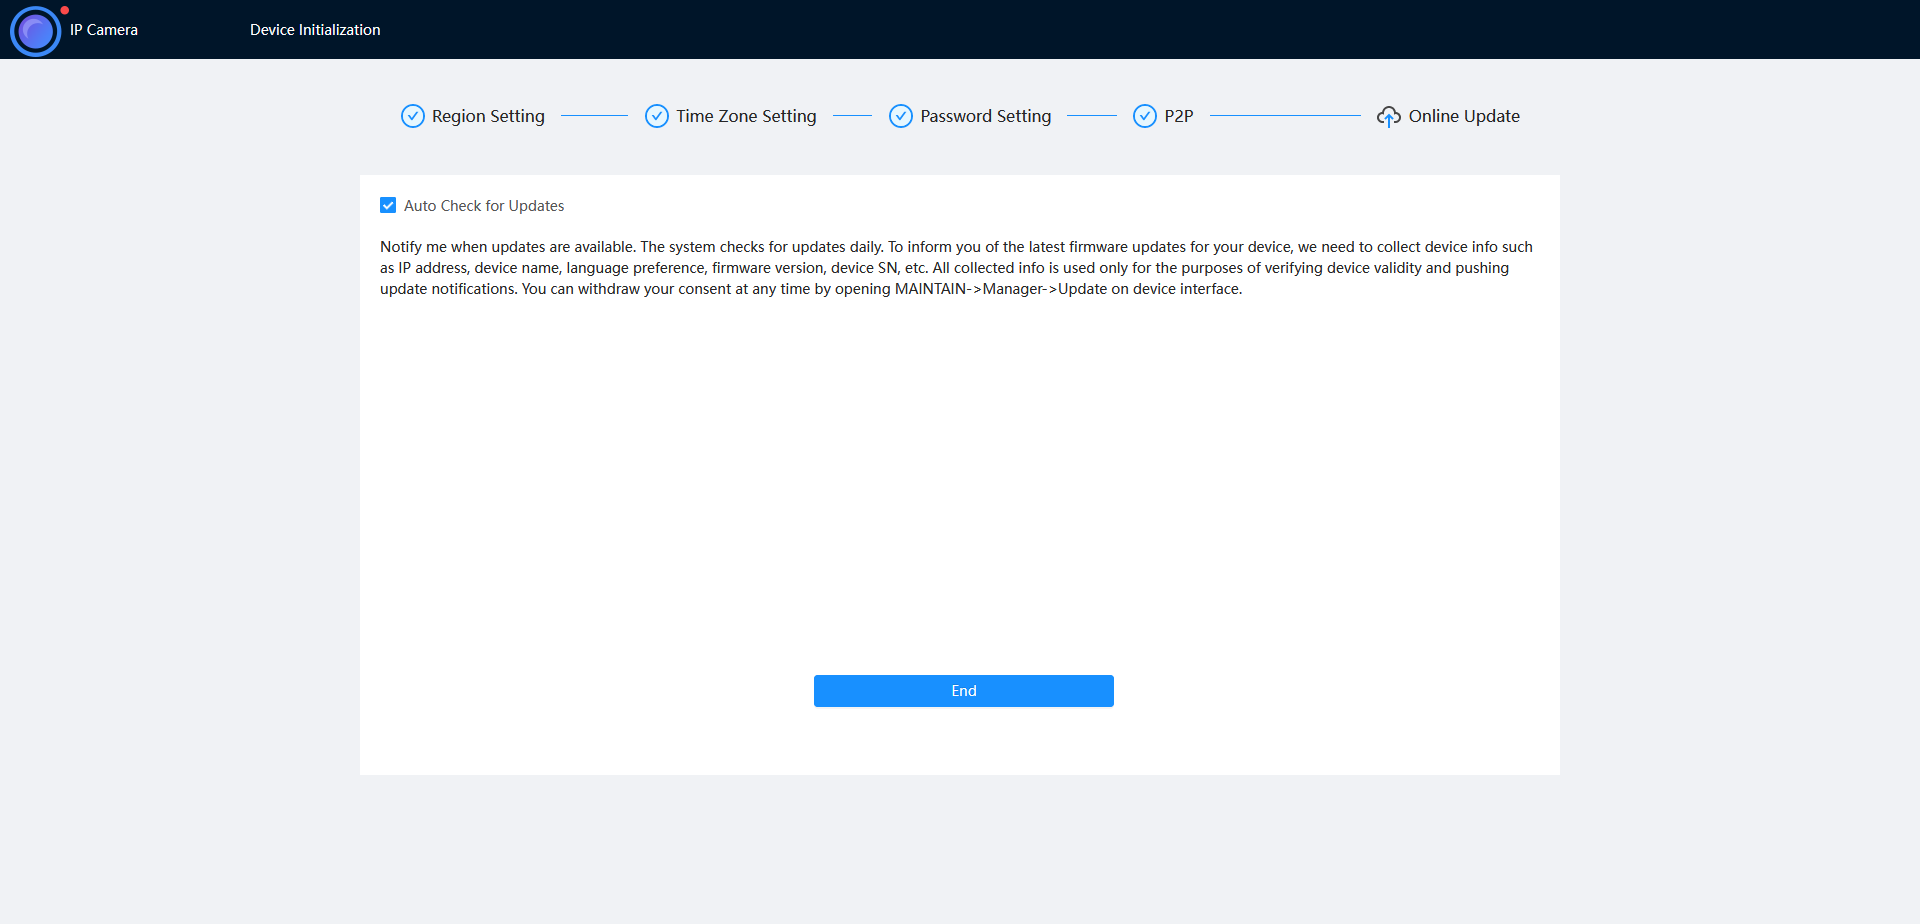
- Click End.
How to initialise a camera via Web interface 3.0
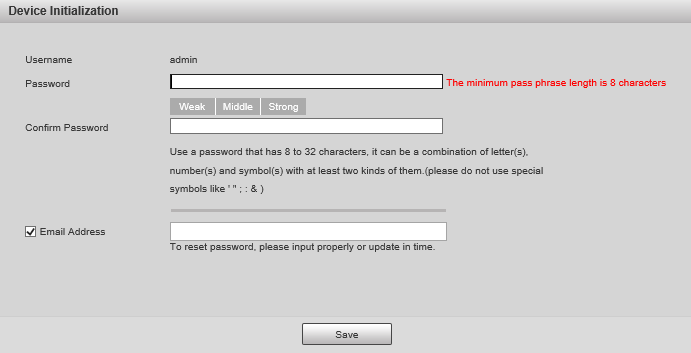
Initialize the camera by entering a new password (It will need to be at least 8 characters long), then click Save.
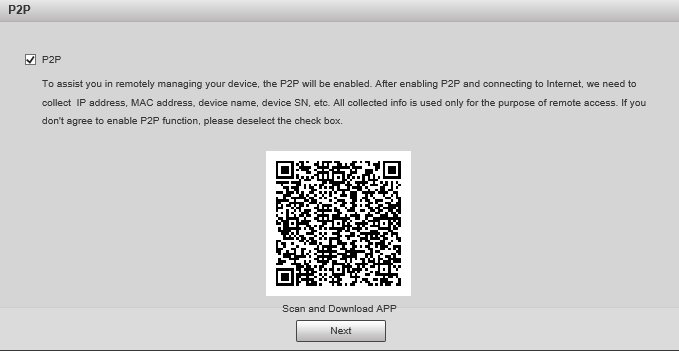
Ensure P2P is enabled and click Next
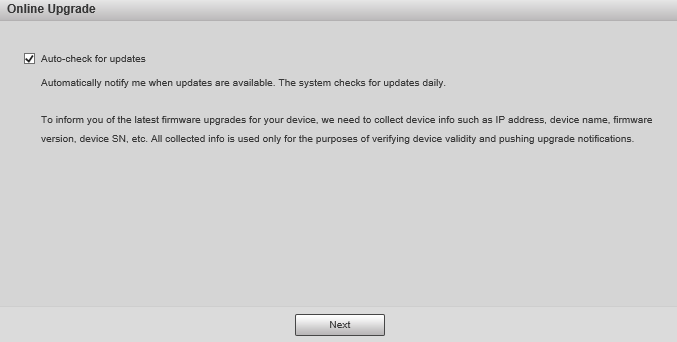
Click Next.
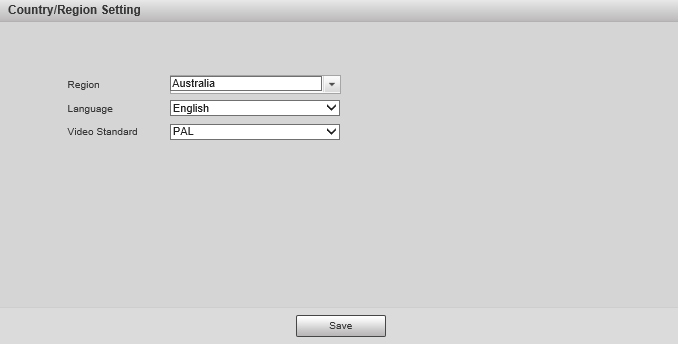
If prompted, select a region and click Save
DeleteOption 2 - Initialisation via the Config Tool
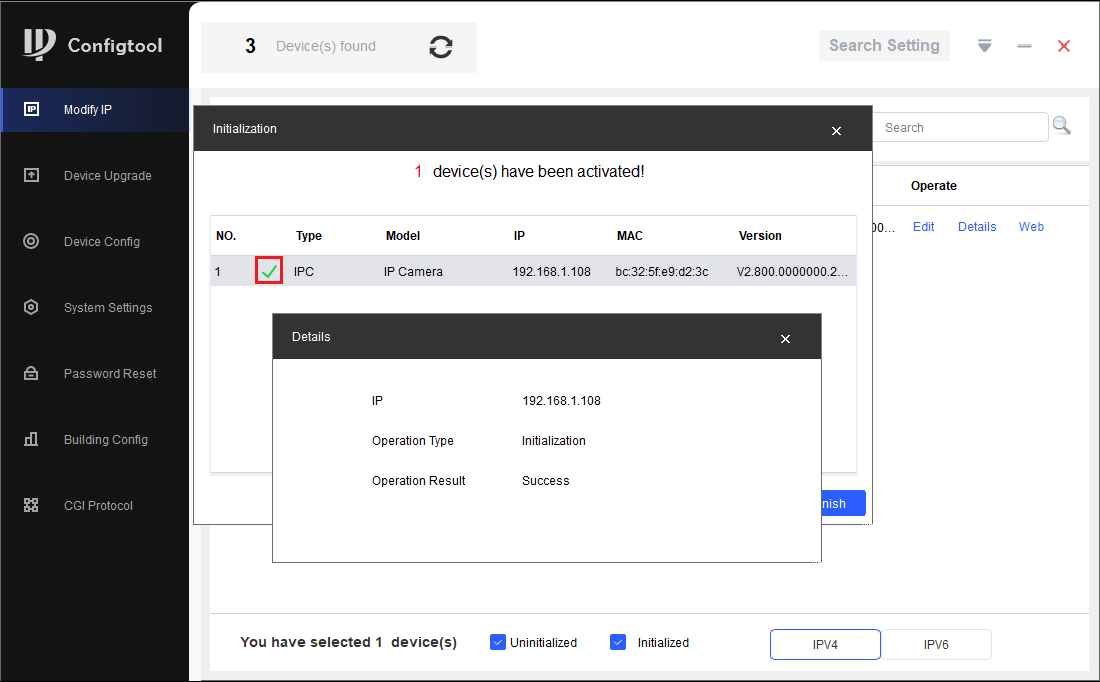
The initialisation process can also be performed using the latest version of our Config Tool - Please see the images below showing how this is done. To speed up the process the Config Tool also allows you to initialise multiple cameras at once.
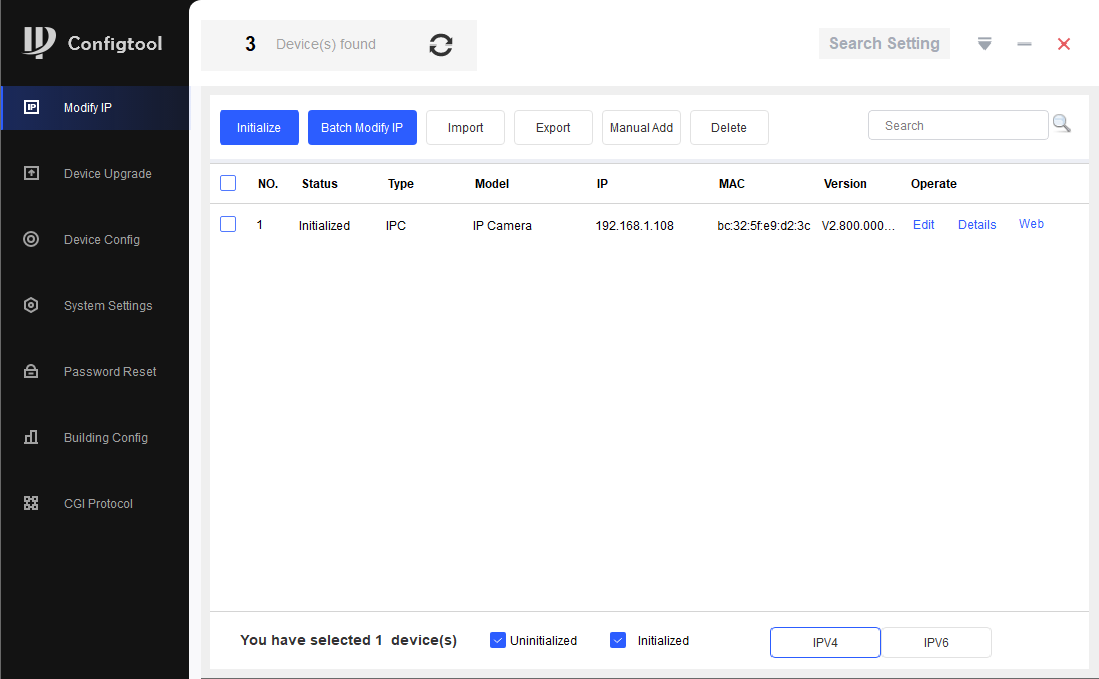
- Download and open Config Tool.
- Put a check in the box
 next to the device you would like to Initialise, and select the Initialize button.
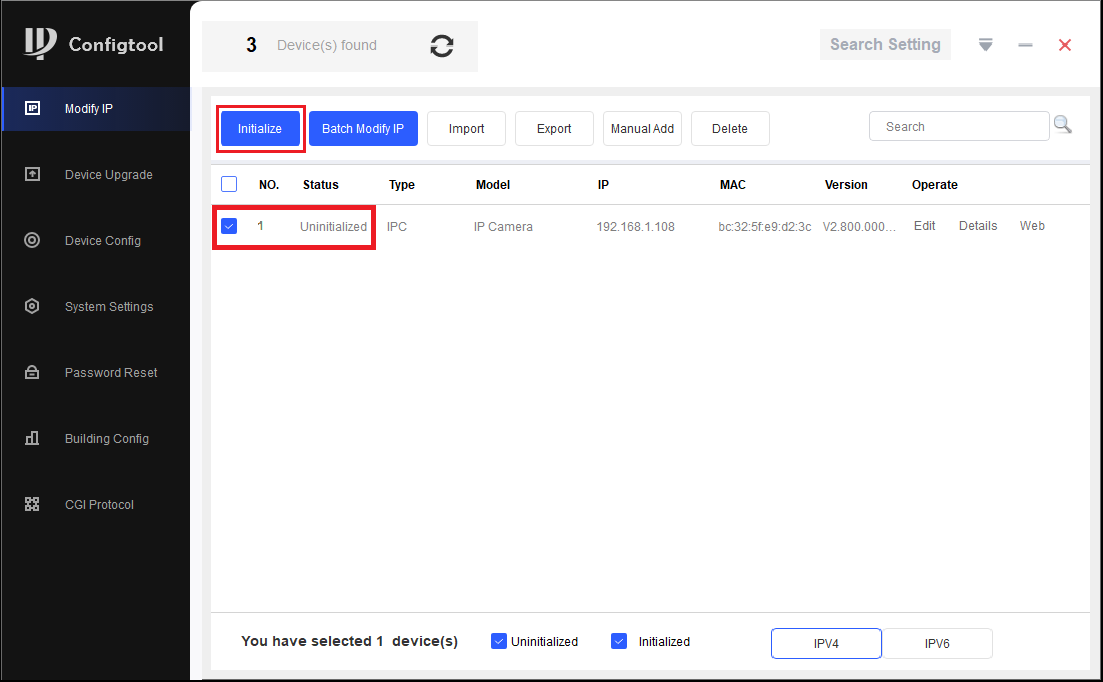
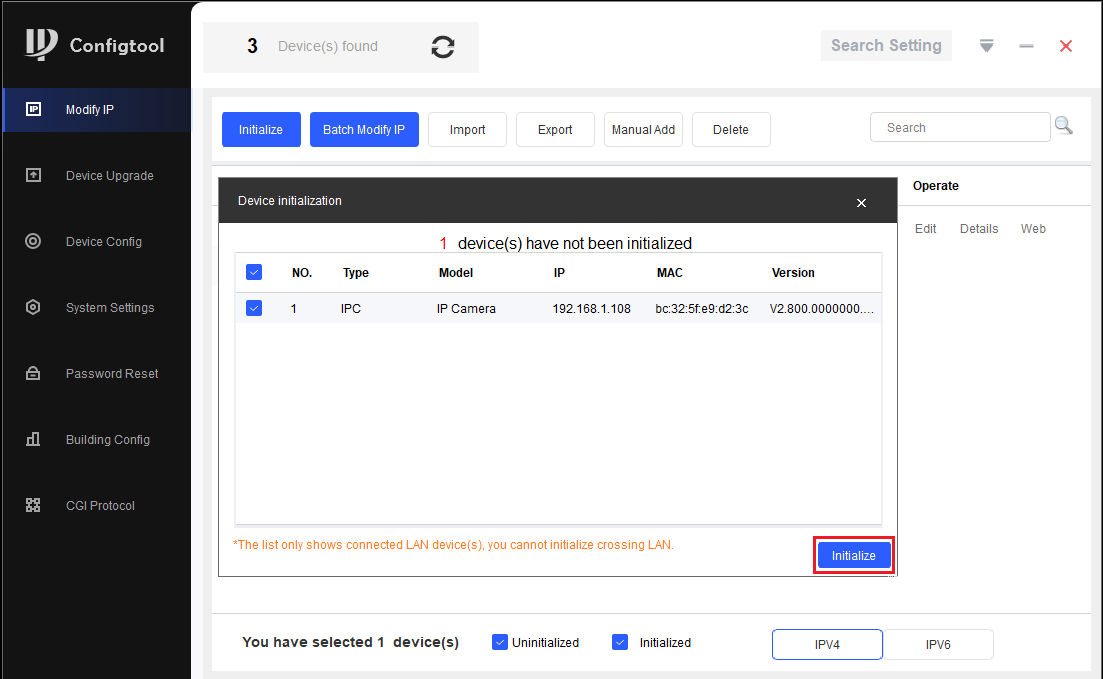
- Select the Initialize button.
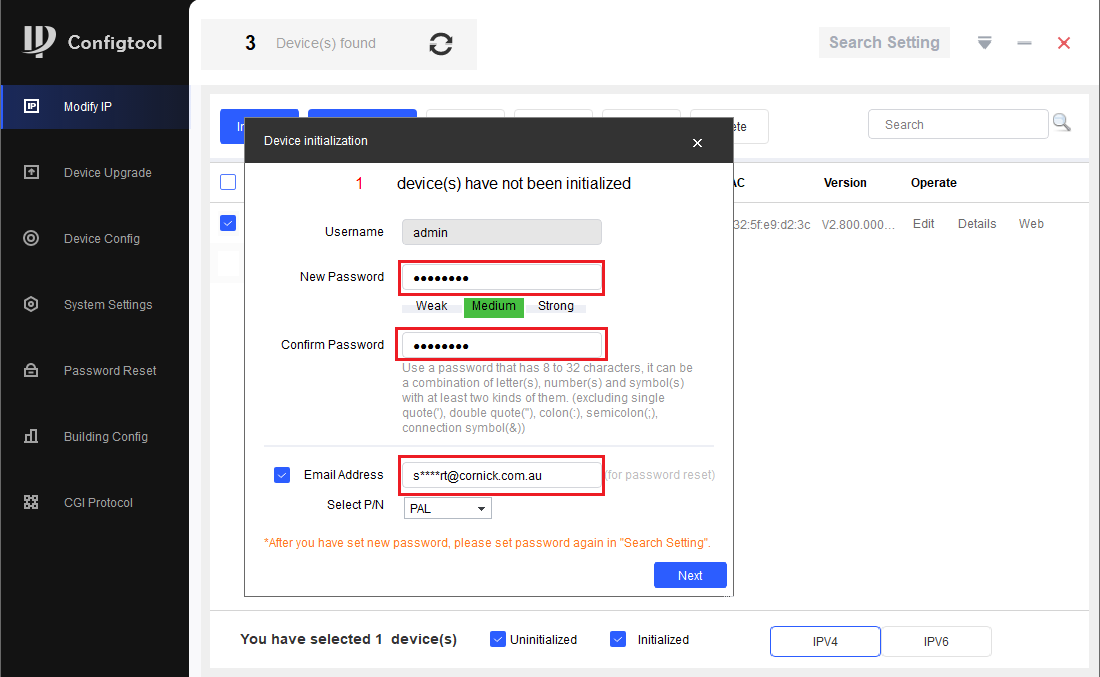
- Enter a password, that is at least 8 characters, and is a mix of letters and numbers. Enter an email address, this will be used if the password is ever forgotten. Select Next.
- Depending on the installation requirements, you can check or uncheck the boxes for Easy4IP (P2P Remote Access) and Auto-check for updates. Select OK.
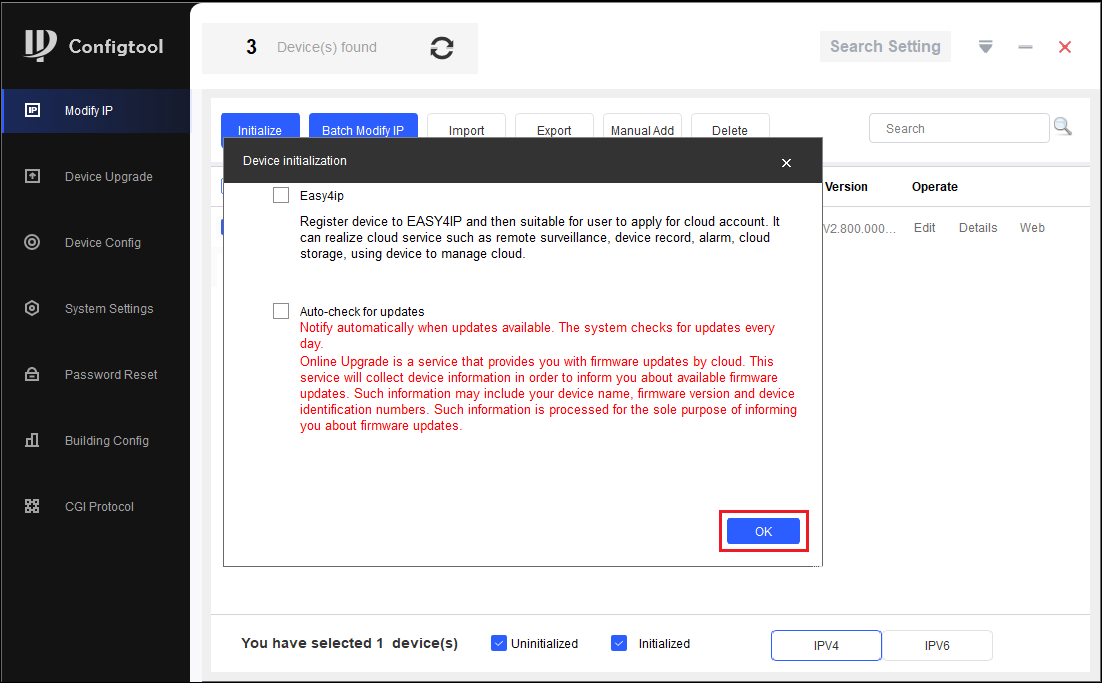
- If the status shows as Initialized, the process was completed successfully.
Camera plugged into back of an NVR
If you know the password of the camera, you will just need to update the password of the camera in Camera Registration.
(Black GUI) Update Password in Camera Registration
Open Camera Registration by right clicking and selecting Main Menu > Camera > Camera List
Click on the Modify pencil of the camera with the error. It's Status will likely be red.
Enter the password of the Camera (You would have set this during the initialisation process in Config Tool) and click "Connect", then "OK".
If you still see the Account Locked error, you may need to reboot the camera by unplugging it briefly.
(Blue GUI) Update Password in Camera Registration
Open Camera Registration by right clicking and selecting "Camera Registration" OR by Navigating to Main Menu > Camera > Registration
Click on the Modify pencil of the camera with the error. It's Status will likely be red.
Enter the password of the Camera (You would have set this during the initialisation process in Config Tool) and click "Connect", then "OK".
If you still see the Account Locked error, you may need to reboot the camera by unplugging it briefly.
If you don't know the password of the camera, you will need to reset it.
Reset IP Camera Guide
Turret Cameras
Reset Button under Flap
AI turret cameras, or turret cameras built post 2021 usually have their reset button located under a flap next to the MicroSD card slot. Press and hold the reset button for 30 seconds while the camera is powered on to reset the camera.
Reset Button on Mainboard
Cameras built pre-2021 require the camera to be opened to expose the mainboard.
Once opened, the button will on the edge of the mainboard (see left image), press and hold this button for 30 seconds while the camera is powered on. In some cases you may need to undo two screws holding the mainboard in place, as the the button may be on the underside or on the second board.
When no button can be found, the reset may be performed by shorting two copper pads (see right image) for 30 seconds using a paperclip while the camera is powered on.
Turret Camera reset locations for specific models
|
VSIPC-4DIRMG You will need to undo some screws to lift up the mainboard to access this reset button. |
|
|
VSIP1MPVDMINIIRC VSIP3MPVDMINIIRC |
|
|
VSIP4MPVDMINIIRCA3.6 You will have to undo 2x screws on the metal plate in order to lift up the mainboard to find this reset. |
|
|
VSIPE4MPVDMINIIRCB2.8 VSIPE6MPVDMINIIRC3.6 VSIPC-6DIRC |
|
| VSIPE8MPVDIRMG | |
|
VSIP4MPVDIRME |
|
Vandal Dome Cameras
To access the reset button on large vandal dome cameras, you will need to first remove the vandal dome (see left image) by removing 3 screws.
The most common style of reset button will be the one in the middle image. Press and hold it for 30 seconds while the camera is powered on to reset it.
If there is no button, there may be copper pads you can short out for 30 seconds to reset the camera (right side of right image). There may also be four silver pads located where the reset button would usually be (left side of right image) you can short out two of vertically or diagonally for 30 seconds to reset the camera. Do not attempt to short any other part of the camera as you may cause irreversible damage.
Large Vandal Dome Cameras
To access the reset button on large vandal dome cameras, you will need to first remove the vandal dome (see left image) by removing 3 screws.
The reset button will then be located toward the edge of the housing, recessed into the plastic (see right image). Press and hold the button for 30 seconds to reset the camera.
Vandal Dome Camera reset locations for specific models
|
VSIPC-4DIRD Short out the two silver pins (E.g. by using a paperclip) for 30 seconds while the camera is powered on. OR short out the two copper coloured holes (Right side of image) |
|
|
VSIPC-4DIRMD Press and hold the button for 30 seconds OR if no button exists, short out 2 silver pins diagonally with wire for 30 seconds |
|
| VSIP4MPVDIRMD | |
| VSIP3MPVDIRM2.8-12 | |
|
VSIP3MPVDMINIIR (Mainboard may be black instead of green) VSIP4MPVDMINIIR |
|
| VSIP2MPVDIRLV2 VSIPE8MPVDIRM |
|
Bullet Cameras
Most Bullet Cameras will have a flap that will reveal the MicroSD card slot and reset button. Press and hold the button for 30 seconds to reset the camera. Some cameras will not have a reset button, instead they will have two copper pads (see right image) which you can short out with a paperclip for 30 seconds to reset the camera.
Bullet cameras without a flap
For cameras without a reset flap you will need to remove the front of the camera (e.g by unscrewing it for cylindrical cameras) to access the reset button. Some cameras will have a physical button to press and hold for 30 seconds to reset it. Other cameras (see right image) will have copper pads to short out for 30 seconds to reset the camera.
Bullet Camera reset locations for specific models
|
VSIPC-4BIRS Short out two of the copper pads (E.g by using a paperclip) for 30 seconds while the camera is powered on. |
|
|
VSIP3MPFBIRM2.8-12 Short out two of the copper pads (E.g by using a paperclip) for 30 seconds while the camera is powered on. |
|
|
VSIP4MPFBIRM2.8-12 Short out two of the silver pins (E.g by using a paperclip) for 30 seconds while the camera is powered on. |
|
|
VSIP4MPFBIRMD VSIP8MPFBIRMD |
|
| VSIPE2MPFBMINIIR |
|
PTZ Cameras
PTZ Camera reset locations for specific models
|
VIP2MPPTZIRW You will have to undo 4 screws on the back to get access. |
|
|
VSIP2MPPTZCV3 Remove the outer shell and round lens cover (4 x Phillips screws) Press & hold button for 30 seconds. |
|
|
VSIP2MPPTZV3 There will be two screws on opposite sides that you will need to remove to take the plastic housing off. Then Press & hold the gold button for 30 seconds to reset the camera. |
|
Fisheye Cameras
To reset a fisheye camera, you will need to undo three screws on the base of the camera to expose the mainboard.
Once the Mainboard is exposed, press and hold the reset button for 30 seconds to reset the camera.
Config Error 18
Config Error 18 or conf.LoginErrorNo-18 means that a camera needs to be initialised before it can be used on the NVR.
To initialise a camera you will need a laptop with Config Tool and either a PoE switch or a 12V power supply.
Connect a laptop to the switch the camera is connected to and open Config Tool.
(Alternatively, power the camera with a 12V power supply and connect it to the laptop using an ethernet cable)
Initialising a Camera
Initialising a camera is the process of setting a password on it. All cameras manufactured post 2018 need to be initialised before use.
If connected to the POE Port of an NVR manufacturer post 2018 this process should happen automatically.
Option 1 - Initialisation via the Web Interface
The Camera will need to be connected to the Laptop via an Ethernet cable.
You can access the Web Interface by entering the camera's IP address into the address bar of Internet Explorer. 192.168.1.108 is the default IP of our cameras.
You may need to change the IP address of your computer to reach it.
How to change the IP Address of your computer
Windows 10
- Open Settings.
- Select Network & Internet.
- Select Status, then Change Adapter Options.
-
Right-click the network adapter you want to change the IP address for, and select Properties.
-
Double-click the Internet Protocol Version 4 (TCP/IPv4) item.
- Click Use the following IP address and enter an IP address in the same range as the device you are trying to access. (E.g when trying to access 192.168.1.108 use a IP address in the 192.168.1.x range.) Note: This cannot be the same as the device you are trying to connect to or any other device on the same network. Save your changes on both windows.
- Type the IP address of the device you are trying to access into the address bar of your web browser.
- Once finished configuring the device, change the adapter settings back to normal by following steps 1-5 and clicking Obtain an IP address automatically.
Windows 11
1. In the Windows search bar at the bottom of the page, type Control Panel and press enter.
2. Select Network and Internet.
3. Select Network and Sharing Centre.
4. Select the link for Connections in the network that you want to change the IP address for.
5. Select Properties.
6. Double-click the Internet Protocol Version 4 (TCP/IPv4) item.
7. Click Use the following IP address and enter an IP address in the same range as the device you are trying to access. (E.g when trying to access 192.168.1.108 use a IP address in the 192.168.1.x range.) Note: This cannot be the same as the device you are trying to connect to or any other device on the same network. Save your changes on both windows.
8. Type the IP address of the device you are trying to access into the address bar of your web browser.
9. Once finished configuring the device, change the adapter settings back to normal by following steps 1-6 and clicking Obtain an IP address automatically.
See the video below for a visual guide of the steps above:
Shortcut
1. In the Windows search bar at the bottom of the page, type Ncpa.cpl and press enter.
2. Right-click the network adapter you want to change the IP address for, and select Properties.
3. Select the Internet Protocol Version 4 (TCP/IPv4) item.
4. Click Use the following IP address and enter an IP address in the same range as the device you are trying to access. (E.g when trying to access 192.168.1.108 use a IP address in the 192.168.1.x range.) Note: This cannot be the same as the device you are trying to connect to or any other device on the same network. Save your changes on both windows.
5. Type the IP address of the device you are trying to access into the address bar of your web browser.
6. Once finished configuring the device, change the adapter settings back to normal by following steps 1-3 and clicking Obtain an IP address automatically.
See the video below for a visual guide of the steps above:
Delete
How to initialise a camera via Web interface 5.0
- Select your Region and Language.
- Select your Time Zone, then press Sync with PC to sync your cameras time with the PCs time.
- Enter a password and recovery email.
- Ensure P2P is enabled, then press Next.
- Click End.
How to initialise a camera via Web interface 3.0
Initialize the camera by entering a new password (It will need to be at least 8 characters long), then click Save.
Ensure P2P is enabled and click Next
Click Next.
If prompted, select a region and click Save
DeleteOption 2 - Initialisation via the Config Tool
The initialisation process can also be performed using the latest version of our Config Tool - Please see the images below showing how this is done. To speed up the process the Config Tool also allows you to initialise multiple cameras at once.
- Download and open Config Tool.
- Put a check in the box next to the device you would like to Initialise, and select the Initialize button.
- Select the Initialize button.
- Enter a password, that is at least 8 characters, and is a mix of letters and numbers. Enter an email address, this will be used if the password is ever forgotten. Select Next.
- Depending on the installation requirements, you can check or uncheck the boxes for Easy4IP (P2P Remote Access) and Auto-check for updates. Select OK.
- If the status shows as Initialized, the process was completed successfully.
Resolving "Invalid Username/Password" OR "Account Locked" Errors
If you have see the error message "Invalid Username/Password" or "Account Locked", it means Camera Registration is trying to access your camera with the incorrect login information.
Resolving "Invalid Username/Password" OR "Account Locked" Errors
If you see this error, it means Camera Registration is trying to access your camera with the incorrect login information.
Cameras plugged into a Switch
If you know the password of the camera, you will just need to update the password of the camera in Camera Registration.
(Black GUI) Update Password in Camera List
Open Camera Registration by right clicking and selecting Main Menu > Camera > Camera List
Click on the Modify pencil of the camera with the error. It's Status will likely be red.
Enter the password of the Camera (You would have set this during the initialisation process in Config Tool) and click Connect, then OK.
If you still see the Account Locked error, you may need to reboot the camera by unplugging it briefly.
(Blue GUI) Update Password in Camera Registration
Open Camera Registration by right clicking and selecting Camera Registration OR by Navigating to Main Menu > Camera > Registration
Click on the Modify pencil of the camera with the error. It's Status will likely be red.
Enter the password of the Camera (You would have set this during the initialisation process in Config Tool) and click Connect, then OK.
If you still see the Account Locked error, you may need to reboot the camera by unplugging it briefly.
If you don't know the password of the Camera you will have to reset it.
Reset IP Camera Guide
Turret Cameras
Reset Button under Flap
AI turret cameras, or turret cameras built post 2021 usually have their reset button located under a flap next to the MicroSD card slot. Press and hold the reset button for 30 seconds while the camera is powered on to reset the camera.
Reset Button on Mainboard
Cameras built pre-2021 require the camera to be opened to expose the mainboard.
Once opened, the button will on the edge of the mainboard (see left image), press and hold this button for 30 seconds while the camera is powered on. In some cases you may need to undo two screws holding the mainboard in place, as the the button may be on the underside or on the second board.
When no button can be found, the reset may be performed by shorting two copper pads (see right image) for 30 seconds using a paperclip while the camera is powered on.
Turret Camera reset locations for specific models
|
VSIPC-4DIRMG You will need to undo some screws to lift up the mainboard to access this reset button. |
|
|
VSIP1MPVDMINIIRC VSIP3MPVDMINIIRC |
|
|
VSIP4MPVDMINIIRCA3.6 You will have to undo 2x screws on the metal plate in order to lift up the mainboard to find this reset. |
|
|
VSIPE4MPVDMINIIRCB2.8 VSIPE6MPVDMINIIRC3.6 VSIPC-6DIRC |
|
| VSIPE8MPVDIRMG | |
|
VSIP4MPVDIRME |
|
Vandal Dome Cameras
To access the reset button on large vandal dome cameras, you will need to first remove the vandal dome (see left image) by removing 3 screws.
The most common style of reset button will be the one in the middle image. Press and hold it for 30 seconds while the camera is powered on to reset it.
If there is no button, there may be copper pads you can short out for 30 seconds to reset the camera (right side of right image). There may also be four silver pads located where the reset button would usually be (left side of right image) you can short out two of vertically or diagonally for 30 seconds to reset the camera. Do not attempt to short any other part of the camera as you may cause irreversible damage.
Large Vandal Dome Cameras
To access the reset button on large vandal dome cameras, you will need to first remove the vandal dome (see left image) by removing 3 screws.
The reset button will then be located toward the edge of the housing, recessed into the plastic (see right image). Press and hold the button for 30 seconds to reset the camera.
Vandal Dome Camera reset locations for specific models
|
VSIPC-4DIRD Short out the two silver pins (E.g. by using a paperclip) for 30 seconds while the camera is powered on. OR short out the two copper coloured holes (Right side of image) |
|
|
VSIPC-4DIRMD Press and hold the button for 30 seconds OR if no button exists, short out 2 silver pins diagonally with wire for 30 seconds |
|
| VSIP4MPVDIRMD | |
| VSIP3MPVDIRM2.8-12 | |
|
VSIP3MPVDMINIIR (Mainboard may be black instead of green) VSIP4MPVDMINIIR |
|
| VSIP2MPVDIRLV2 VSIPE8MPVDIRM |
|
Bullet Cameras
Most Bullet Cameras will have a flap that will reveal the MicroSD card slot and reset button. Press and hold the button for 30 seconds to reset the camera. Some cameras will not have a reset button, instead they will have two copper pads (see right image) which you can short out with a paperclip for 30 seconds to reset the camera.
Bullet cameras without a flap
For cameras without a reset flap you will need to remove the front of the camera (e.g by unscrewing it for cylindrical cameras) to access the reset button. Some cameras will have a physical button to press and hold for 30 seconds to reset it. Other cameras (see right image) will have copper pads to short out for 30 seconds to reset the camera.
Bullet Camera reset locations for specific models
|
VSIPC-4BIRS Short out two of the copper pads (E.g by using a paperclip) for 30 seconds while the camera is powered on. |
|
|
VSIP3MPFBIRM2.8-12 Short out two of the copper pads (E.g by using a paperclip) for 30 seconds while the camera is powered on. |
|
|
VSIP4MPFBIRM2.8-12 Short out two of the silver pins (E.g by using a paperclip) for 30 seconds while the camera is powered on. |
|
|
VSIP4MPFBIRMD VSIP8MPFBIRMD |
|
| VSIPE2MPFBMINIIR |
|
PTZ Cameras
PTZ Camera reset locations for specific models
|
VIP2MPPTZIRW You will have to undo 4 screws on the back to get access. |
|
|
VSIP2MPPTZCV3 Remove the outer shell and round lens cover (4 x Phillips screws) Press & hold button for 30 seconds. |
|
|
VSIP2MPPTZV3 There will be two screws on opposite sides that you will need to remove to take the plastic housing off. Then Press & hold the gold button for 30 seconds to reset the camera. |
|
Fisheye Cameras
To reset a fisheye camera, you will need to undo three screws on the base of the camera to expose the mainboard.
Once the Mainboard is exposed, press and hold the reset button for 30 seconds to reset the camera.
You will then need to initialise and add the camera to the recorder again.
Camera Initialisation Guide
Initialising a camera is the process of setting a password on it. All cameras manufactured post 2018 need to be initialised before use.
If connected to the POE Port of an NVR manufacturer post 2018 this process should happen automatically.
Option 1 - Initialisation via the Web Interface
The Camera will need to be connected to the Laptop via an Ethernet cable.
You can access the Web Interface by entering the camera's IP address into the address bar of Internet Explorer. 192.168.1.108 is the default IP of our cameras.
You may need to change the IP address of your computer to reach it.
How to change the IP Address of your computer
Windows 10
- Open Settings.
- Select Network & Internet.
- Select Status, then Change Adapter Options.
-
Right-click the network adapter you want to change the IP address for, and select Properties.
-
Double-click the Internet Protocol Version 4 (TCP/IPv4) item.
- Click Use the following IP address and enter an IP address in the same range as the device you are trying to access. (E.g when trying to access 192.168.1.108 use a IP address in the 192.168.1.x range.) Note: This cannot be the same as the device you are trying to connect to or any other device on the same network. Save your changes on both windows.
- Type the IP address of the device you are trying to access into the address bar of your web browser.
- Once finished configuring the device, change the adapter settings back to normal by following steps 1-5 and clicking Obtain an IP address automatically.
Windows 11
1. In the Windows search bar at the bottom of the page, type Control Panel and press enter.
2. Select Network and Internet.
3. Select Network and Sharing Centre.
4. Select the link for Connections in the network that you want to change the IP address for.
5. Select Properties.
6. Double-click the Internet Protocol Version 4 (TCP/IPv4) item.
7. Click Use the following IP address and enter an IP address in the same range as the device you are trying to access. (E.g when trying to access 192.168.1.108 use a IP address in the 192.168.1.x range.) Note: This cannot be the same as the device you are trying to connect to or any other device on the same network. Save your changes on both windows.
8. Type the IP address of the device you are trying to access into the address bar of your web browser.
9. Once finished configuring the device, change the adapter settings back to normal by following steps 1-6 and clicking Obtain an IP address automatically.
See the video below for a visual guide of the steps above:
Shortcut
1. In the Windows search bar at the bottom of the page, type Ncpa.cpl and press enter.
2. Right-click the network adapter you want to change the IP address for, and select Properties.
3. Select the Internet Protocol Version 4 (TCP/IPv4) item.
4. Click Use the following IP address and enter an IP address in the same range as the device you are trying to access. (E.g when trying to access 192.168.1.108 use a IP address in the 192.168.1.x range.) Note: This cannot be the same as the device you are trying to connect to or any other device on the same network. Save your changes on both windows.
5. Type the IP address of the device you are trying to access into the address bar of your web browser.
6. Once finished configuring the device, change the adapter settings back to normal by following steps 1-3 and clicking Obtain an IP address automatically.
See the video below for a visual guide of the steps above:
Delete
How to initialise a camera via Web interface 5.0
- Select your Region and Language.
- Select your Time Zone, then press Sync with PC to sync your cameras time with the PCs time.
- Enter a password and recovery email.
- Ensure P2P is enabled, then press Next.
- Click End.
How to initialise a camera via Web interface 3.0
Initialize the camera by entering a new password (It will need to be at least 8 characters long), then click Save.
Ensure P2P is enabled and click Next
Click Next.
If prompted, select a region and click Save
DeleteOption 2 - Initialisation via the Config Tool
The initialisation process can also be performed using the latest version of our Config Tool - Please see the images below showing how this is done. To speed up the process the Config Tool also allows you to initialise multiple cameras at once.
- Download and open Config Tool.
- Put a check in the box next to the device you would like to Initialise, and select the Initialize button.
- Select the Initialize button.
- Enter a password, that is at least 8 characters, and is a mix of letters and numbers. Enter an email address, this will be used if the password is ever forgotten. Select Next.
- Depending on the installation requirements, you can check or uncheck the boxes for Easy4IP (P2P Remote Access) and Auto-check for updates. Select OK.
- If the status shows as Initialized, the process was completed successfully.
Camera plugged into back of an NVR
If you know the password of the camera, you will just need to update the password of the camera in Camera Registration.
(Black GUI) Update Password in Camera Registration
Open Camera Registration by right clicking and selecting Main Menu > Camera > Camera List
Click on the Modify pencil of the camera with the error. It's Status will likely be red.
Enter the password of the Camera (You would have set this during the initialisation process in Config Tool) and click "Connect", then "OK".
If you still see the Account Locked error, you may need to reboot the camera by unplugging it briefly.
(Blue GUI) Update Password in Camera Registration
Open Camera Registration by right clicking and selecting "Camera Registration" OR by Navigating to Main Menu > Camera > Registration
Click on the Modify pencil of the camera with the error. It's Status will likely be red.
Enter the password of the Camera (You would have set this during the initialisation process in Config Tool) and click "Connect", then "OK".
If you still see the Account Locked error, you may need to reboot the camera by unplugging it briefly.
If you don't know the password of the camera, you will need to reset it.
Reset IP Camera Guide
Turret Cameras
Reset Button under Flap
AI turret cameras, or turret cameras built post 2021 usually have their reset button located under a flap next to the MicroSD card slot. Press and hold the reset button for 30 seconds while the camera is powered on to reset the camera.
Reset Button on Mainboard
Cameras built pre-2021 require the camera to be opened to expose the mainboard.
Once opened, the button will on the edge of the mainboard (see left image), press and hold this button for 30 seconds while the camera is powered on. In some cases you may need to undo two screws holding the mainboard in place, as the the button may be on the underside or on the second board.
When no button can be found, the reset may be performed by shorting two copper pads (see right image) for 30 seconds using a paperclip while the camera is powered on.
Turret Camera reset locations for specific models
|
VSIPC-4DIRMG You will need to undo some screws to lift up the mainboard to access this reset button. |
|
|
VSIP1MPVDMINIIRC VSIP3MPVDMINIIRC |
|
|
VSIP4MPVDMINIIRCA3.6 You will have to undo 2x screws on the metal plate in order to lift up the mainboard to find this reset. |
|
|
VSIPE4MPVDMINIIRCB2.8 VSIPE6MPVDMINIIRC3.6 VSIPC-6DIRC |
|
| VSIPE8MPVDIRMG | |
|
VSIP4MPVDIRME |
|
Vandal Dome Cameras
To access the reset button on large vandal dome cameras, you will need to first remove the vandal dome (see left image) by removing 3 screws.
The most common style of reset button will be the one in the middle image. Press and hold it for 30 seconds while the camera is powered on to reset it.
If there is no button, there may be copper pads you can short out for 30 seconds to reset the camera (right side of right image). There may also be four silver pads located where the reset button would usually be (left side of right image) you can short out two of vertically or diagonally for 30 seconds to reset the camera. Do not attempt to short any other part of the camera as you may cause irreversible damage.
Large Vandal Dome Cameras
To access the reset button on large vandal dome cameras, you will need to first remove the vandal dome (see left image) by removing 3 screws.
The reset button will then be located toward the edge of the housing, recessed into the plastic (see right image). Press and hold the button for 30 seconds to reset the camera.
Vandal Dome Camera reset locations for specific models
|
VSIPC-4DIRD Short out the two silver pins (E.g. by using a paperclip) for 30 seconds while the camera is powered on. OR short out the two copper coloured holes (Right side of image) |
|
|
VSIPC-4DIRMD Press and hold the button for 30 seconds OR if no button exists, short out 2 silver pins diagonally with wire for 30 seconds |
|
| VSIP4MPVDIRMD | |
| VSIP3MPVDIRM2.8-12 | |
|
VSIP3MPVDMINIIR (Mainboard may be black instead of green) VSIP4MPVDMINIIR |
|
| VSIP2MPVDIRLV2 VSIPE8MPVDIRM |
|
Bullet Cameras
Most Bullet Cameras will have a flap that will reveal the MicroSD card slot and reset button. Press and hold the button for 30 seconds to reset the camera. Some cameras will not have a reset button, instead they will have two copper pads (see right image) which you can short out with a paperclip for 30 seconds to reset the camera.
Bullet cameras without a flap
For cameras without a reset flap you will need to remove the front of the camera (e.g by unscrewing it for cylindrical cameras) to access the reset button. Some cameras will have a physical button to press and hold for 30 seconds to reset it. Other cameras (see right image) will have copper pads to short out for 30 seconds to reset the camera.
Bullet Camera reset locations for specific models
|
VSIPC-4BIRS Short out two of the copper pads (E.g by using a paperclip) for 30 seconds while the camera is powered on. |
|
|
VSIP3MPFBIRM2.8-12 Short out two of the copper pads (E.g by using a paperclip) for 30 seconds while the camera is powered on. |
|
|
VSIP4MPFBIRM2.8-12 Short out two of the silver pins (E.g by using a paperclip) for 30 seconds while the camera is powered on. |
|
|
VSIP4MPFBIRMD VSIP8MPFBIRMD |
|
| VSIPE2MPFBMINIIR |
|
PTZ Cameras
PTZ Camera reset locations for specific models
|
VIP2MPPTZIRW You will have to undo 4 screws on the back to get access. |
|
|
VSIP2MPPTZCV3 Remove the outer shell and round lens cover (4 x Phillips screws) Press & hold button for 30 seconds. |
|
|
VSIP2MPPTZV3 There will be two screws on opposite sides that you will need to remove to take the plastic housing off. Then Press & hold the gold button for 30 seconds to reset the camera. |
|
Fisheye Cameras
To reset a fisheye camera, you will need to undo three screws on the base of the camera to expose the mainboard.
Once the Mainboard is exposed, press and hold the reset button for 30 seconds to reset the camera.
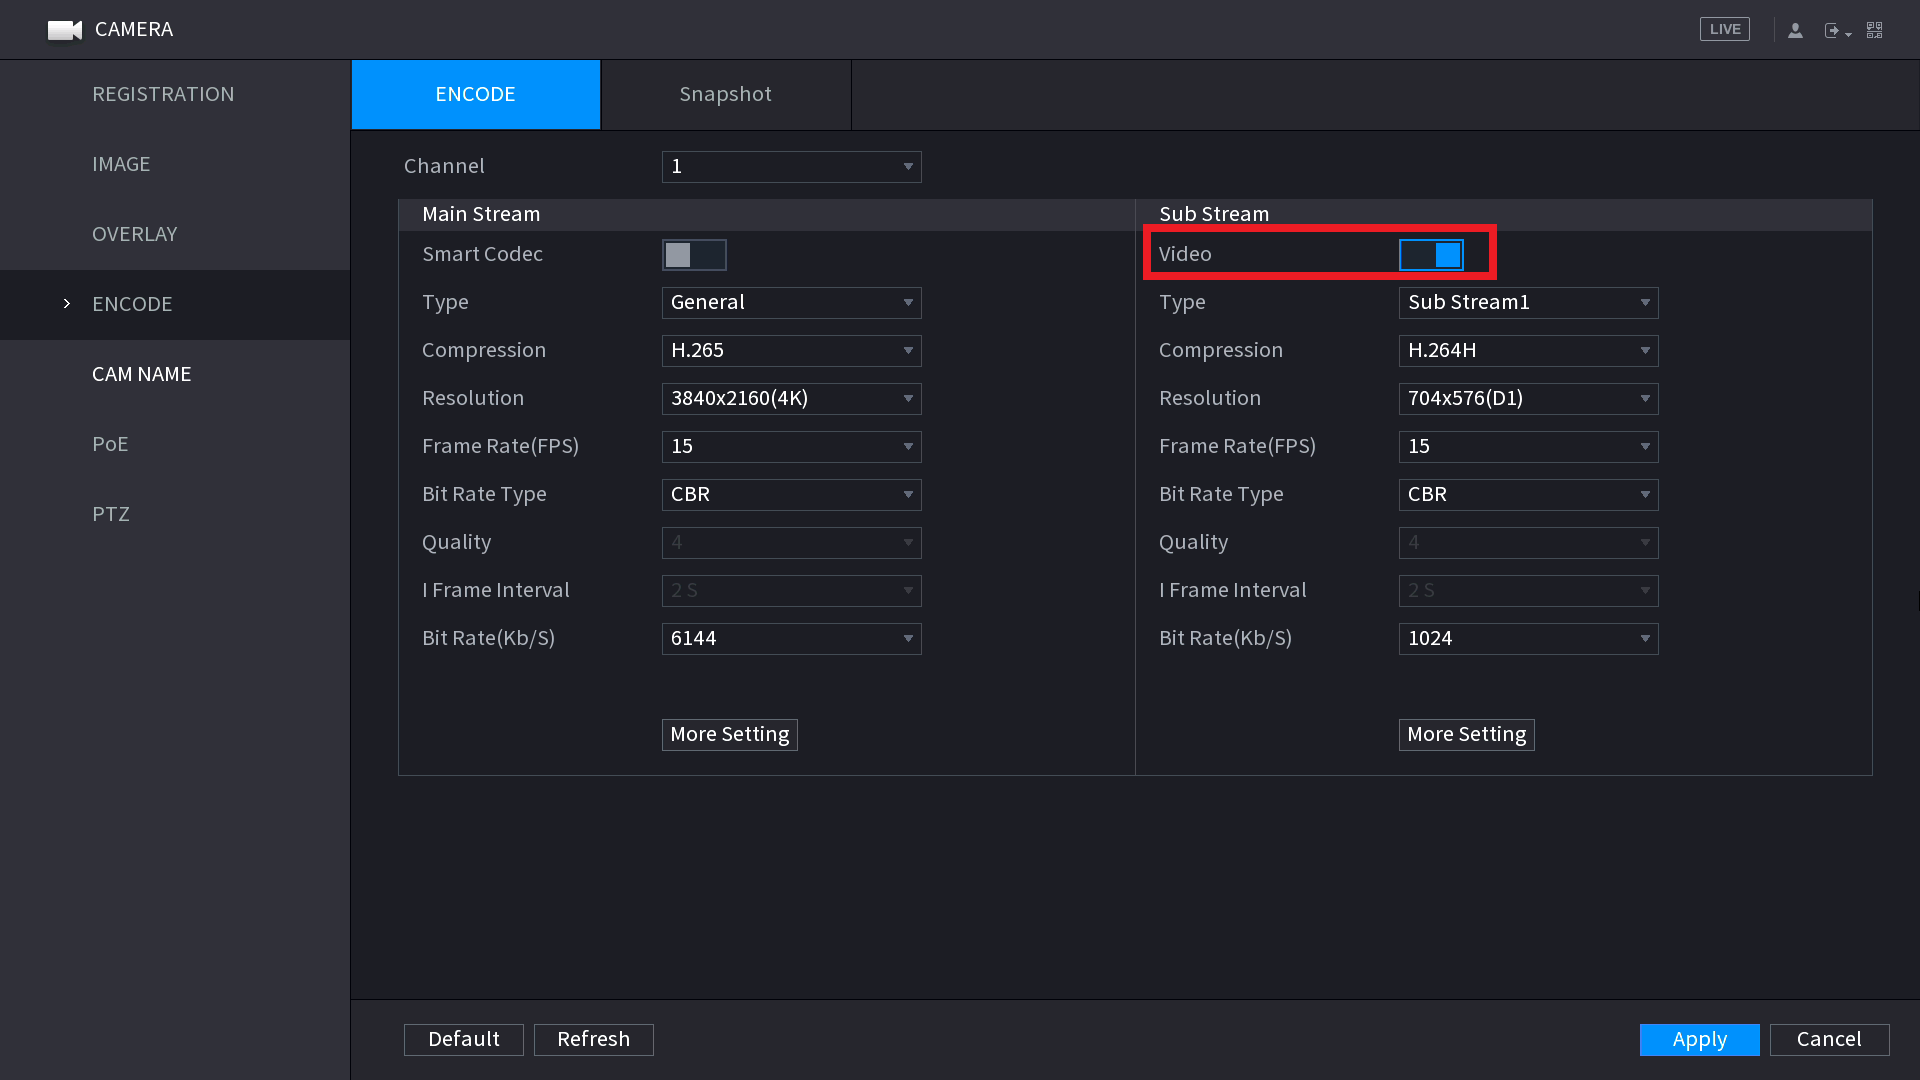
Over Decode Shown on Camera Playback
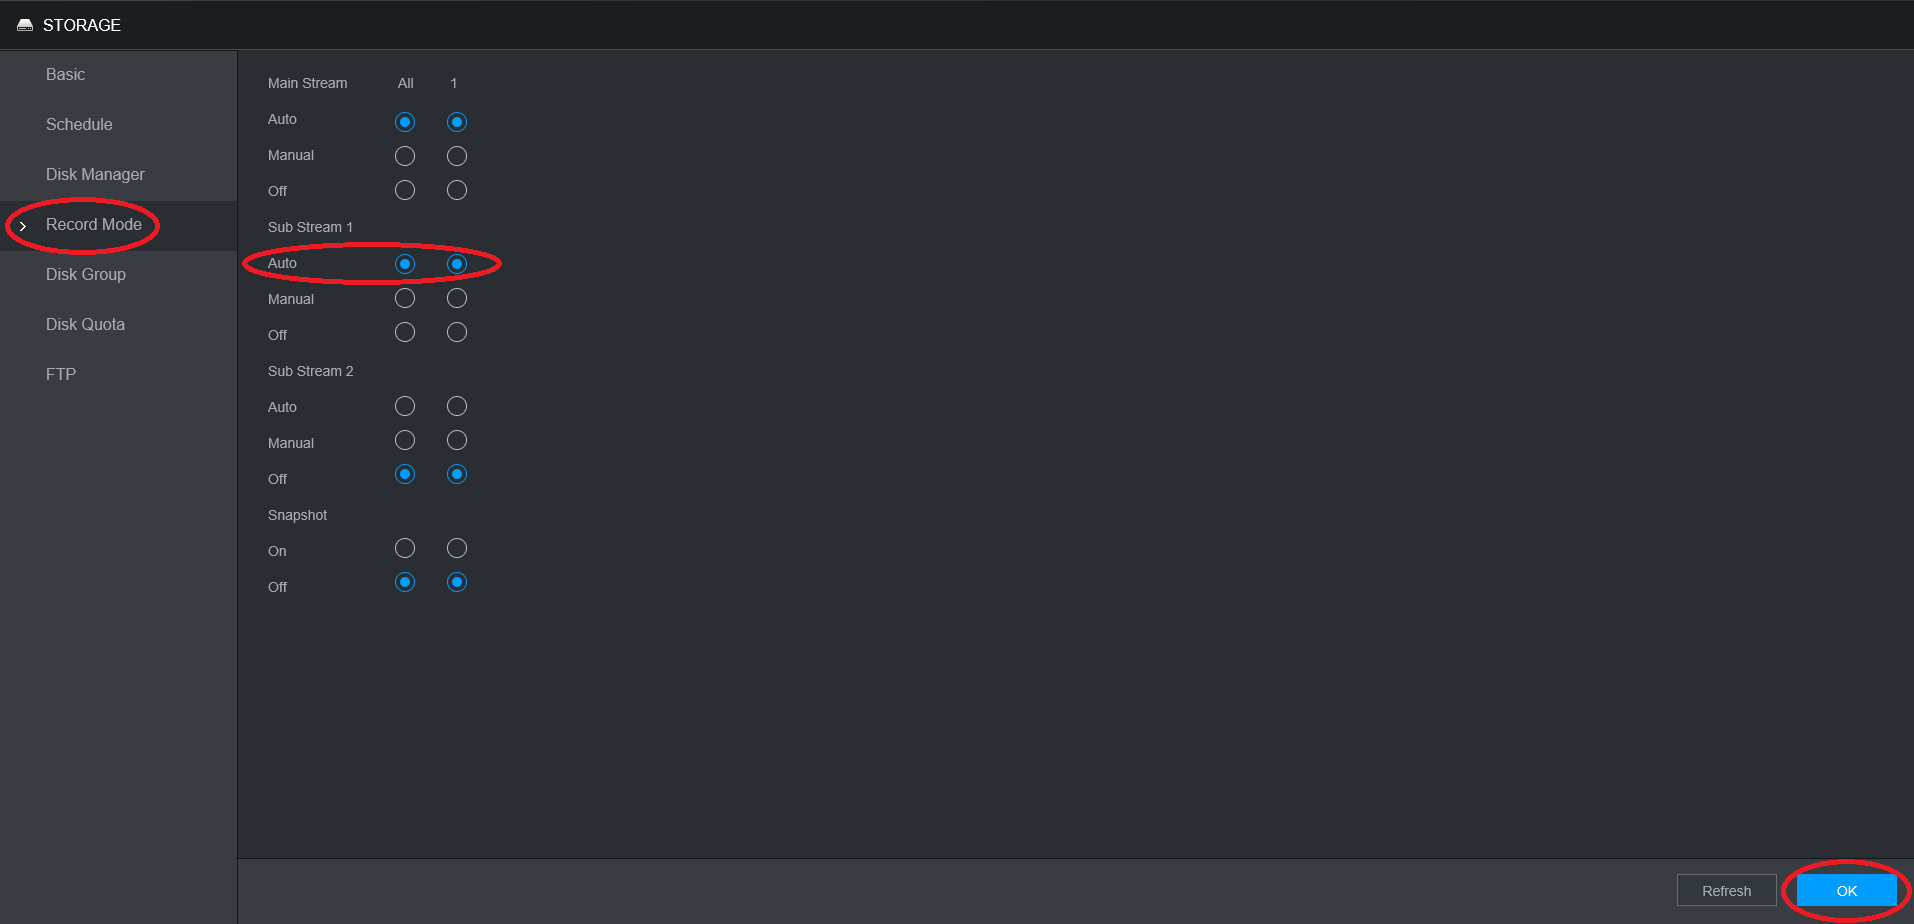
This error can normally be rectified by enabling substream recording.
There are two different types of recording used on CCTV recorders.
Main Stream: Full quality video reserved for CCTV Recordings, Uses high bandwidth.
Sub Stream: Lower quality video, Uses much lower bandwidth and is usually used for mobile phone access, where high quality is not of great importance.
By default, all cameras are set to record Main Stream. You have the option to enable Sub Stream if you are going to playback on slower internet connections or if using mobile data, as to not go over the data cap.
It can also be used to playback multiple channels at once on recorders that cannot view multiple Main Stream's.
To Enable Sub Stream
1. Go to the Main Menu > Storage > Record.
2. Select the Auto box under All to enable the Sub Stream for all channels.
3. Select OK.
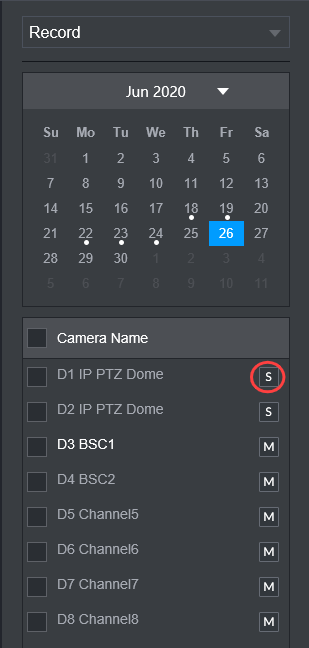
To playback Sub Stream footage, select the M Icon so it switch to S, indicating the stream type has been switched to Sub Stream. Then click play to start the footage. This will allow you to play back multiple cameras at once, at a lower quality. Once you have found the footage you wish to backup, switch to Main Stream to review the footage in high quality, a single channel at a time.
Over Decode Shown on Camera Live View
- Ensure camera substream is enabled.
- Drop camera resolution and/or bit rate.
Camera Time Drifting
If your camera time is drifting, it may be because the time on the recorder/camera is set incorrectly. Follow the steps below to rectify the issue.
Normally setting the time on the recorder will sync the cameras times, however in some cases you may need to login to the camera directly to set the date and time. Standalone cameras will need to be setup as there is no recorder for it to sync time to.
(Black GUI) Setting the Time and Changing the Camera Sync Interval
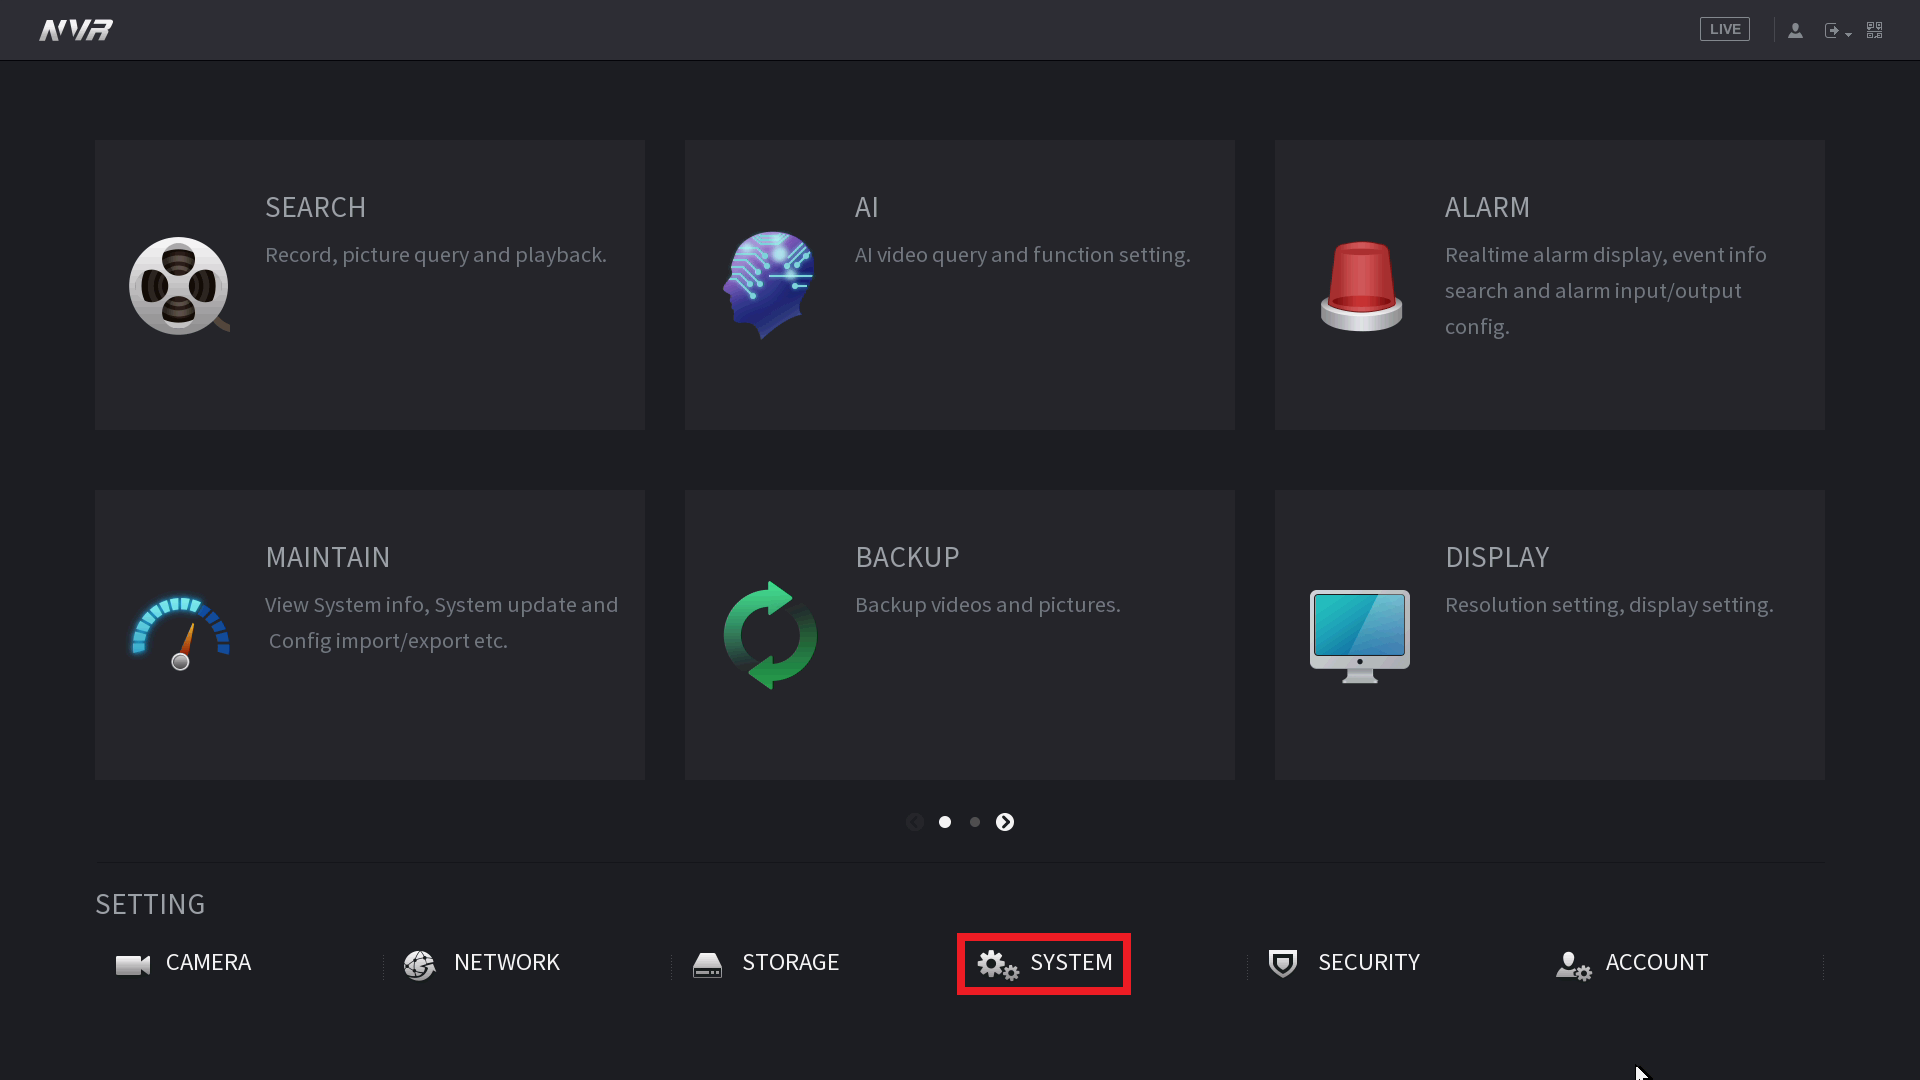
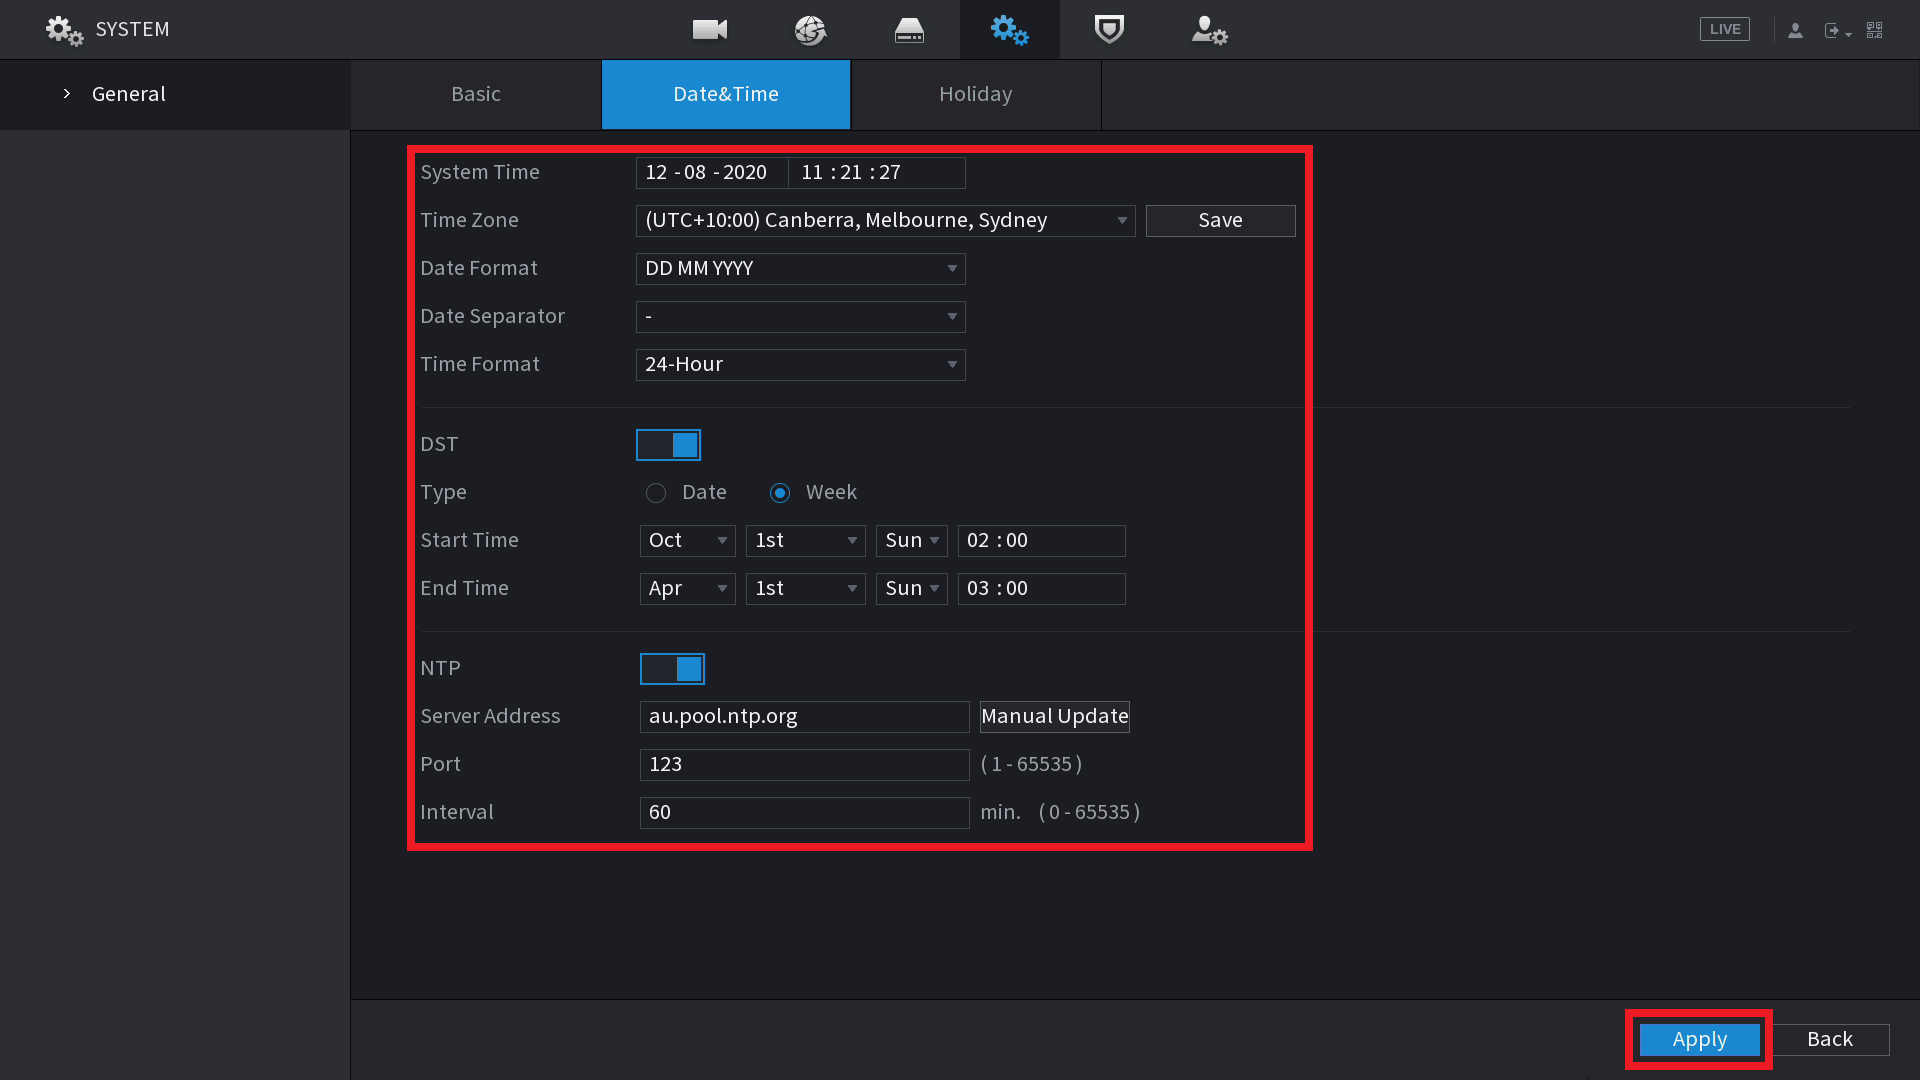
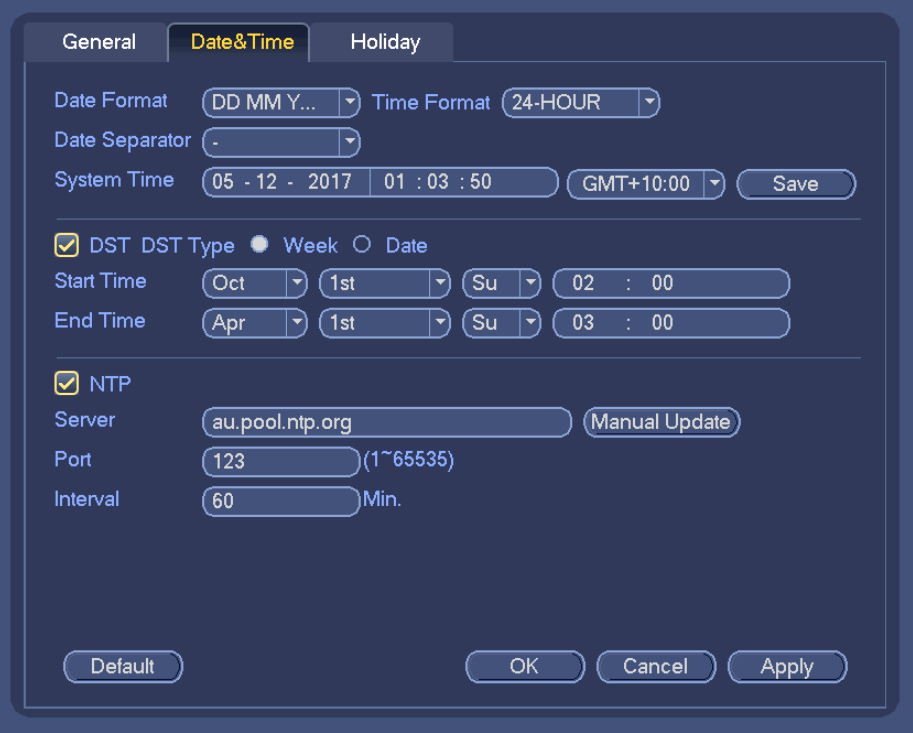
1. Right click and select Main Menu, select System, then Date & Time.
2. Ensure the date and time, DST (if applicable in your state/territory), and NTP is setup. In Australia, the NTP server is au.pool.ntp.org
3. Select the Save button after setting the time, then select Apply.
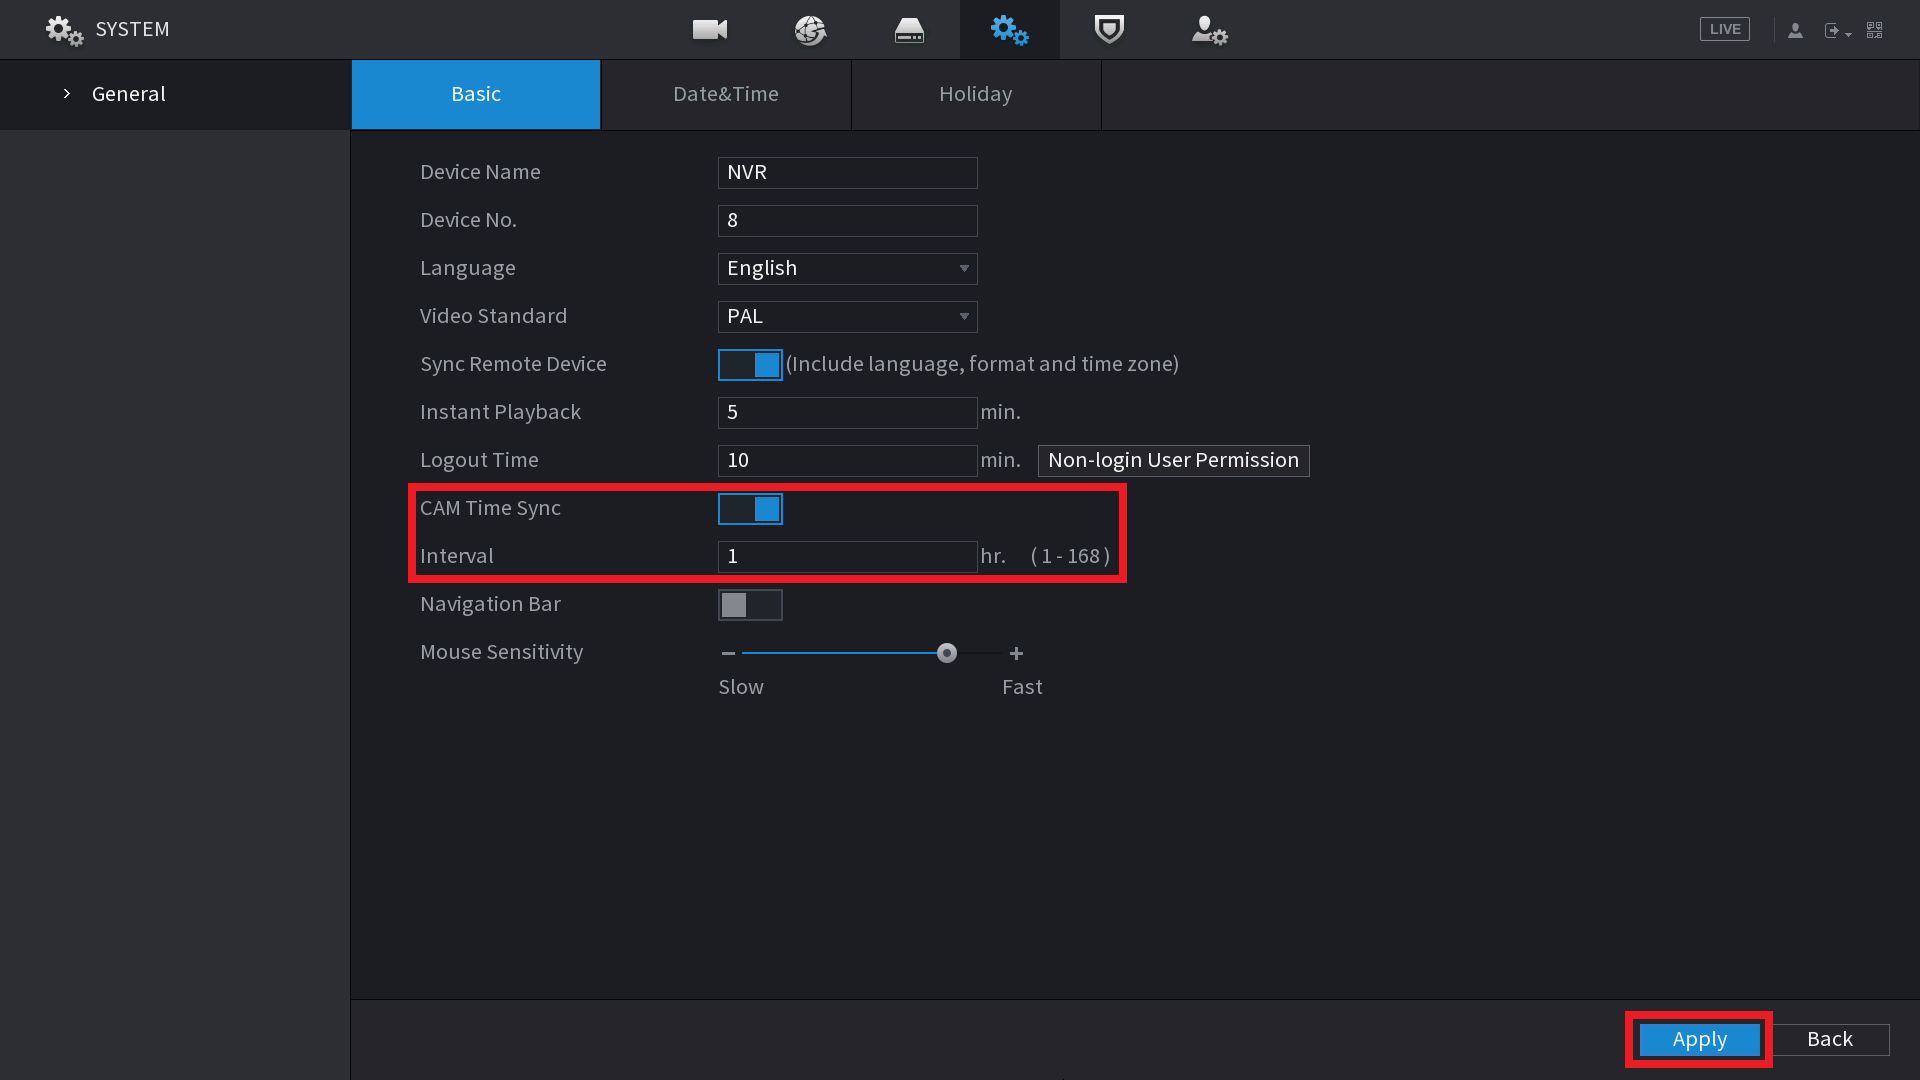
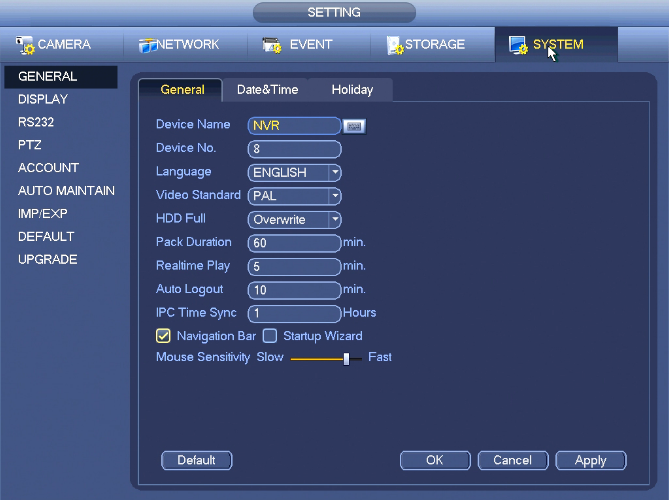
3. Select the Basic tab. Ensure CAM Time Sync is enabled, and the interval is set to 1. This means the recorders time will synchronise with the camera's every 1 hour. Select Apply.
(Blue GUI) Setting the Time and Changing the Camera Sync Interval
1. Right click and select Main Menu, select System, then Date & Time.
2. Ensure the date and time, DST (if applicable in your state/territory), and NTP is setup. In Australia, the NTP server is au.pool.ntp.org
3. Select the Save button after setting the time, then select Apply.
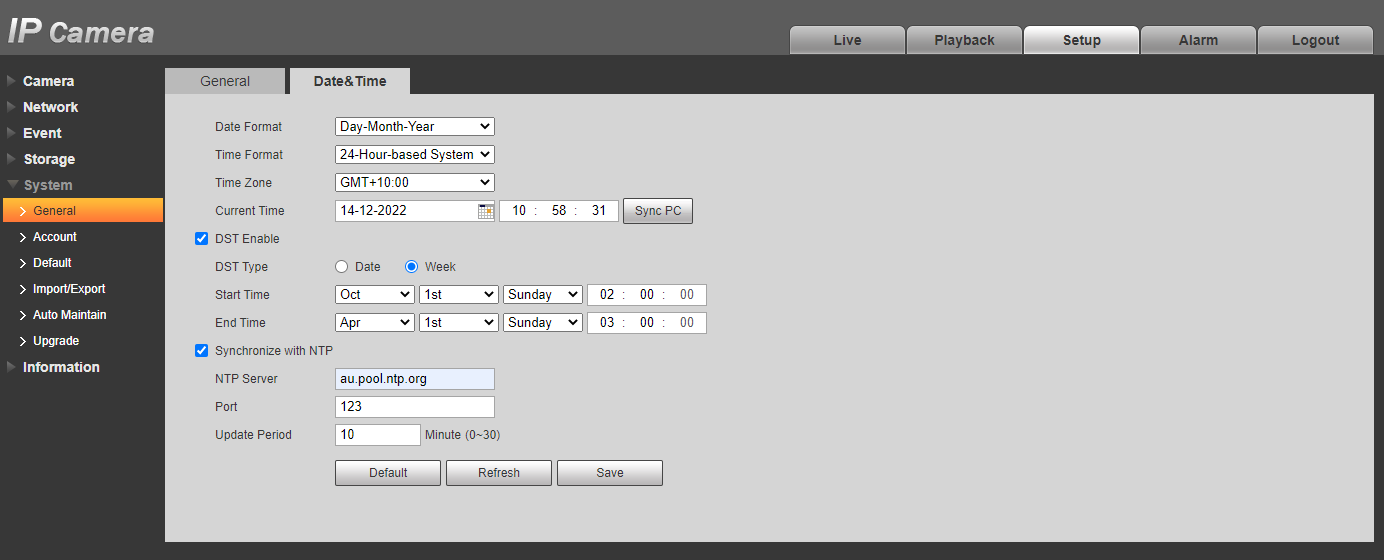
Setting an Individual Camera's Time using the Web Interface
- Login to the cameras web interface using its IP address.
- Select Setup > System > General > Date & Time.
- Ensure the date and time, DST (if applicable in your state/territory), and NTP is setup. In Australia, the NTP server is au.pool.ntp.org
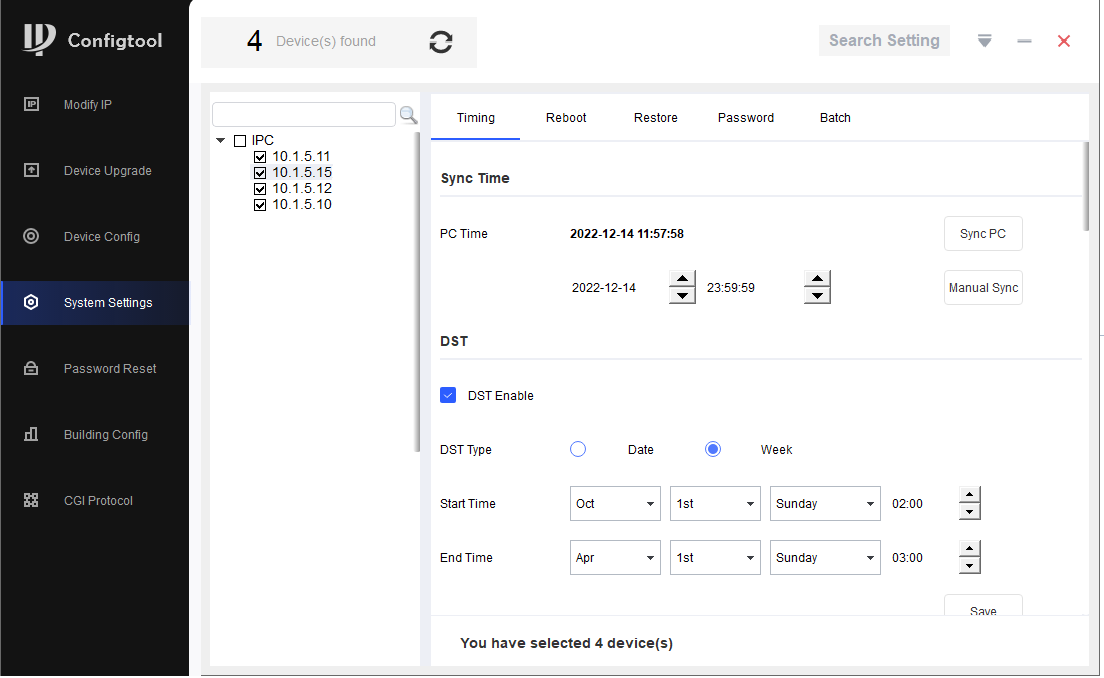
Setting Multiple Camera's Time's using the Config Tool Software
- Open the Config Tool (It can be downloaded from here.)
- Select System Settings > Timing.
- Select the Search Settings button and enter the camera's username and password.

- Select the cameras you would like to update the time on
- Ensure the date and time, DST (if applicable in your state/territory), and NTP is setup. In Australia, the NTP server is au.pool.ntp.org
- Select Save as you configure each setting.
No Audio from Cameras
To record audio from a camera with a built-in or line-in microphone you will need to enable it first.
You can do this via the NVR or the Web Interface of the camera. If the camera has both line-in and an in-built microphone, you will have to select the option you wish to use in the web interface.
How to Enable the Microphone via the NVR
-
Right Click and select Main Menu, then Camera.
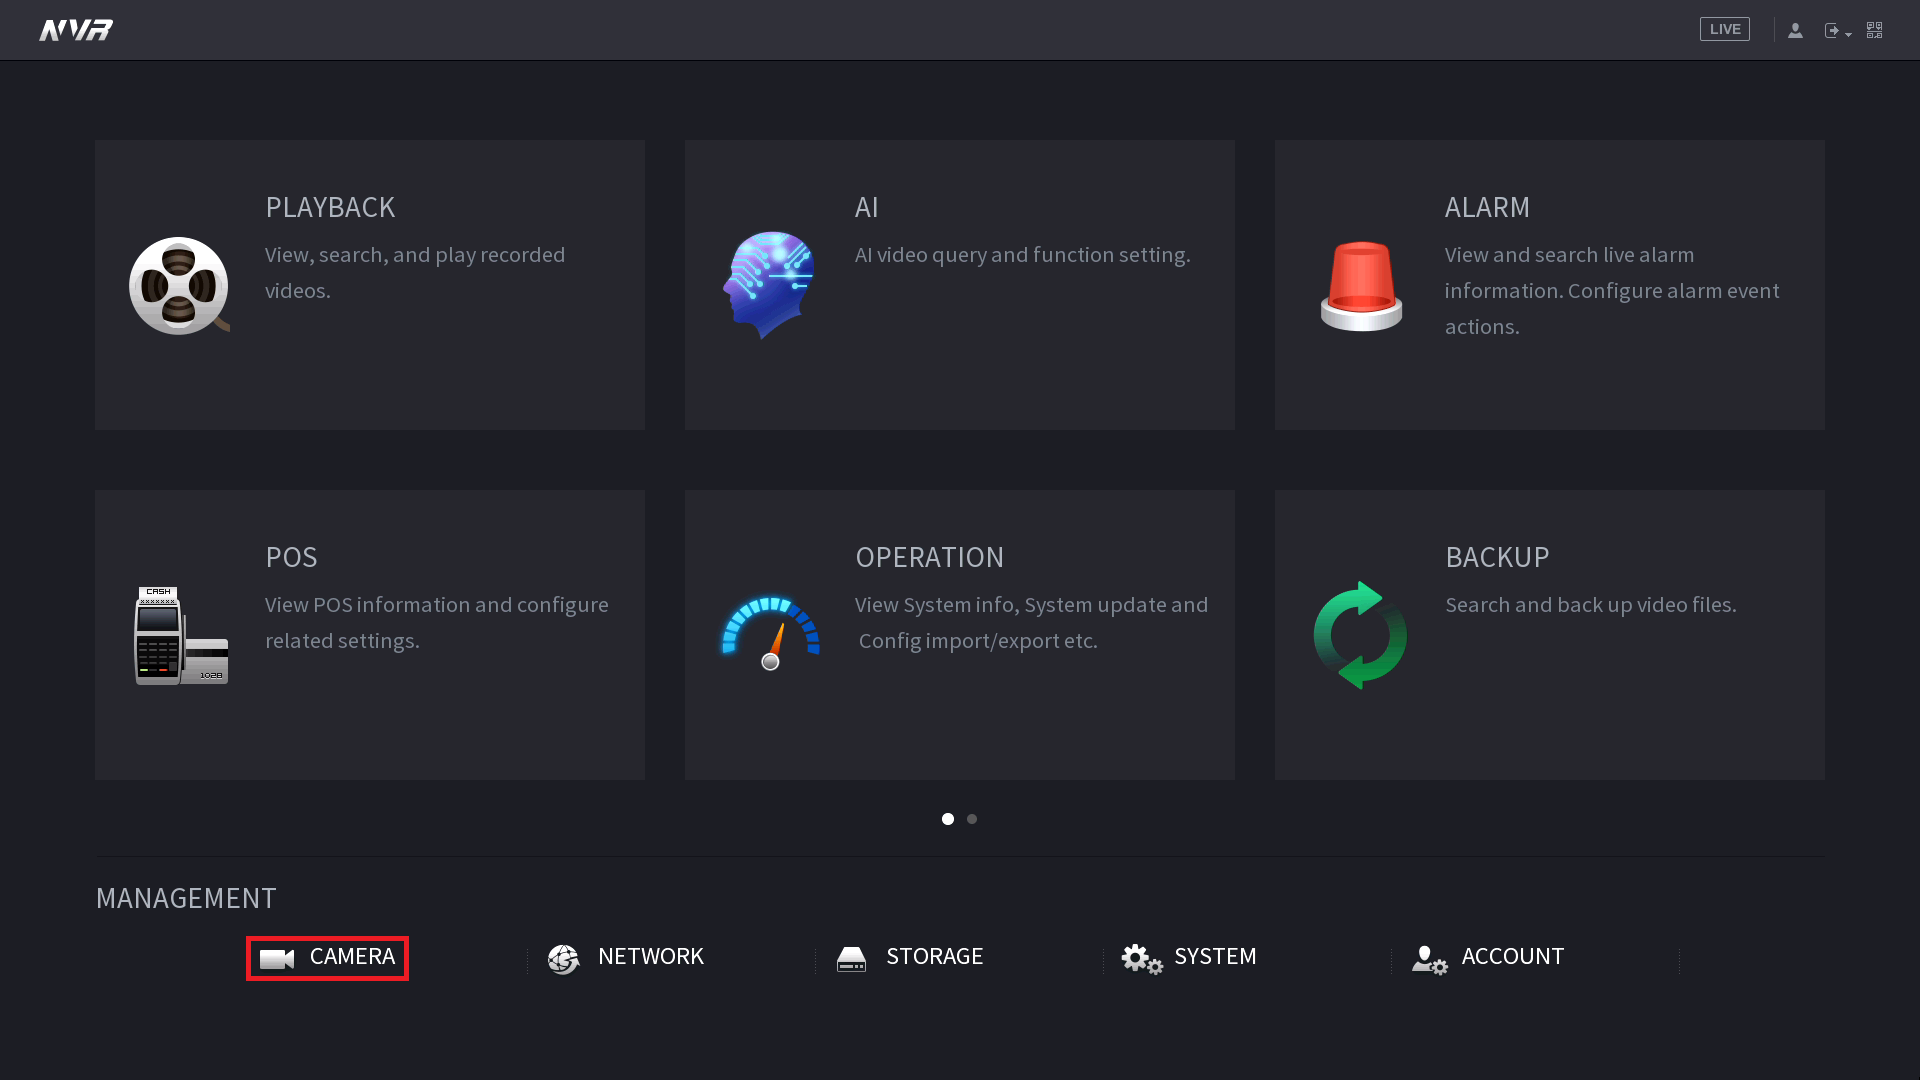
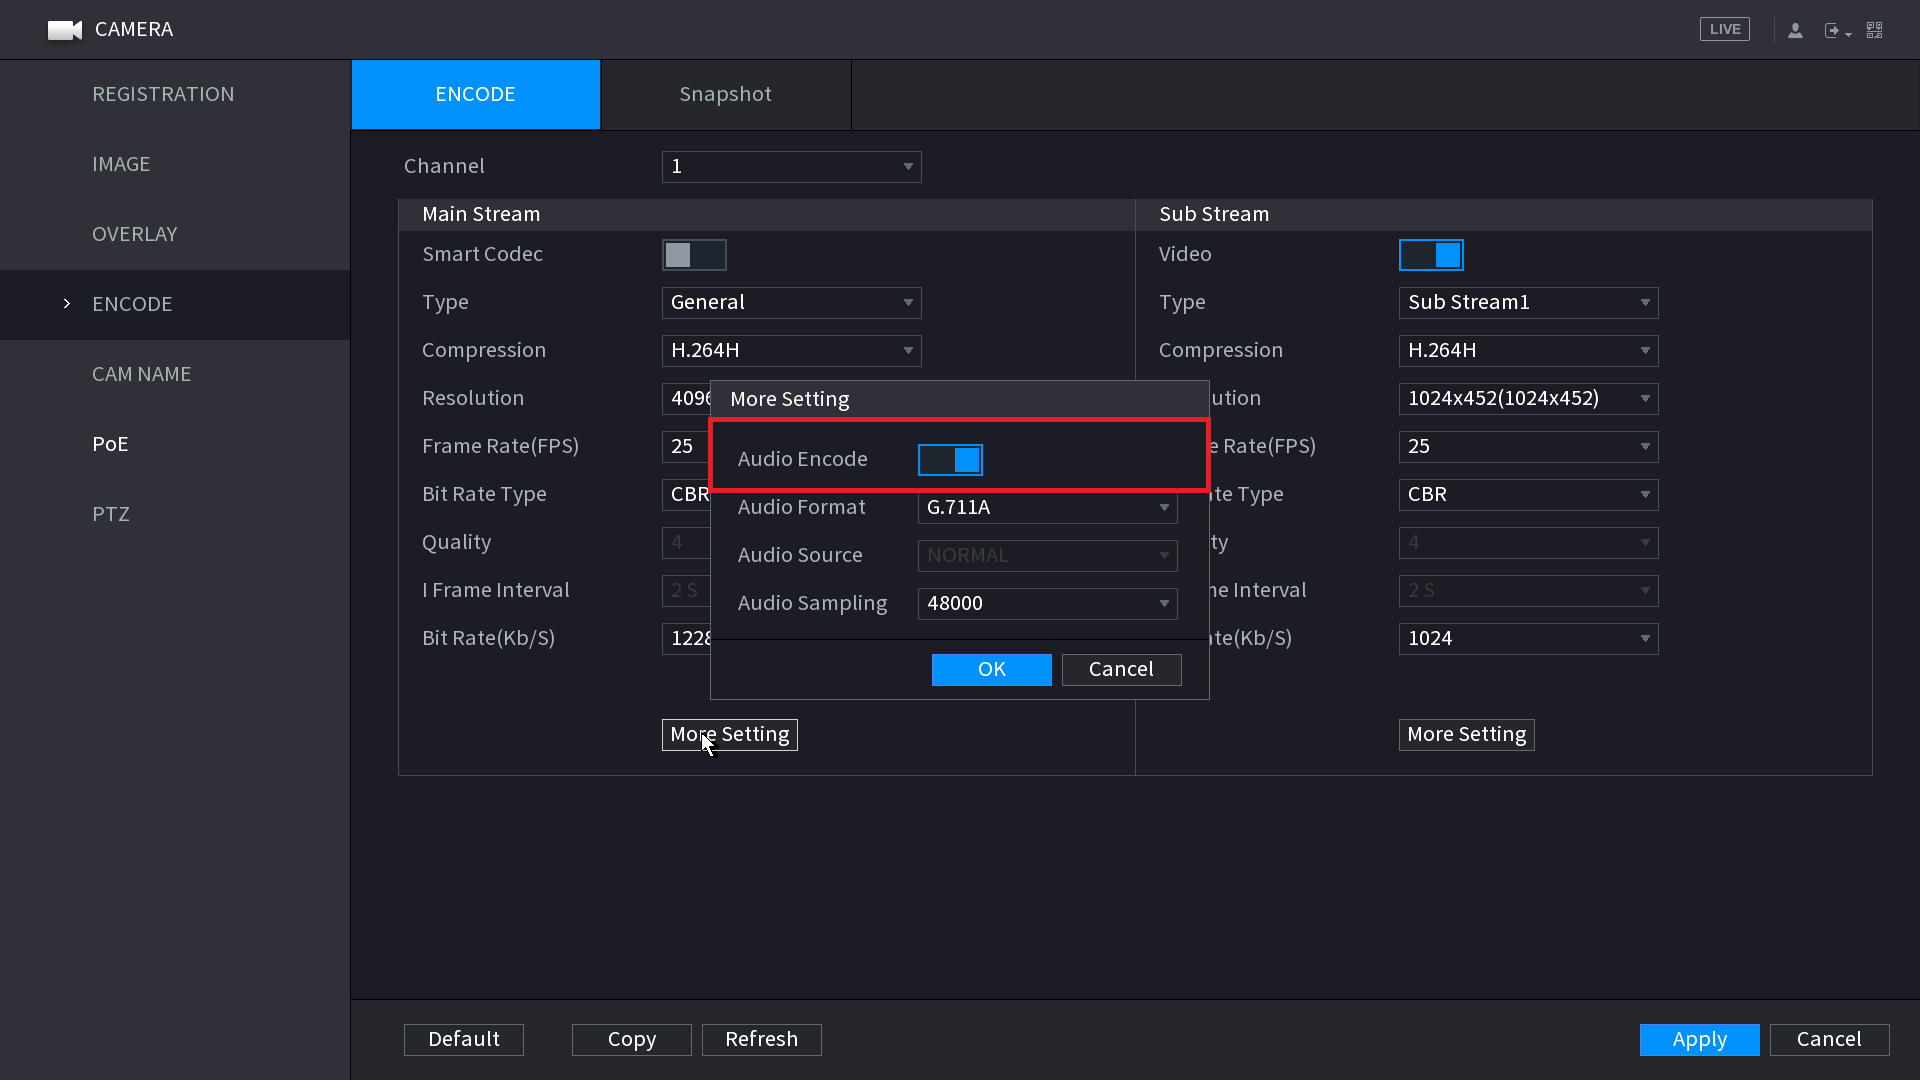
- Select Encode then More Setting.
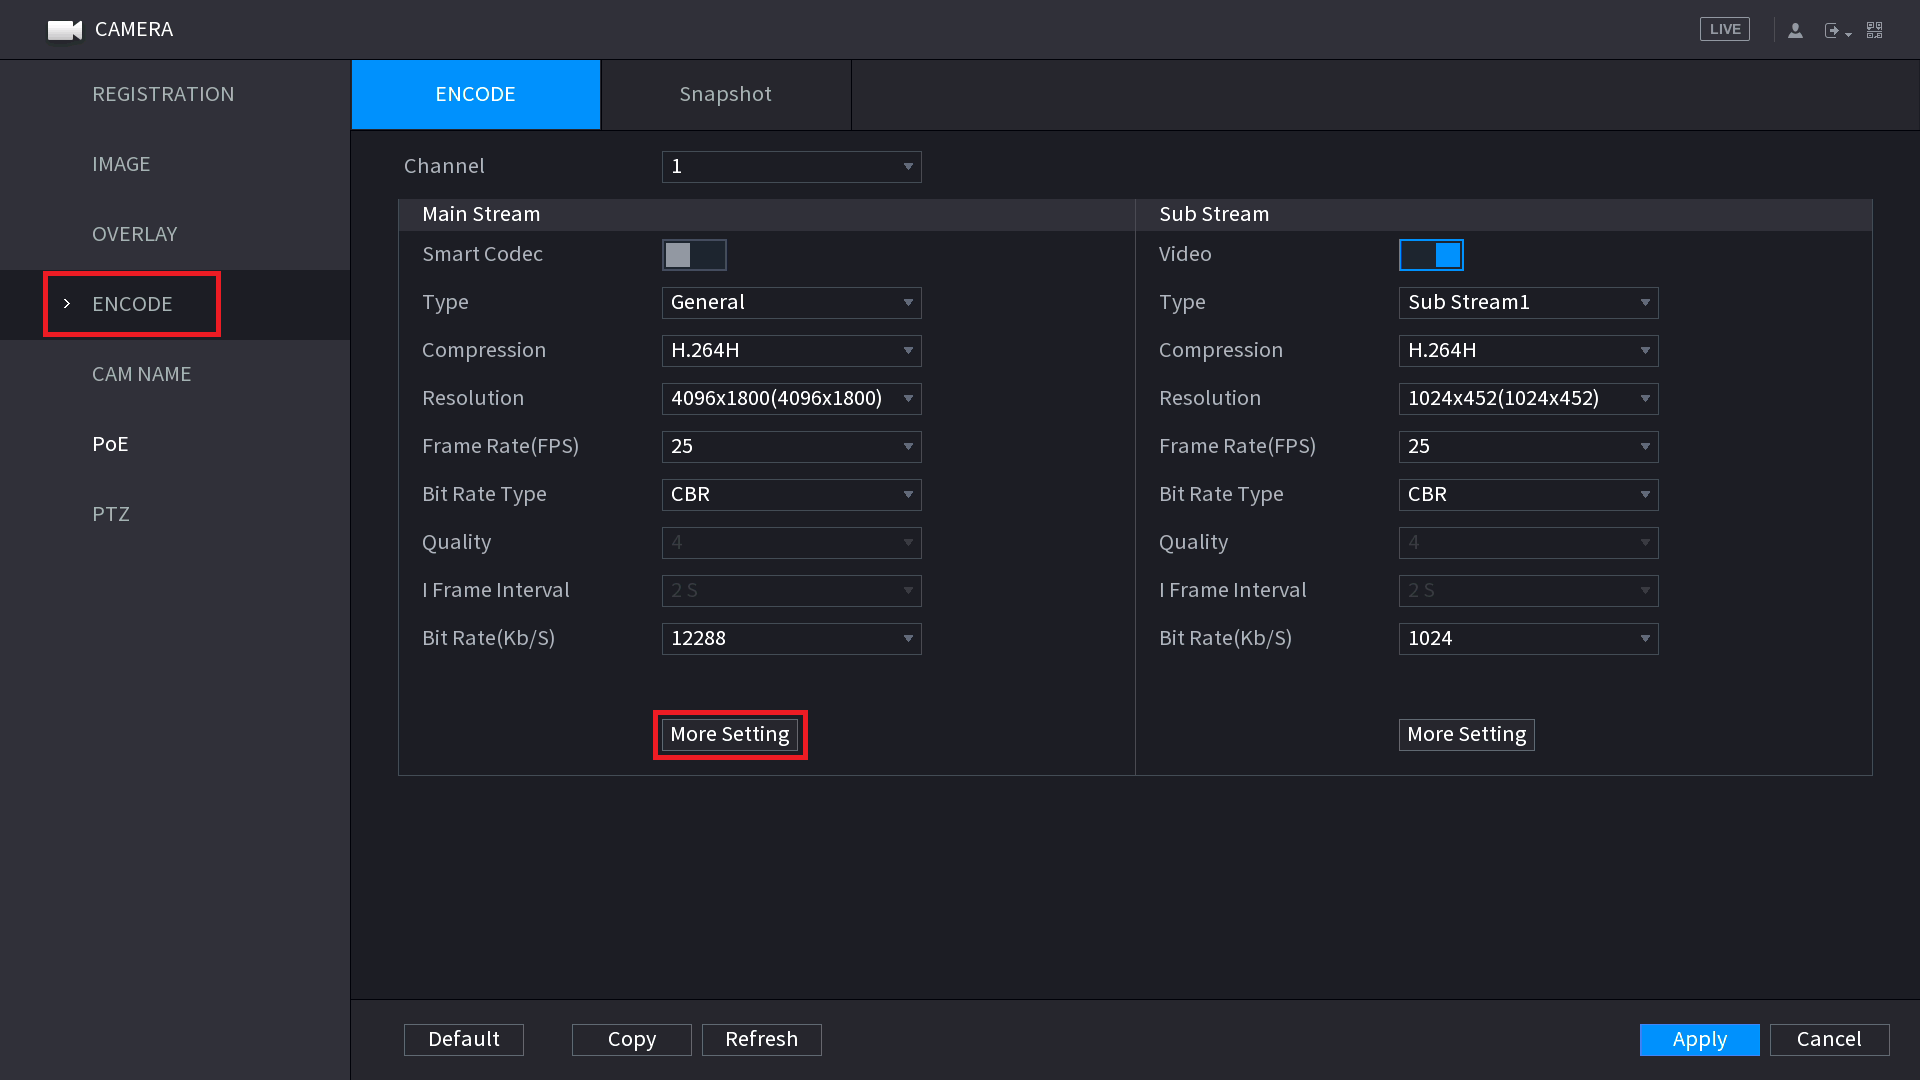
- Enable the Audio Encode option. Select OK then the Apply button. Depending on the camera and where the microphone is connected, you may need to change the Audio Source option.
How to enable Audio Recording via the Camera's Web Interface
Step 1
How to access the Web Interface
There are two methods to connect to an IP camera's web interface, depending on how the camera is connected to the recorder. The reason to connect directly to the web interface, is to adjust specific settings that are unable to be setup from the recorder. Such as PTZ camera idle motion settings, and ANPR camera settings.
Accessing Cameras that are directly connected to an NVR
When using a recorder with inbuilt PoE ports, the cameras that are connected will automatically get assigned an IP address from the recorder.
In order to login to the camera, we first need to login to the NVR. This method works on recorders that are using the black user interface.
- Connect your computer to the same network as the recorder.

- If there is internet access, your computer should receive an IP address in the same IP address range of the recorder. If your computer does not receive an IP address or there is no modem/router, see the "Changing the IP address on a Windows Computer" section to statically assign an IP address in the same range as the recorders IP address.
- On the recorder, go to Main Menu > Network. Note down the IP address of the recorder.
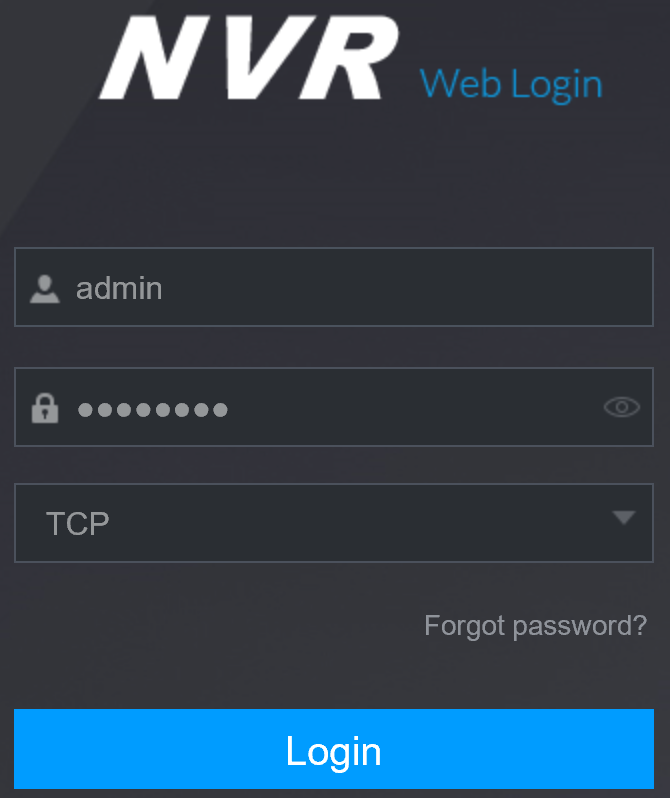
- On the computer, open Internet Explorer and enter the IP address of the recorder.
- If the computer is able to see the recorder, you will see a login page. Enter the recorders username and password.
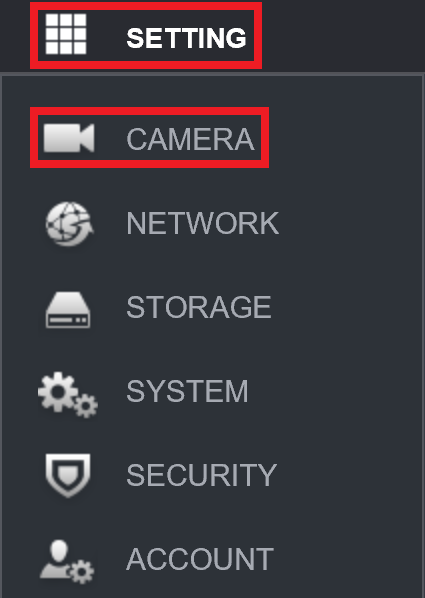
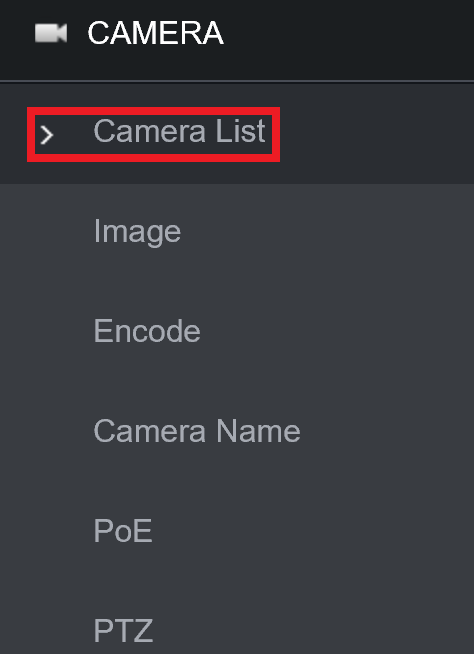
- Select Setting > Camera > Camera List.
- Next to each camera, there will be a
 icon. Select the icon next to the camera you wish to connect to.
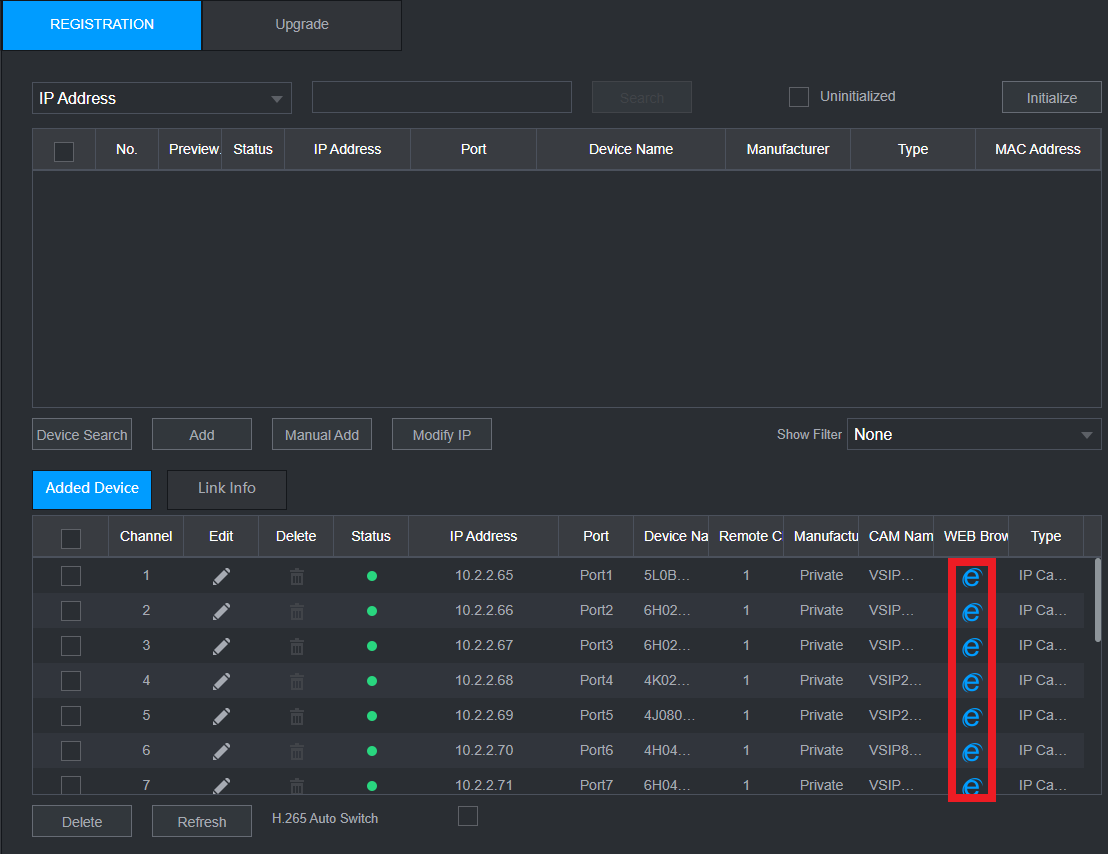
- A new page will open, bringing up the login page for the camera. Enter the username and password for the camera. Usually, the username is admin, and the password is the same as the recorder.


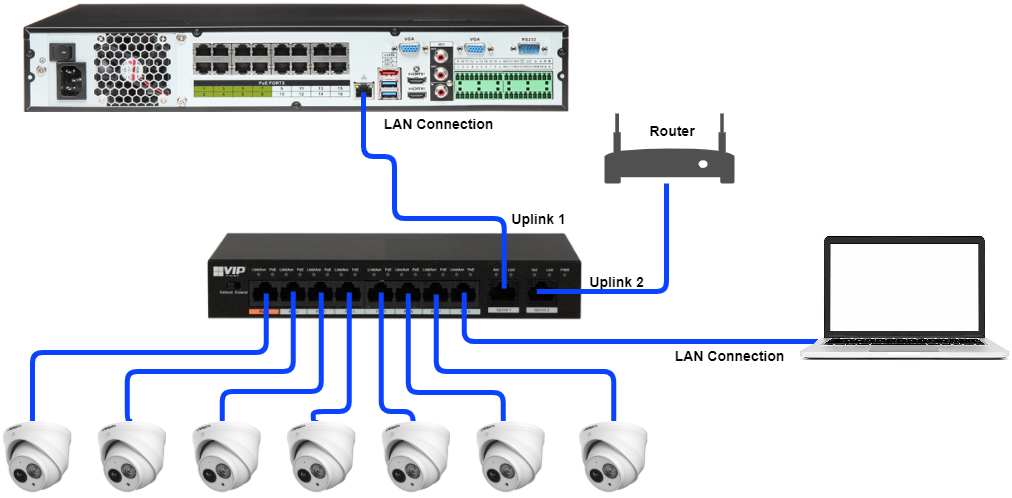
Connecting to cameras that are connected via a PoE switch.
This guide requires that the recorder and camera are already setup for network access. If the camera is not currently connected to the NVR, you may need to assign an IP address to your PC/Laptop Manually, see the "Changing the IP address on a Windows Computer" below to statically assign an IP address in the same range as the cameras IP address.
Changing the IP address on a Windows Computer - If no Modem/Router is connected
Follow the below steps to manually assign an IP address to a Windows computer, this will need to be done if the recorder/camera you are connecting to is not connected to a local network where DHCP is being assigned to devices.
Windows 10
- Open Settings.
- Select Network & Internet.
- Select Status, then Change Adapter Options.
-
Right-click the network adapter you want to change the IP address for, and select Properties.
-
Double-click the Internet Protocol Version 4 (TCP/IPv4) item.
- Click Use the following IP address and enter an IP address in the same range as the device you are trying to access. (E.g when trying to access 192.168.1.108 use a IP address in the 192.168.1.x range.) Note: This cannot be the same as the device you are trying to connect to or any other device on the same network. Save your changes on both windows.
- Type the IP address of the device you are trying to access into the address bar of your web browser.
- Once finished configuring the device, change the adapter settings back to normal by following steps 1-5 and clicking Obtain an IP address automatically.
Windows 11
1. In the Windows search bar at the bottom of the page, type Control Panel and press enter.
2. Select Network and Internet.
3. Select Network and Sharing Centre.
4. Select the link for Connections in the network that you want to change the IP address for.
5. Select Properties.
6. Double-click the Internet Protocol Version 4 (TCP/IPv4) item.
7. Click Use the following IP address and enter an IP address in the same range as the device you are trying to access. (E.g when trying to access 192.168.1.108 use a IP address in the 192.168.1.x range.) Note: This cannot be the same as the device you are trying to connect to or any other device on the same network. Save your changes on both windows.
8. Type the IP address of the device you are trying to access into the address bar of your web browser.
9. Once finished configuring the device, change the adapter settings back to normal by following steps 1-6 and clicking Obtain an IP address automatically.
See the video below for a visual guide of the steps above:
Shortcut
1. In the Windows search bar at the bottom of the page, type Ncpa.cpl and press enter.
2. Right-click the network adapter you want to change the IP address for, and select Properties.
3. Select the Internet Protocol Version 4 (TCP/IPv4) item.
4. Click Use the following IP address and enter an IP address in the same range as the device you are trying to access. (E.g when trying to access 192.168.1.108 use a IP address in the 192.168.1.x range.) Note: This cannot be the same as the device you are trying to connect to or any other device on the same network. Save your changes on both windows.
5. Type the IP address of the device you are trying to access into the address bar of your web browser.
6. Once finished configuring the device, change the adapter settings back to normal by following steps 1-3 and clicking Obtain an IP address automatically.
See the video below for a visual guide of the steps above:
- Connect the computer to the same network as the cameras.
- Download the Config tool program.
- Once the download is complete, extract the zip file, and open the ConfigTool.exe file.
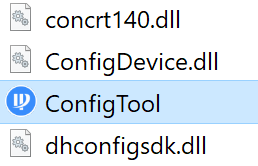
- Select the
 button, devices that are found on the network will be listed.
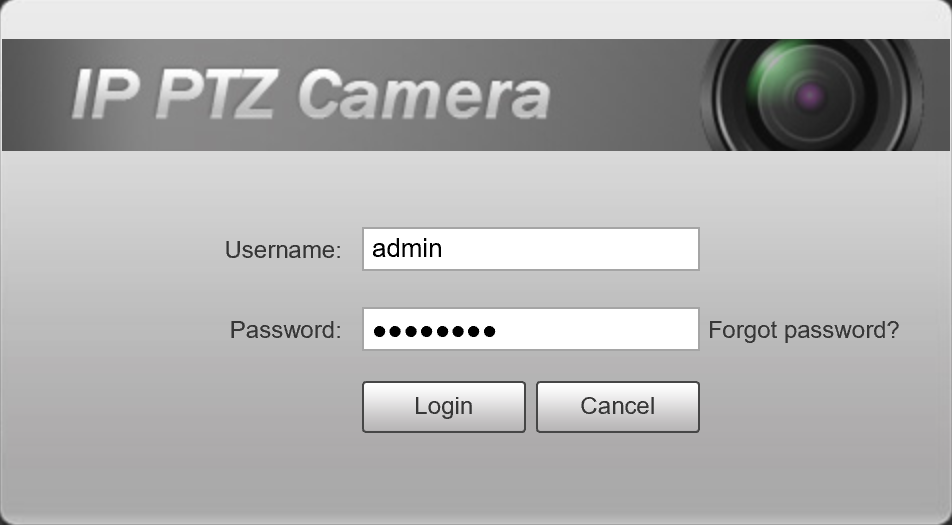
 - Click the Web button next to the camera you would like to login to.
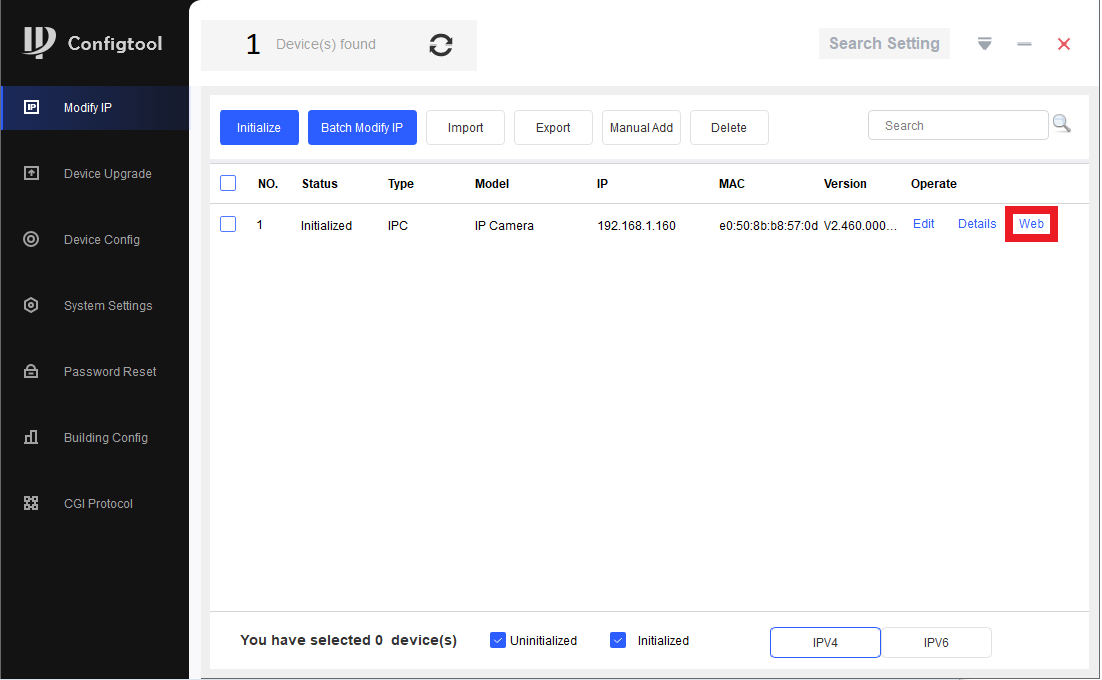
- A new page will open, bringing up the login page for the camera. Enter the username and password for the camera. Usually, the username is admin, and the password is the same as the recorder.
Step 2
Old GUI (Grey)
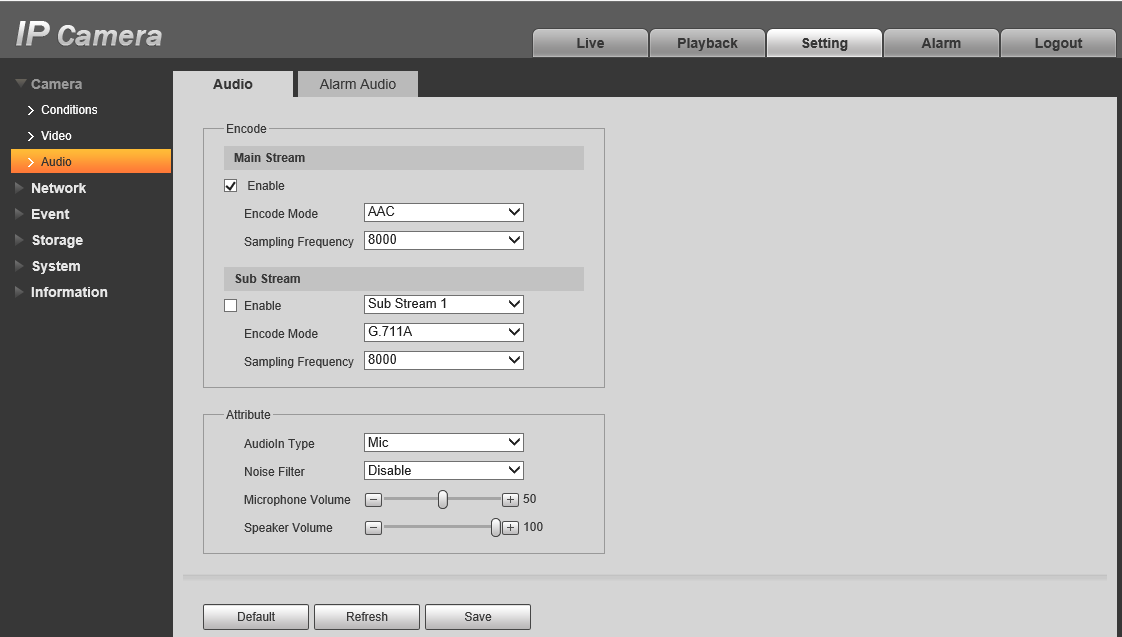
- Navigate to Setting > Camera > Audio
- Tick Enable to under Main Stream to enable the microphone for the Main Stream. This is the high quality stream that is used for recording.
- Tick Enable under Sub Stream to enable the microphone for the Sub Stream. This is the low quality stream used for remote streaming e.g via DMSS.
- Set the AudioIn Type. Mic is for the In-built Mic. Line-In is for a Microphone that is wired in. NOTE: Options available will differ by model.
- Click Save to save your changes.
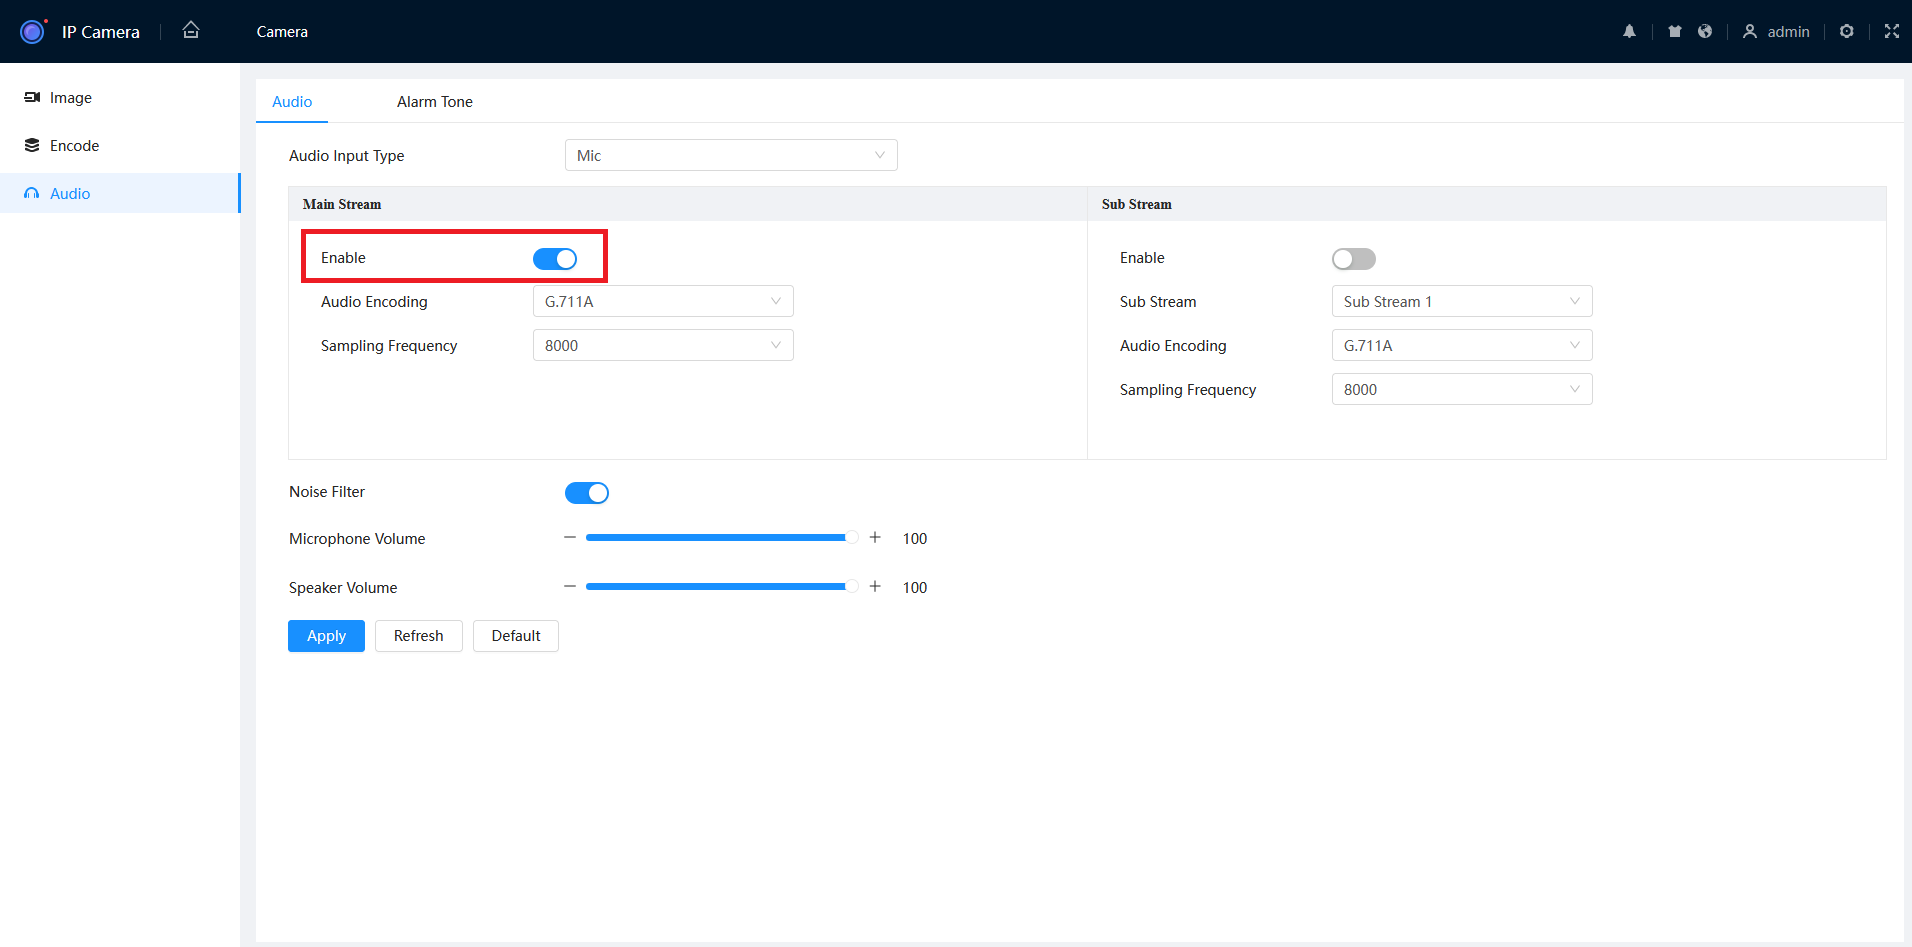
New GUI (White/Blue)
- Press the Home icon, then select Camera.

- Select Audio.
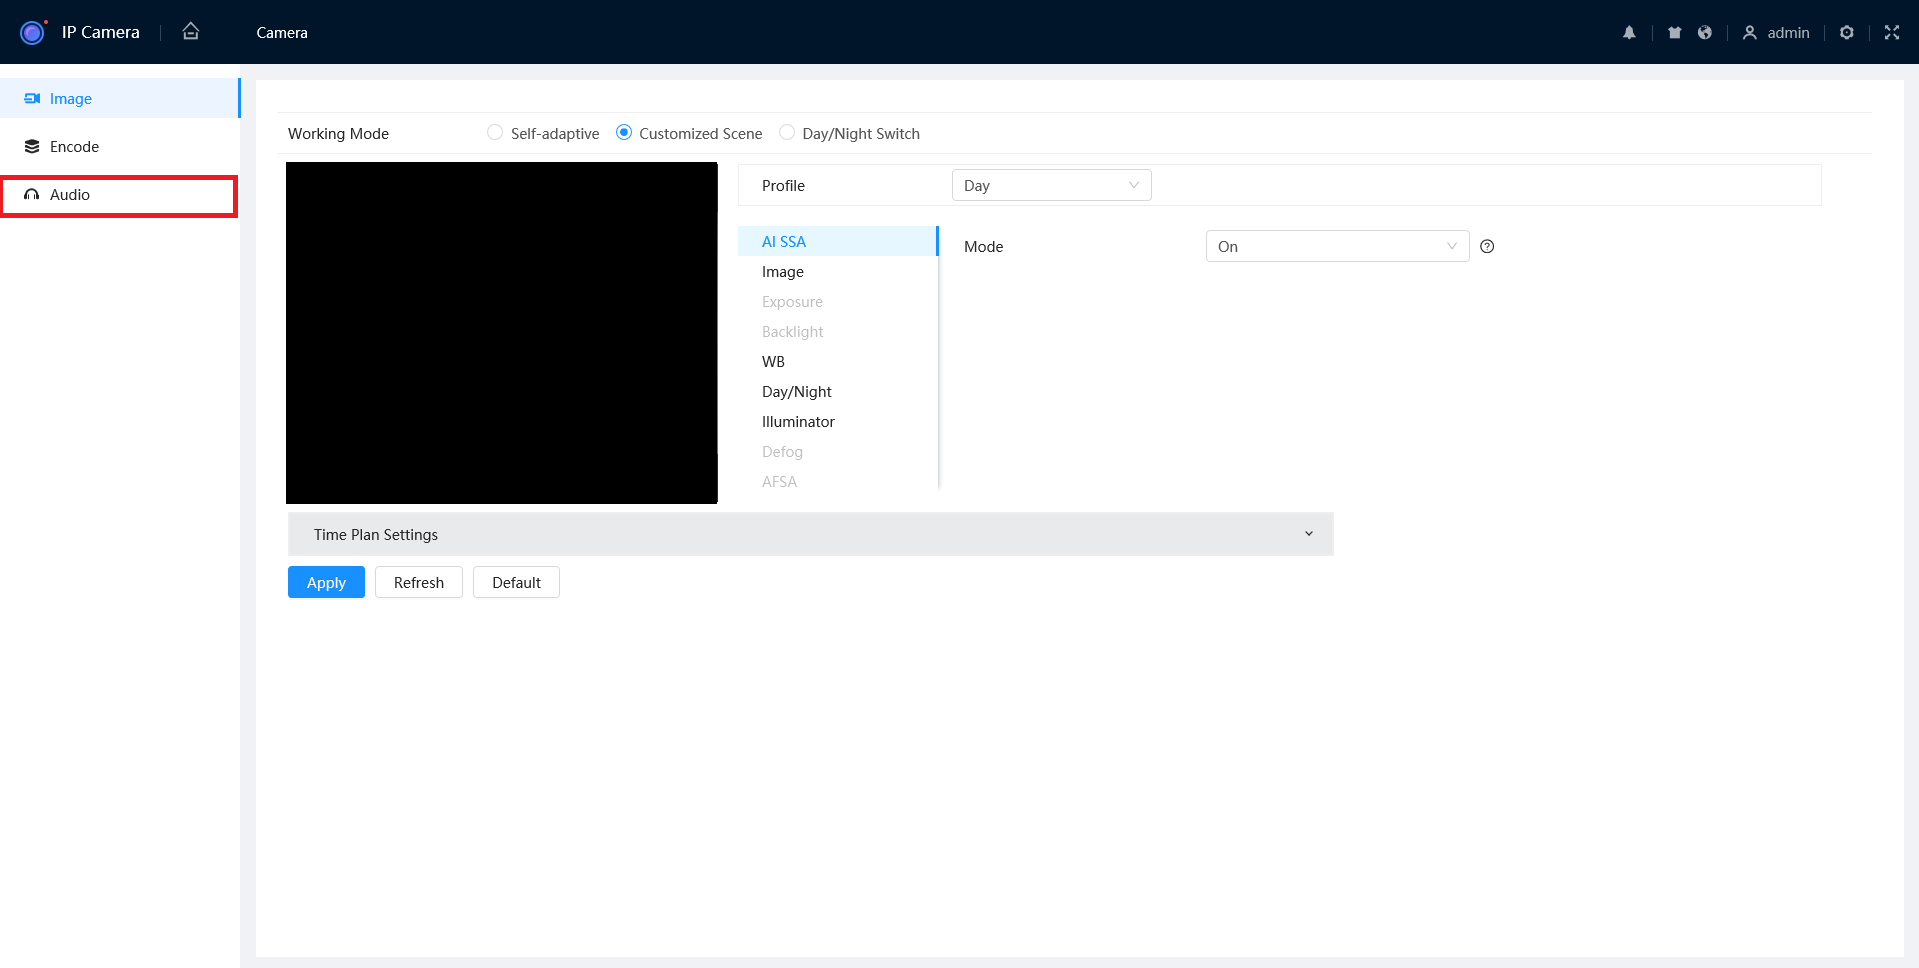
- Set the Enable status to on.
Cameras Dropping in and out or stuttering
- If the cameras are connected through a network switch, ensure the recorder is connected to the up-link port of the switch. If the recorder is trying to receive more then 100mbps of data from the switch, and it is not connected to an up-link port this creates a bottleneck. This is most common on recorders 32 channels and above with no built in PoE ports. You can check the network load on the recorder to view the current throughput.
- Check CAT5 cable for damage and correct termination.
- Check camera connection for water damage.
Unable to Connect to the Web Interface
If directly accessing the device using the IP address, ensure that the IP address of your PC is in the same range as the device you are trying to access
If you get an error that says "Unable to open the search page", "This page can't be displayed" or something similar, your PC might not be in the correct IP range. If you are trying to log into a camera with the IP Address of 192.168.1.108, your PC's IP address should be in the 192.168.1.x range.
How to change your Computer's IP Address
Windows 10
- Open Settings.
- Select Network & Internet.
- Select Status, then Change Adapter Options.
-
Right-click the network adapter you want to change the IP address for, and select Properties.
-
Double-click the Internet Protocol Version 4 (TCP/IPv4) item.
- Click Use the following IP address and enter an IP address in the same range as the device you are trying to access. (E.g when trying to access 192.168.1.108 use a IP address in the 192.168.1.x range.) Note: This cannot be the same as the device you are trying to connect to or any other device on the same network. Save your changes on both windows.
- Type the IP address of the device you are trying to access into the address bar of your web browser.
- Once finished configuring the device, change the adapter settings back to normal by following steps 1-5 and clicking Obtain an IP address automatically.
Windows 11
1. In the Windows search bar at the bottom of the page, type Control Panel and press enter.
2. Select Network and Internet.
3. Select Network and Sharing Centre.
4. Select the link for Connections in the network that you want to change the IP address for.
5. Select Properties.
6. Double-click the Internet Protocol Version 4 (TCP/IPv4) item.
7. Click Use the following IP address and enter an IP address in the same range as the device you are trying to access. (E.g when trying to access 192.168.1.108 use a IP address in the 192.168.1.x range.) Note: This cannot be the same as the device you are trying to connect to or any other device on the same network. Save your changes on both windows.
8. Type the IP address of the device you are trying to access into the address bar of your web browser.
9. Once finished configuring the device, change the adapter settings back to normal by following steps 1-6 and clicking Obtain an IP address automatically.
See the video below for a visual guide of the steps above:
Shortcut
1. In the Windows search bar at the bottom of the page, type Ncpa.cpl and press enter.
2. Right-click the network adapter you want to change the IP address for, and select Properties.
3. Select the Internet Protocol Version 4 (TCP/IPv4) item.
4. Click Use the following IP address and enter an IP address in the same range as the device you are trying to access. (E.g when trying to access 192.168.1.108 use a IP address in the 192.168.1.x range.) Note: This cannot be the same as the device you are trying to connect to or any other device on the same network. Save your changes on both windows.
5. Type the IP address of the device you are trying to access into the address bar of your web browser.
6. Once finished configuring the device, change the adapter settings back to normal by following steps 1-3 and clicking Obtain an IP address automatically.
See the video below for a visual guide of the steps above:
Reload the page in Internet Explorer or Microsoft Edge in Internet Explorer mode.
The plugins for our products are designed for Internet explorer, so you may run into issues using another web browser.
The icon for Internet Explorer looks like this  , whereas the icon for Microsoft Edge looks like this
  .
.
Reloading Microsoft Edge in Internet Explorer Mode
- select the 3 dots(
 ) in the top right corner.
 - Select Reload in Internet Explorer Mode.

If the Reload in Internet Explorer Mode option isn't there, follow the steps below:
- Open Microsoft Edge and select the 3 dots(
 ) in the top right corner.
 - Select Settings.
- Select Default Browser.
- Change “Allow sites to be reloaded in Internet Explorer mode (IE mode)” to Allow.

Clear your Browsing History
If using Internet Explorer and the web interface has "sys." or "com." in front of text or it doesn't load some elements correctly, you will need to delete your browsing history to fix it.
Press CTRL + SHIFT + DELETE.
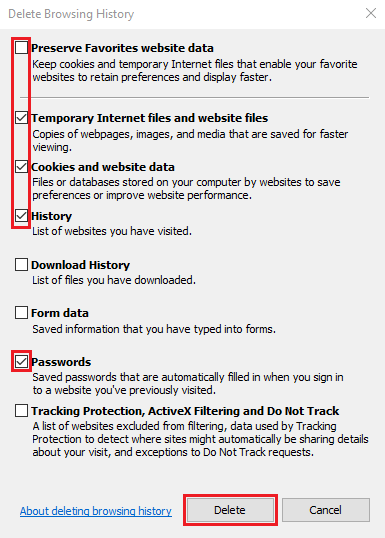
Untick Preserve Favourites website data and Tick Temporary Internet files and website files, Cookies and website data, History and Passwords, then click Delete.

Internet explorer will prompt you when it has finished deleting your browser history. Refresh the page
Delete Internet Explorer's Plugins
Our cameras and NVRs use a plugin made for Internet Explorer and, depending on the firmware of the device, may present a different version of the plugin which can cause conflicts.
To resolve this, close Internet Explorer then find the directory below and delete the webrec folder containing the plugins.
C:\Program Files\webrec\ or C:\Program Files (x86)\webrec\
Cannot Find Network Host Error
- Check CAT5 cable for damage and correct termination.
- Check camera connection for water damage.
- Check IP address of the camera using config tool, to ensure it has not changed.
- Plug the camera directly into the recorder with a CAT5 patch lead.
- Factory reset the camera
Reset IP Camera Guide
Turret Cameras
Reset Button under Flap
AI turret cameras, or turret cameras built post 2021 usually have their reset button located under a flap next to the MicroSD card slot. Press and hold the reset button for 30 seconds while the camera is powered on to reset the camera.
Reset Button on Mainboard
Cameras built pre-2021 require the camera to be opened to expose the mainboard.
Once opened, the button will on the edge of the mainboard (see left image), press and hold this button for 30 seconds while the camera is powered on. In some cases you may need to undo two screws holding the mainboard in place, as the the button may be on the underside or on the second board.
When no button can be found, the reset may be performed by shorting two copper pads (see right image) for 30 seconds using a paperclip while the camera is powered on.
Turret Camera reset locations for specific models
|
VSIPC-4DIRMG You will need to undo some screws to lift up the mainboard to access this reset button. |
|
|
VSIP1MPVDMINIIRC VSIP3MPVDMINIIRC |
|
|
VSIP4MPVDMINIIRCA3.6 You will have to undo 2x screws on the metal plate in order to lift up the mainboard to find this reset. |
|
|
VSIPE4MPVDMINIIRCB2.8 VSIPE6MPVDMINIIRC3.6 VSIPC-6DIRC |
|
| VSIPE8MPVDIRMG | |
|
VSIP4MPVDIRME |
|
Vandal Dome Cameras
To access the reset button on large vandal dome cameras, you will need to first remove the vandal dome (see left image) by removing 3 screws.
The most common style of reset button will be the one in the middle image. Press and hold it for 30 seconds while the camera is powered on to reset it.
If there is no button, there may be copper pads you can short out for 30 seconds to reset the camera (right side of right image). There may also be four silver pads located where the reset button would usually be (left side of right image) you can short out two of vertically or diagonally for 30 seconds to reset the camera. Do not attempt to short any other part of the camera as you may cause irreversible damage.
Large Vandal Dome Cameras
To access the reset button on large vandal dome cameras, you will need to first remove the vandal dome (see left image) by removing 3 screws.
The reset button will then be located toward the edge of the housing, recessed into the plastic (see right image). Press and hold the button for 30 seconds to reset the camera.
Vandal Dome Camera reset locations for specific models
|
VSIPC-4DIRD Short out the two silver pins (E.g. by using a paperclip) for 30 seconds while the camera is powered on. OR short out the two copper coloured holes (Right side of image) |
|
|
VSIPC-4DIRMD Press and hold the button for 30 seconds OR if no button exists, short out 2 silver pins diagonally with wire for 30 seconds |
|
| VSIP4MPVDIRMD | |
| VSIP3MPVDIRM2.8-12 | |
|
VSIP3MPVDMINIIR (Mainboard may be black instead of green) VSIP4MPVDMINIIR |
|
| VSIP2MPVDIRLV2 VSIPE8MPVDIRM |
|
Bullet Cameras
Most Bullet Cameras will have a flap that will reveal the MicroSD card slot and reset button. Press and hold the button for 30 seconds to reset the camera. Some cameras will not have a reset button, instead they will have two copper pads (see right image) which you can short out with a paperclip for 30 seconds to reset the camera.
Bullet cameras without a flap
For cameras without a reset flap you will need to remove the front of the camera (e.g by unscrewing it for cylindrical cameras) to access the reset button. Some cameras will have a physical button to press and hold for 30 seconds to reset it. Other cameras (see right image) will have copper pads to short out for 30 seconds to reset the camera.
Bullet Camera reset locations for specific models
|
VSIPC-4BIRS Short out two of the copper pads (E.g by using a paperclip) for 30 seconds while the camera is powered on. |
|
|
VSIP3MPFBIRM2.8-12 Short out two of the copper pads (E.g by using a paperclip) for 30 seconds while the camera is powered on. |
|
|
VSIP4MPFBIRM2.8-12 Short out two of the silver pins (E.g by using a paperclip) for 30 seconds while the camera is powered on. |
|
|
VSIP4MPFBIRMD VSIP8MPFBIRMD |
|
| VSIPE2MPFBMINIIR |
|
PTZ Cameras
PTZ Camera reset locations for specific models
|
VIP2MPPTZIRW You will have to undo 4 screws on the back to get access. |
|
|
VSIP2MPPTZCV3 Remove the outer shell and round lens cover (4 x Phillips screws) Press & hold button for 30 seconds. |
|
|
VSIP2MPPTZV3 There will be two screws on opposite sides that you will need to remove to take the plastic housing off. Then Press & hold the gold button for 30 seconds to reset the camera. |
|
Fisheye Cameras
To reset a fisheye camera, you will need to undo three screws on the base of the camera to expose the mainboard.
Once the Mainboard is exposed, press and hold the reset button for 30 seconds to reset the camera.