Adding new cameras to an old NVR sometimes requires extra steps for the devices to work with each other. See the steps below to ensure your new cameras will work with your old NVR.
Step 1 - Get into the Camera Web Interface
To reach the camera's web interface, you will need a computer/laptop with an ethernet port or external ethernet adapter. There are 3 ways to connect to the camera.
Connect both the computer and the camera into a PoE switch:
Connect the computer directly to the camera. Connect a 12V power supply to the camera.
Connect the camera and the computer into a PoE port of the NVR.
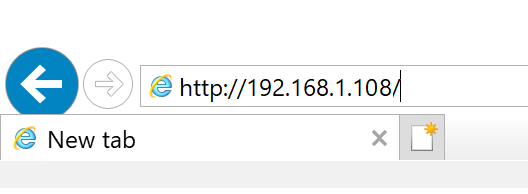
Once you are connected to the camera, you can reach the camera interface by typing the IP address into a browser's address bar. The default IP address of a camera is 192.168.1.108 but your camera may have different camera if it has been connected to an NVR before.
To find the IP address of your camera, download ConfigTool. Once downloaded, extract the folder then find and open the Configtool application. Once open, ConfigTool will list your camera/s and their IP addresses. You can then use this IP address to reach the web interface in a browser.
You may need to change the IP address of your computer to be able to reach the IP address of the camera. If the camera web interface fails to load, follow the guide below to change your computer to the right IP range.
Changing the IP address of a Windows Computer
1. In the Windows search bar at the bottom of the page, type Control Panel and press enter. 2. Select Network and Internet.
3. Select Network and Sharing Centre.
4. Select the link for Connections in the network that you want to change the IP address for.
5. Select Properties.
6. Double-click theInternet Protocol Version 4 (TCP/IPv4)item.
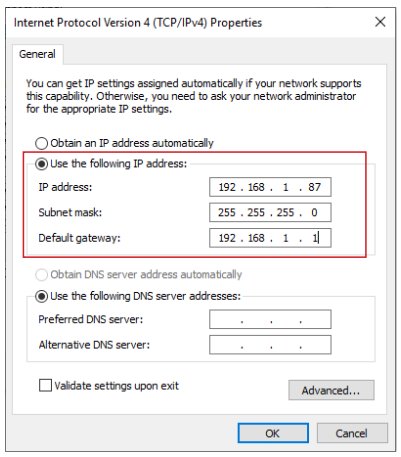
7. Click Use the following IP address and enter an IP address in the same range as the device you are trying to access. (E.g when trying to access 192.168.1.108, use an IP address in the 192.168.1.2 - 192.168.1.254 range.) Note: This cannot be the same as the device you are trying to connect to or any other device on the same network. Save your changes by clicking OK twice.
Step 2 - Initialise the Camera
Once you reach the web interface, follow the steps below to initialise the camera:
Select your Region and Language.
Select your Time Zone, then press Sync with PC to sync your cameras time with the PCs time.
Enter a password and recovery email. Ensure the password is set as the exact same password used for the NVR.
Ensure P2P is enabled, then press Next.
Click End.
Step 3 - Enable Compatibility Mode
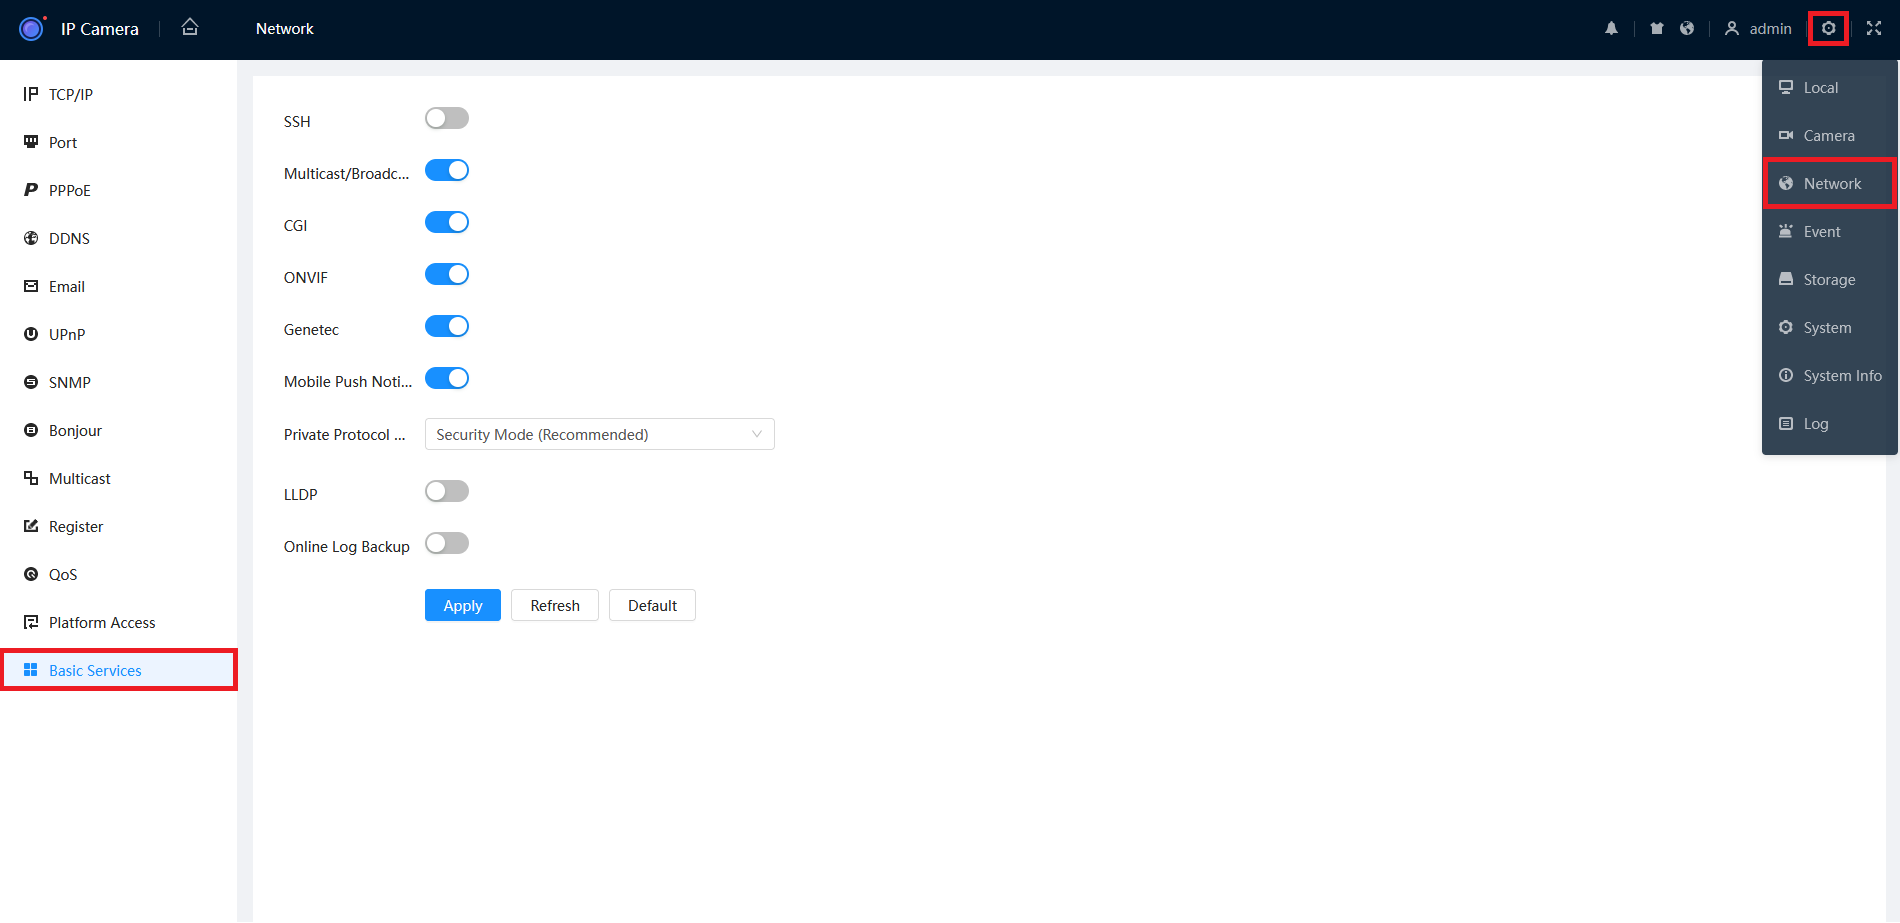
Once the camera is initialised, navigate to Settings > Network > Basic Services.
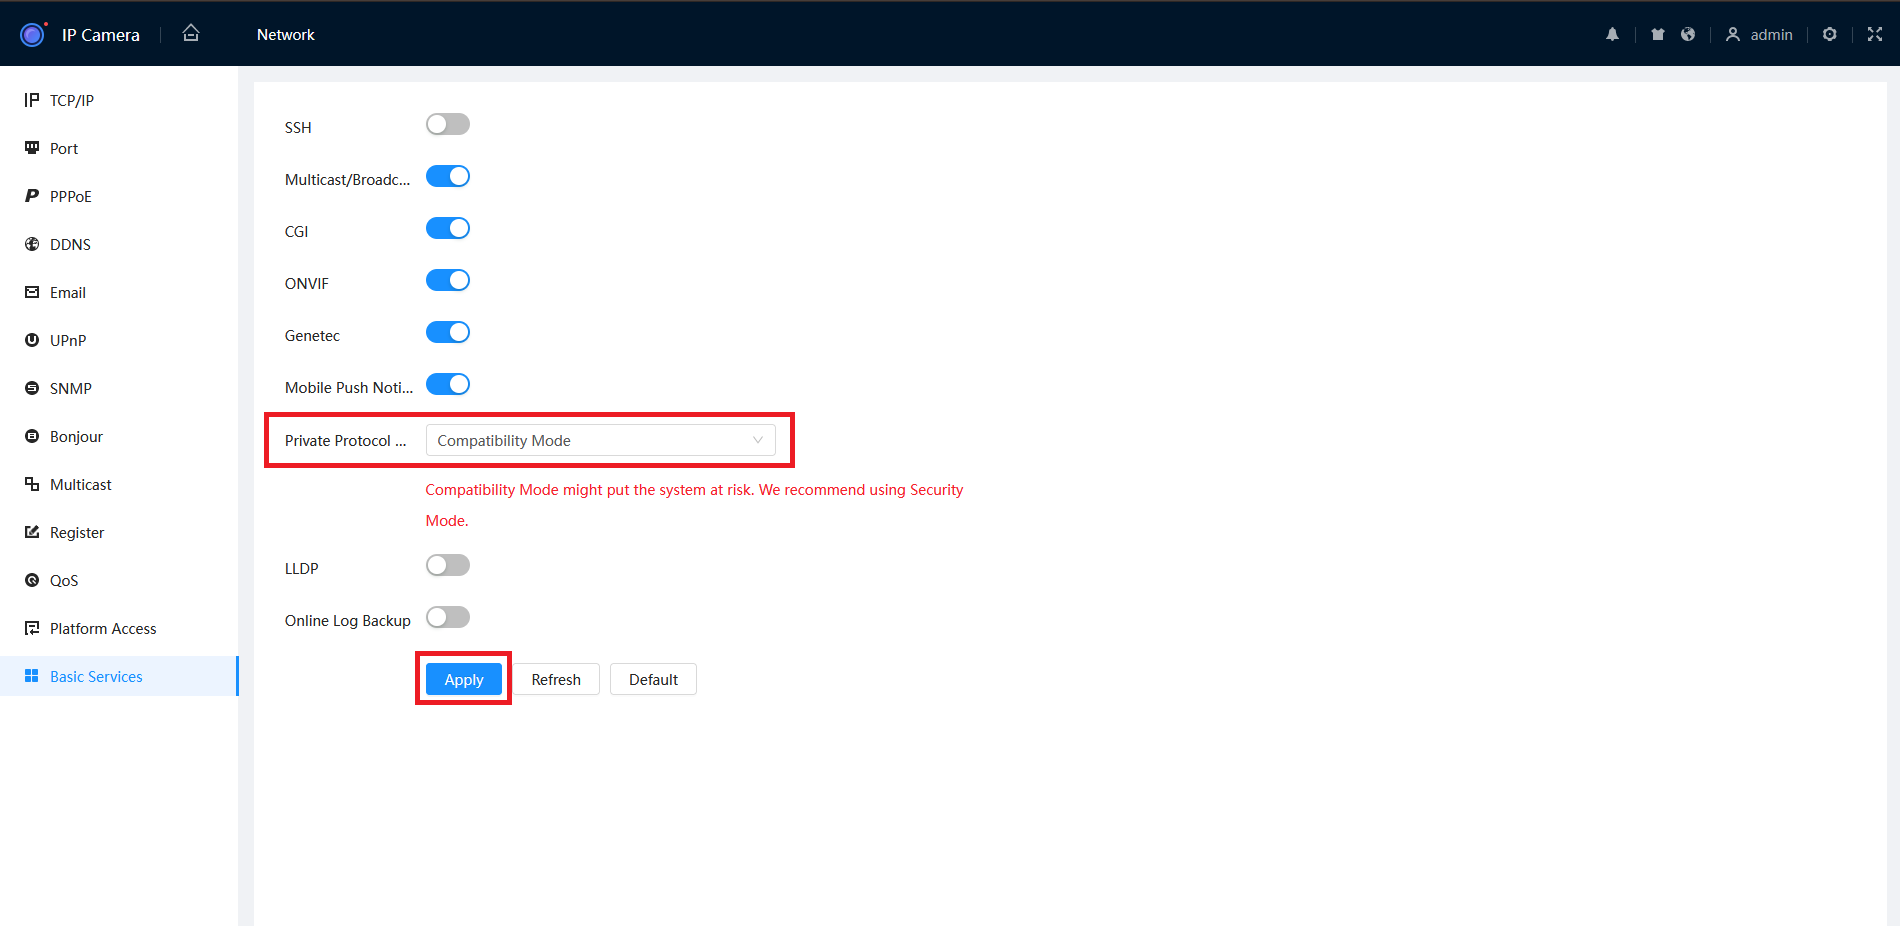
Set the Private Protocol Authentication Mode to Compatibility Mode, then click Apply.
Step 4 - Lower the Camera Encode Settings
Depending on how old your NVR is, it may not be able to handle the encode settings of a new camera. Follow the steps below to lower your camera encode settings to ensure it will be compatible with your NVR.
On your NVR's interface, go to the Main Menu > System (under Info) > Version OR Main Menu > Maintenance > System > Version. In here you should be able to see your Device Model (e.g. NVR16COM). Alternatively, you can find the NVR model on the physical sticker located on the bottom or side of your NVR.
Search for your model on the NVR manufacturer's website then go to the Specifications section.
In the Specifications section, look for the Resolution, Video Compression and Bitrate that your NVR can handle (This might look like the image below). These are the settings that you would need to drop on your cameras.
On the web interface of your camera, go to Settings > Camera > Encode.
Change the Main Stream and Sub Stream settings as needed to match the specs of your NVR.
Step 5 - Add the Camera to the NVR
After following steps 1-4, if connecting the camera directly to a PoE port of your NVR, the camera will automatically show up. If you are adding the camera to the NVR through a switch or the local network, follow the steps below.
Blue GUI
From the NVR interface, go to Main Menu > Camera > Remote/Registration.
Click Device Search to search for cameras on the same network as the NVR. You should see your camera appear in the top list.
3. Tick the camera using the checkbox on the left side, then click Add. This will add your camera to the next available channel on your NVR and will now be viewable.
Black GUI
From the NVR interface, go to Main Menu > Camera/Remote Devices > Camera List/Video Device.
Click Device Search to search for cameras on the same network as the NVR. You should see your camera appear in the top list.
Tick the camera using the checkbox on the left side, then click Add. This will add your camera to the next available channel on your NVR and will now be viewable.
Update NVR Firmware (Only if Required)
If you have followed steps 1-5 and the camera still fails to add or be viewed on your NVR, the NVR firmware may be too outdated to work with the new camera. To update the NVR's firmware, see the steps below.
You would first need to get the latest firmware for your NVR. You can usually find this in the Downloads > Firmware section on the NVR manufacturer's web page for your NVR model.
To find your NVR's model follow the below: On your NVR's interface, go to the Main Menu > System (under Info) > Version OR Main Menu > Maintenance > System > Version. In here you should be able to see your Device Model (e.g. NVR16COM). Alternatively, you can find the NVR model on the physical sticker located on the bottom or side of your NVR.
Updating NVR Firmware - Method 1 (USB)
Blue GUI
Download the firmware file for your recorder onto a USB stick.
Connect the USB stick into any of the USB ports on your recorder.
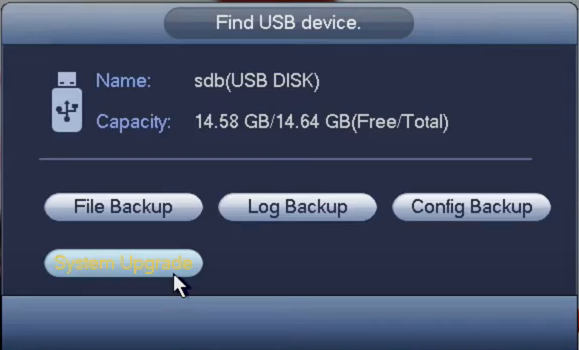
After a few seconds, a message will pop up on the screen.
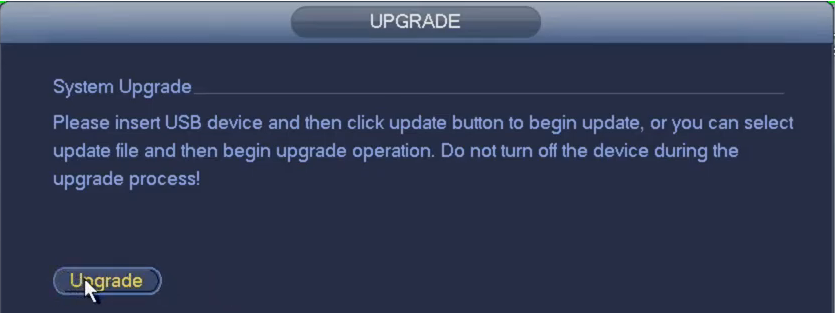
Click System Upgrade.
Click Upgrade.
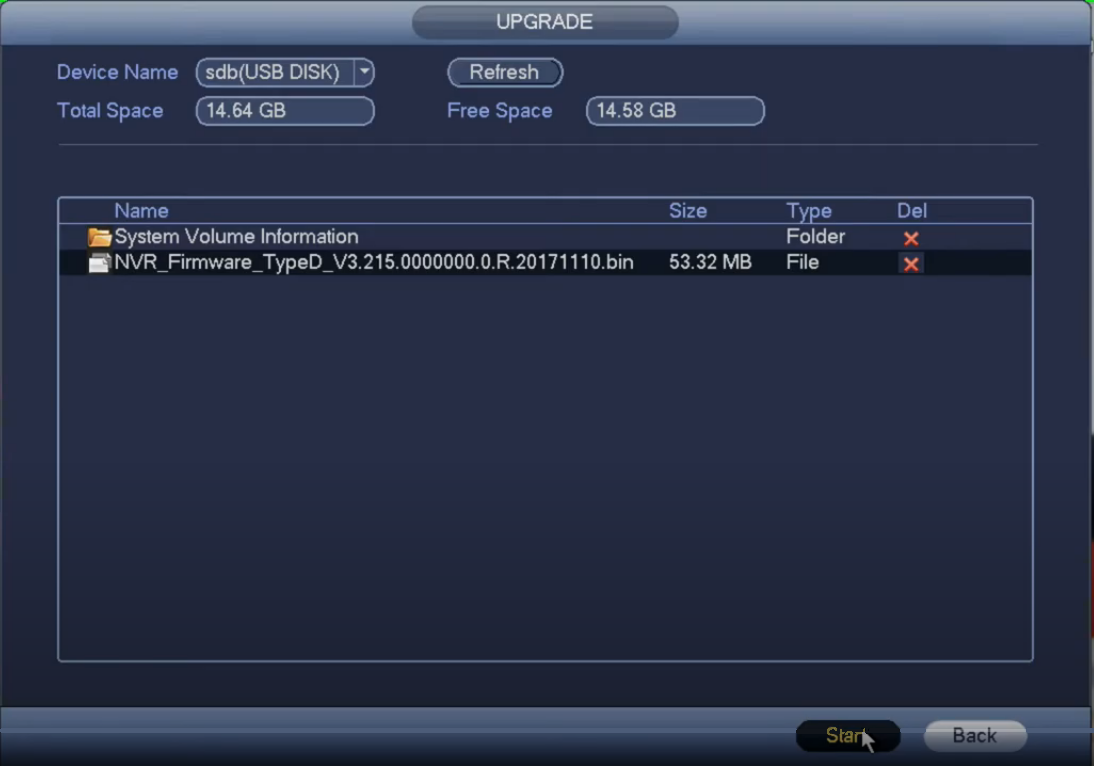
The USB's contents will be displayed. Find and select the firmware (.bin) file then click Start.
Your recorder will begin updating and will reboot once complete.
Black GUI
Put the firmware file for your recorder onto a USB stick.
Connect the USB stick into any of the USB ports on your recorder.
After a few seconds, a message will pop up on the screen.
Click System Upgrade.
Click Upgrade.
The USB's contents will be displayed. Find and select the firmware file then click OK.
Your recorder will begin updating and will reboot once complete.
Updating NVR Firmware - Method 2 (Web Interface)
Download the firmware onto your computer.
Log into the web interface of your NVR.
Accessing the Web Interface of an NVR
Accessing The Web Interface Of An NVR
There are 3 ways to access the web interface of an NVR.
Logging in directly using the IP address.
Logging in via SmartPSS
Logging in via SmartPSS Lite
Logging in to NVR Directly
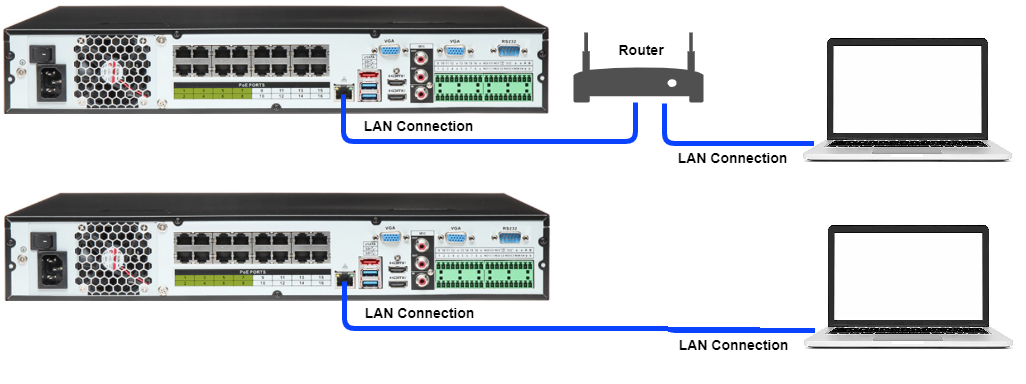
Connect your device to the same network as your NVR Either through a Switch or directly to the LAN port of the NVR.
Depending on how your network and NVR are Configured you may have to change the IP of the device so it is the same IP range of the NVR.
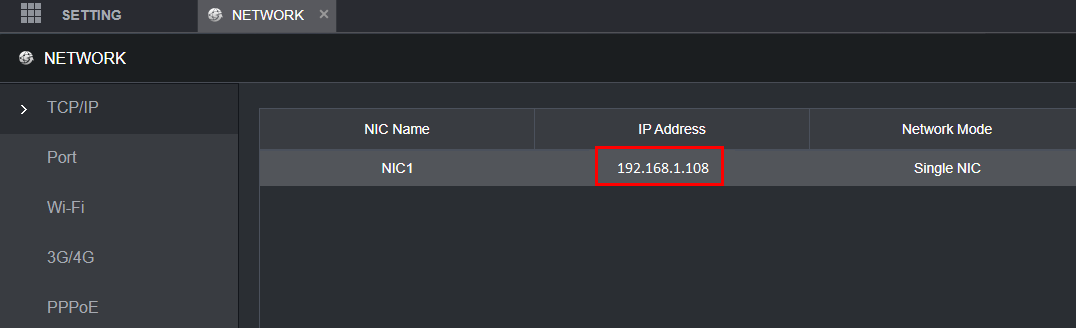
To Find IP of Recorder, got to Main Menu > Network > TCP/IP and note down the IP of your NVR.
Changing the IP address on a Windows Computer
Windows 10
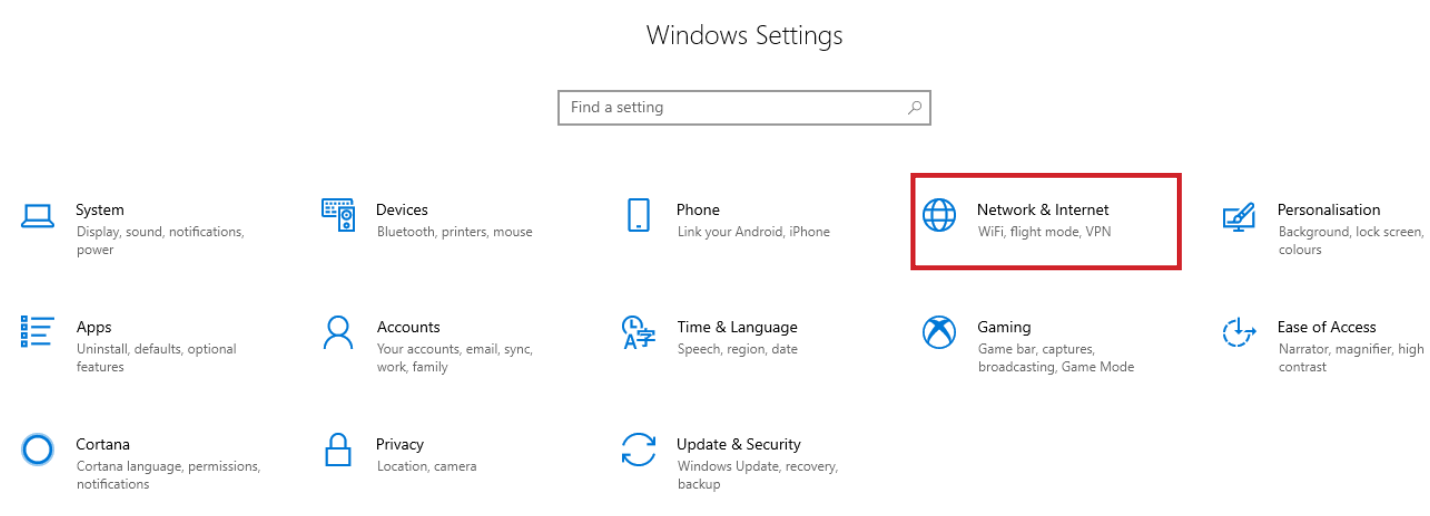
Open Settings.
Select Network & Internet.
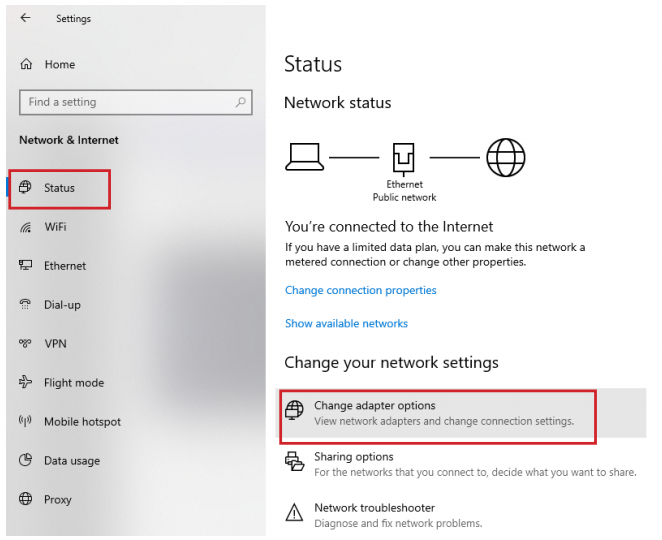
Select Status, thenChange Adapter Options.
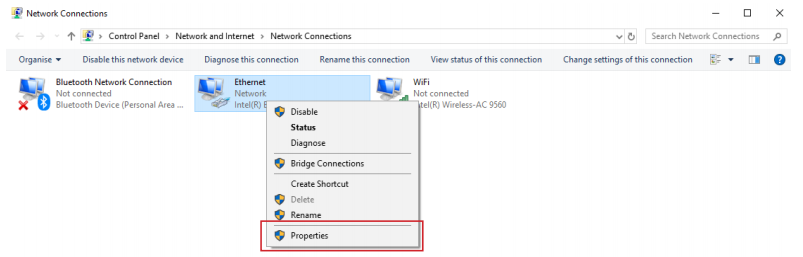
Right-click the network adapter you want to change the IP address for, and select Properties.
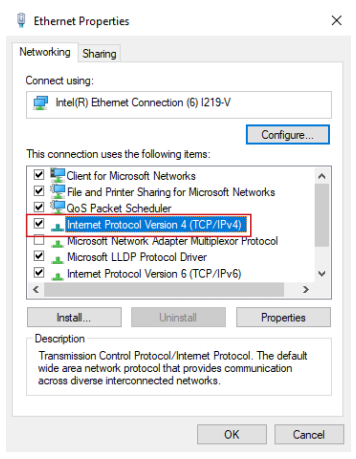
Double-click the Internet Protocol Version 4 (TCP/IPv4) item.
Click Use the following IP address and enter an IP address in the same range as the device you are trying to access. (E.g when trying to access 192.168.1.108 use a IP address in the 192.168.1.x range.) Note: This cannot be the same as the device you are trying to connect to or any other device on the same network. Save your changes on both windows.
Type the IP address of the device you are trying to access into the address bar of your web browser.
Once finished configuring the device, change the adapter settings back to normal by following steps 1-5 and clicking Obtain an IP address automatically.
1. In the Windows search bar at the bottom of the page, type Control Panel and press enter. 2. Select Network and Internet.
3. Select Network and Sharing Centre.
4. Select the link for Connections in the network that you want to change the IP address for.
5. Select Properties.
6. Double-click theInternet Protocol Version 4 (TCP/IPv4)item.
7. Click Use the following IP address and enter an IP address in the same range as the device you are trying to access. (E.g when trying to access 192.168.1.108 use a IP address in the 192.168.1.x range.) Note: This cannot be the same as the device you are trying to connect to or any other device on the same network. Save your changes on both windows.
8. Type the IP address of the device you are trying to access into the address bar of your web browser. 9. Once finished configuring the device, change the adapter settings back to normal by following steps 1-6 and clicking Obtain an IP address automatically.
See the video below for a visual guide of the steps above:
Shortcut
1. In the Windows search bar at the bottom of the page, type Ncpa.cpl and press enter. 2. Right-click the network adapter you want to change the IP address for, and select Properties.
3. Select theInternet Protocol Version 4 (TCP/IPv4)item.
4. Click Use the following IP address and enter an IP address in the same range as the device you are trying to access. (E.g when trying to access 192.168.1.108 use a IP address in the 192.168.1.x range.) Note: This cannot be the same as the device you are trying to connect to or any other device on the same network. Save your changes on both windows.
5. Type the IP address of the device you are trying to access into the address bar of your web browser. 6. Once finished configuring the device, change the adapter settings back to normal by following steps 1-3 and clicking Obtain an IP address automatically.
See the video below for a visual guide of the steps above:
Once Device is in Same Range of the NVR. On the computer, open Internet Explorer and enter the IP address of the recorder.
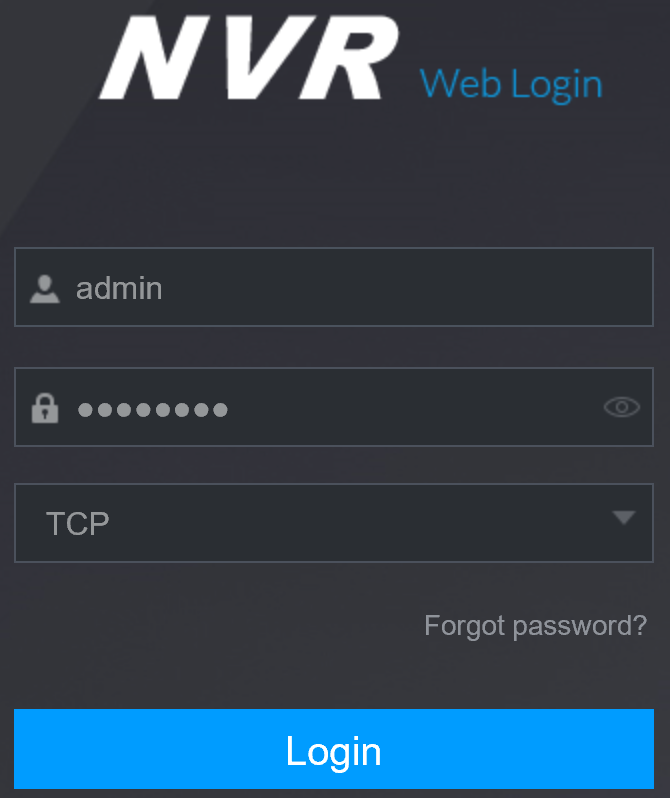
If Device is in same range and the IP Address is correct, you will be Prompted with a login page.
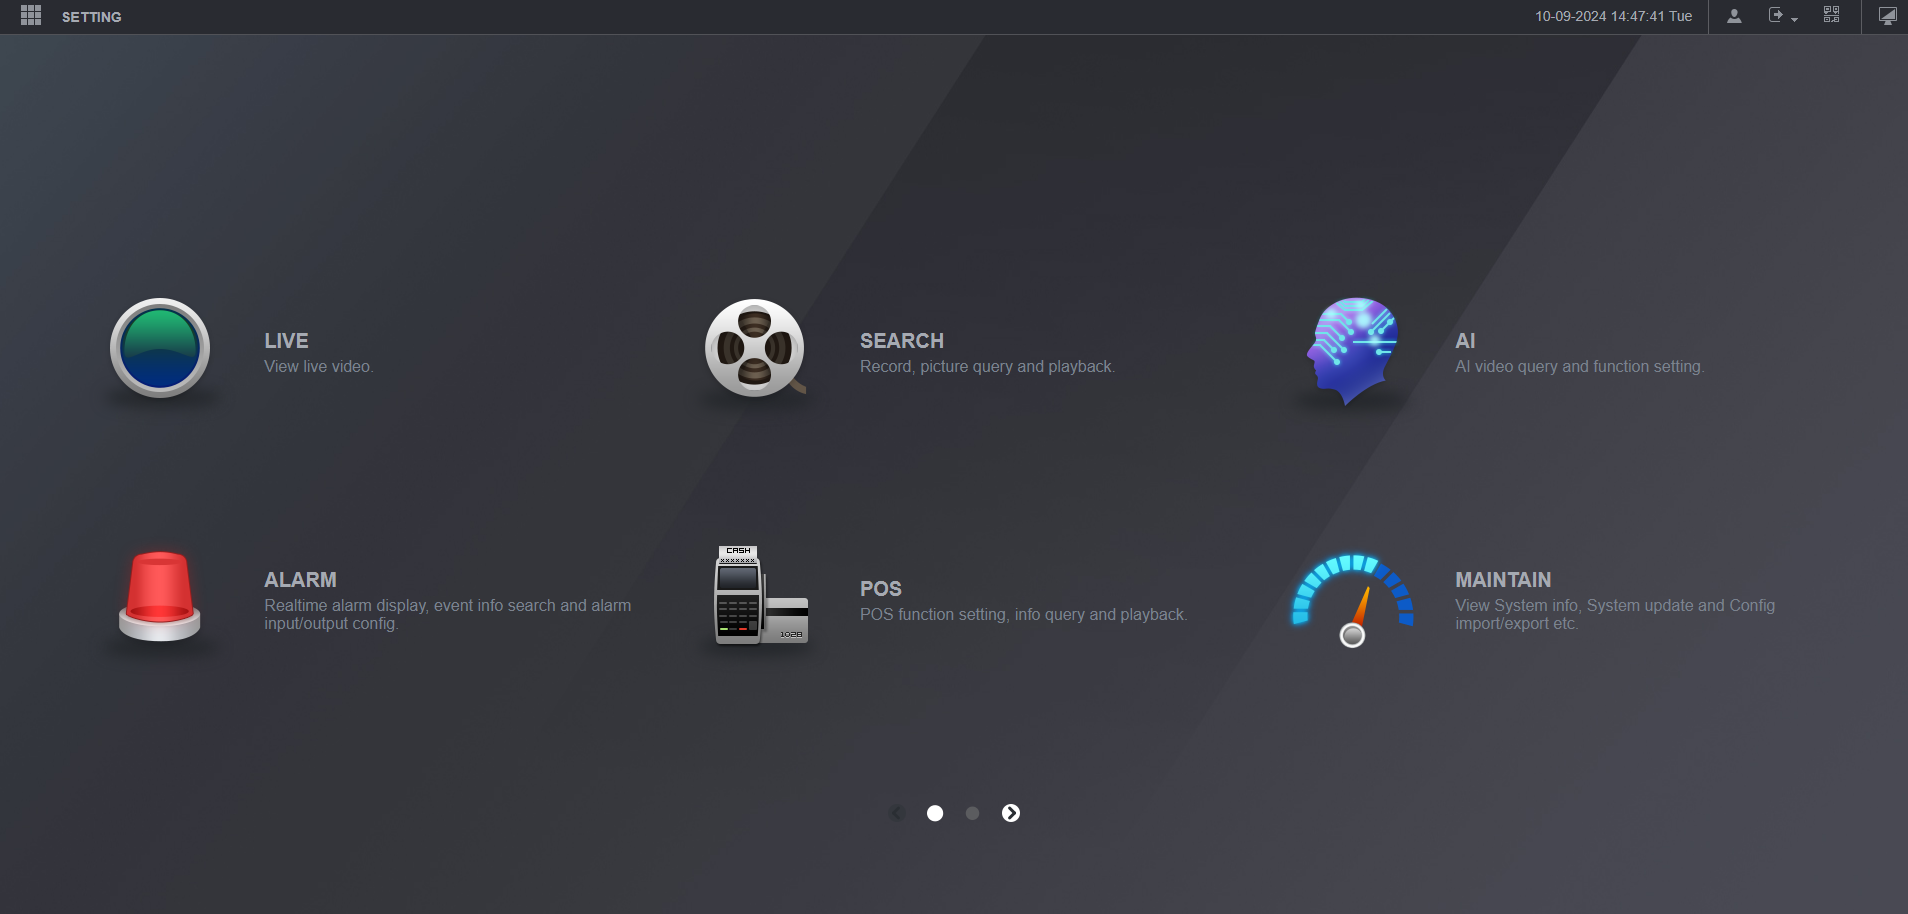
After Login The NVR web Interface will be Shown as below.
Accessing the Web Interface via SmartPSS
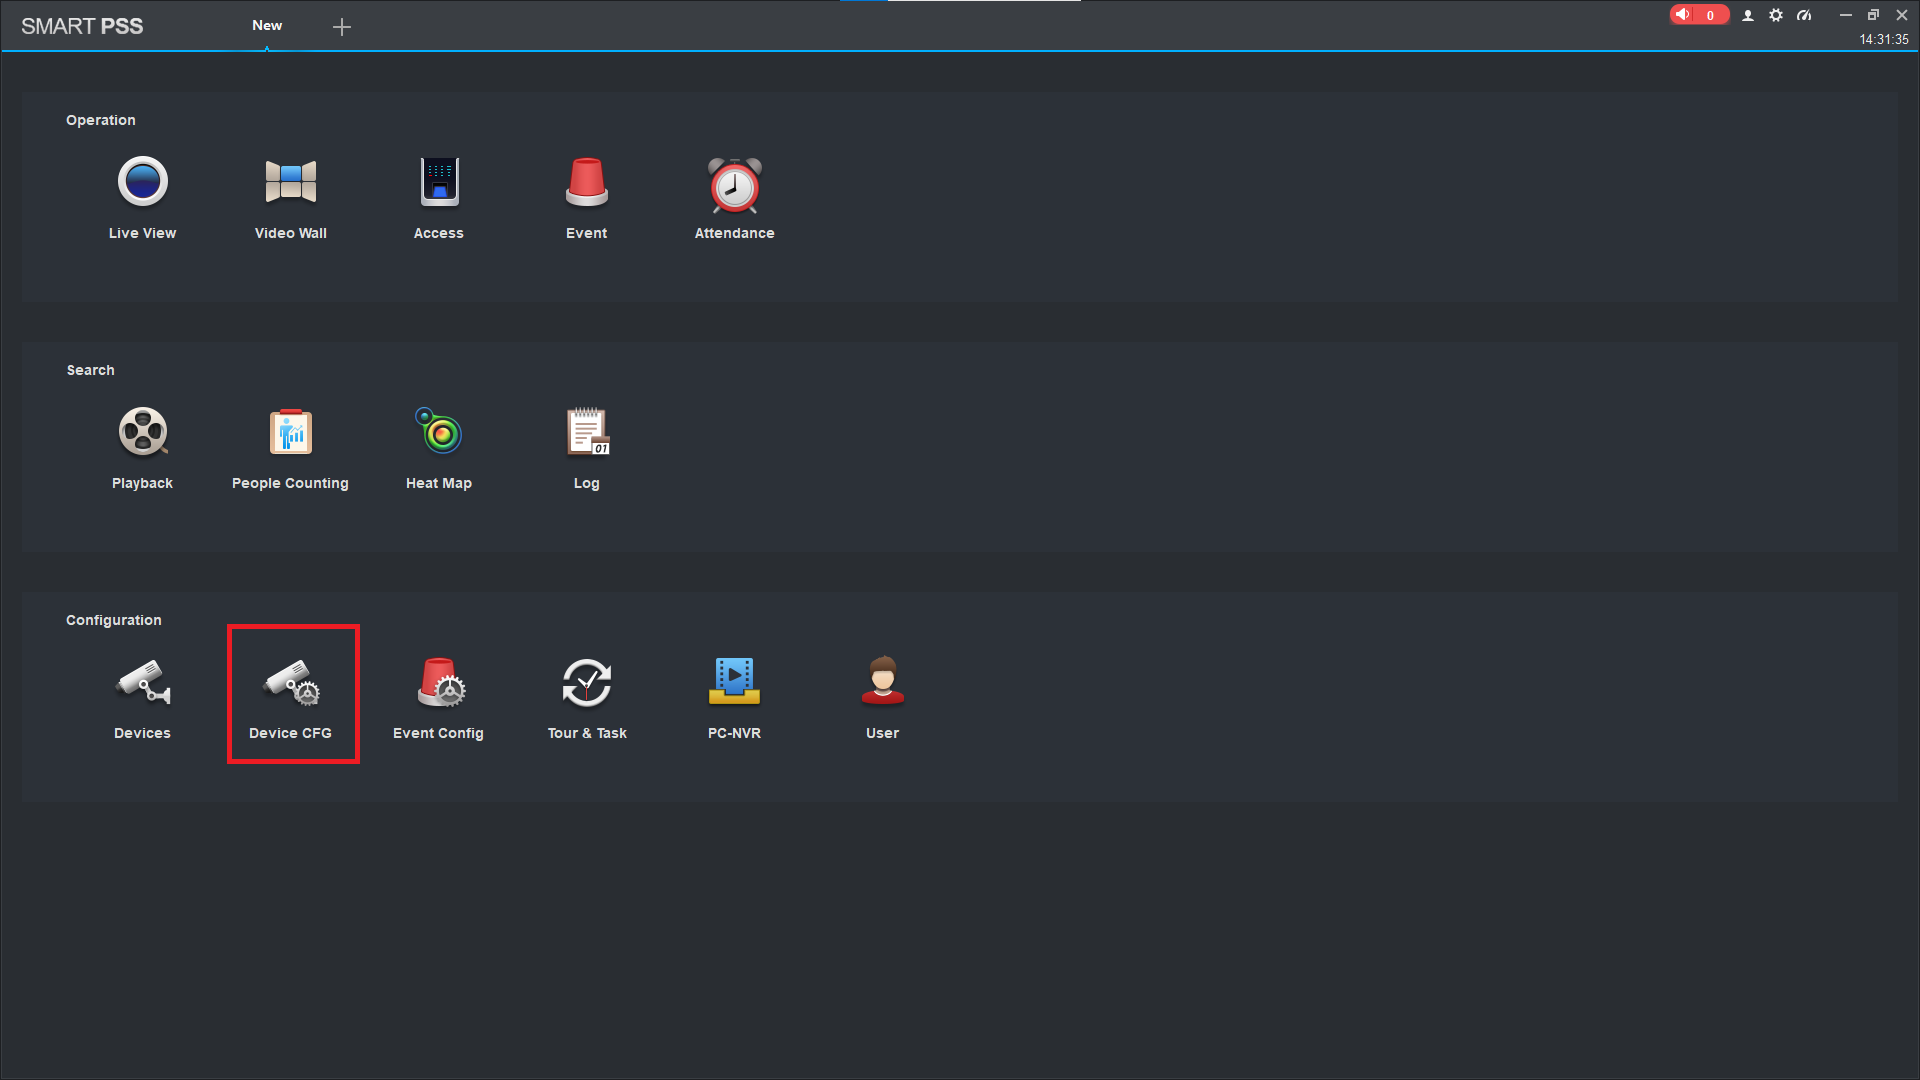
Open Smart PSS and select Device CFG.
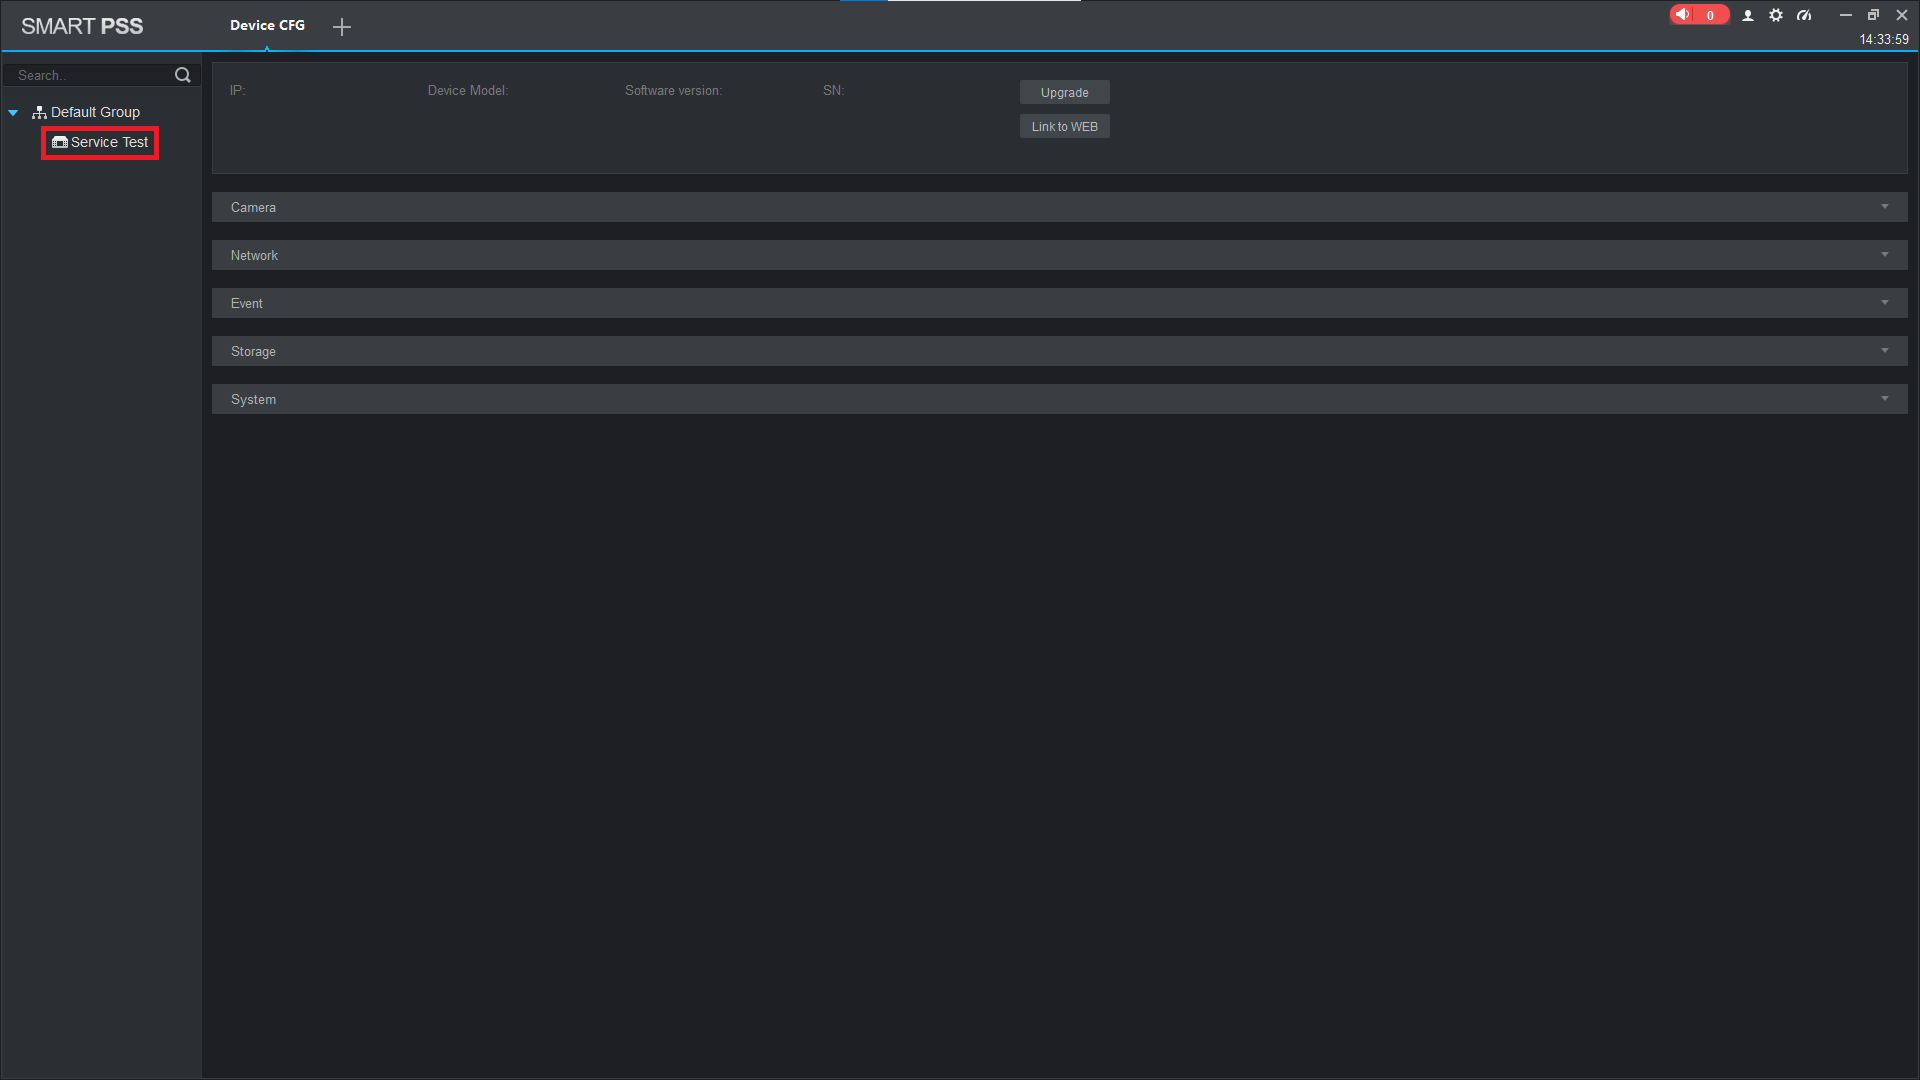
Select your device.
Select Link to WEB.
A Browser will open with the login page. Once Logged in the NVR web interface will appear as below
Accessing the Web Interface via SmartPSS Lite
Open SmartPSS Lite and select Devices.
2. For the device you want to access the web interface of, select the Globe Icon. This will direct you to the login page of your device, allowing you to enter the username and password.
If everything is done correctly but the web interface doesn't load, see below.
Web Interface Troubleshooting
Web Interface Troubleshooting
If directly accessing the device using the IP address, ensure that the IP address of your PC is in the same range as the device you are trying to access
If you get an error that says "Unable to open the search page", "This page can't be displayed" or something similar, your PC might not be in the correct IP range. If you are trying to log into a camera with the IP Address of 192.168.1.108, your PC's IP address should be in the 192.168.1.x range.
How to change your Computer's IP Address
Windows 10
Open Settings.
Select Network & Internet.
Select Status, thenChange Adapter Options.
Right-click the network adapter you want to change the IP address for, and select Properties.
Double-click the Internet Protocol Version 4 (TCP/IPv4) item.
Click Use the following IP address and enter an IP address in the same range as the device you are trying to access. (E.g when trying to access 192.168.1.108 use a IP address in the 192.168.1.x range.) Note: This cannot be the same as the device you are trying to connect to or any other device on the same network. Save your changes on both windows.
Type the IP address of the device you are trying to access into the address bar of your web browser.
Once finished configuring the device, change the adapter settings back to normal by following steps 1-5 and clicking Obtain an IP address automatically.
1. In the Windows search bar at the bottom of the page, type Control Panel and press enter. 2. Select Network and Internet.
3. Select Network and Sharing Centre.
4. Select the link for Connections in the network that you want to change the IP address for.
5. Select Properties.
6. Double-click theInternet Protocol Version 4 (TCP/IPv4)item.
7. Click Use the following IP address and enter an IP address in the same range as the device you are trying to access. (E.g when trying to access 192.168.1.108 use a IP address in the 192.168.1.x range.) Note: This cannot be the same as the device you are trying to connect to or any other device on the same network. Save your changes on both windows.
8. Type the IP address of the device you are trying to access into the address bar of your web browser. 9. Once finished configuring the device, change the adapter settings back to normal by following steps 1-6 and clicking Obtain an IP address automatically.
See the video below for a visual guide of the steps above:
Shortcut
1. In the Windows search bar at the bottom of the page, type Ncpa.cpl and press enter. 2. Right-click the network adapter you want to change the IP address for, and select Properties.
3. Select theInternet Protocol Version 4 (TCP/IPv4)item.
4. Click Use the following IP address and enter an IP address in the same range as the device you are trying to access. (E.g when trying to access 192.168.1.108 use a IP address in the 192.168.1.x range.) Note: This cannot be the same as the device you are trying to connect to or any other device on the same network. Save your changes on both windows.
5. Type the IP address of the device you are trying to access into the address bar of your web browser. 6. Once finished configuring the device, change the adapter settings back to normal by following steps 1-3 and clicking Obtain an IP address automatically.
See the video below for a visual guide of the steps above:
Reload the page in Internet Explorer or Microsoft Edge in Internet Explorer mode.
The plugins for our products are designed for Internet explorer, so you may run into issues using another web browser. The icon for Internet Explorer looks like this , whereas the icon for Microsoft Edge looks like this .
Reloading Microsoft Edge in Internet Explorer Mode
select the 3 dots() in the top right corner.
Select Reload in Internet Explorer Mode.
If the Reload in Internet Explorer Mode option isn't there, follow the steps below:
Open Microsoft Edge and select the 3 dots() in the top right corner.
Select Settings.
Select Default Browser.
Change “Allow sites to be reloaded in Internet Explorer mode (IE mode)”to Allow.
If using Internet Explorer and the web interface has "sys." or "com." in front of text or it doesn't load some elements correctly, you will need to delete your browsing history to fix it.
Press CTRL + SHIFT + DELETE.
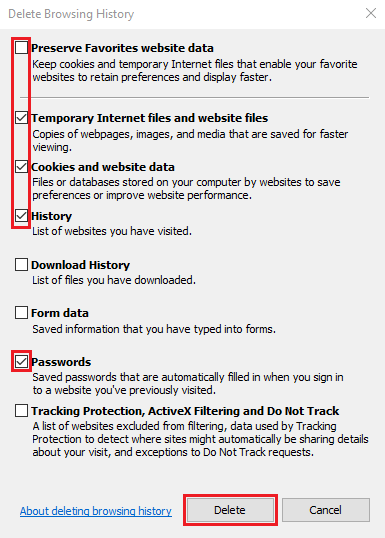
Untick Preserve Favourites website data and Tick Temporary Internet files and website files, Cookies and website data, Historyand Passwords, then click Delete.
Internet explorer will prompt you when it has finished deleting your browser history. Refresh the page
Delete Internet Explorer's Plugins
Our cameras and NVRs use a plugin made for Internet Explorer and, depending on the firmware of the device, may present a different version of the plugin which can cause conflicts.
To resolve this, close Internet Explorer then find the directory below and delete the webrec folder containing the plugins.
C:\Program Files\webrec\ or C:\Program Files (x86)\webrec\
Once logged in, go to Maintenance > Manager > Update.
Click Browse. This will open your computers file explorer.
Find and select the firmware file and click Open.
Click Update.
Your recorder will begin updating and will reboot once complete.










 , whereas the icon for Microsoft Edge looks like this
  .
. ) in the top right corner.
 ) in the top right corner.