Cameras with Manufacturer Dates after 2018 will have to be Initialised before they can be used
Initialise Camera via NVR
Cameras that are connected to the POE of an NVR will be Initialised and configured Automatically

Initialise and Configure Cameras over Network
Some installations may require cameras to be added to the NVR over the network. This may be the case if the NVR doesn't have POE ports, or if a wireless bridge is involved in the installation. In this case the cameras need to be added to the NVR via a different method, see below for details.
Important Note
If this is a business installation, please make sure you consult with the Manager and/or IT department before installing any devices that will need to be connected to the network.
Installing a network device without approval and prior knowledge of how the network is setup, has the potential to cause critical devices to fail, bring down the network and even stop business' server/software from operating.
Please be advised the following instructions are only true for simple networks
Warning
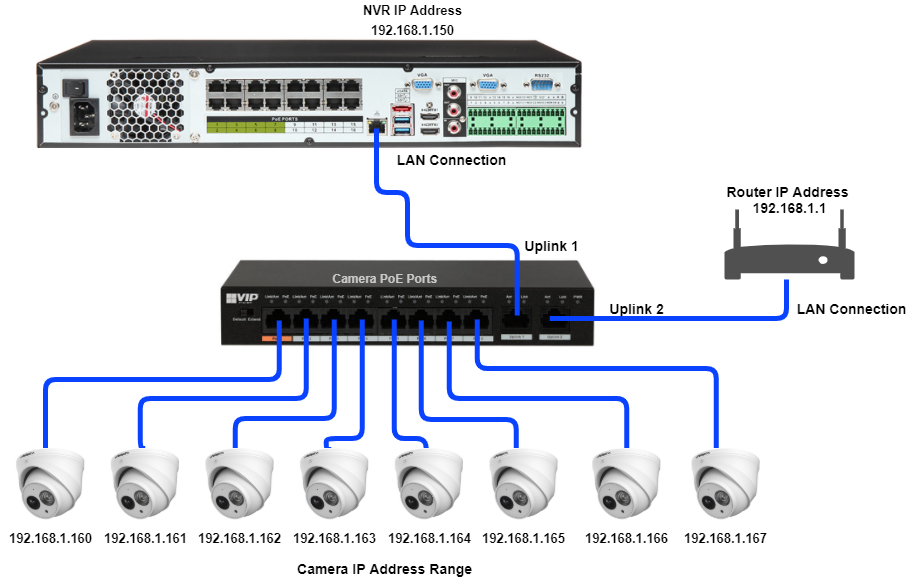
When connecting cameras over the network, they must only connect to the NVR's LAN Port as shown in the above diagram.
Do not connect ANY Network Devices/Switches to the NVR POE Ports
Only Connect 1 IP Camera per channel of the NVR
Configuration via PC is required to address and initialise multiple cameras.
How to see check your IP Address and find available IP Addresses
Step 1 - CMD: Identify and Set an IP Address
If you are currently connected to a router or have internet access, that means a Router/Modem or Other Device is supplying your computer with an IP Address, Subnet Mask and Gateway. This process is Automatic and is called DHCP.
Info
To initialise, configure and connect to a device the computer must be in the same IP Address range.
Two devices on the same network, cannot have the same IP Address. If two devices have the same IP Address, a conflict will occur and both devices will stop working correctly.
Each network is different, and will have a different IP addresses range.
How to see check your IP Address and find available IP Addresses
Network Identification
To find the IP range on a network, or to find available IP addresses, follow the ...
To find the IP range on a network, or to find available IP addresses, follow the steps below.
Windows
Finding the IP Range of a Network
This is useful if you are unsure what the network details are, or if you have requested pre-programming. When pre-programming devices, we require these details.
1. Connect a Windows PC / Laptop, open the start menu and type cmd.
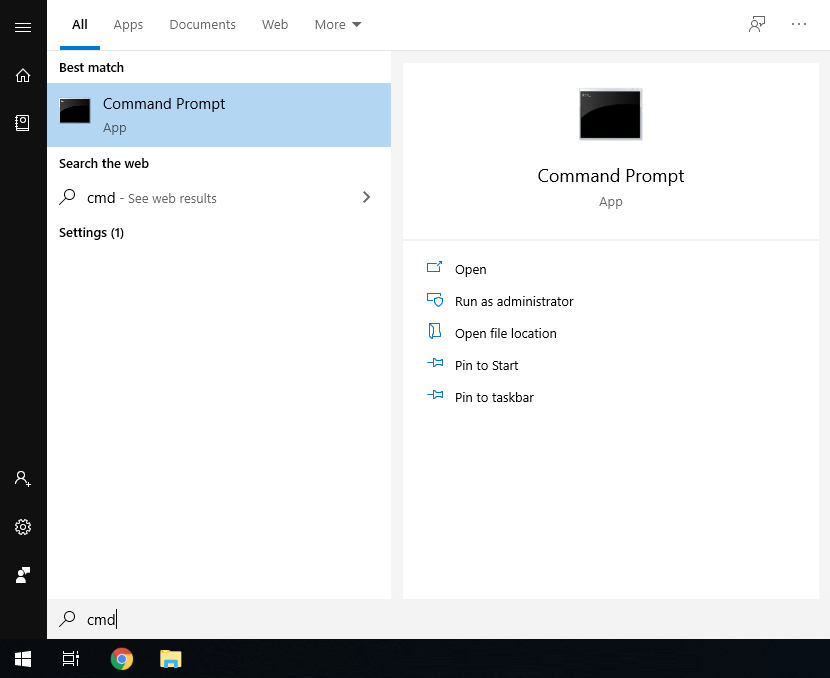
2. Launch the Command Prompt program.
3. Once it opens, enter the command ipconfig and take a screenshot or copy the information as below. We require the IP address, Subnet Mask and Default Gateway.
4. A screenshot can be taken by pressing the Windows + Shift + S keys simultaneously, then paste it into a document/email with Ctrl + V

Finding Available IP Addresses
If you wish to connect devices to the network for remote access, you must give each device an IP address, within your network range. In this example, we will be using a Windows computer which is connected to a modem to find the IP address of the computer, and available IP addresses to use for the devices. If the devices are being installed on a business or managed network, contact an IT representative for assistance.
1. Connect a Windows PC / Laptop, open the start menu and type cmd.

2. Launch the Command Prompt program.
3. Once it opens, enter the command ipconfig and take a screenshot or copy the information as below. Note down the IP Address, Subnet Mask and Default Gateway.
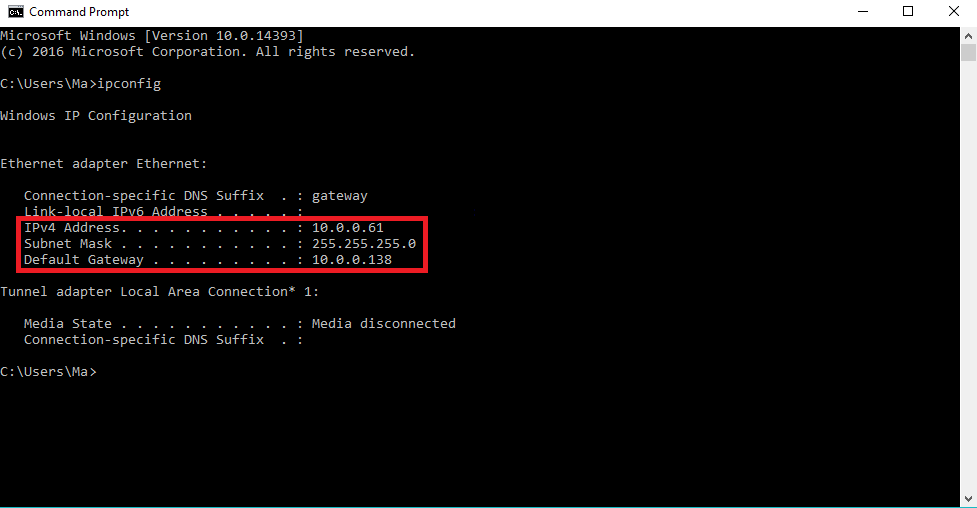
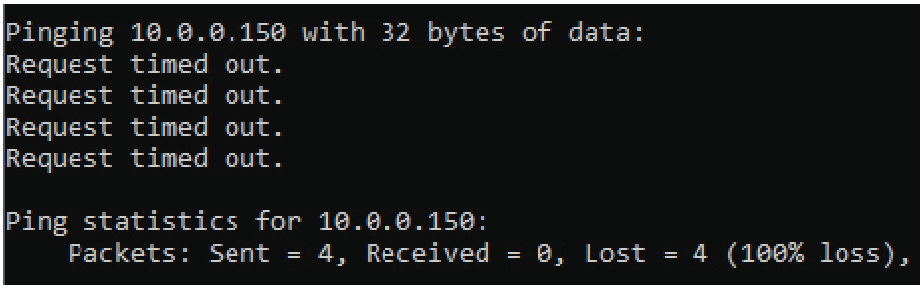
4. In our example, the IP address is 10.0.0.61. To check what IP address is available, type ping 10.0.0.XXX, where XXX is any number between 2 and 254. If Destination host unreachable or Request timed out is show on screen, there is no device using that IP address. Repeat the process to find multiple IP addresses that are available for use. Every devices requires one IP address. 10.0.0.XXX is used as an example, you the IP Address range will vary depending on the network.
5. When configuring the devices, use the IP addresses that you have found that are available, making sure each device has a unique IP address. The Subnet Mask and Default Gateway, will be set the same on each device.
MAC OSX
Finding the IP Range of a Network
This is useful if you are unsure what the network details are, or if you have requested pre-programming. When pre-programming devices, we require these details.
1. Open the Apple Menu ( ) and select System Preferences.
2. Select the Network option.

3. Select either Ethernet (for wired connections) or Wi-Fi (for wireless connections), then select advanced.
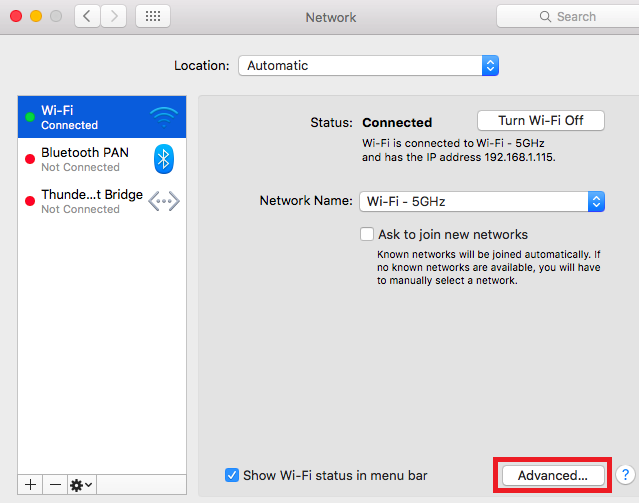
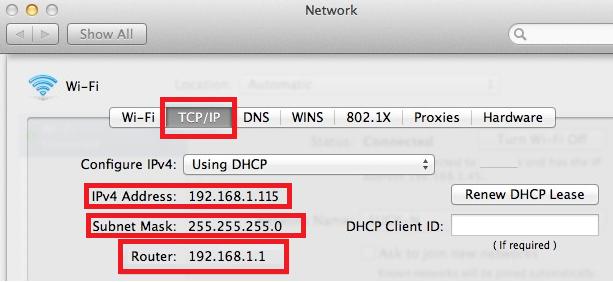
4. Select TCP/IP. The details in red are the network details.
5. A screenshot can be taken by pressing the Command + Shift + 3 keys simultaneously. The screenshot will be saved to the desktop
Finding Available IP Addresses
If you wish to connect devices to the network for remote access, you must give each device an IP address, within your network range. In this example, we will be using a Apple Mac which is connected to a modem to find the IP address of the computer, and available IP addresses to use for the devices. If the devices are being installed on a business or managed network, contact an IT representative for assistance.
1. Follow the steps for Finding the IP Range of a Network - Mac OSX.
2. Press Command + Space bar keys to bring up spotlight.
3. Type Terminal, and double click on the search result.
4. To check what IP address is available, type ping 192.168.1.XXX, where XXX is any number between 2 and 254. If Request timeout is show on screen, there is no device using that IP address. Repeat the process to find multiple IP addresses that are available for use. Every devices requires one IP address. 192.168.1.XXX is used as an example, you the IP Address range will vary depending on the network.
5. When configuring the devices, use the IP addresses that you have found that are available, making sure each device has a unique IP address. The Subnet Mask and Default Gateway, will be set the same on each device.
To access the devices you will need to be in the same range as them. See the guide below for how to change the IP Address of a Windows Computer.
Changing the IP Address of your Computer
Changing the IP address on a Windows Computer
1. Open Settings. 2. Select Network & Internet. 3. Select Status. 4. Select C...
Windows 10
- Open Settings.
- Select Network & Internet.
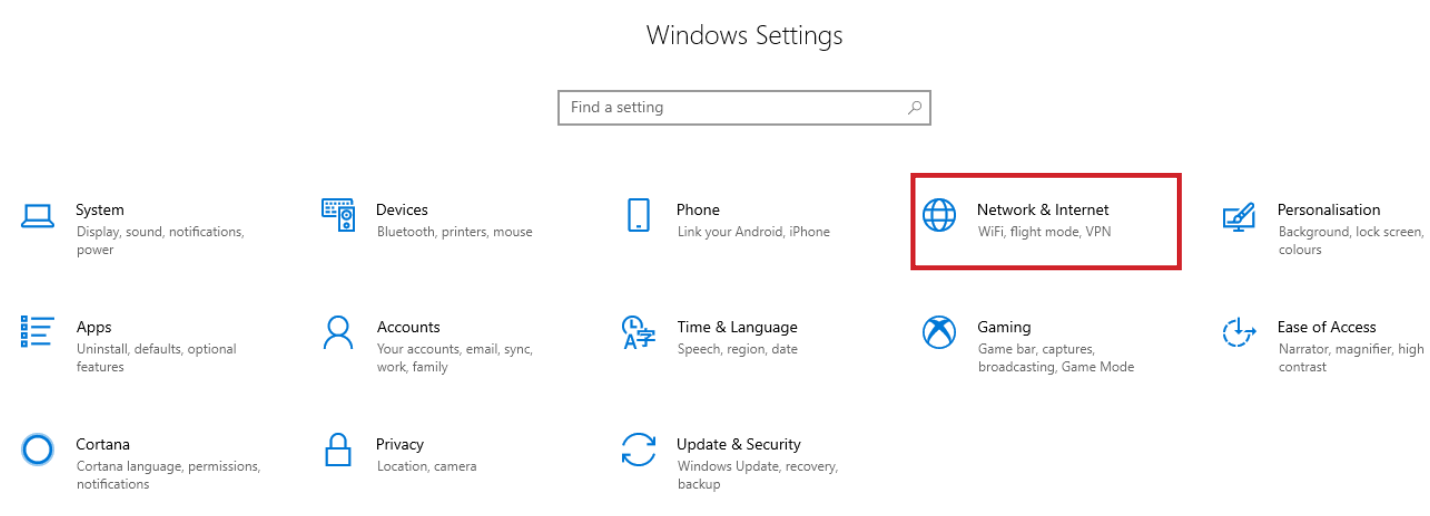
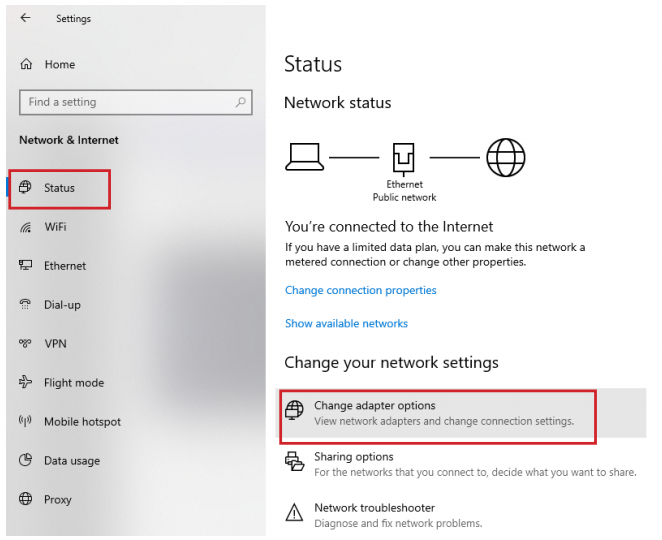
- Select Status, then Change Adapter Options.
-
Right-click the network adapter you want to change the IP address for, and select Properties.
-
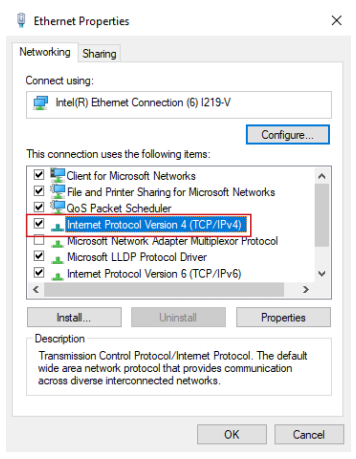
Double-click the Internet Protocol Version 4 (TCP/IPv4) item.
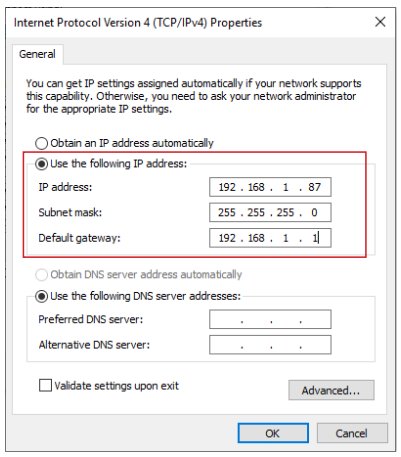
- Click Use the following IP address and enter an IP address in the same range as the device you are trying to access. (E.g when trying to access 192.168.1.108 use a IP address in the 192.168.1.x range.) Note: This cannot be the same as the device you are trying to connect to or any other device on the same network. Save your changes on both windows.
- Type the IP address of the device you are trying to access into the address bar of your web browser.
- Once finished configuring the device, change the adapter settings back to normal by following steps 1-5 and clicking Obtain an IP address automatically.
Windows 11
1. In the Windows search bar at the bottom of the page, type Control Panel and press enter.
2. Select Network and Internet.

3. Select Network and Sharing Centre.

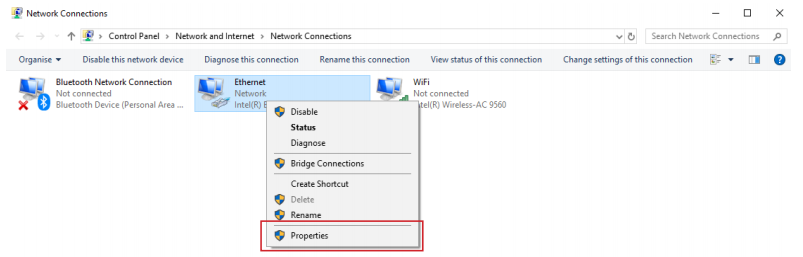
4. Select the link for Connections in the network that you want to change the IP address for.

5. Select Properties.

6. Double-click the Internet Protocol Version 4 (TCP/IPv4) item.

7. Click Use the following IP address and enter an IP address in the same range as the device you are trying to access. (E.g when trying to access 192.168.1.108 use a IP address in the 192.168.1.x range.) Note: This cannot be the same as the device you are trying to connect to or any other device on the same network. Save your changes on both windows.

8. Type the IP address of the device you are trying to access into the address bar of your web browser.
9. Once finished configuring the device, change the adapter settings back to normal by following steps 1-6 and clicking Obtain an IP address automatically.
See the video below for a visual guide of the steps above:
Shortcut
1. In the Windows search bar at the bottom of the page, type Ncpa.cpl and press enter.
2. Right-click the network adapter you want to change the IP address for, and select Properties.
3. Select the Internet Protocol Version 4 (TCP/IPv4) item.

4. Click Use the following IP address and enter an IP address in the same range as the device you are trying to access. (E.g when trying to access 192.168.1.108 use a IP address in the 192.168.1.x range.) Note: This cannot be the same as the device you are trying to connect to or any other device on the same network. Save your changes on both windows.
5. Type the IP address of the device you are trying to access into the address bar of your web browser.
6. Once finished configuring the device, change the adapter settings back to normal by following steps 1-3 and clicking Obtain an IP address automatically.
See the video below for a visual guide of the steps above:
Initialise the cameras
The camera(s) will need to be connected to a computer via ethernet into a POE switch or powered by 12 volt.


You can access the Web interface by entering the cameras default IP address of (192.168.1.108) into a web browser.
You may need to change the IP address of your Computer to be able to reach the IP address of the camera.
Changing IP of Windows Computer
Changing the IP address on a Windows Computer
Windows 10
- Open Settings.
- Select Network & Internet.
- Select Status, then Change Adapter Options.
-
Right-click the network adapter you want to change the IP address for, and select Properties.
-
Double-click the Internet Protocol Version 4 (TCP/IPv4) item.
- Click Use the following IP address and enter an IP address in the same range as the device you are trying to access. (E.g when trying to access 192.168.1.108 use a IP address in the 192.168.1.x range.) Note: This cannot be the same as the device you are trying to connect to or any other device on the same network. Save your changes on both windows.
- Type the IP address of the device you are trying to access into the address bar of your web browser.
- Once finished configuring the device, change the adapter settings back to normal by following steps 1-5 and clicking Obtain an IP address automatically.
Windows 11
1. In the Windows search bar at the bottom of the page, type Control Panel and press enter.
2. Select Network and Internet.
3. Select Network and Sharing Centre.
4. Select the link for Connections in the network that you want to change the IP address for.
5. Select Properties.
6. Double-click the Internet Protocol Version 4 (TCP/IPv4) item.
7. Click Use the following IP address and enter an IP address in the same range as the device you are trying to access. (E.g when trying to access 192.168.1.108 use a IP address in the 192.168.1.x range.) Note: This cannot be the same as the device you are trying to connect to or any other device on the same network. Save your changes on both windows.
8. Type the IP address of the device you are trying to access into the address bar of your web browser.
9. Once finished configuring the device, change the adapter settings back to normal by following steps 1-6 and clicking Obtain an IP address automatically.
See the video below for a visual guide of the steps above:
Shortcut
1. In the Windows search bar at the bottom of the page, type Ncpa.cpl and press enter.
2. Right-click the network adapter you want to change the IP address for, and select Properties.
3. Select the Internet Protocol Version 4 (TCP/IPv4) item.
4. Click Use the following IP address and enter an IP address in the same range as the device you are trying to access. (E.g when trying to access 192.168.1.108 use a IP address in the 192.168.1.x range.) Note: This cannot be the same as the device you are trying to connect to or any other device on the same network. Save your changes on both windows.
5. Type the IP address of the device you are trying to access into the address bar of your web browser.
6. Once finished configuring the device, change the adapter settings back to normal by following steps 1-3 and clicking Obtain an IP address automatically.
See the video below for a visual guide of the steps above:
Initialise camera via Web interface 5.0
- Select your Region and Language.

- Select your Time Zone, then press Sync with PC to sync your cameras time with the PCs time.

- Enter a password and recovery email.

- Ensure P2P is enabled, then press Next.

- Click End.

Initialise camera Via Web Interface 3.0
1. Initialize the camera by entering a new password (It will need to be at least 8 characters long), then click Save.

2. Ensure P2P is enabled and click Next

3. Click Next.

4. If prompted, select a region and click Save

Initialise Camera Via Config Tool
The Initialisation process can also be performed using the latest version of our Config Tool - Please see the images below showing how this is done. To speed up the process the Config Tool also allows you to initialise multiple cameras at once.
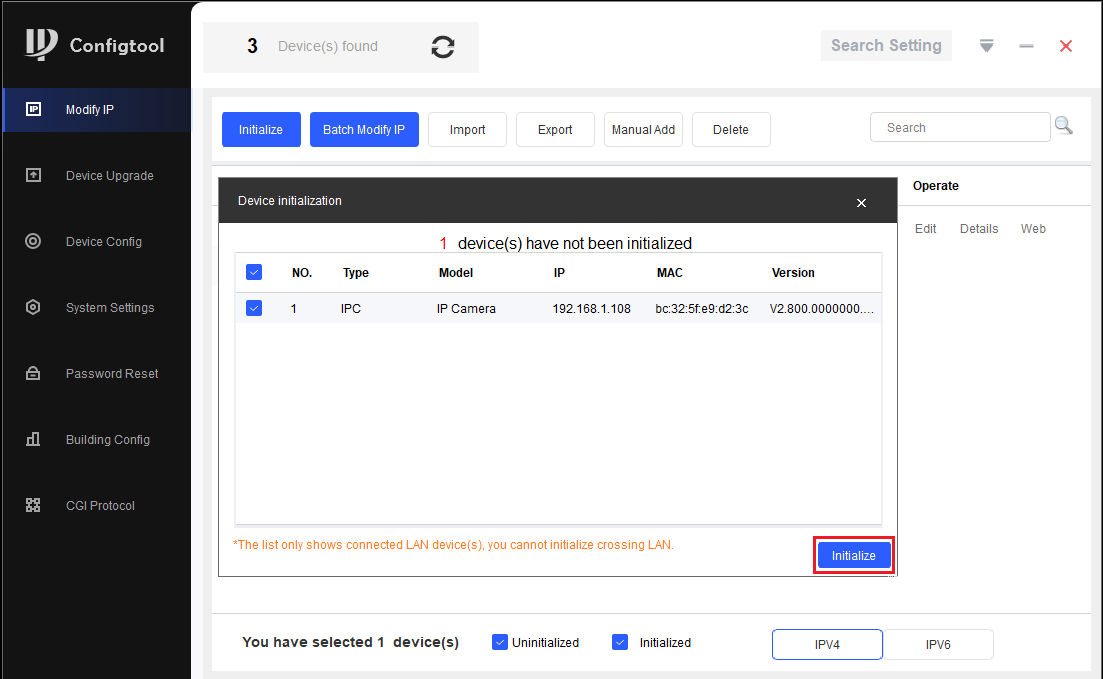
- Download and open Config Tool.
- Put a check in the box
 next to the device you would like to Initialise, and select the Initialize button.
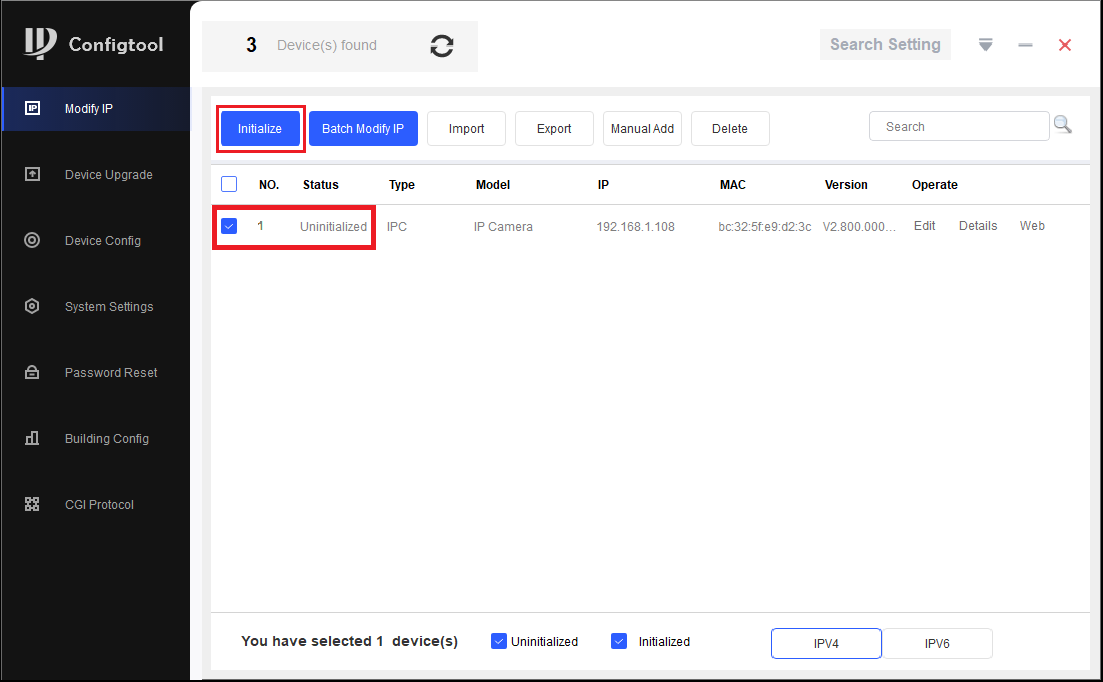
- Select the Initialize button.
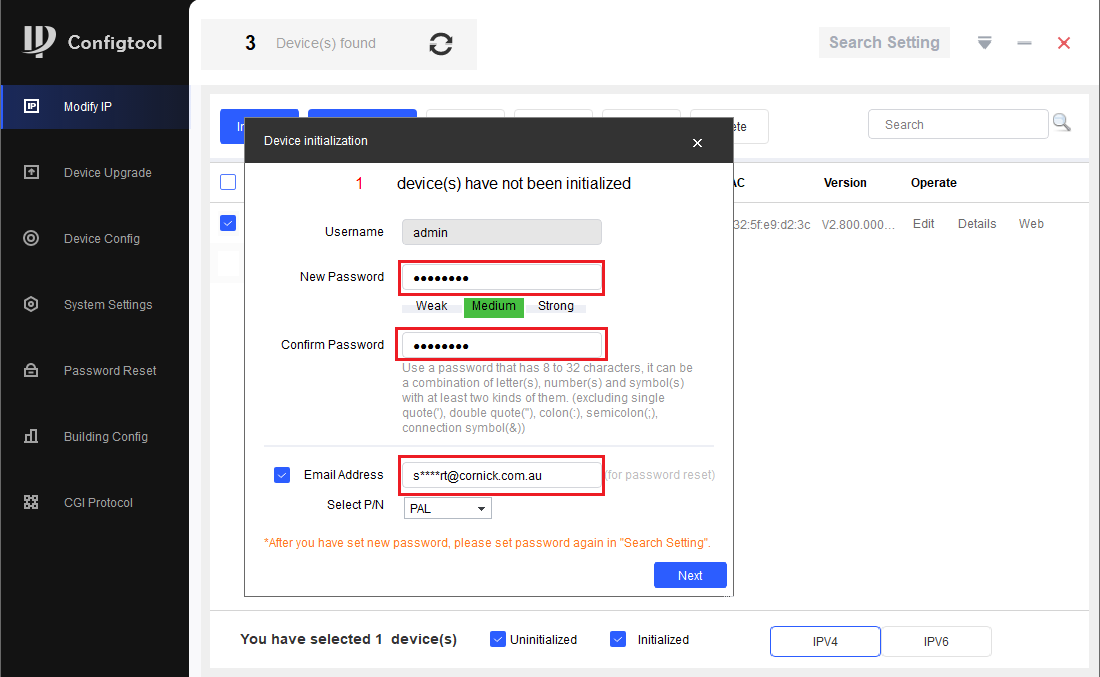
- Enter a password, that is at least 8 characters, and is a mix of letters and numbers. Enter an email address, this will be used if the password is ever forgotten. Select Next.
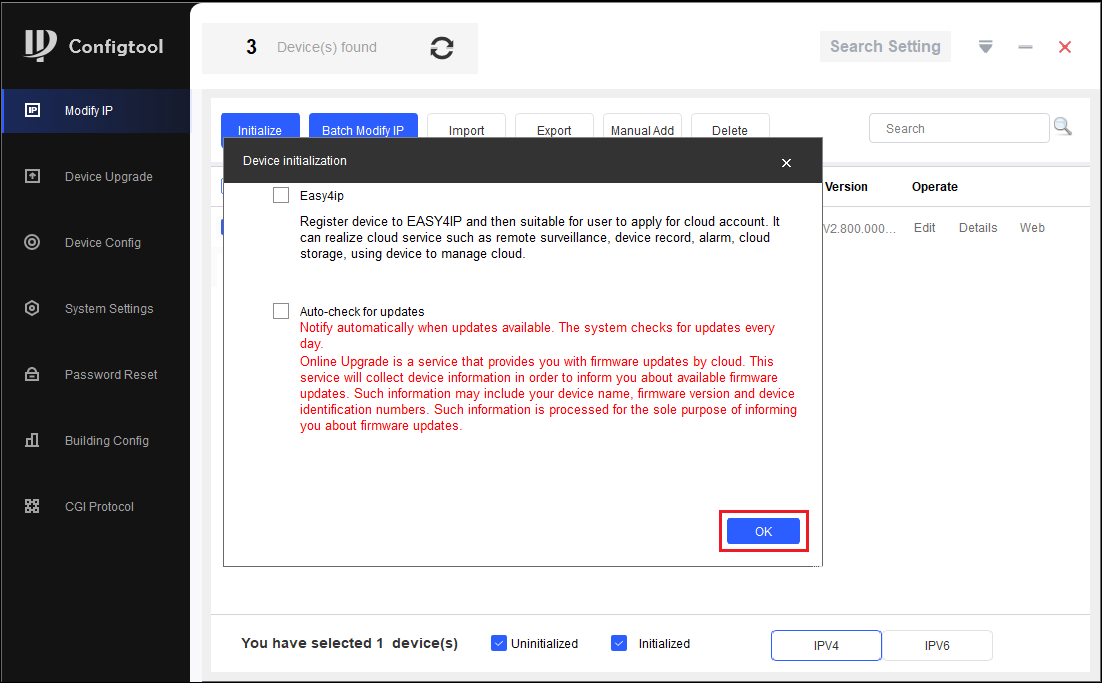
- Depending on the installation requirements, you can check or uncheck the boxes for Easy4IP (P2P Remote Access) and Auto-check for updates. Select OK.
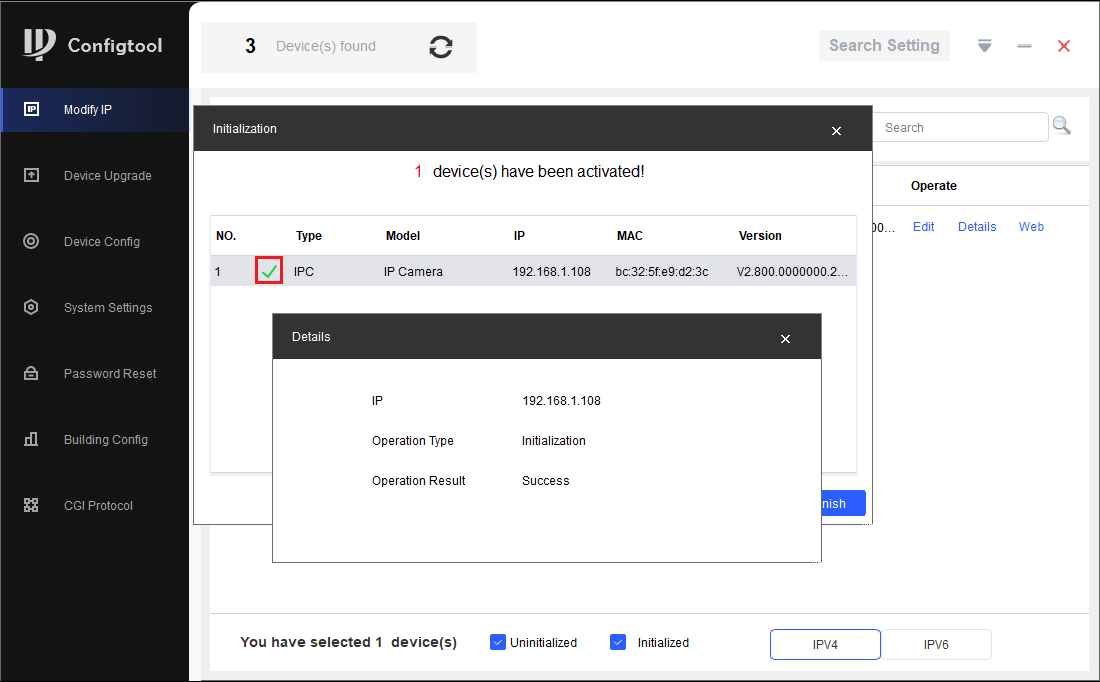
- If the status shows as Initialized, the process was completed successfully.
Optional - Initializing Network Cameras via the NVR
In some installations you may find it easier to initialize cameras directly from the recorder, this method works best when adding a few camera.
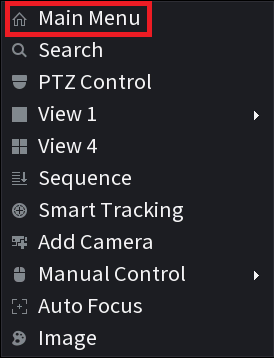
- Right click and select Main Menu, then Camera.
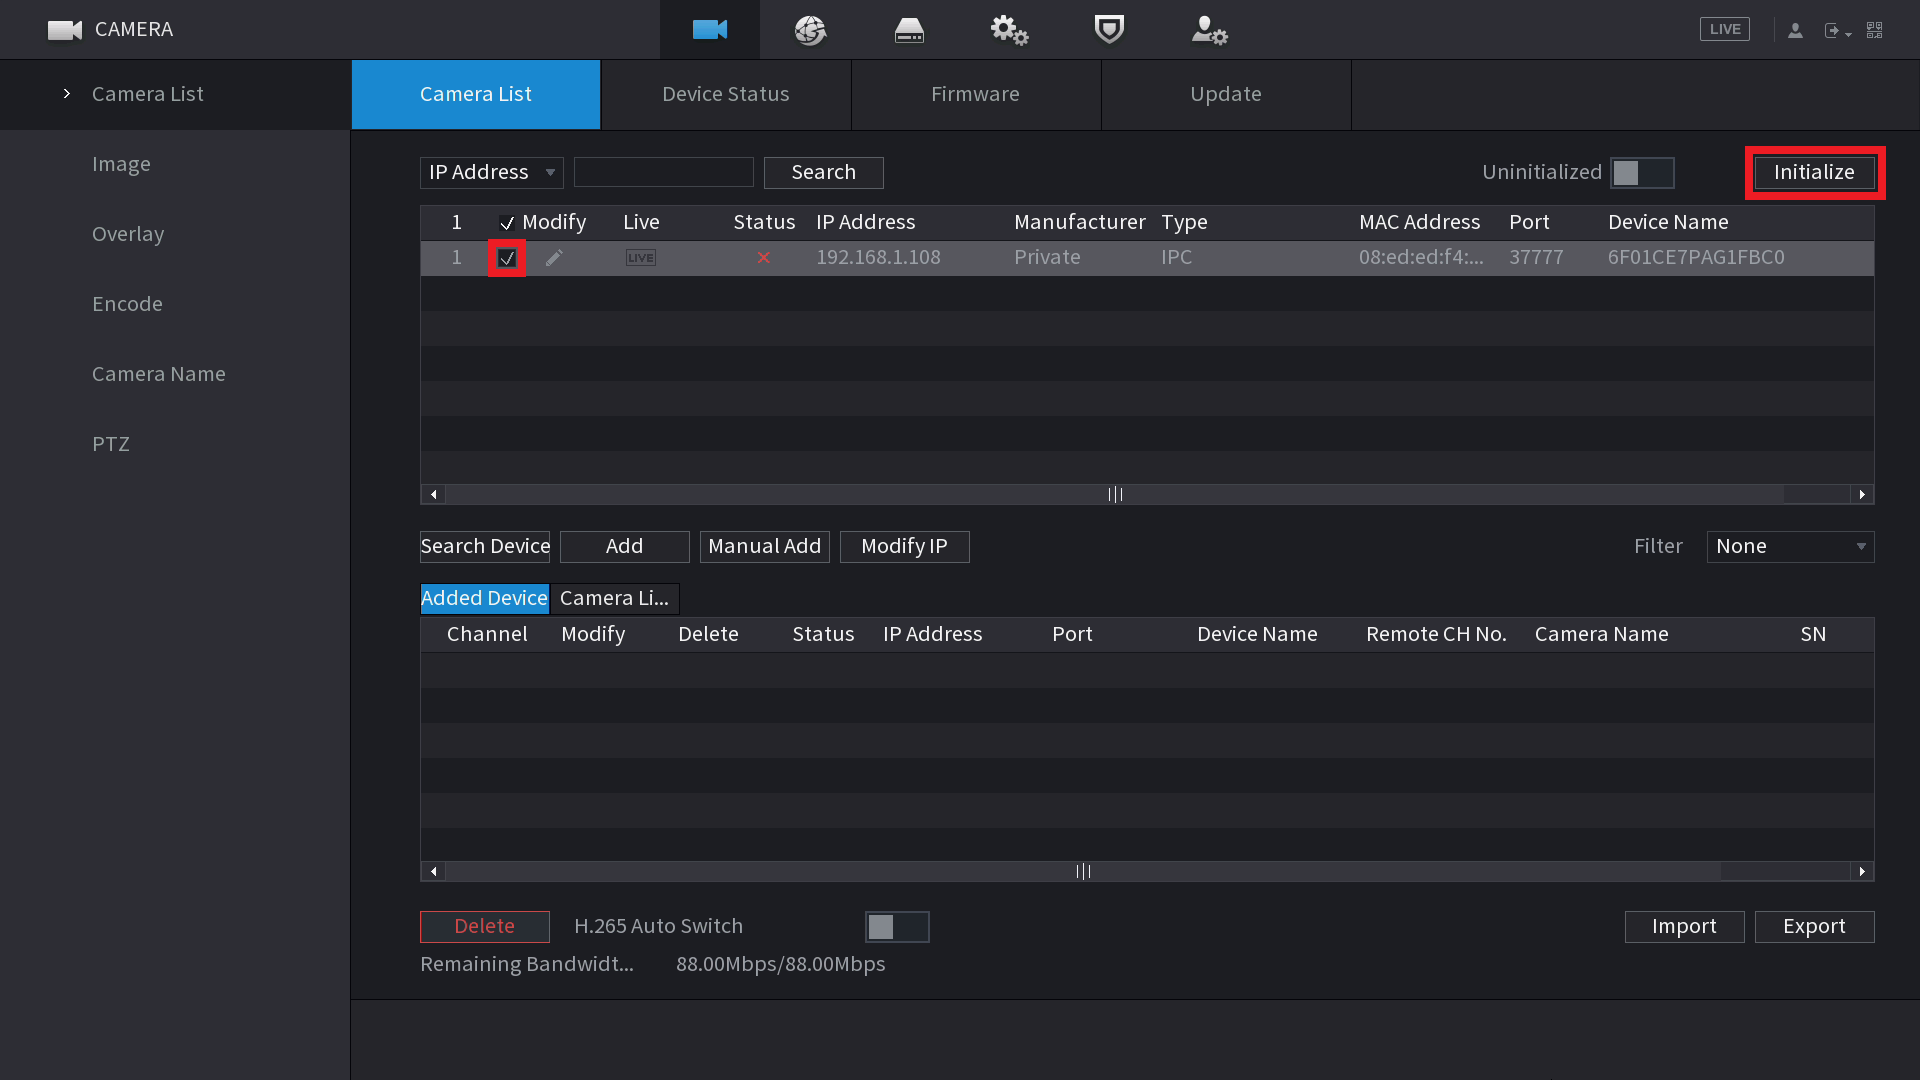
- Select Device Search.
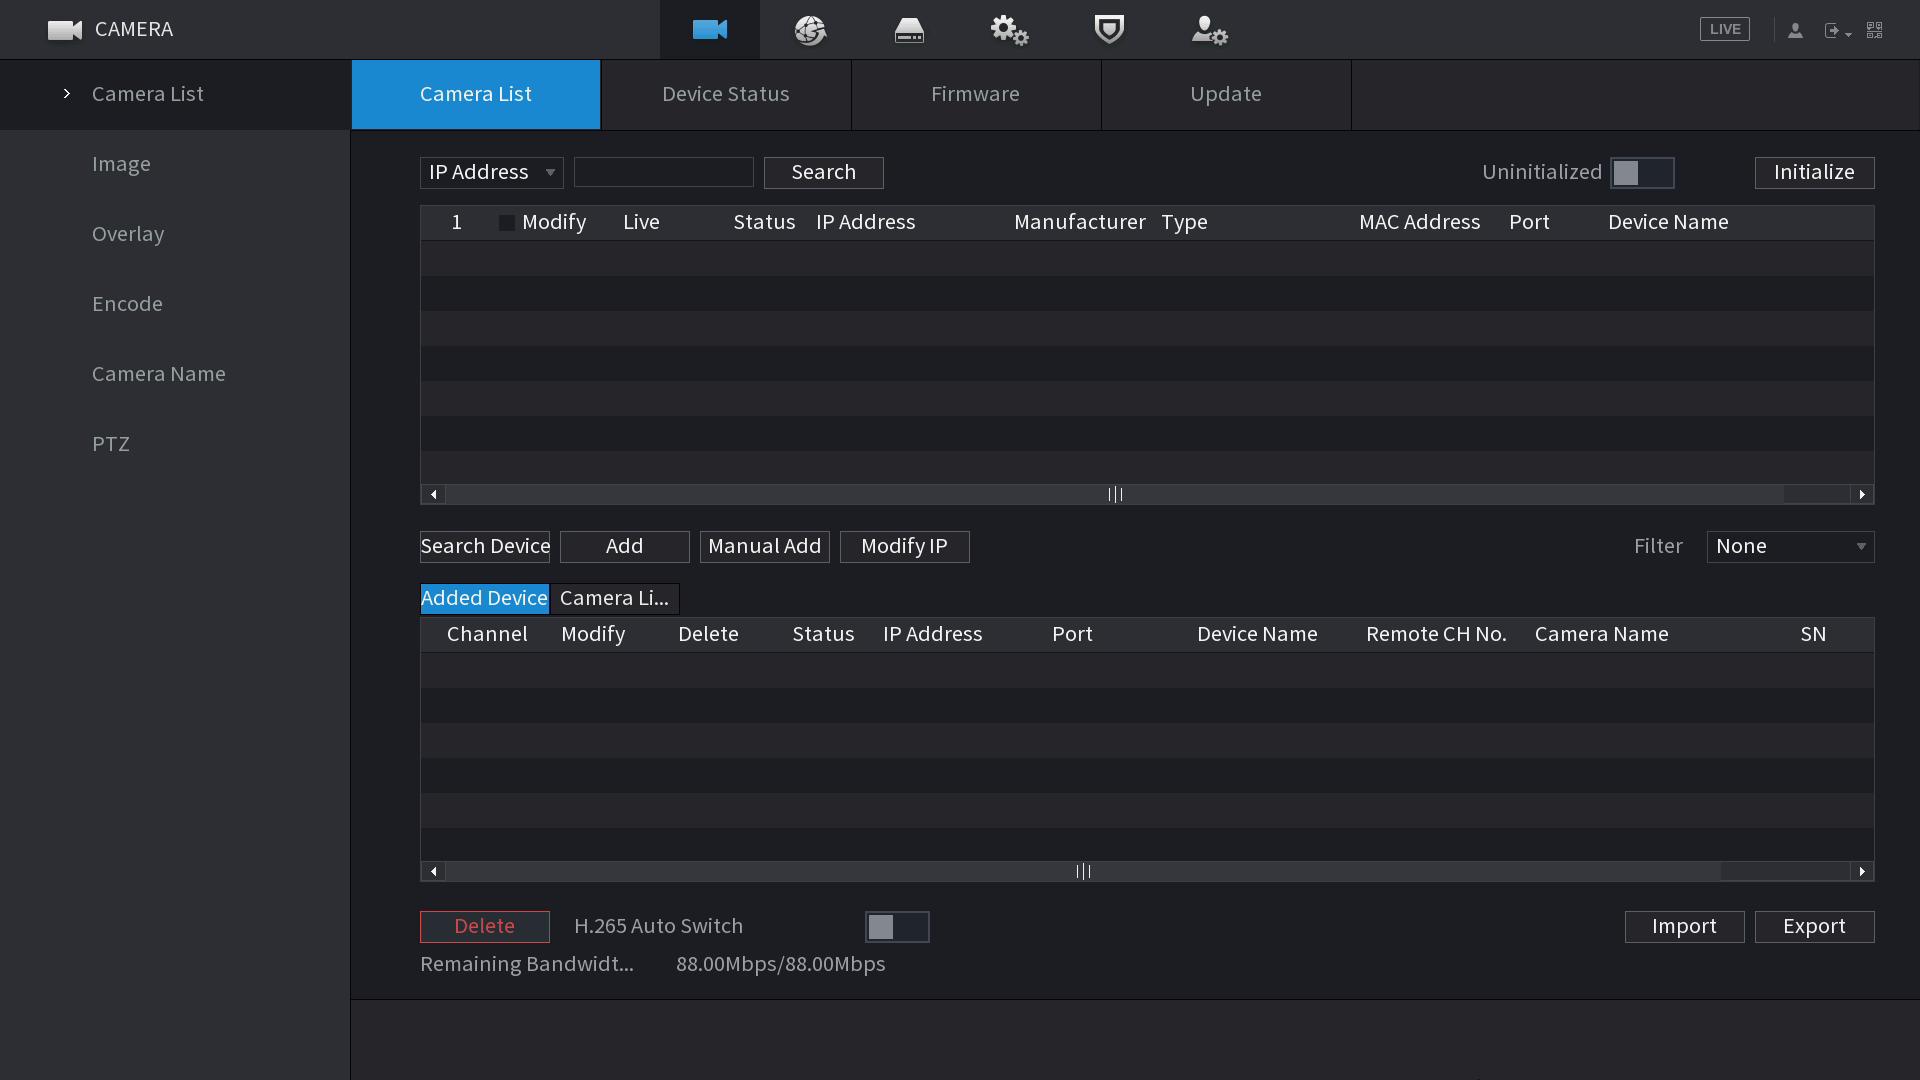
- Select the cameras you wish to initialise, then click Initialize.
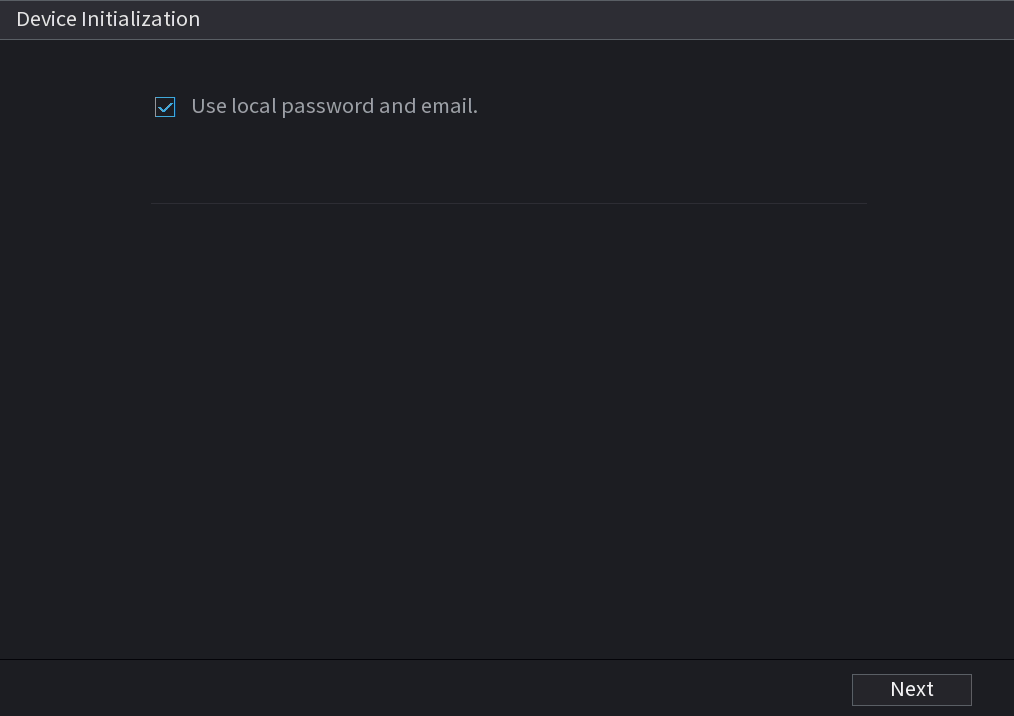
- Select Next.
- Enter the IP Address, Subnet Mask and Default Gateway, then click Next.
NOTE: When Initialising more than one camera, the last section of the IP address will be incremented by the Incremental Value.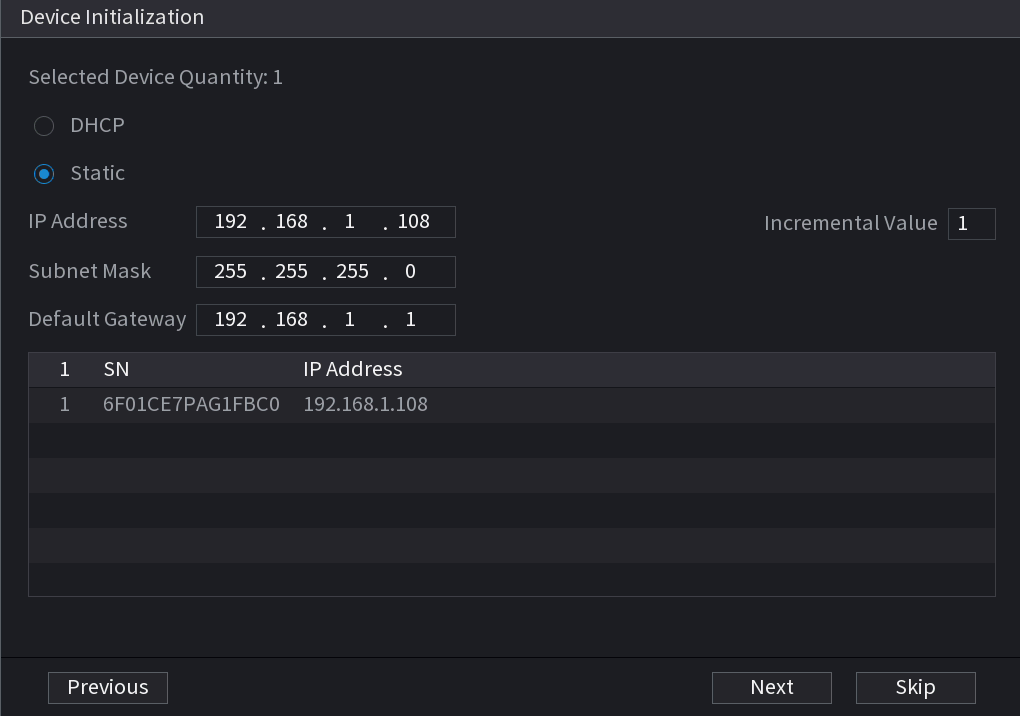
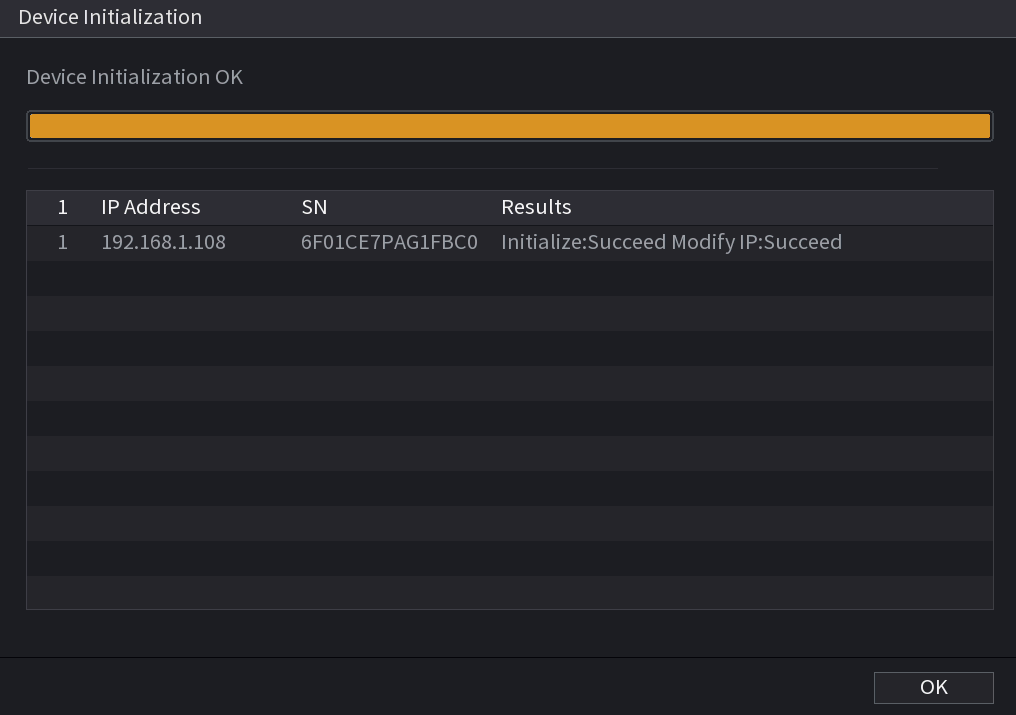
- Select OK.
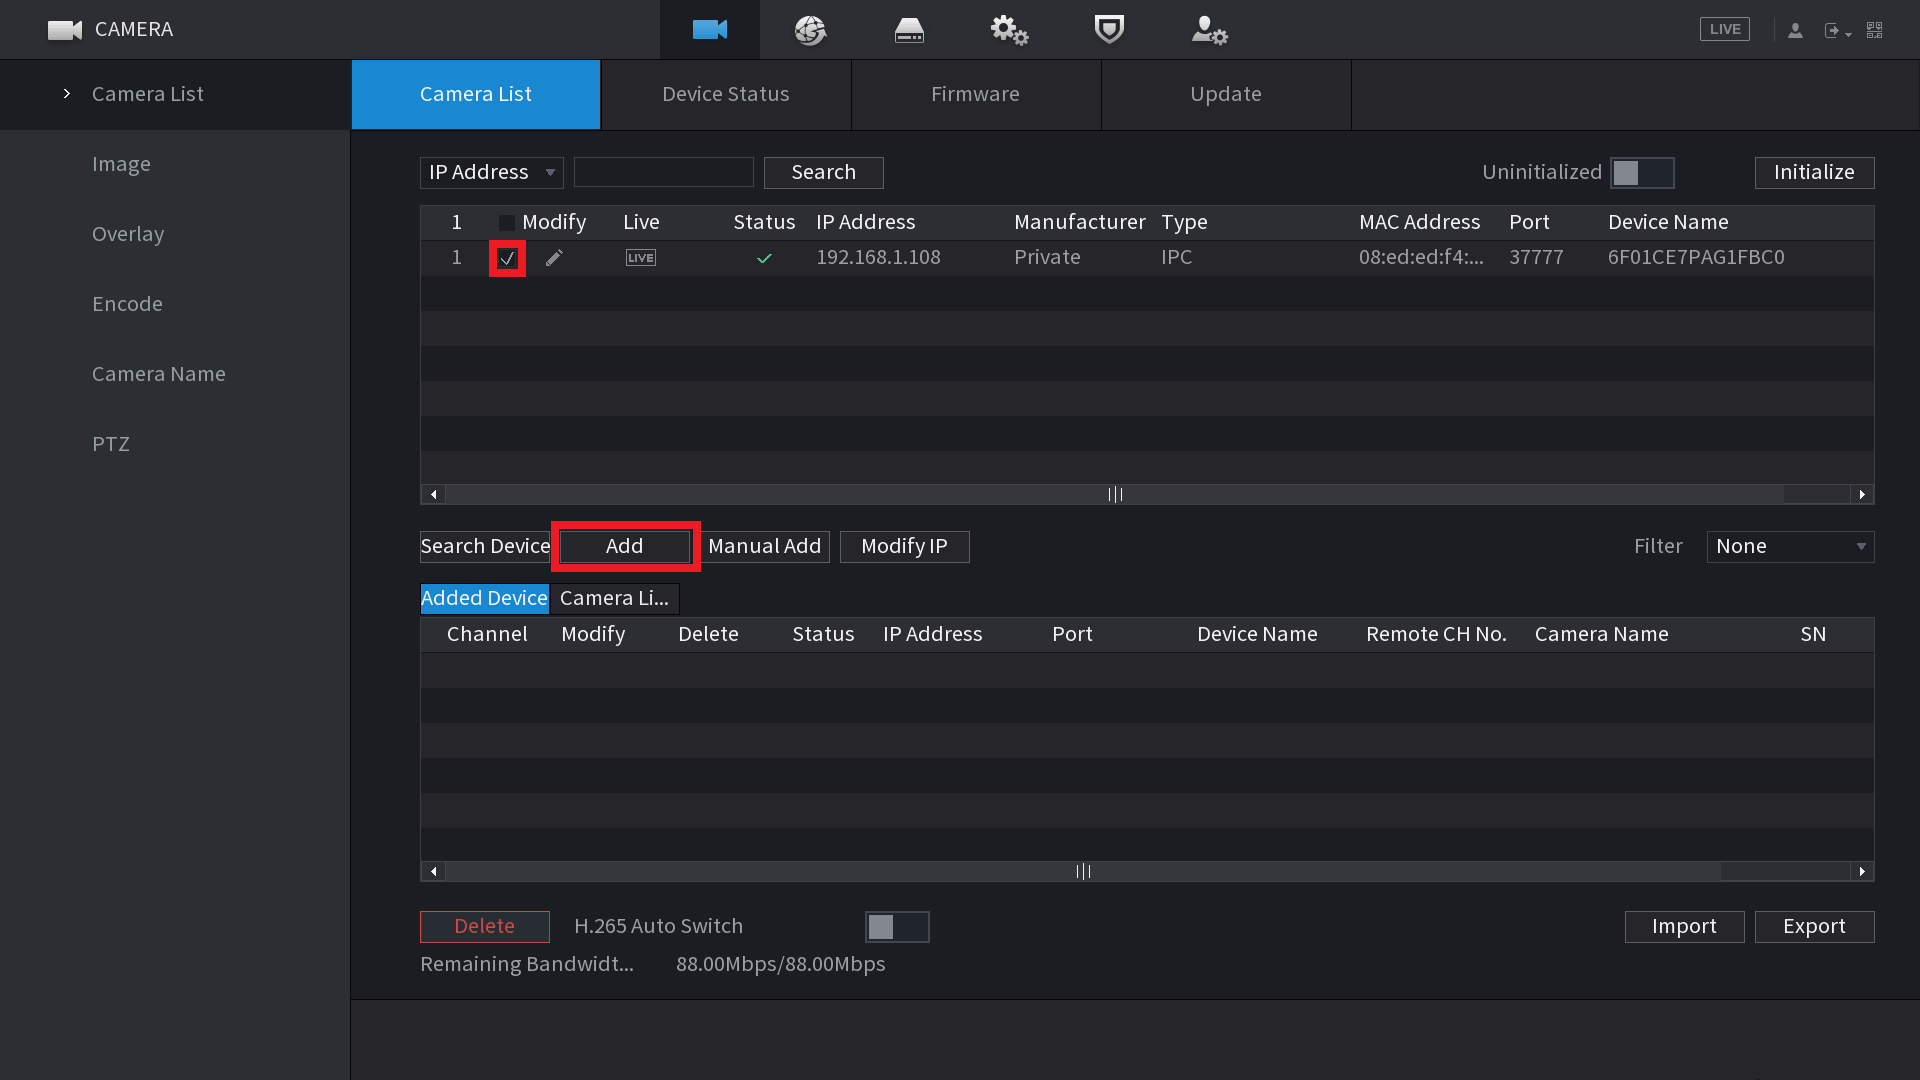
- Select the Cameras you wish to add, then select Add.
Change IP address of a Camera
Change IP Address through Web Interface
- Log Into Camera Web interface By entering IP into a browser
- From Main Menu Go to Network Settings

- Change Network Settings to suit network that camera will be connected to and hit apply.

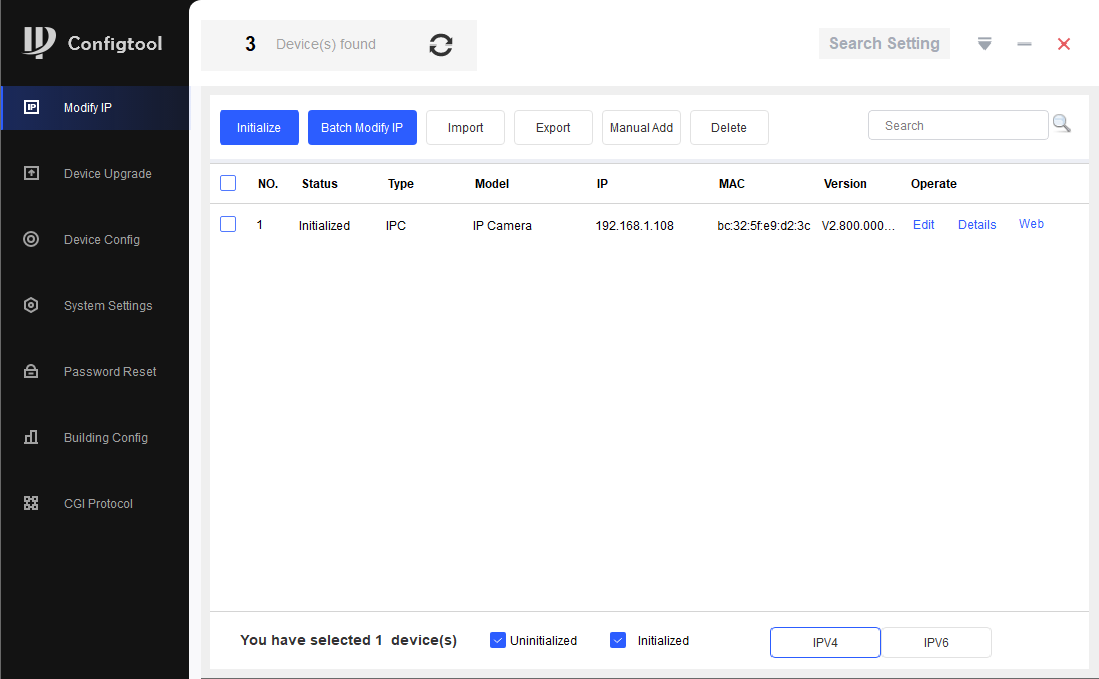
Change IP Address With Config Tool
-
Select Search Setting, and enter the password for the device. Select OK.

-
Put a tick the box
 next to the device(s) you would like to change the IP address of, and select Batch Modify IP.
- Enter the Start IP address, Subnet Mask and Default Gateway for the device, in this example we are going to start from 192.168.1.160. If you have multiple devices selected, the first device will be addressed as 192.168.1.160, the second 192.168.1.161, the third 192.168.1.162, and so on. Select OK.

- The IP address of the device will now be set. If you encounter any errors, ensure the password in Search Setting is correct, and there are no errors in the IP Address.

Change IP Address With NVR
1. Navigate Main Menu > Camera/ Remote Device > Camera List/ Video Device
2. Check on remote device you wish to change the IP of and hit Modify IP

3. A new box will open, enter in new network information and username and password of the camera, Select Save.

4. You will get Success message when operation is succeeded.

Recorder Network Configuration
To Ensure the Recorder Network Settings Are correct follow Steps Below.
- Right click and select Main Menu. Login to the recorder's using your username and password.
- Select Network, then TCP/IP. Select the pencil icon next to the network port, on some recorders there will be the option to select from multiple network ports, select the one that the cameras are going to be connected to.
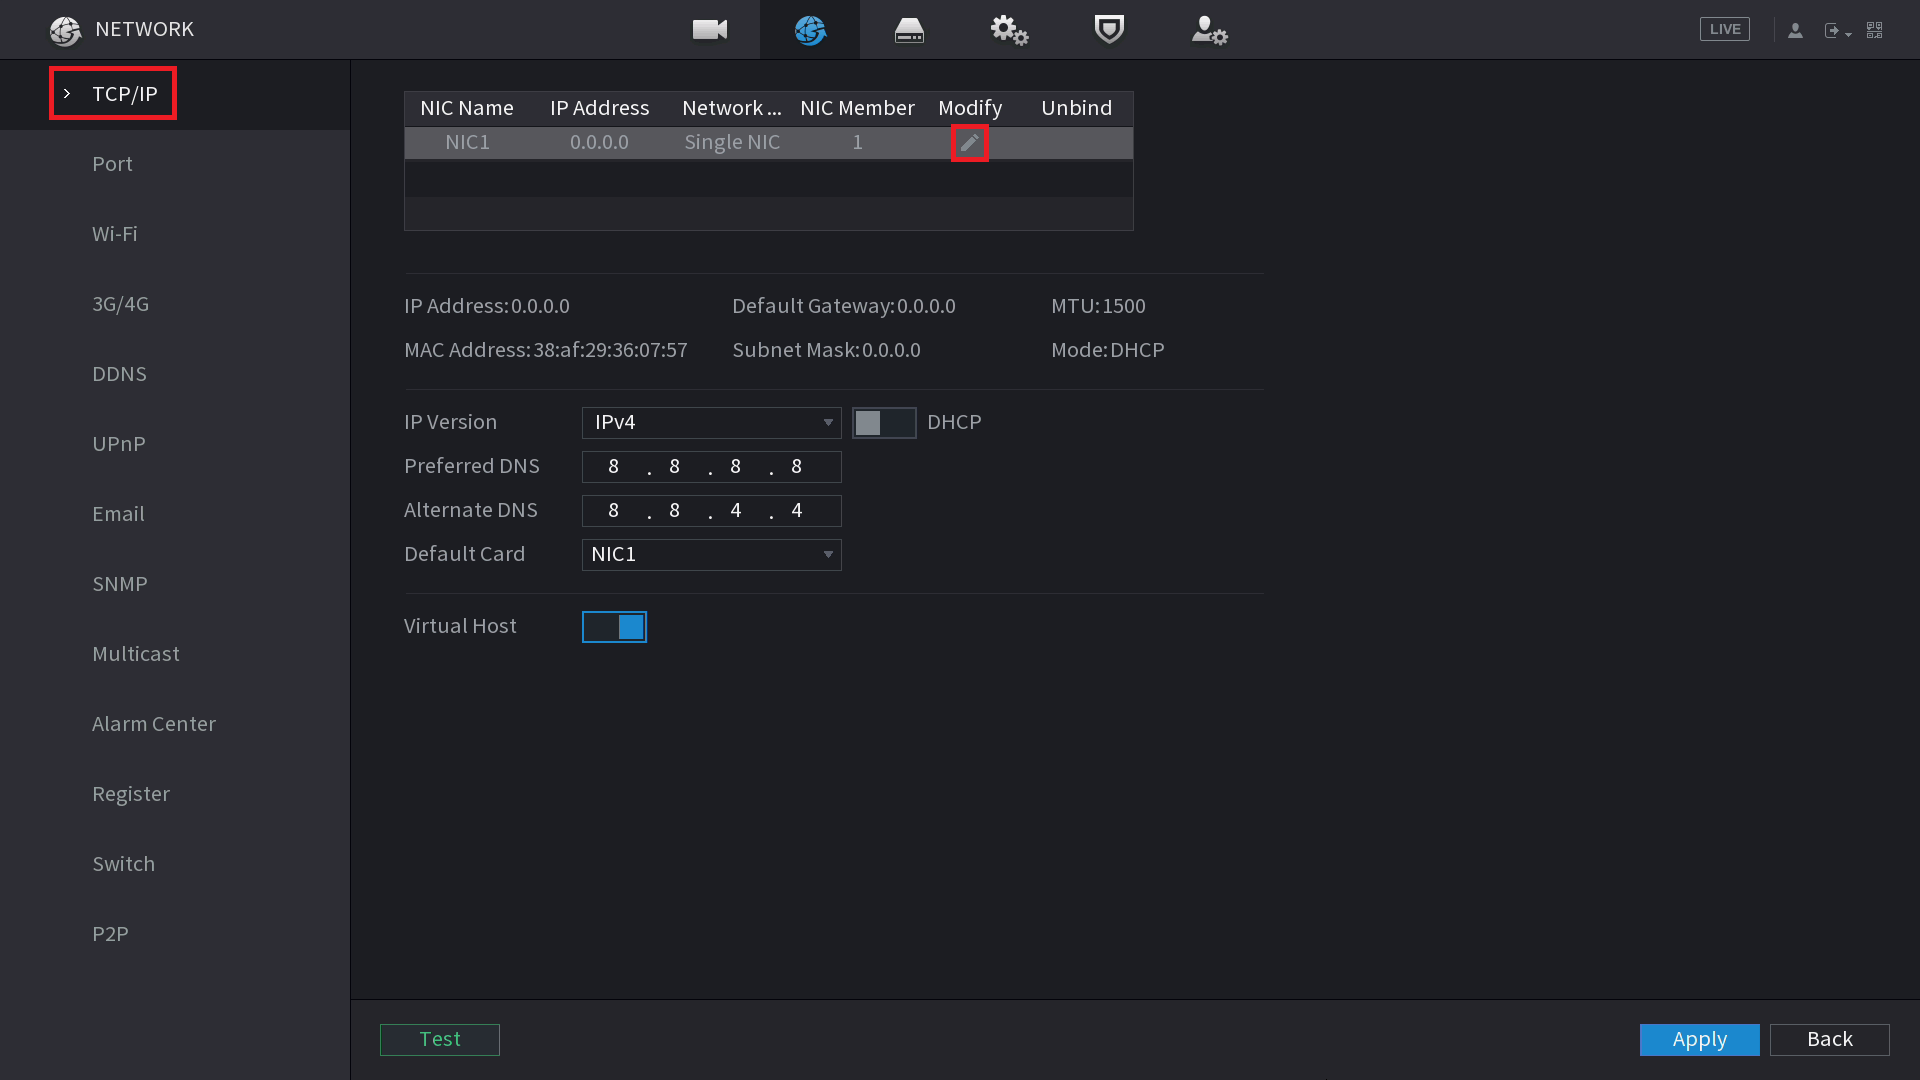
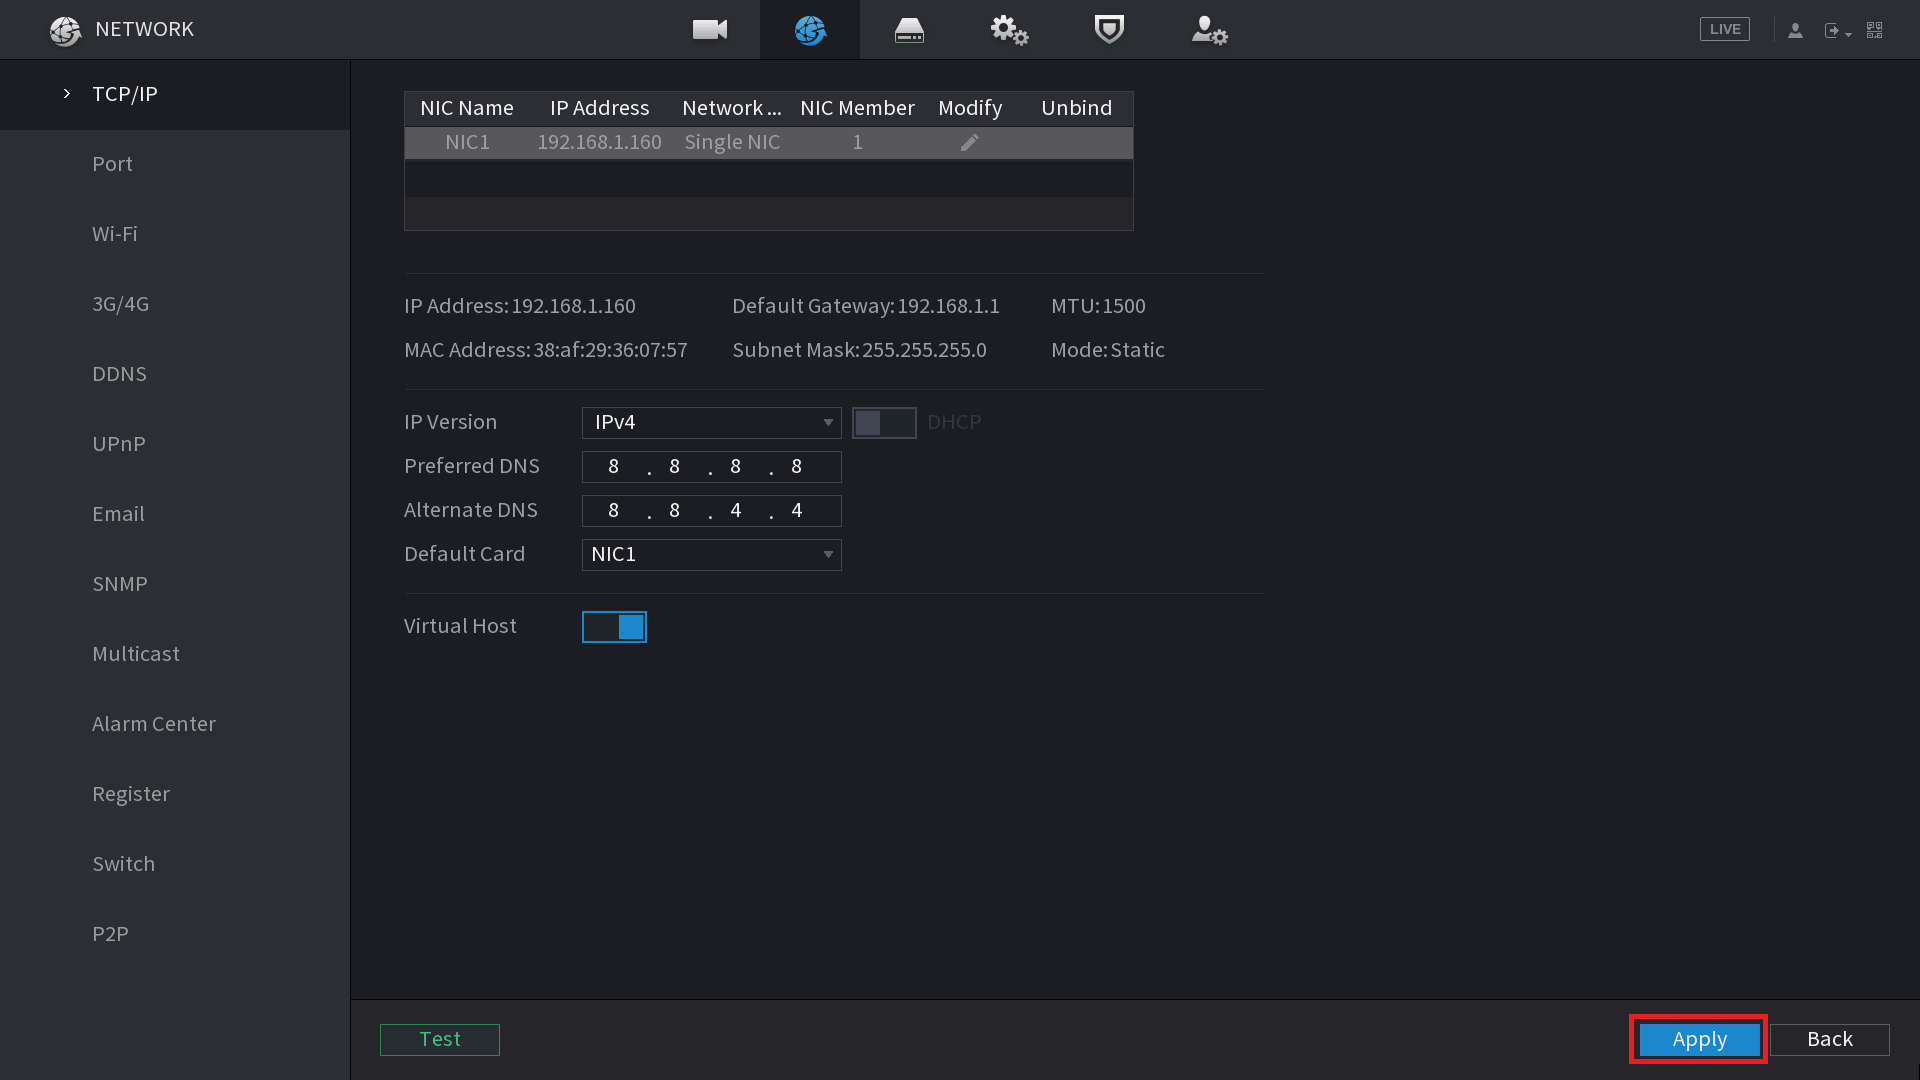
- Ensure DHCP is turned off, and enter the IP Address, Subnet Mask, and Default Gateway for the recorder. In our example we are using 192.168.1.150 for the IP address, 255.255.255.0 for the Subnet Mask, and 192.168.1.1 for the Default Gateway. Select OK.

- Select Apply to save your changes. The IP address of the recorder is now set.
Adding Cameras to the Recorder
- Login to Main Menu of NVR, then Select Camera, then Camera List.
- Cameras that are connected via POE will be automatically added to the device list.
- Select Search Device. The cameras that are connected should be listed in the top list.
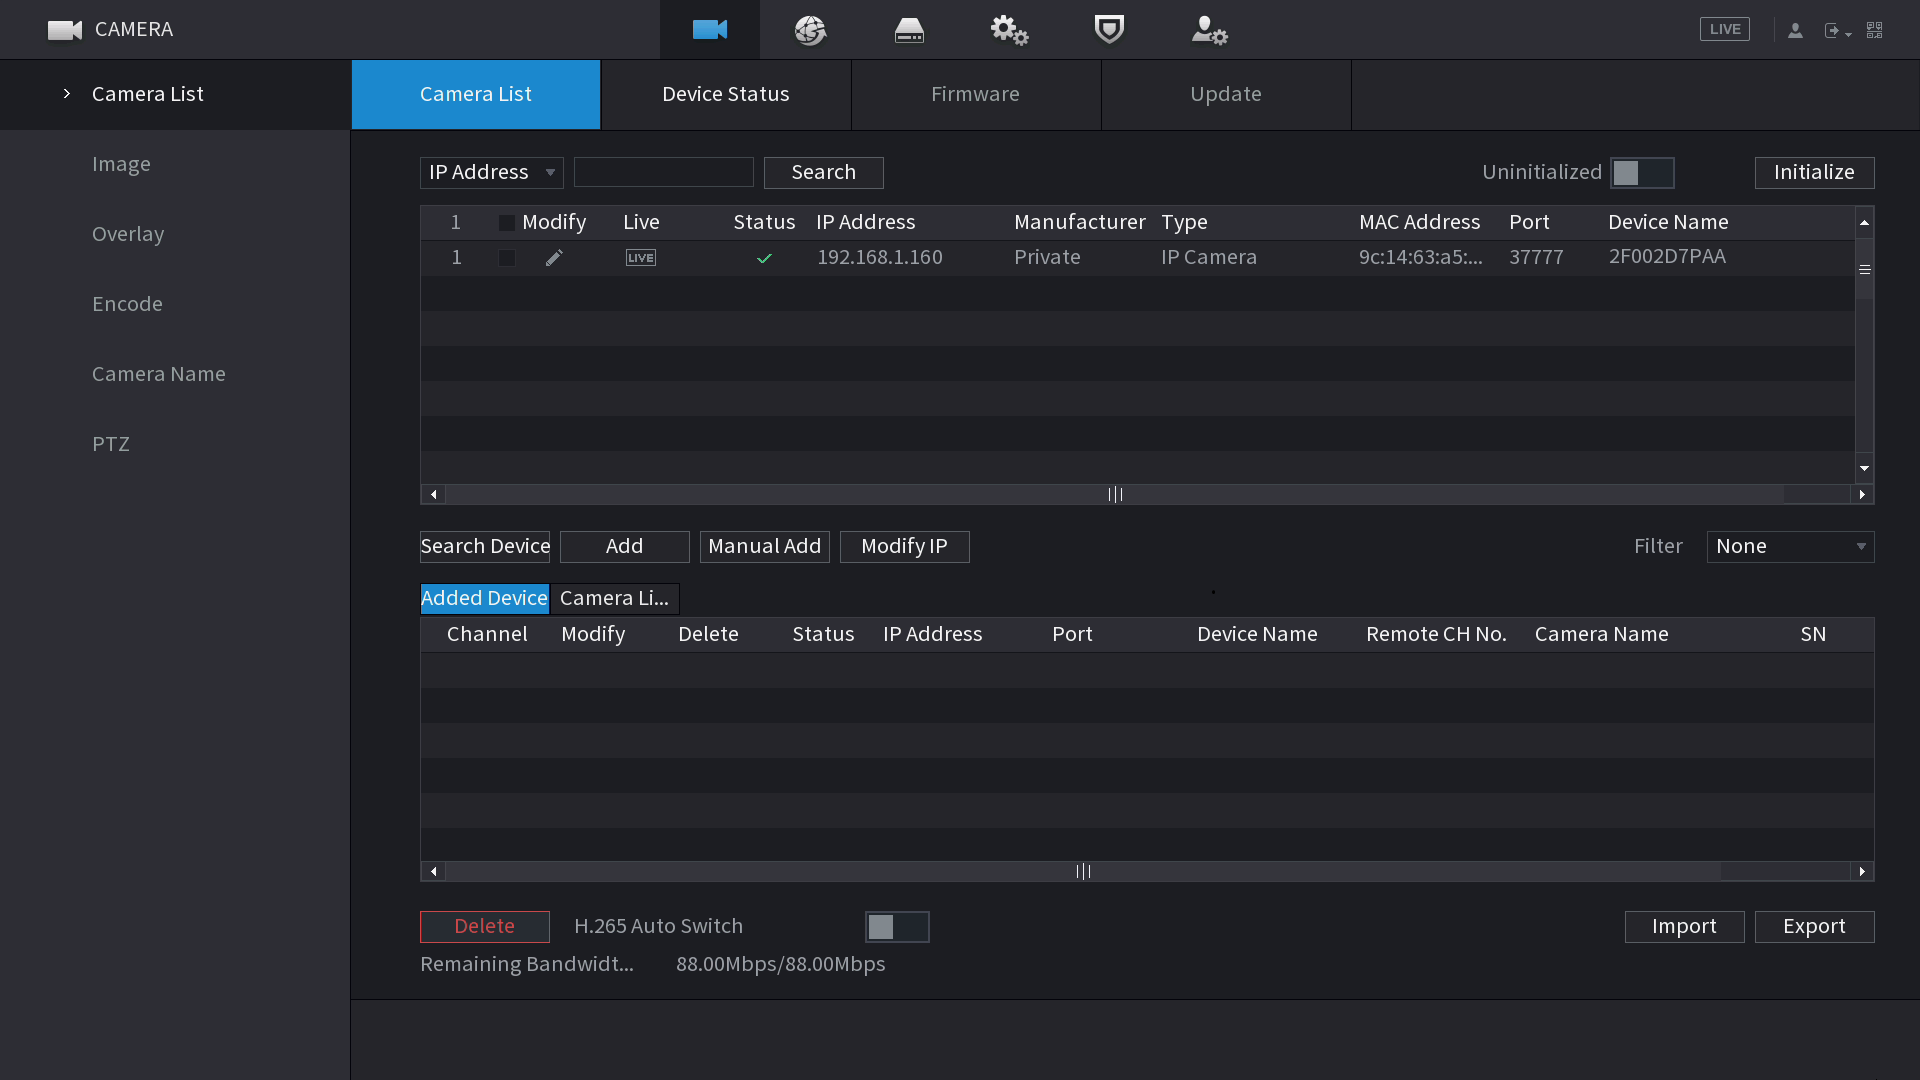
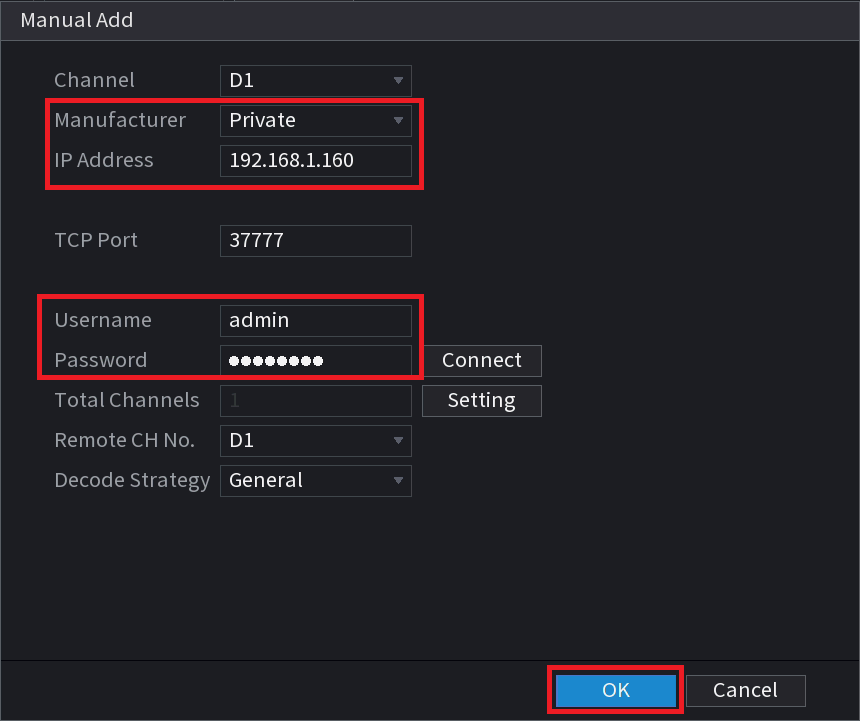
- Select the check box next to the camera/s, then select Add. If you cannot see any cameras, select Manual Add, and enter the IP Address, username and password and select OK.
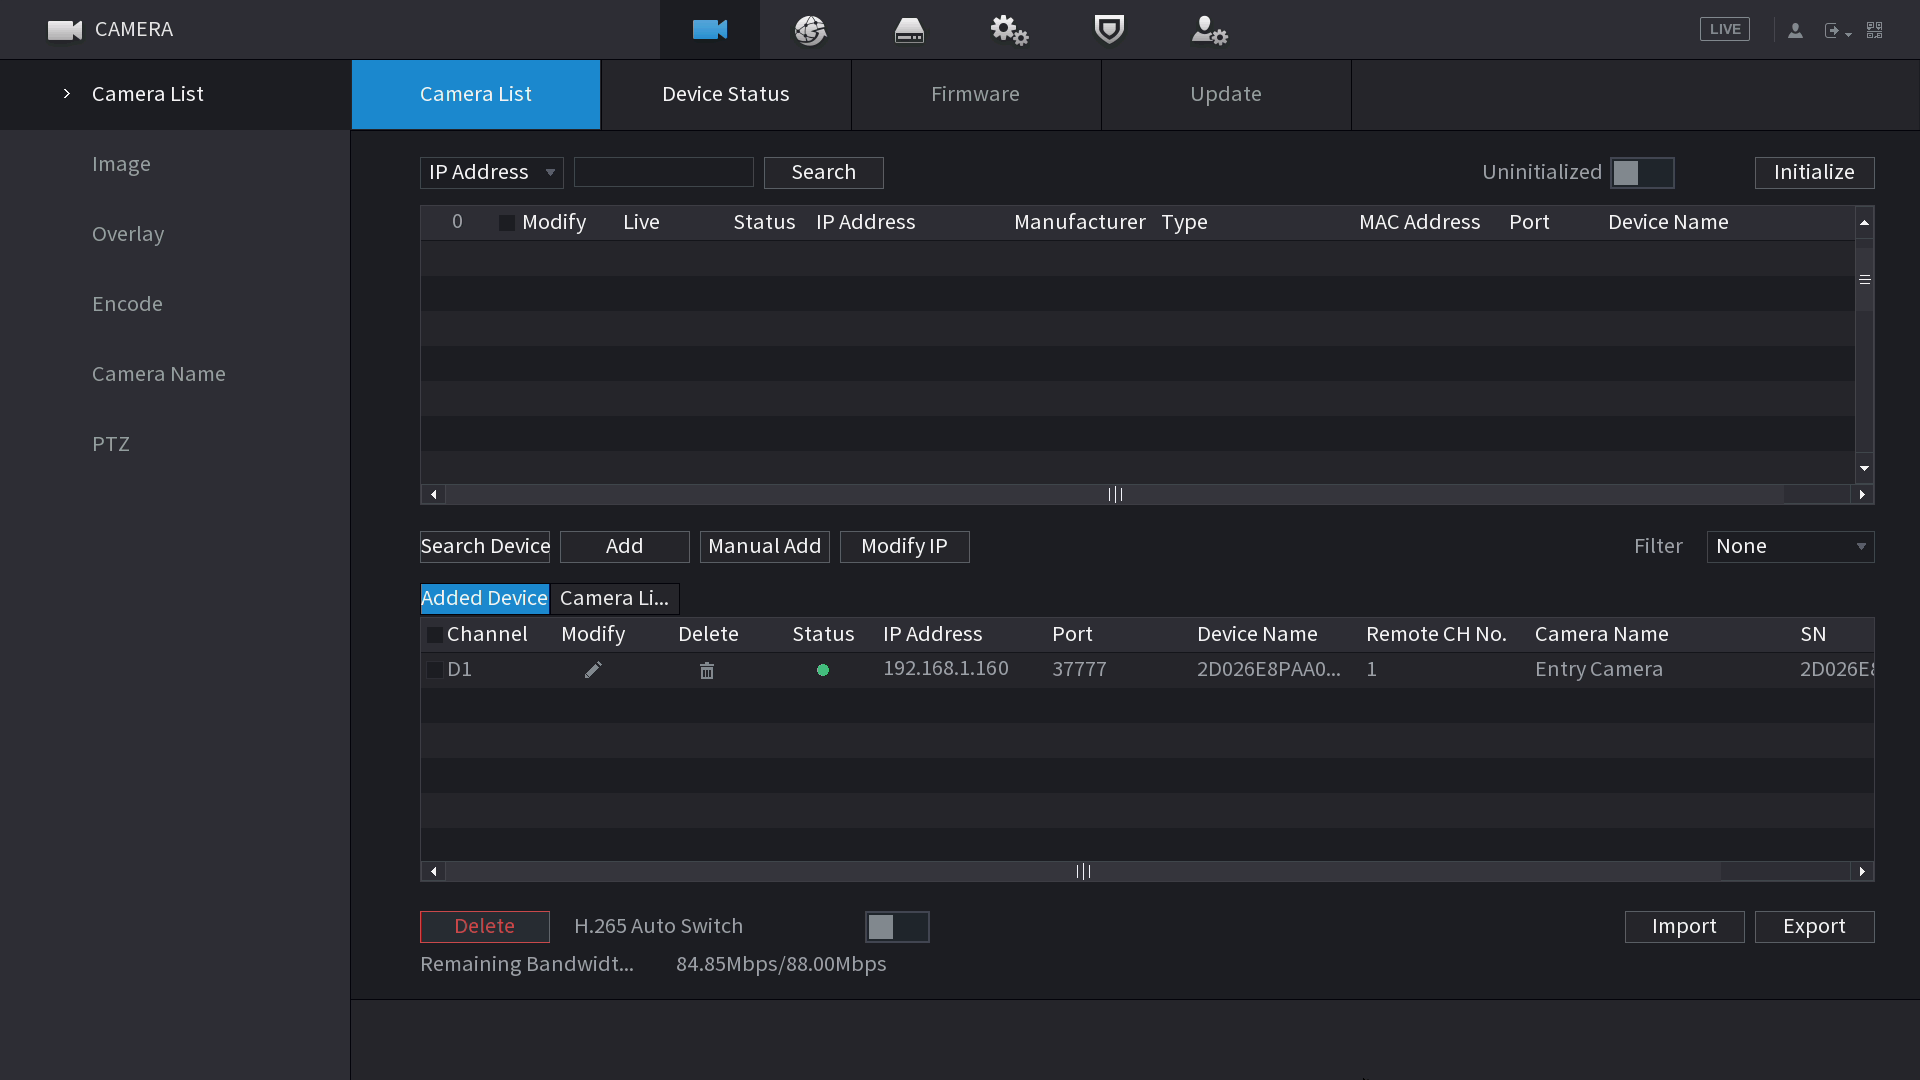
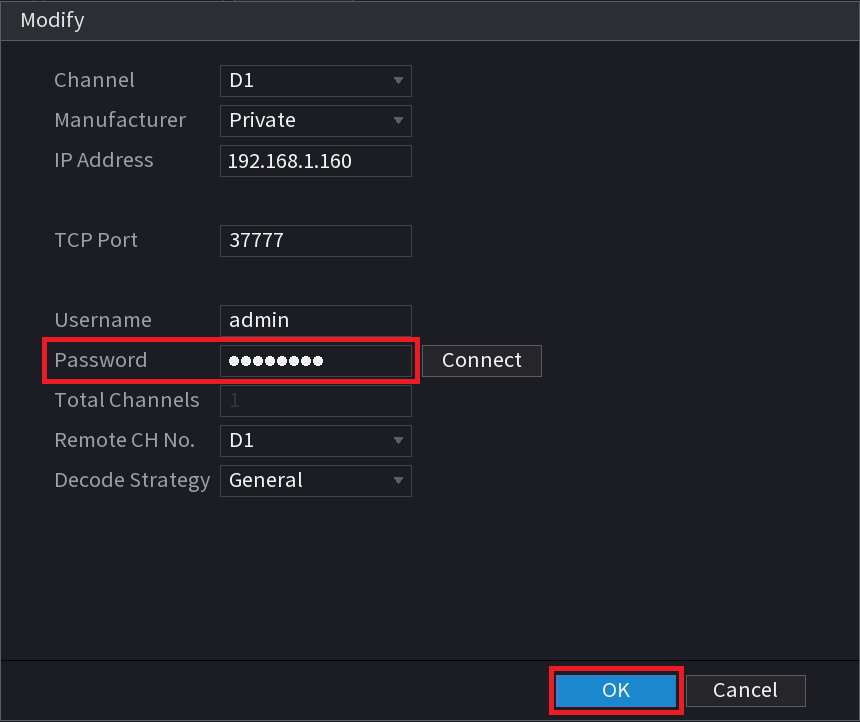
- The camera/s should now be added to the bottom list, and the status green. If the status is red, select the modify button, and ensure the password is entered correctly and select OK.
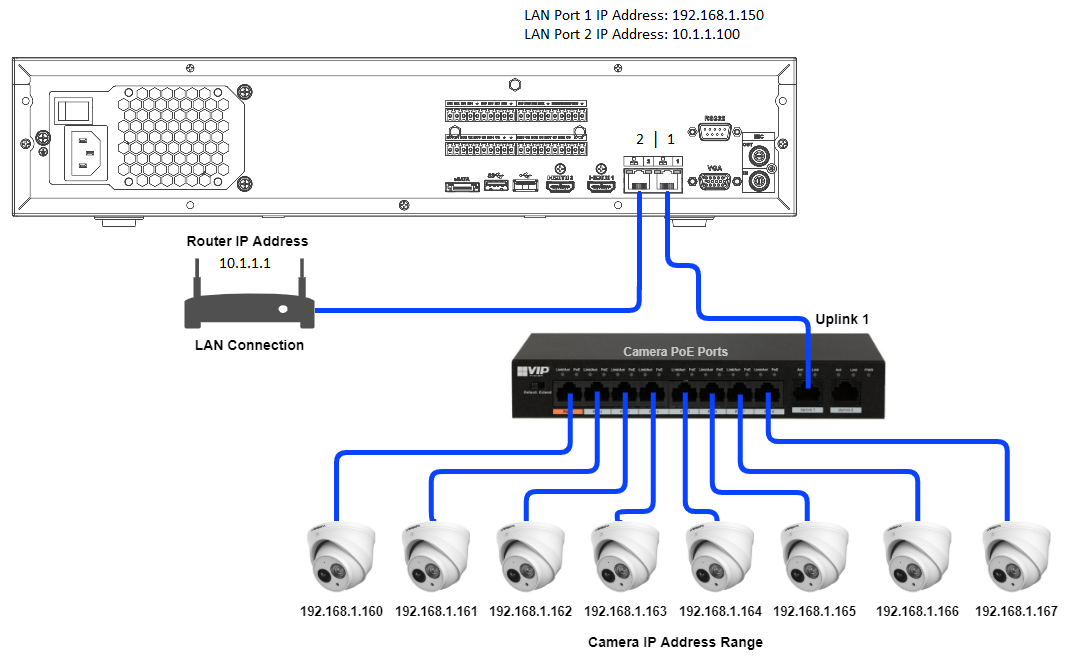
Wiring a NVR with 2x LAN Ports
The below example shows a NVR with 2 LAN ports. In this example LAN 1 is being used to connect to a PoE switch with cameras on it, and LAN 2 is being connecting to the modem to provide network access to the recorder.
Additional Initialisation Steps
conf.LoginErrorNo-18 or Config Error 18
Config Error 18 or conf.LoginErrorNo-18 means that a camera needs to be initialised before it can be used on the NVR.
Follow the Steps above to Initialise the Camera.
conf.LoginErrorNo-20 or Config Error 20
On some older model recorders, the "Config Error 20"/"conf.LoginErrorNo-20" error may be seen on the Live-View Page when trying to add a new camera. The cameras will need to have Compatibility mode enabled via its web interface.
Accessing Web Interface
Cameras Plugged into NVR
Cameras Plugged directly into NVR can be Accessed in two different ways, Through the NVR's Web interface or by putting a computer into the NVR's Internal Switch Range.
NVR Web Interface
1. Make sure you have a Connection to the NVR like below

2. On your Computer enter the address of the recorder in your browser.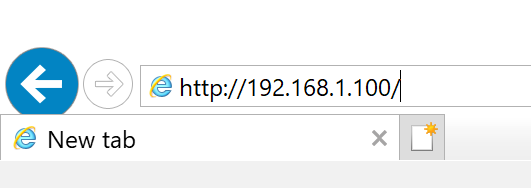
3. Enter the recorders username and password.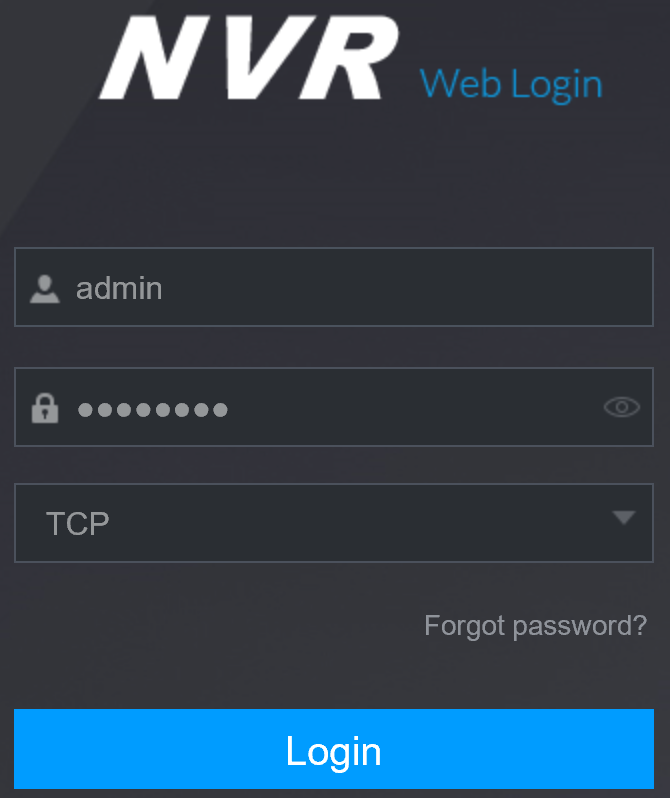
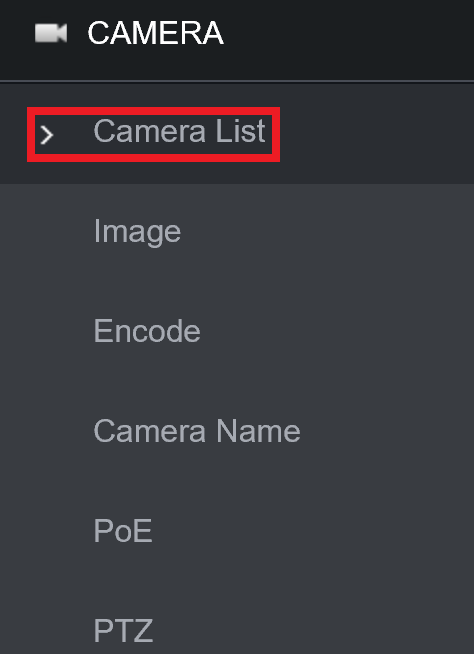
4. Select Setting > Camera > Camera List.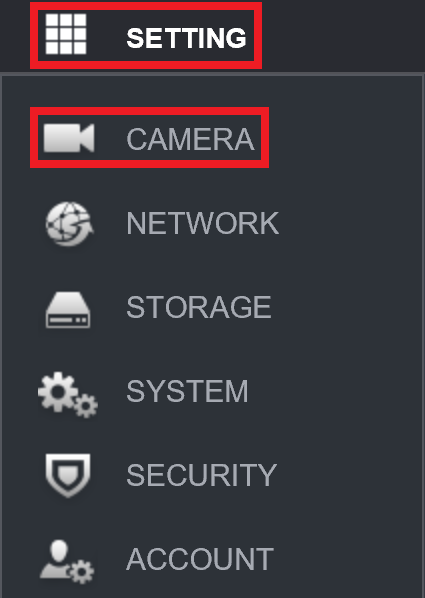
5. Next to each camera, there will be a  icon. Select the icon next to the camera you wish to connect to.
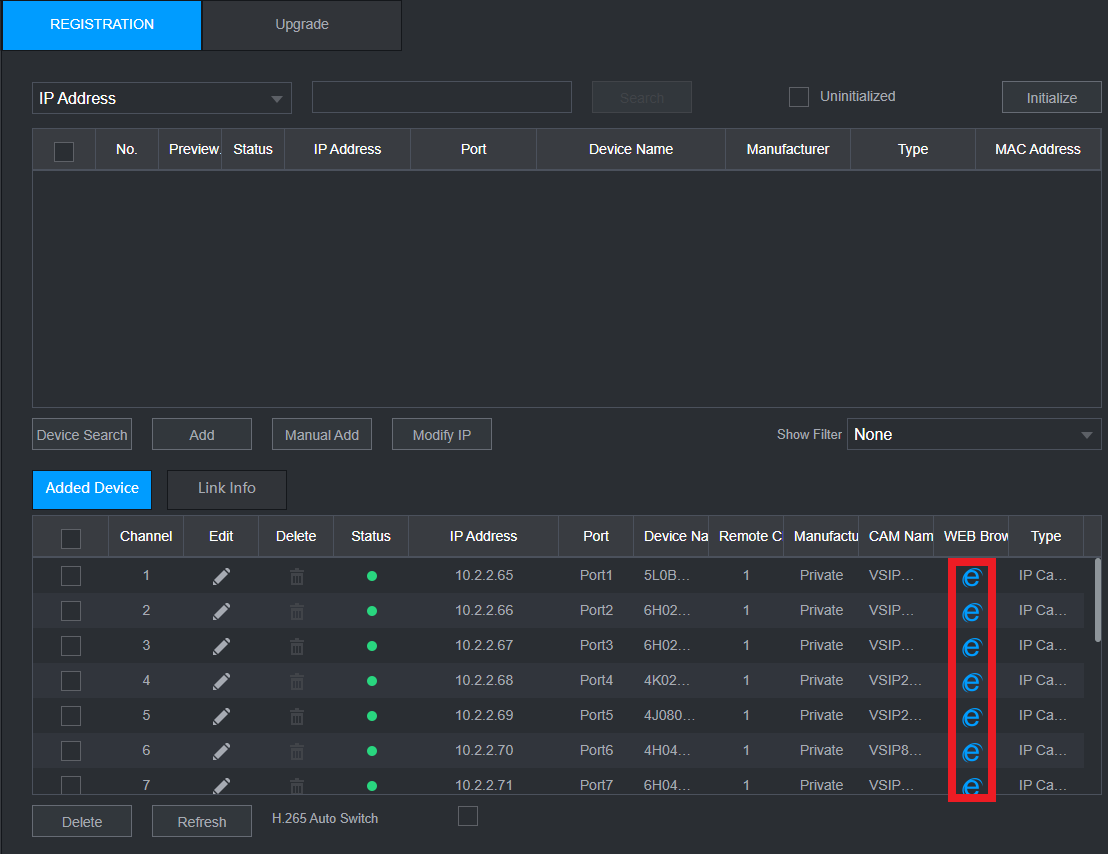
6. A new tab will open, Bringing up the Login page for the Cameras Web interface.
NVR Internal Switch
Network Setup with Pc going into NVR internal Switch.

1. Change Computers IP to be in same range of NVR (Usually 10.1.1.X) This can also be found in
Main Menu > Network > Switch

2. Log into Camera Web Interface Be Entering Ip Address into Browser (10.1.1.60)


Network Camera
1. Log into Cameras Web interface by typing it into your browser (e.g. 192.168.1.100)
2. Enter In Username And Password of the Camera

Enable Compatibility Mode - New GUI (white/Blue)
1. Navigate to Setting > Network > Basic Services.
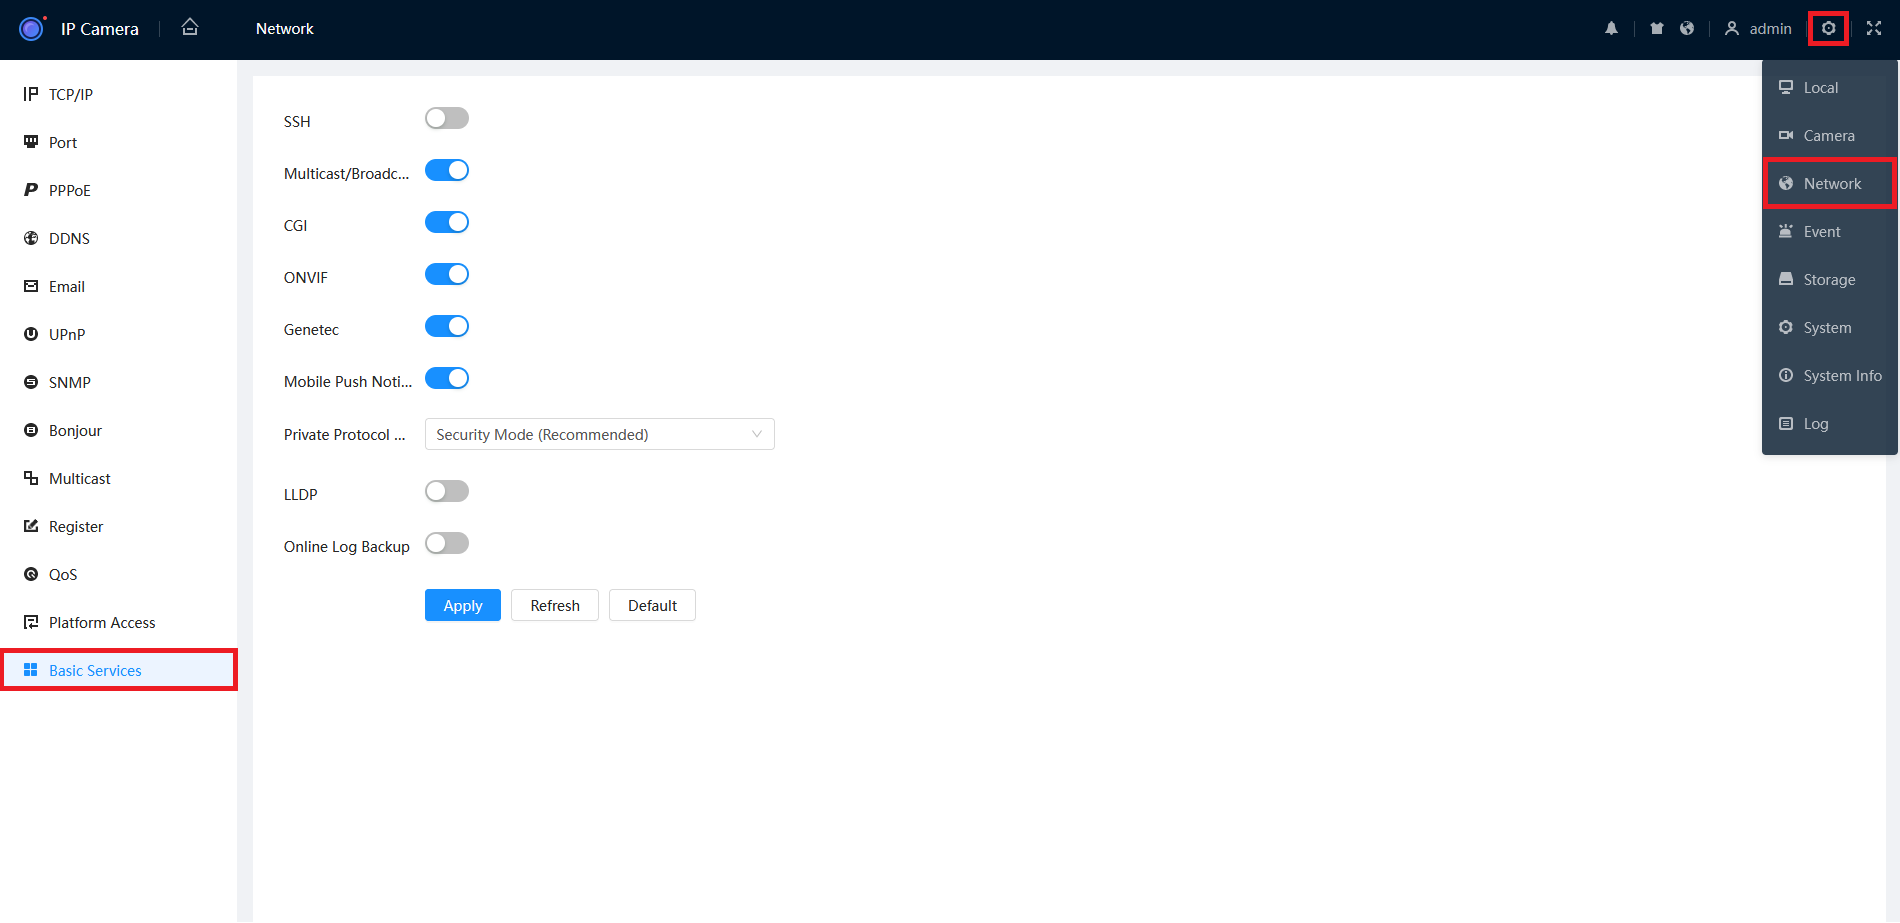
2. Set the Private Protocol to Compatibility Mode, then press Apply.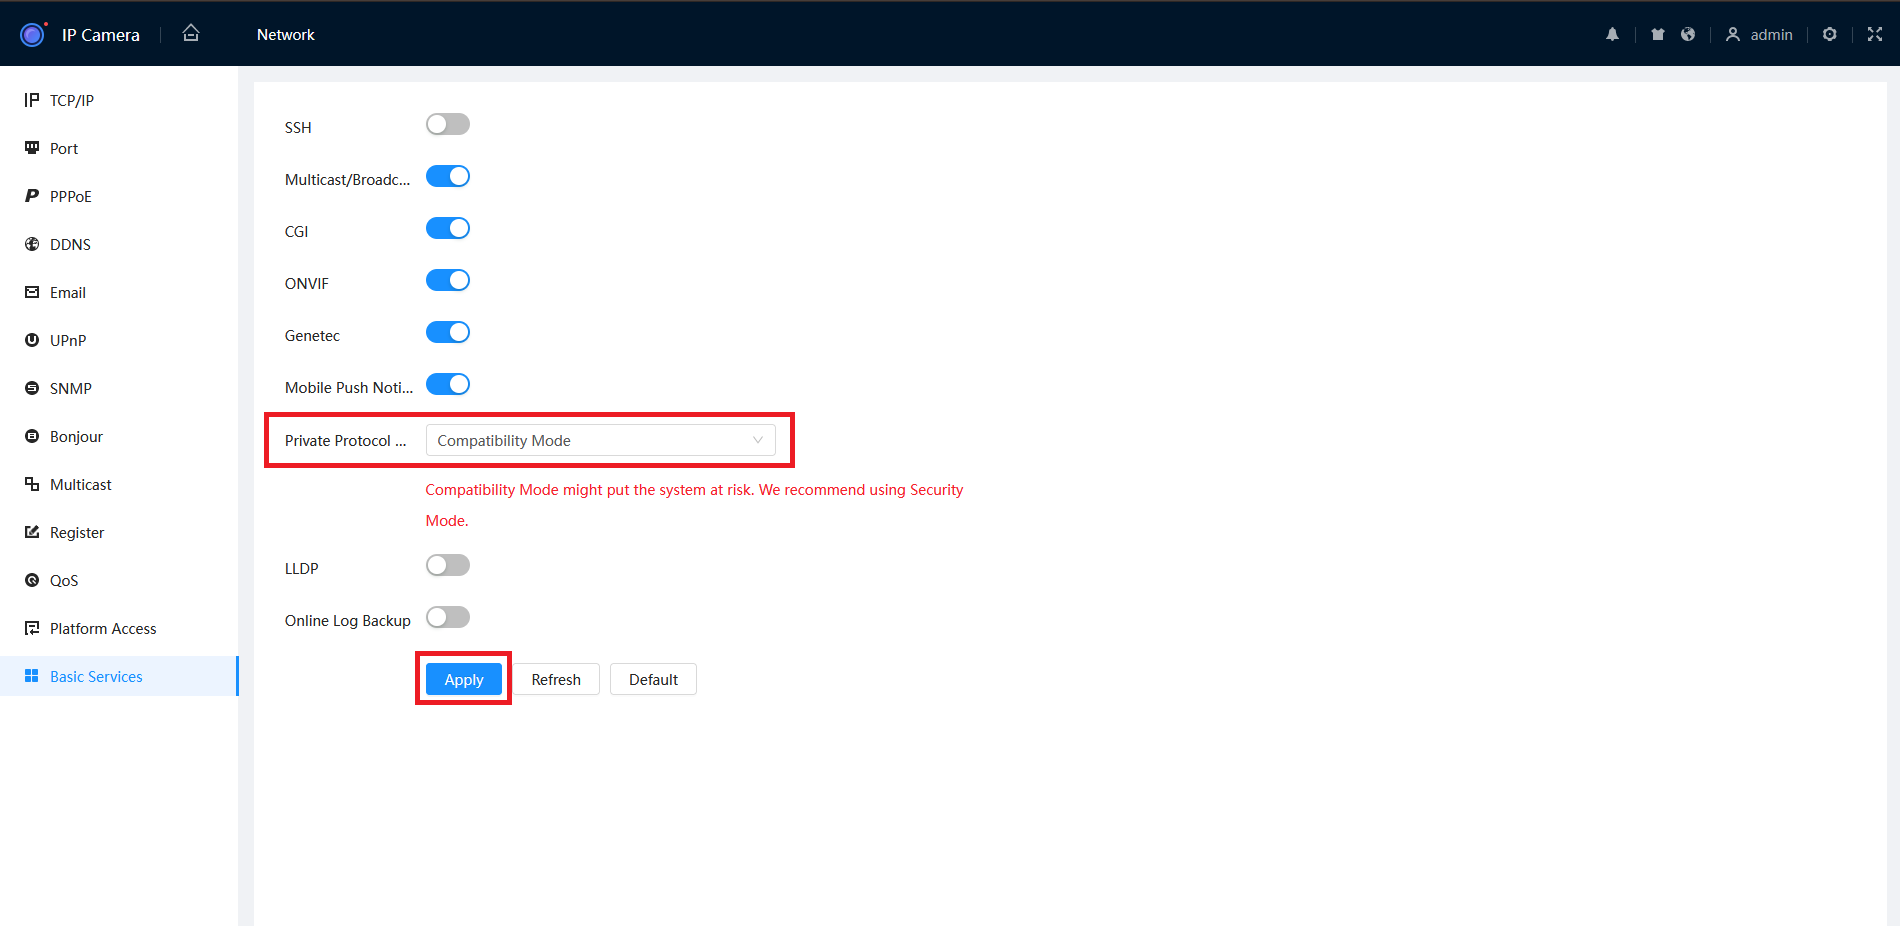
Enabling Compatibility Mode - Old GUI (Grey)
1. Navigate to Settings > System > Safety > System Service.
2. Set Private Protocol Authentication Mode to Select Compatible Mode.
NVR Compatibility Mode
Compatibility mode may be required when adding older IP cameras to a new NVR. 
1. From the Main Menu, select Security.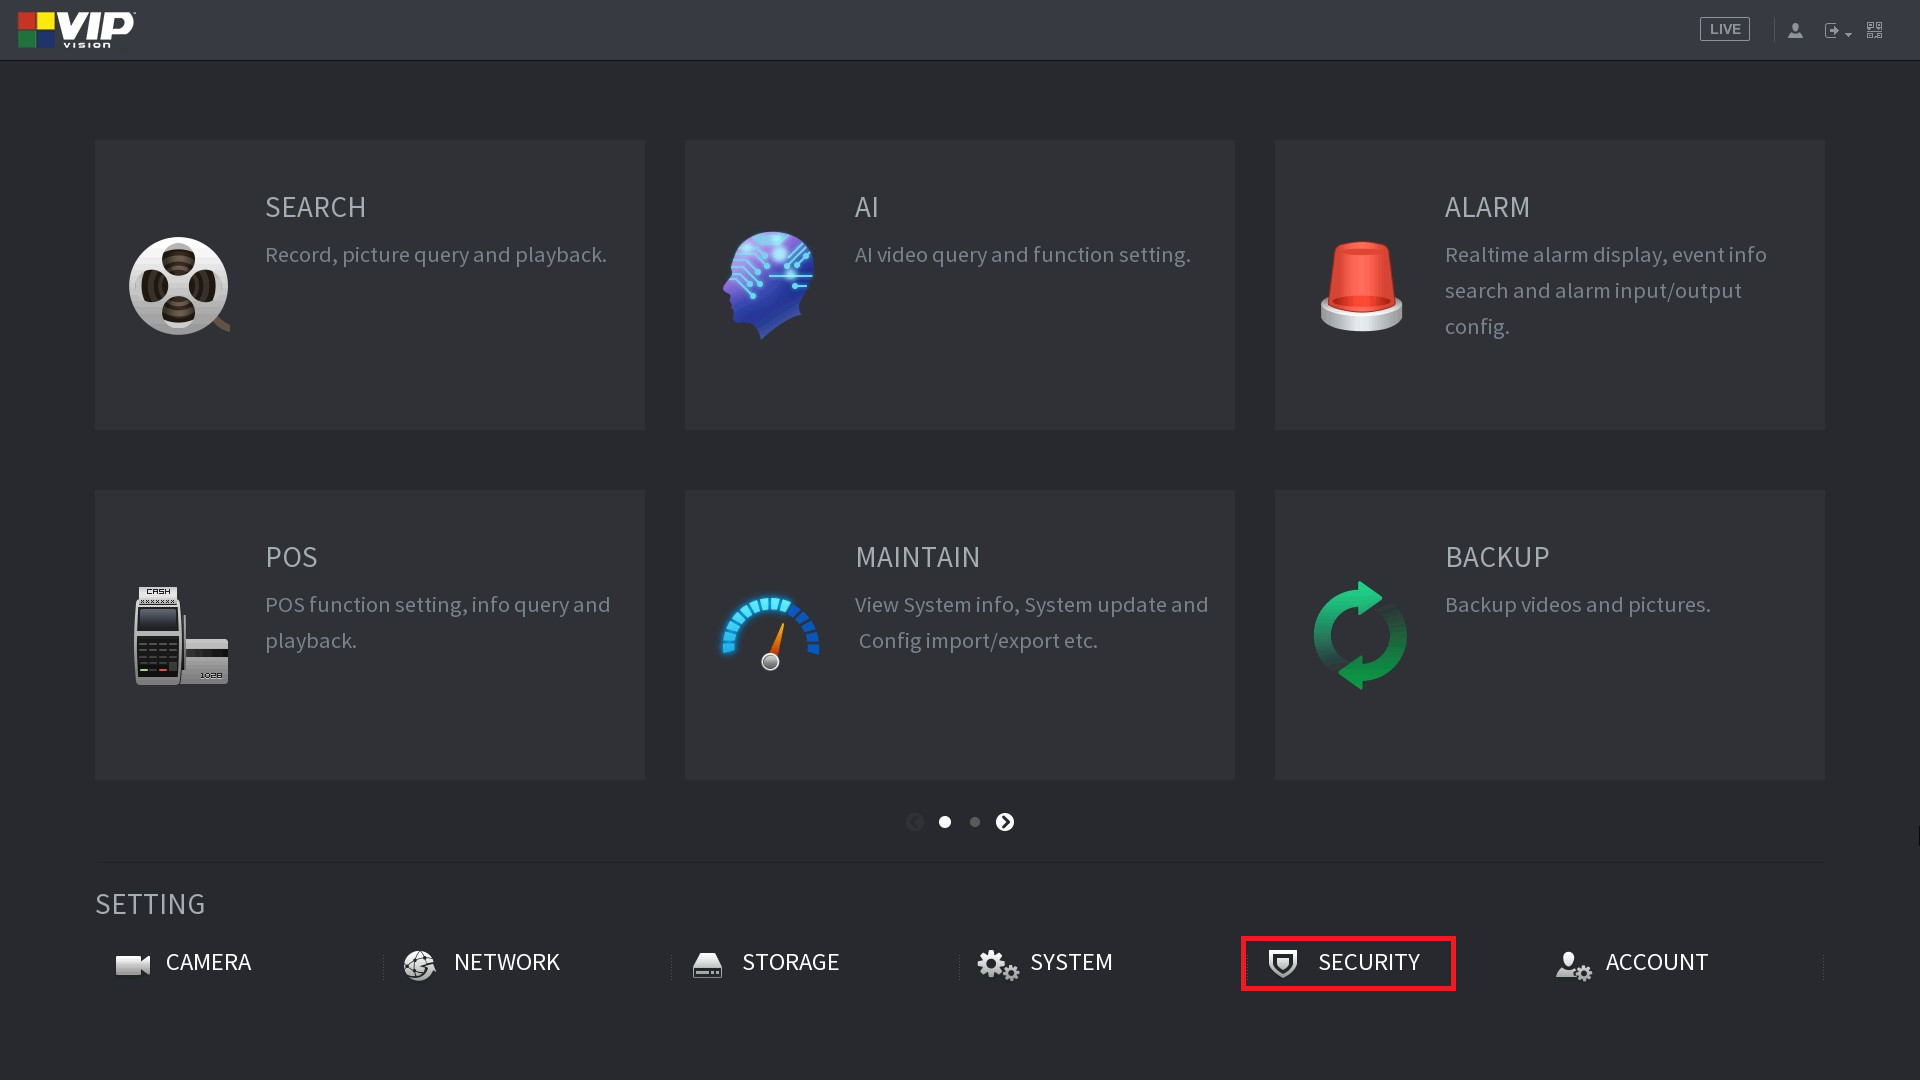
2. Select System Service

3. Change Private Protocol Authentication from Security mode to Compatible Mode. Select Apply/

Changing Encode Settings
When adding newer camera to older recorders, the cameras encode settings may have to be changed in order for the recorder to display and record video of that camera. Refer to the Data sheet of your devices for reference.


1. Navigate Main Menu > Camera Settings > Encode Settings.


2. Change Compression and Resolutions Setting of both Main Stream and Sub Stream to match Specifications of your Recorder.
(Sub stream resolution is generally fine to leave as default.)
