Whether you are Resetting an old NVR or Setting up a Brand new system.
There are a few traps for new players when setting up an NVR
And here is a guide for setting one up from basics
Out Of The Box State
This guide is to assist in Setting up your NVR from an out of the Box State.
It is not necessary to reset your device to Fact. Default But highly recommended.
How to factory default an NVR and Cameras
NVR
Factory Defaulting your Recorder
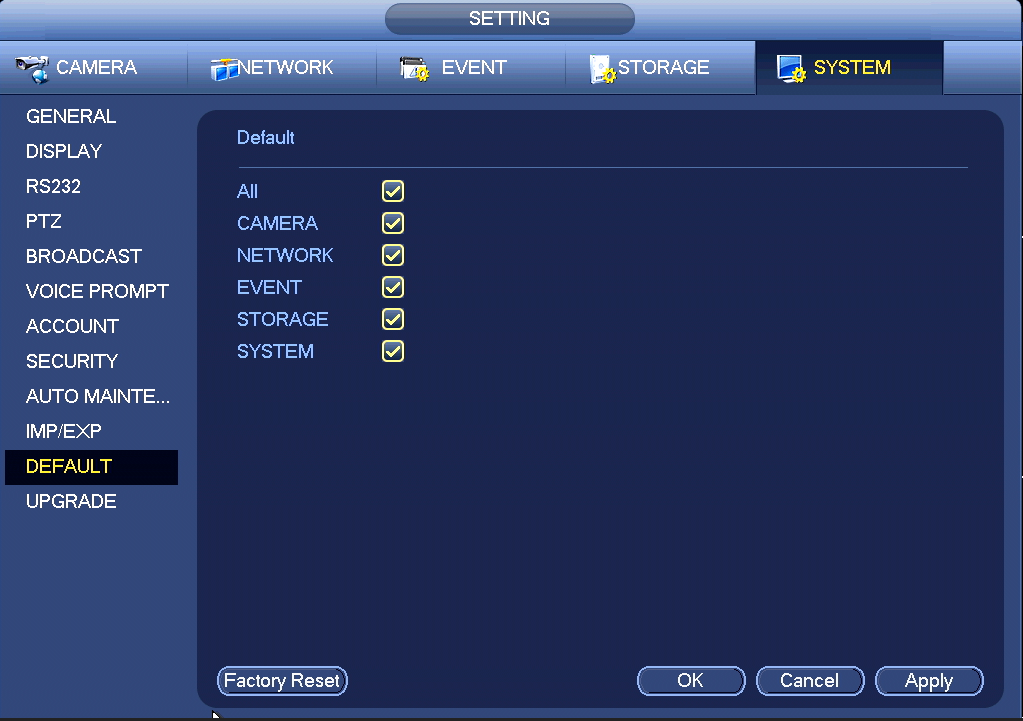
To reset your device, refer to either of the following images.
You can choose to reset back to factory defaults, removing all configuration and user settings on the recorder. This is done by clicking the factory reset button on the bottom left.
To reset particular sections, tick the enable box then click apply and OK. The recorder may restart after any changes are applied.
Blue GUI
Login > Main Menu > System(Setting)
Black GUI (Old)
Login > Main Menu > Operation >System Maintain > Default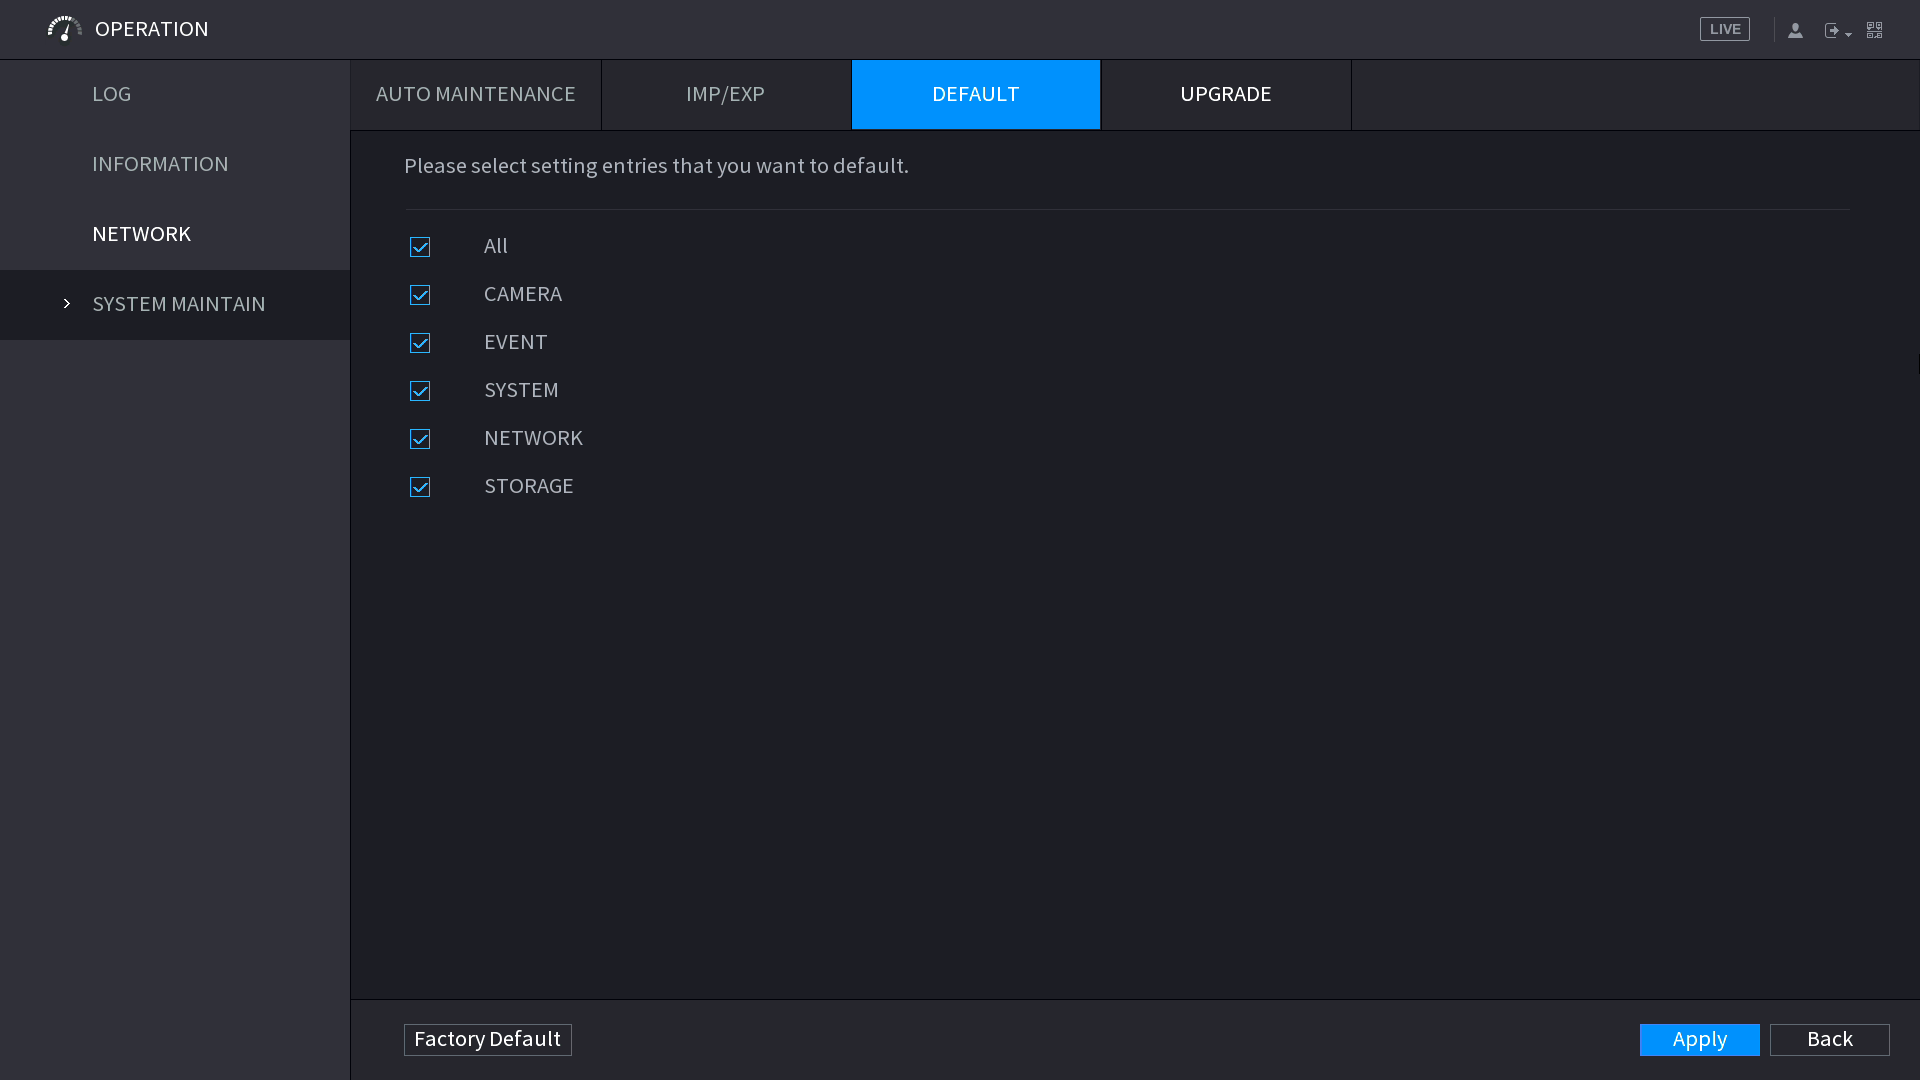
Using the Reset Button (Select Recorders Only)
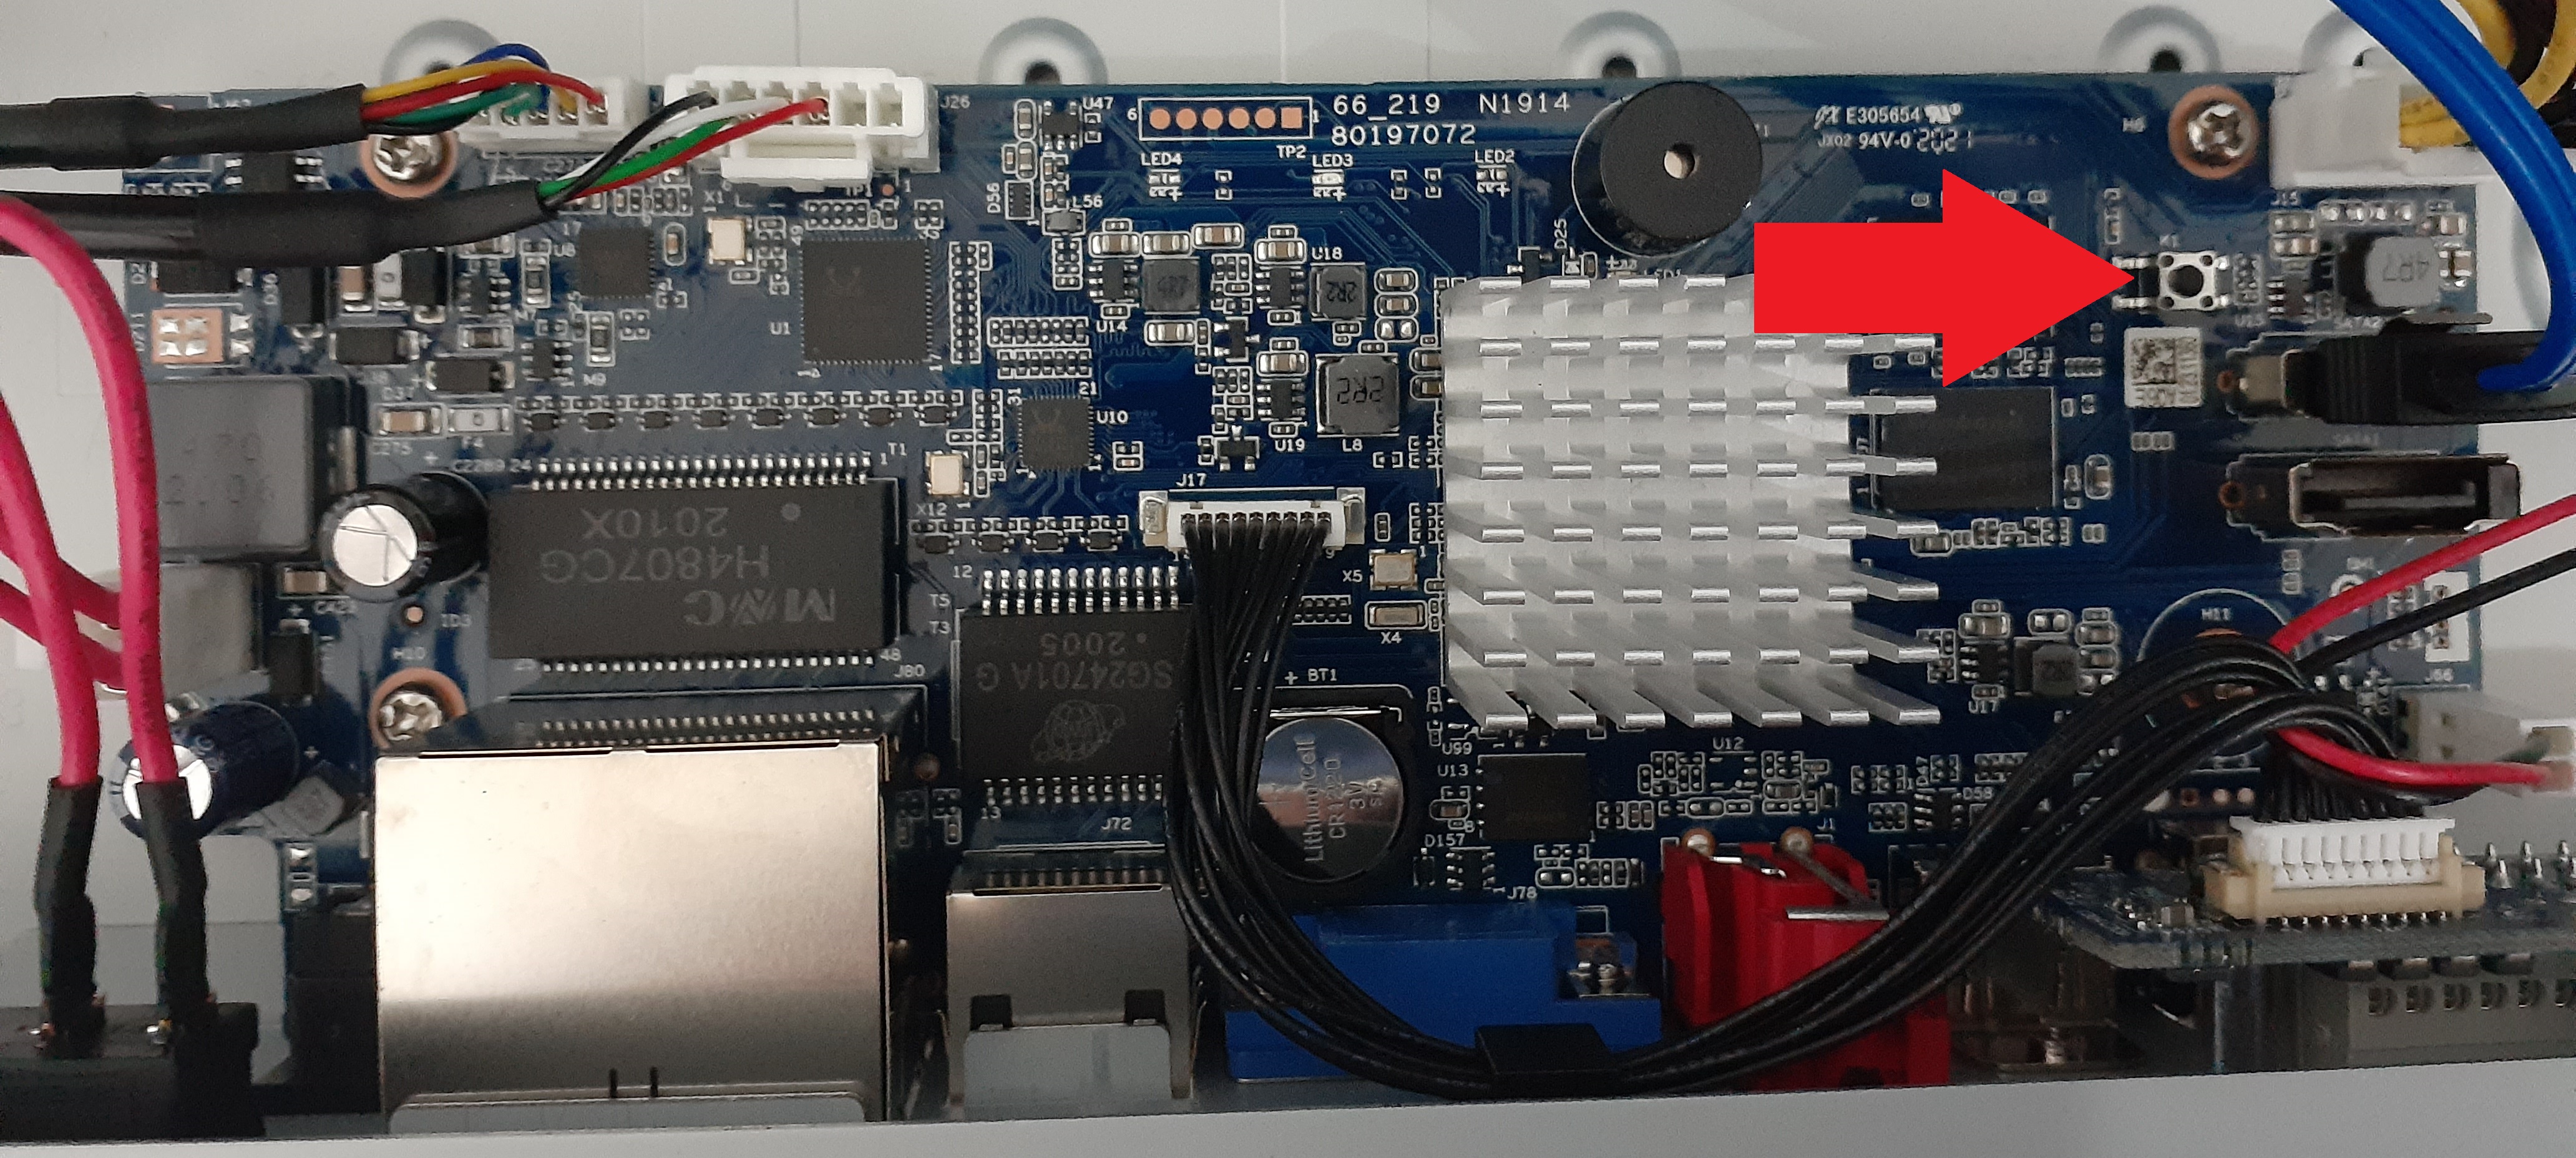
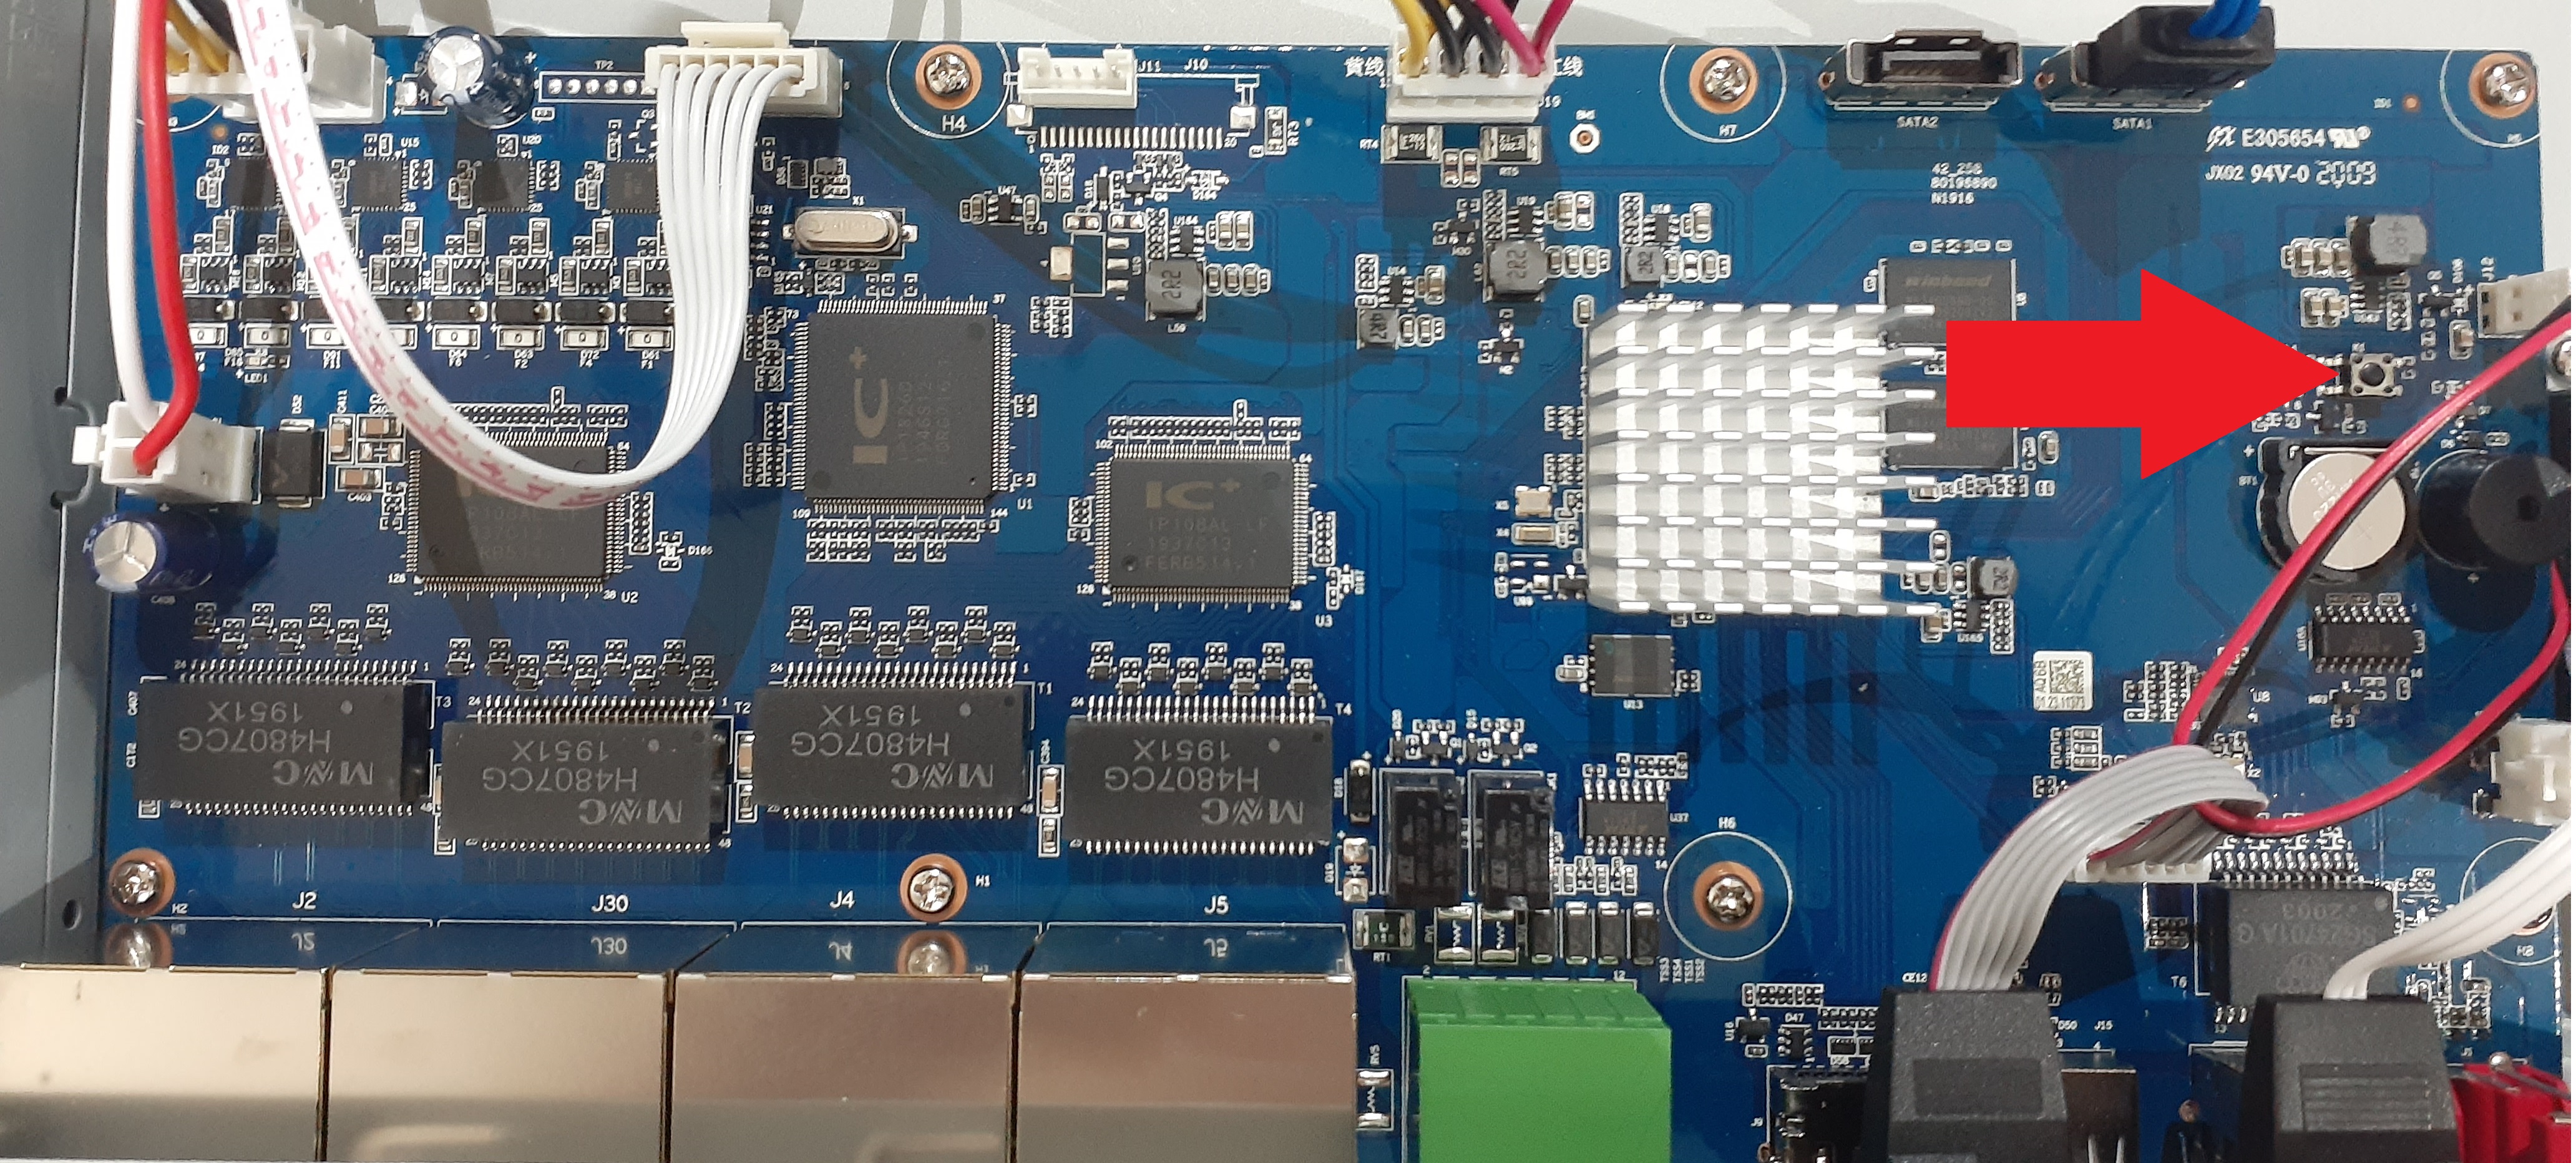
Some recorders have a reset button on the PCB. Turn the recorder off then press and hold down the reset button, while holding the button down turn the recorder on. Once you hear a beep, release the button.
NVR4PRO4
NVR16COM3
Cameras
How To Reset IP Cameras
Turret Cameras
Reset Button under Flap
AI turret cameras, or turret cameras built post 2021 usually have their reset button located under a flap next to the MicroSD card slot. Press and hold the reset button for 30 seconds while the camera is powered on to reset the camera.

Reset Button on Mainboard
Cameras built pre-2021 require the camera to be opened to expose the mainboard.
Once opened, the button will on the edge of the mainboard (see left image), press and hold this button for 30 seconds while the camera is powered on. In some cases you may need to undo two screws holding the mainboard in place, as the the button may be on the underside or on the second board.
When no button can be found, the reset may be performed by shorting two copper pads (see right image) for 30 seconds using a paperclip while the camera is powered on.

Turret Camera reset locations for specific models
|
VSIPC-4DIRMG You will need to undo some screws to lift up the mainboard to access this reset button. |
 |
|
VSIP1MPVDMINIIRC VSIP3MPVDMINIIRC |
 |
|
VSIP4MPVDMINIIRCA3.6 You will have to undo 2x screws on the metal plate in order to lift up the mainboard to find this reset. |
 |
|
VSIPE4MPVDMINIIRCB2.8 VSIPE6MPVDMINIIRC3.6 VSIPC-6DIRC |
 |
| VSIPE8MPVDIRMG |  |
|
VSIP4MPVDIRME |
 |
Vandal Dome Cameras
To access the reset button on large vandal dome cameras, you will need to first remove the vandal dome (see left image) by removing 3 screws.
The most common style of reset button will be the one in the middle image. Press and hold it for 30 seconds while the camera is powered on to reset it.
If there is no button, there may be copper pads you can short out for 30 seconds to reset the camera (right side of right image). There may also be four silver pads located where the reset button would usually be (left side of right image) you can short out two of vertically or diagonally for 30 seconds to reset the camera. Do not attempt to short any other part of the camera as you may cause irreversible damage.

Large Vandal Dome Cameras
To access the reset button on large vandal dome cameras, you will need to first remove the vandal dome (see left image) by removing 3 screws.
The reset button will then be located toward the edge of the housing, recessed into the plastic (see right image). Press and hold the button for 30 seconds to reset the camera.
Vandal Dome Camera reset locations for specific models
|
VSIPC-4DIRD Short out the two silver pins (E.g. by using a paperclip) for 30 seconds while the camera is powered on. OR short out the two copper coloured holes (Right side of image) |
 |
|
VSIPC-4DIRMD Press and hold the button for 30 seconds OR if no button exists, short out 2 silver pins diagonally with wire for 30 seconds |
 |
| VSIP4MPVDIRMD |  |
| VSIP3MPVDIRM2.8-12 |  |
|
VSIP3MPVDMINIIR (Mainboard may be black instead of green) VSIP4MPVDMINIIR |
 |
| VSIP2MPVDIRLV2 VSIPE8MPVDIRM |
 |
Bullet Cameras
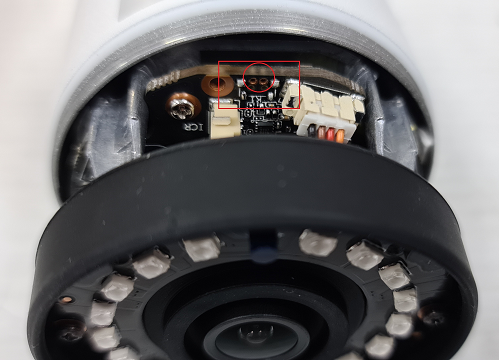
Most Bullet Cameras will have a flap that will reveal the MicroSD card slot and reset button. Press and hold the button for 30 seconds to reset the camera. Some cameras will not have a reset button, instead they will have two copper pads (see right image) which you can short out with a paperclip for 30 seconds to reset the camera.

Bullet cameras without a flap
For cameras without a reset flap you will need to remove the front of the camera (e.g by unscrewing it for cylindrical cameras) to access the reset button. Some cameras will have a physical button to press and hold for 30 seconds to reset it. Other cameras (see right image) will have copper pads to short out for 30 seconds to reset the camera.
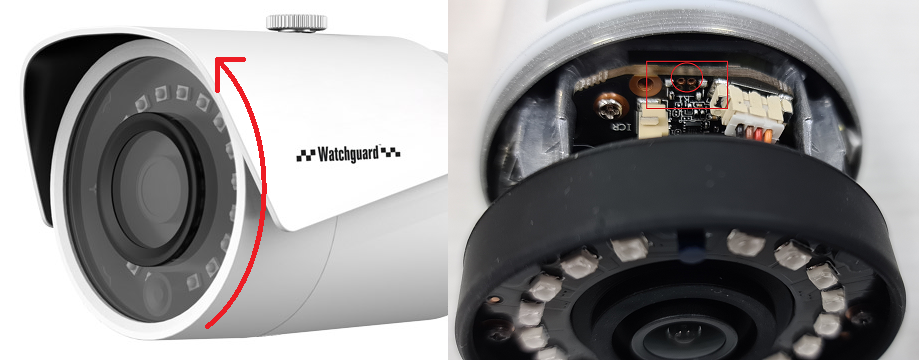
Bullet Camera reset locations for specific models
|
VSIPC-4BIRS Short out two of the copper pads (E.g by using a paperclip) for 30 seconds while the camera is powered on. |
 |
|
VSIP3MPFBIRM2.8-12 Short out two of the copper pads (E.g by using a paperclip) for 30 seconds while the camera is powered on. |
 |
|
VSIP4MPFBIRM2.8-12 Short out two of the silver pins (E.g by using a paperclip) for 30 seconds while the camera is powered on. |
 |
|
VSIP4MPFBIRMD VSIP8MPFBIRMD |
 |
| VSIPE2MPFBMINIIR |
 |
PTZ Cameras
PTZ Camera reset locations for specific models
|
VIP2MPPTZIRW You will have to undo 4 screws on the back to get access. |
 |
|
VSIP2MPPTZCV3 Remove the outer shell and round lens cover (4 x Phillips screws) Press & hold button for 30 seconds. |
 |
|
VSIP2MPPTZV3 There will be two screws on opposite sides that you will need to remove to take the plastic housing off. Then Press & hold the gold button for 30 seconds to reset the camera. |
 
|
Fisheye Cameras
To reset a fisheye camera, you will need to undo three screws on the base of the camera to expose the mainboard.
Once the Mainboard is exposed, press and hold the reset button for 30 seconds to reset the camera.

Making Connections
Setting up the connections
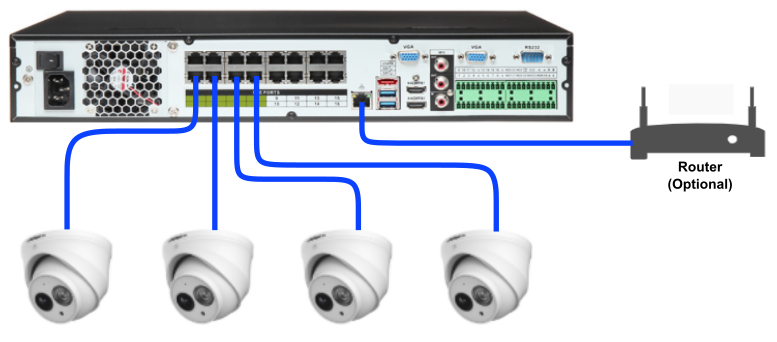
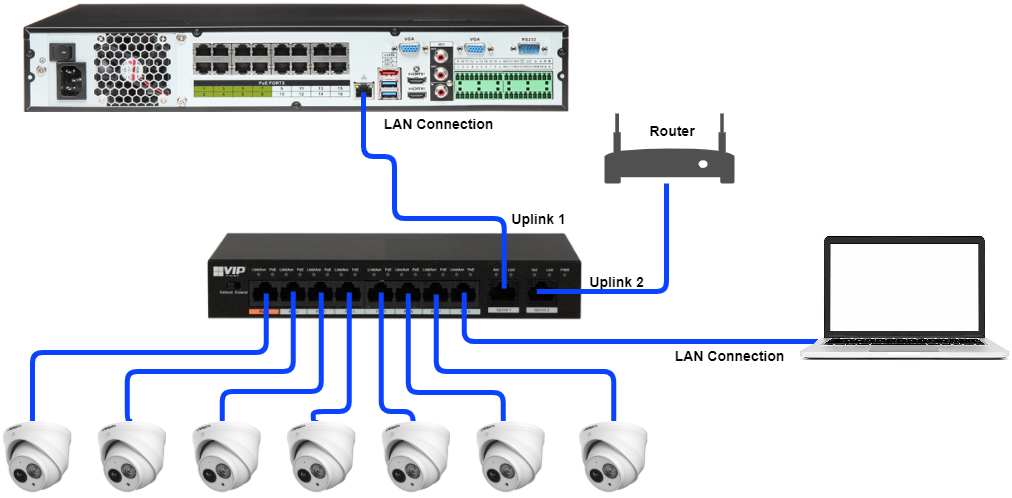
Cameras connected to NVR
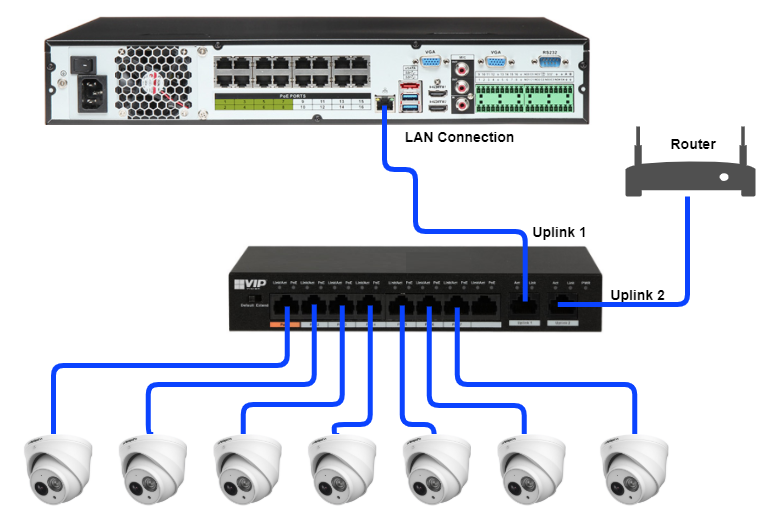
Cameras Connected to Network
Initialising settings on NVR Unit
Setup Network settings
Applying Changes
Make sure to hit “Apply” after you change a setting as when you leave that page your settings will revert to last save.
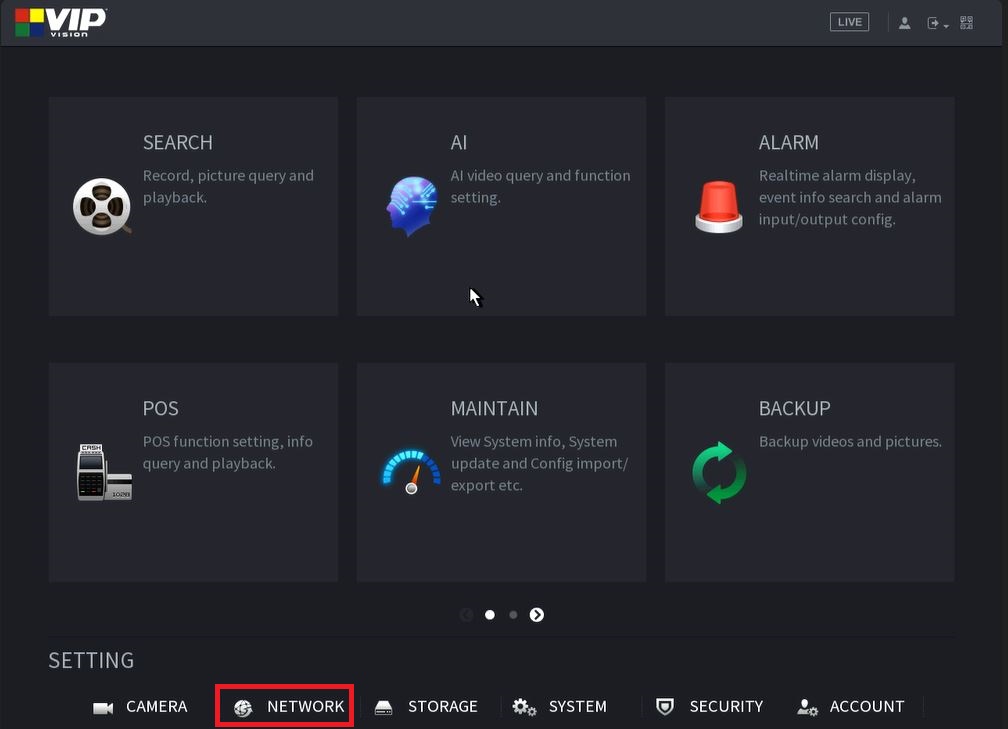 |
Navigate to Main Menu and select Network settings |
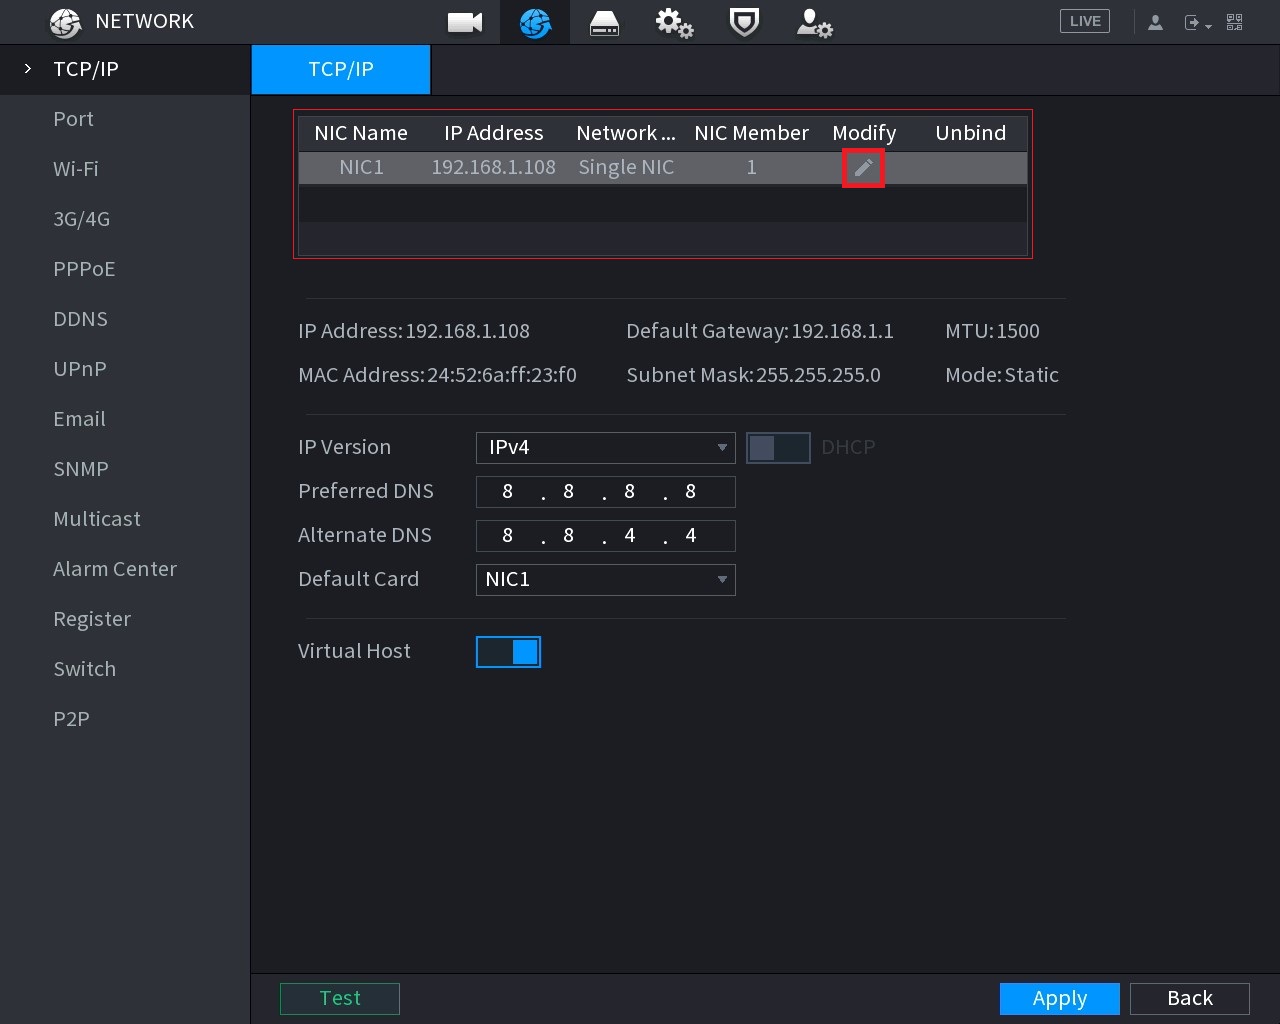 |
By selecting the top box and the you can change the IP settings.
|
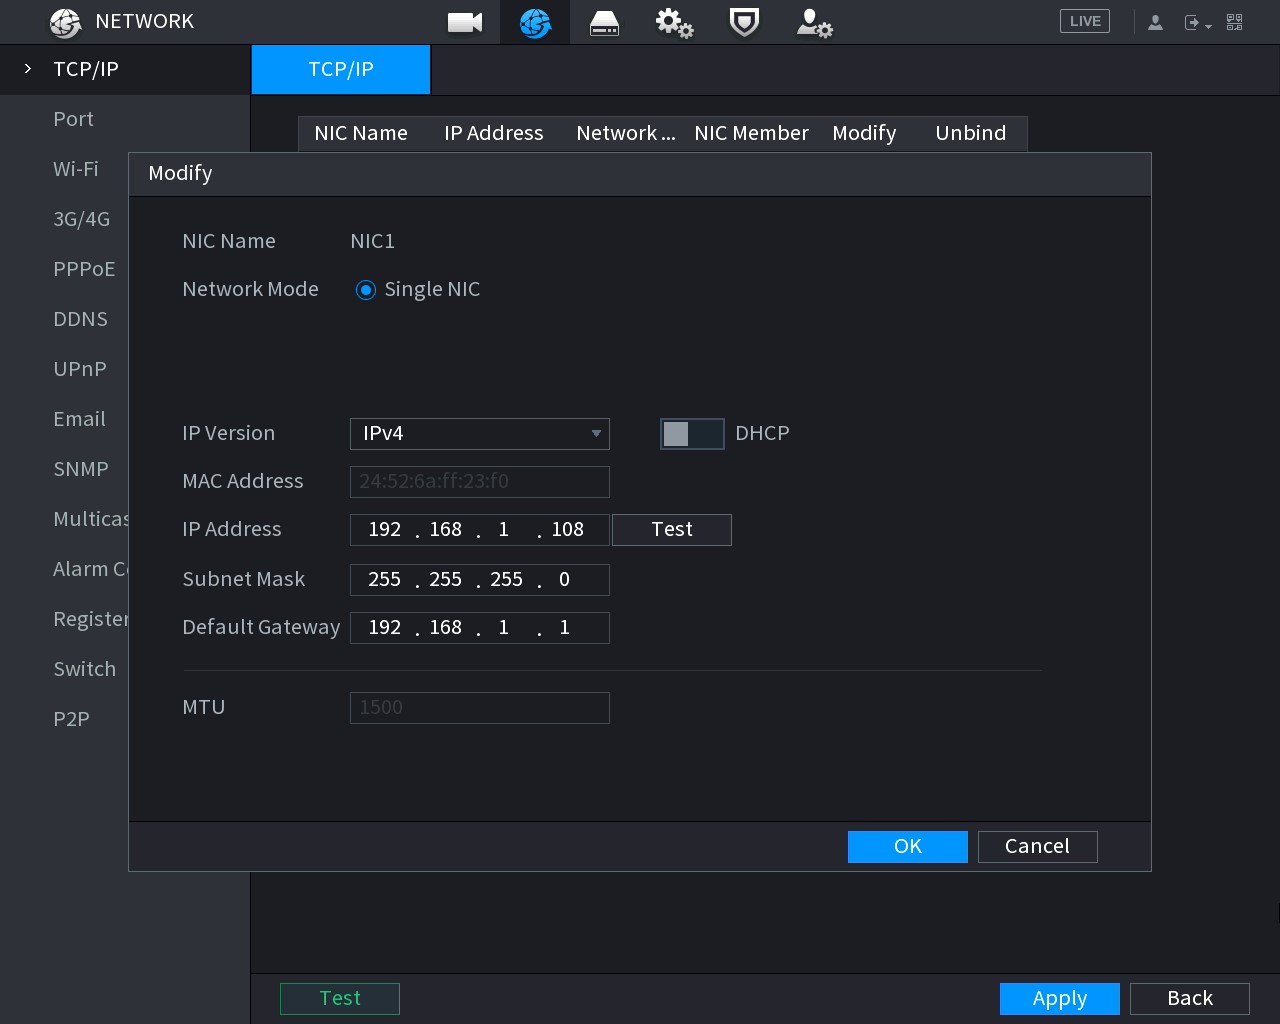 |
The image on the left shows the default settings, but you should consult a Network Admin regarding what address suits your requirement. |
 |
You can activate DHCP (as seen on the left) This means an address will automatically be assigned by the network |
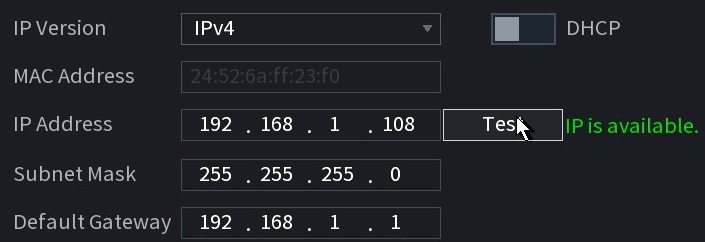 |
Or choose a static address & the Subnet Mask is:- - - 255.255.255.0 The IP Addr. should be:- - - 123.456.789.[XXX]
and where the IP Address of the router of that network is the same as the Gateway. |
 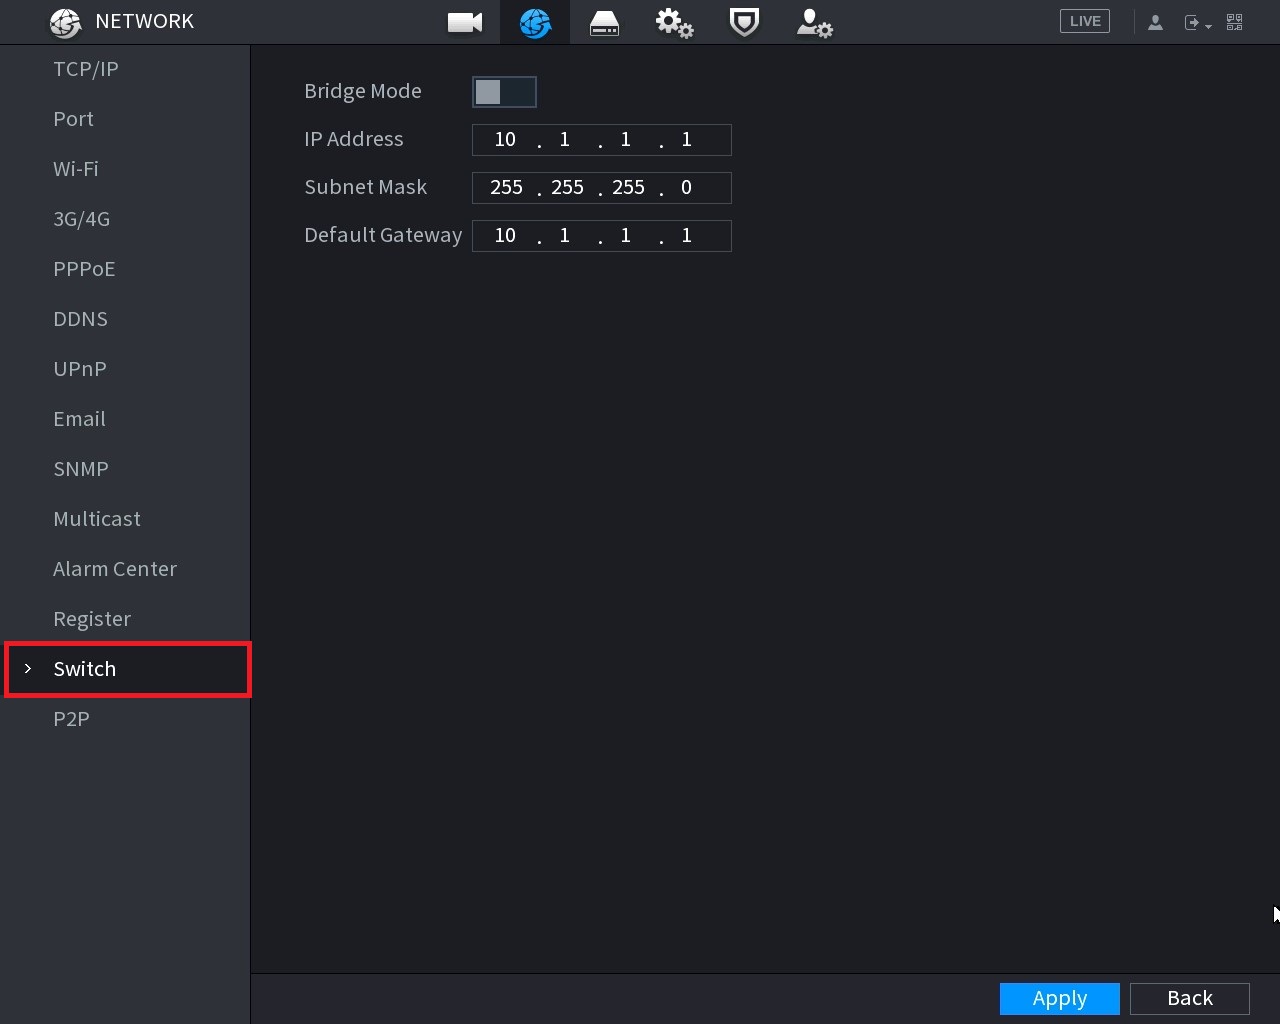 |
You may also want to change the IP Address of the switch ports, which you're cameras will be initialized to.
|
Adding Cameras
Camera Passwords
If your cameras have already been initialized - but has an unknown password,
it is advised to factory default the cameras to an uninitialized state (See ‘How To’ Above) - even if it is inconvenient.
If your cameras have already been initialized - but have a know password,
it is advised to change the password to the same as the NVR.
either via the web interface, or via the NVR.
Changing Camera Passwords
How to Login to Web Interface of an IP Camera
There are two methods to connect to an IP camera's web interface, depending on how the camera is connected to the recorder. The reason to connect directly to the web interface, is to adjust specific settings that are unable to be setup from the recorder. Such as PTZ camera idle motion settings, and ANPR camera settings.
Accessing Cameras that are directly connected to an NVR
When using a recorder with inbuilt PoE ports, the cameras that are connected will automatically get assigned an IP address from the recorder.
In order to login to the camera, we first need to login to the NVR. This method works on recorders that are using the black user interface.
- Connect your computer to the same network as the recorder.

- If there is internet access, your computer should receive an IP address in the same IP address range of the recorder. If your computer does not receive an IP address or there is no modem/router, see the "Changing the IP address on a Windows Computer" section to statically assign an IP address in the same range as the recorders IP address.
- On the recorder, go to Main Menu > Network. Note down the IP address of the recorder.
- On the computer, open Internet Explorer and enter the IP address of the recorder.

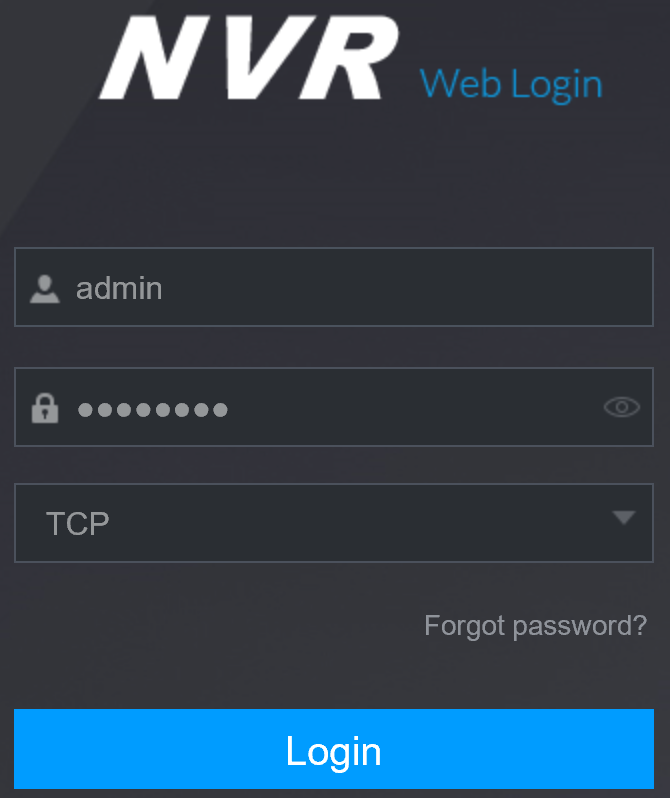
- If the computer is able to see the recorder, you will see a login page. Enter the recorders username and password.
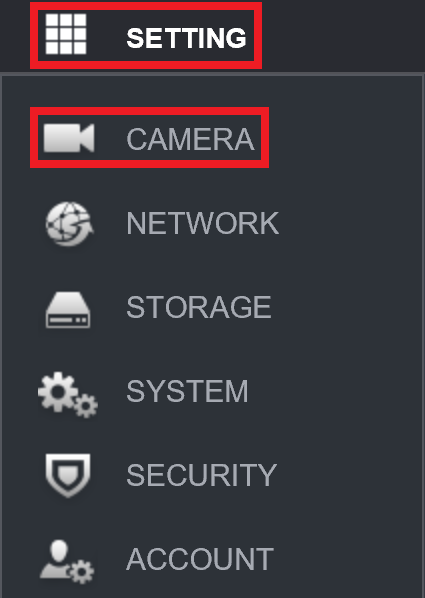
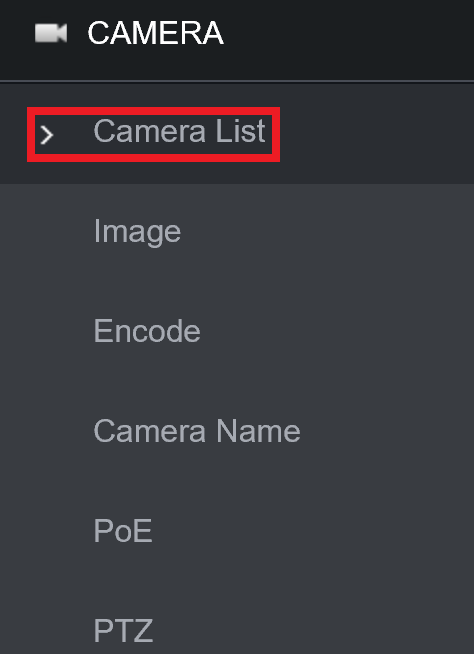
- Select Setting > Camera > Camera List.
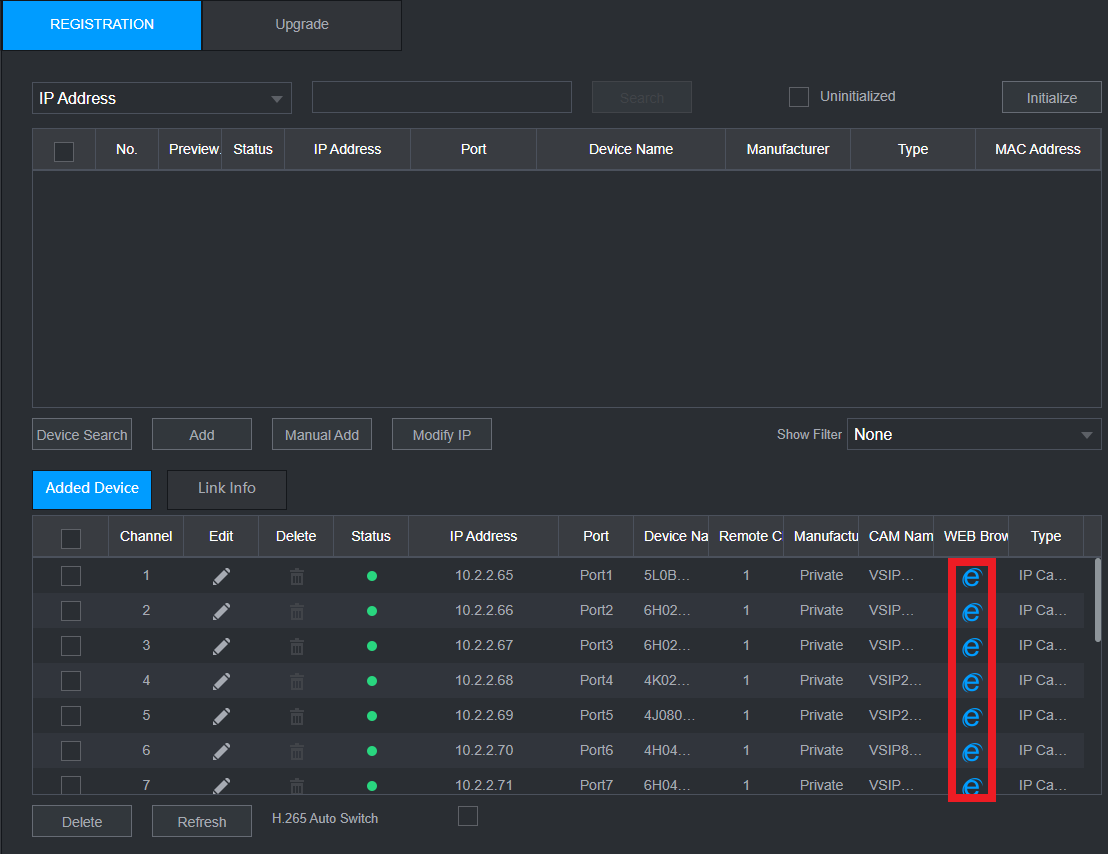
- Next to each camera, there will be a
 icon. Select the icon next to the camera you wish to connect to.
- A new page will open, bringing up the login page for the camera. Enter the username and password for the camera. Usually, the username is admin, and the password is the same as the recorder.
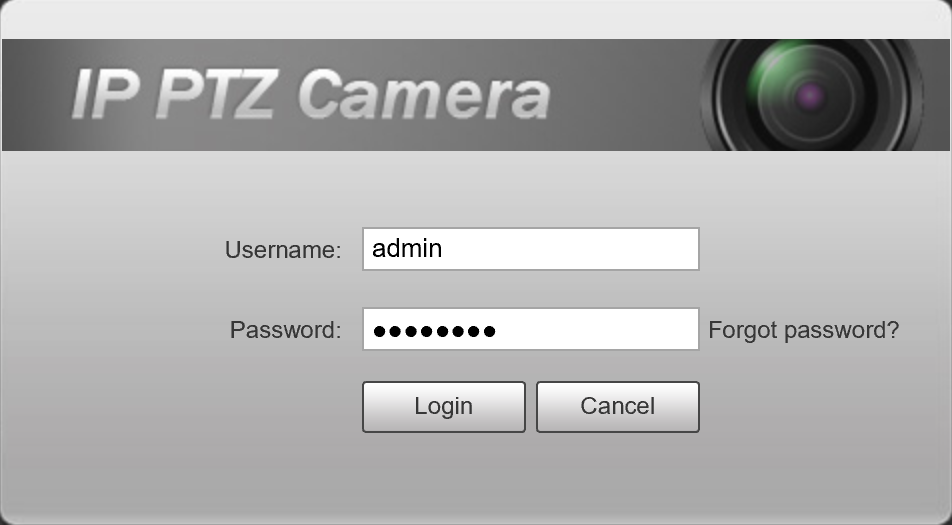
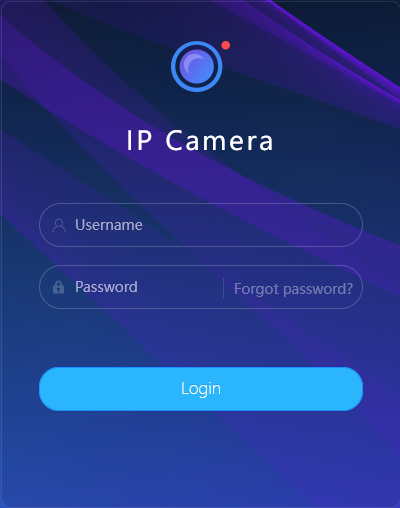
Connecting to cameras that are connected via a PoE switch.
This guide requires that the recorder and camera are already setup for network access. If the camera is not currently connected to the NVR, you may need to assign an IP address to your PC/Laptop Manually, see the "Changing the IP address on a Windows Computer" below to statically assign an IP address in the same range as the cameras IP address.
Changing the IP address on a Windows Computer - If no Modem/Router is connected
Follow the below steps to manually assign an IP address to a Windows computer, this will need to be done if the recorder/camera you are connecting to is not connected to a local network where DHCP is being assigned to devices.
Windows 10
- Open Settings.
- Select Network & Internet.
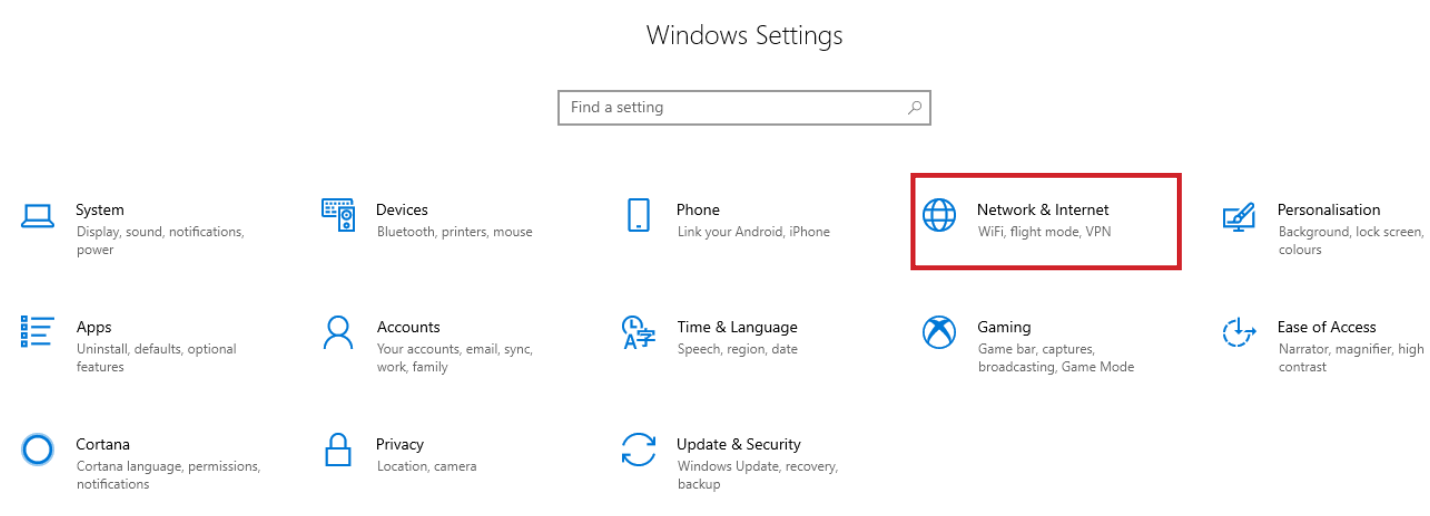
- Select Status, then Change Adapter Options.
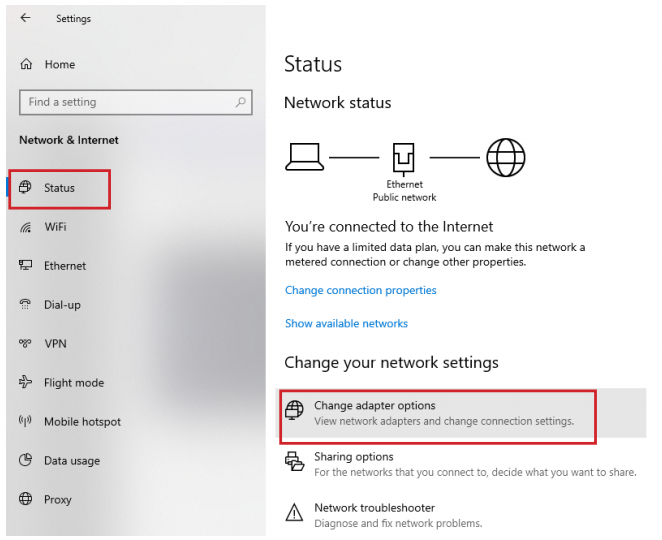
-
Right-click the network adapter you want to change the IP address for, and select Properties.

-
Double-click the Internet Protocol Version 4 (TCP/IPv4) item.
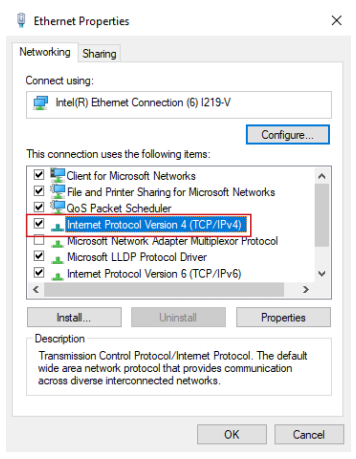
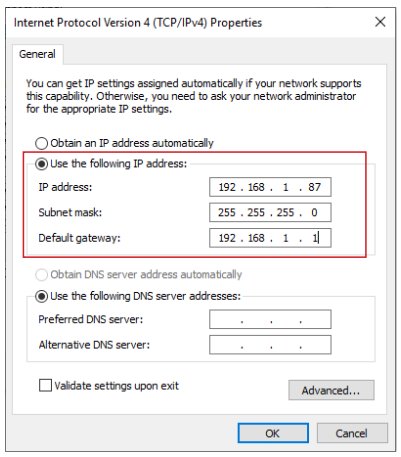
- Click Use the following IP address and enter an IP address in the same range as the device you are trying to access. (E.g when trying to access 192.168.1.108 use a IP address in the 192.168.1.x range.) Note: This cannot be the same as the device you are trying to connect to or any other device on the same network. Save your changes on both windows.
- Type the IP address of the device you are trying to access into the address bar of your web browser.
- Once finished configuring the device, change the adapter settings back to normal by following steps 1-5 and clicking Obtain an IP address automatically.
Windows 11
1. In the Windows search bar at the bottom of the page, type Control Panel and press enter.
2. Select Network and Internet.

3. Select Network and Sharing Centre.

4. Select the link for Connections in the network that you want to change the IP address for.

5. Select Properties.

6. Double-click the Internet Protocol Version 4 (TCP/IPv4) item.

7. Click Use the following IP address and enter an IP address in the same range as the device you are trying to access. (E.g when trying to access 192.168.1.108 use a IP address in the 192.168.1.x range.) Note: This cannot be the same as the device you are trying to connect to or any other device on the same network. Save your changes on both windows.

8. Type the IP address of the device you are trying to access into the address bar of your web browser.
9. Once finished configuring the device, change the adapter settings back to normal by following steps 1-6 and clicking Obtain an IP address automatically.
See the video below for a visual guide of the steps above:
Shortcut
1. In the Windows search bar at the bottom of the page, type Ncpa.cpl and press enter.
2. Right-click the network adapter you want to change the IP address for, and select Properties.
3. Select the Internet Protocol Version 4 (TCP/IPv4) item.

4. Click Use the following IP address and enter an IP address in the same range as the device you are trying to access. (E.g when trying to access 192.168.1.108 use a IP address in the 192.168.1.x range.) Note: This cannot be the same as the device you are trying to connect to or any other device on the same network. Save your changes on both windows.

5. Type the IP address of the device you are trying to access into the address bar of your web browser.
6. Once finished configuring the device, change the adapter settings back to normal by following steps 1-3 and clicking Obtain an IP address automatically.
See the video below for a visual guide of the steps above:
- Connect the computer to the same network as the cameras.
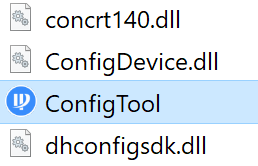
- Download the Config tool program.
- Once the download is complete, extract the zip file, and open the ConfigTool.exe file.
- Select the
 button, devices that are found on the network will be listed.
 - Click the Web button next to the camera you would like to login to.
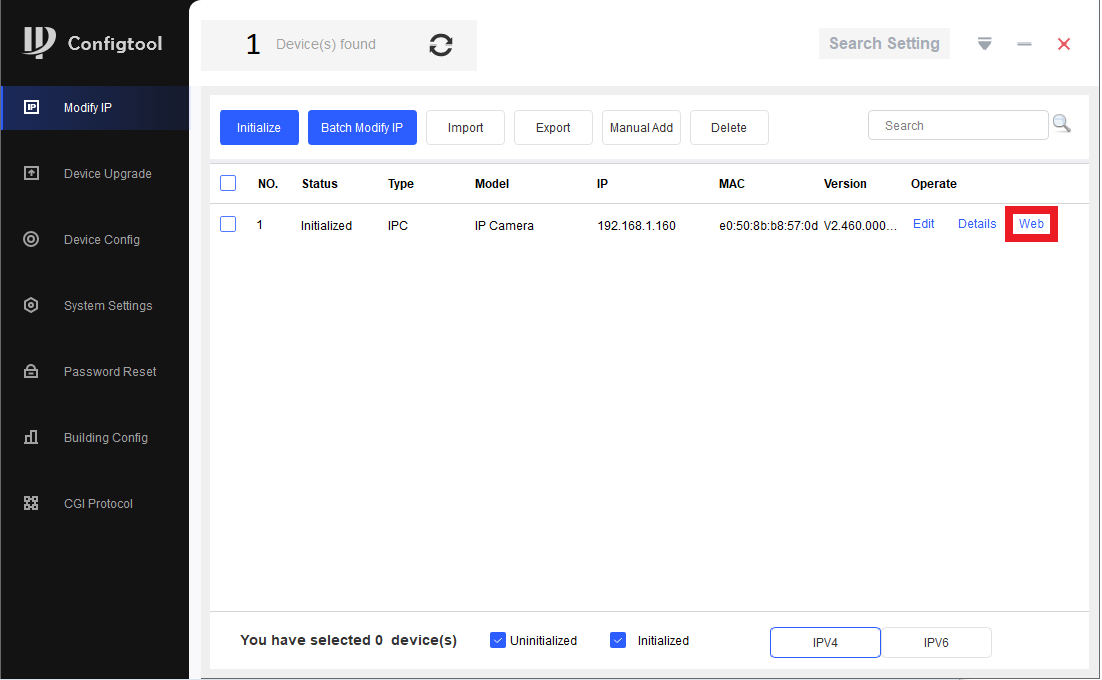
- A new page will open, bringing up the login page for the camera. Enter the username and password for the camera. Usually, the username is admin, and the password is the same as the recorder.
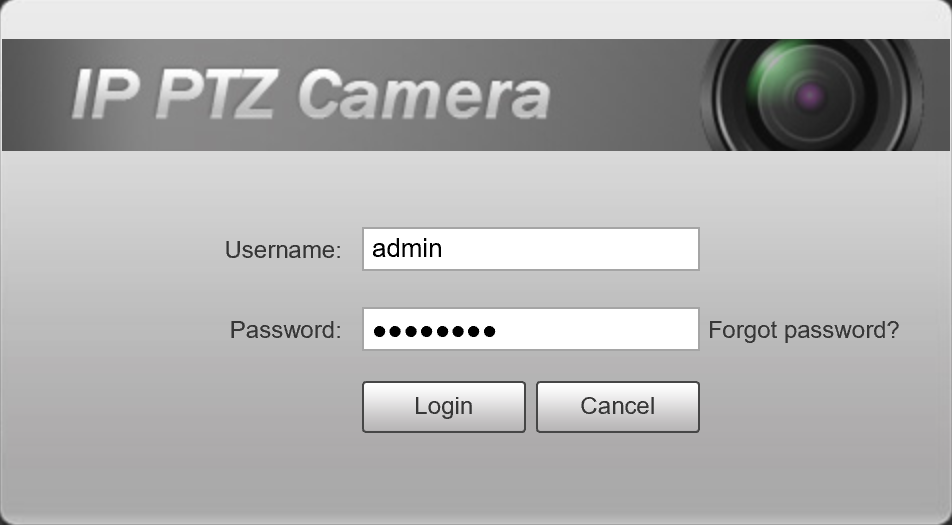
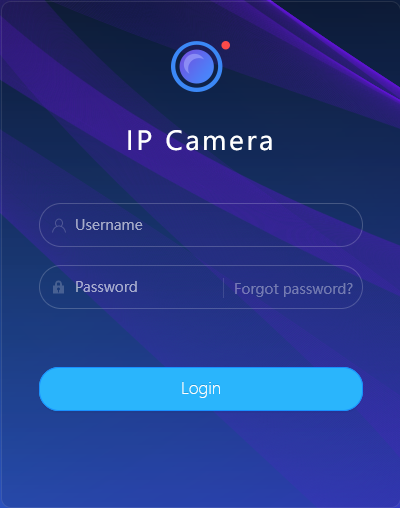
How to fix
If you see this error, it means Camera Registration is trying to access your camera with the incorrect login information.
Cameras plugged into a Switch
If you know the password of the camera, you will just need to update the password of the camera in Camera Registration.
(Black GUI) Update Password in Camera List
Open Camera Registration by right clicking and selecting Main Menu > Camera > Camera List
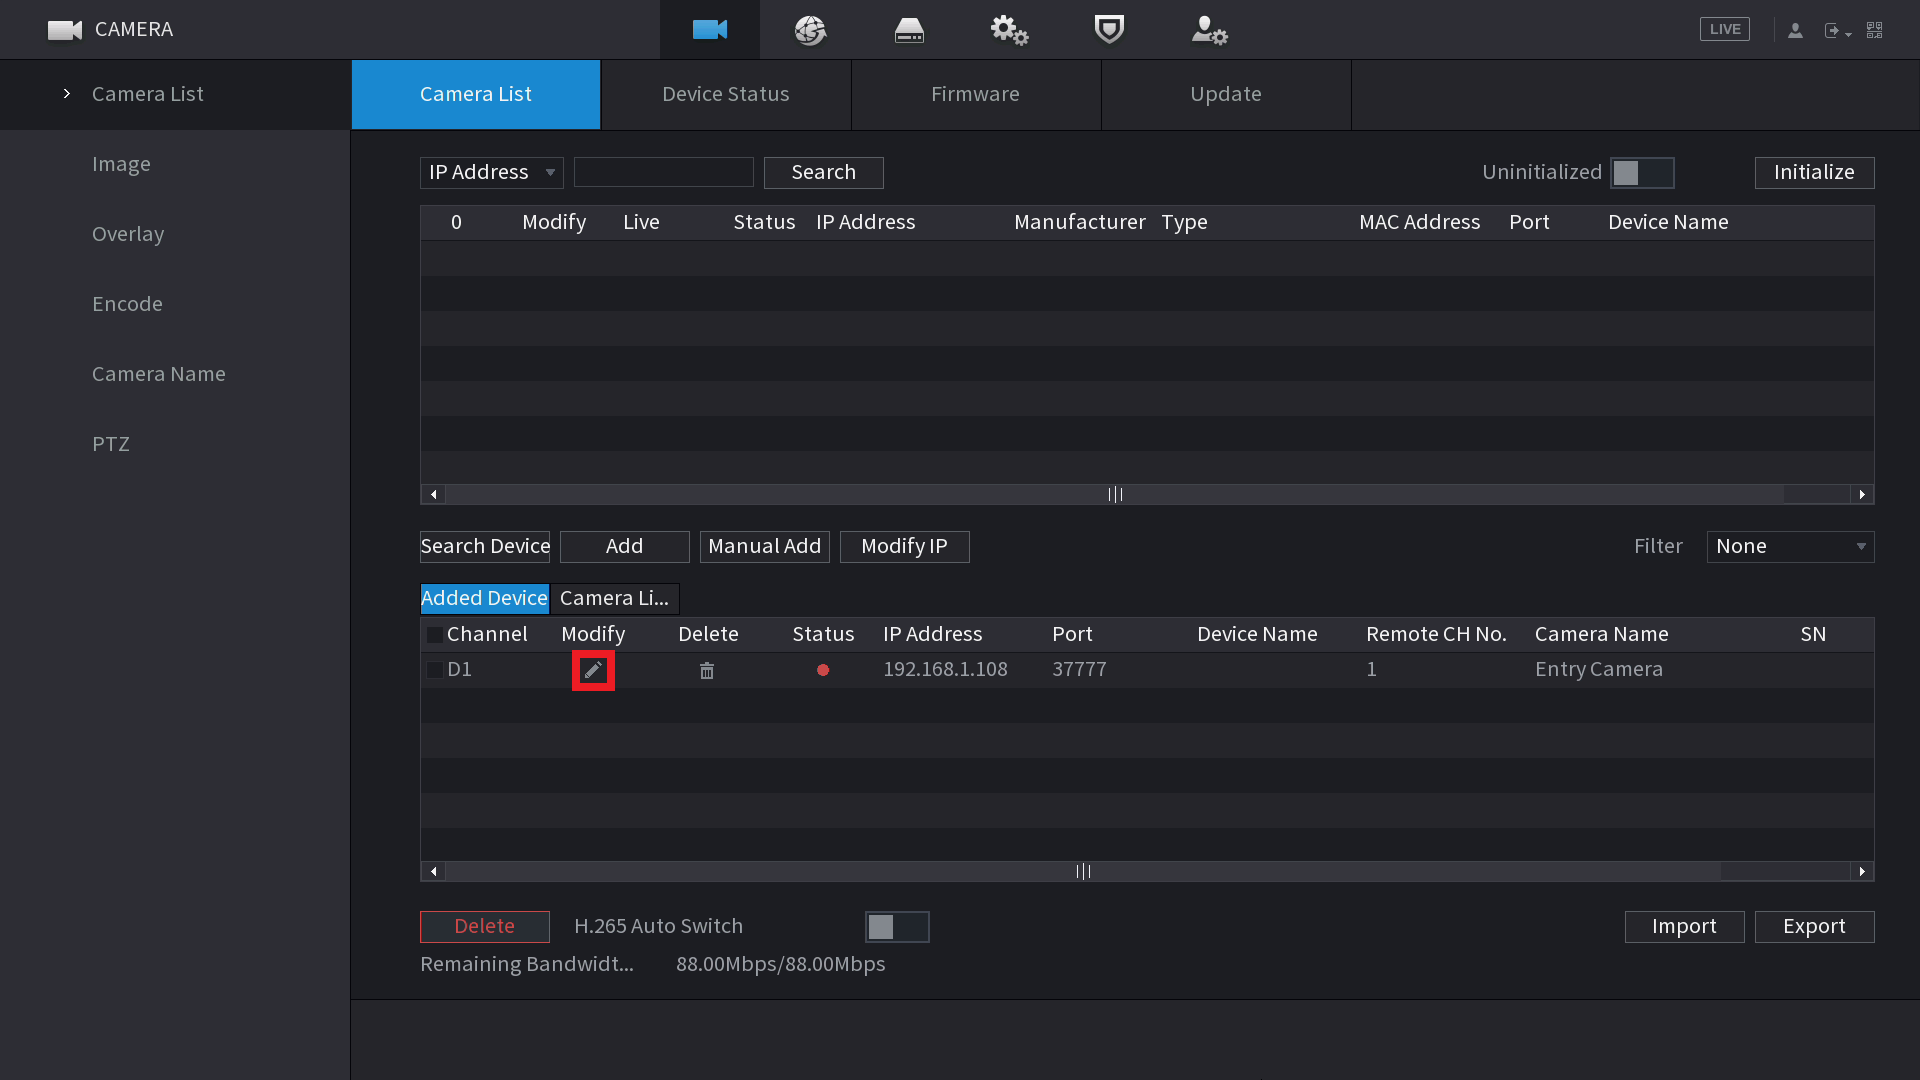
Click on the Modify pencil  of the camera with the error. It's Status will likely be red.
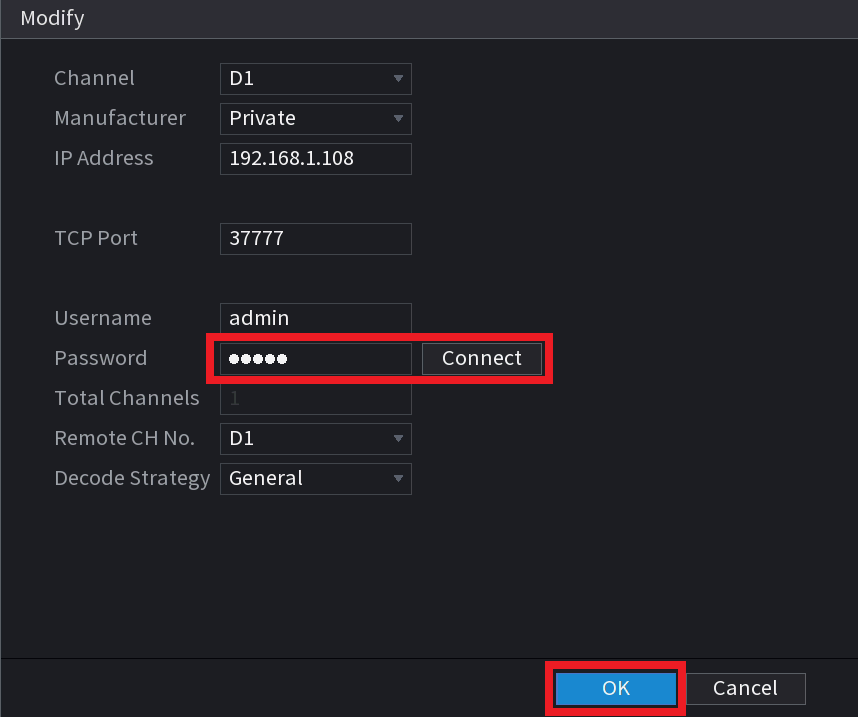
Enter the password of the Camera (You would have set this during the initialisation process in Config Tool) and click Connect, then OK.
If you still see the Account Locked error, you may need to reboot the camera by unplugging it briefly.
(Blue GUI) Update Password in Camera Registration
Open Camera Registration by right clicking and selecting Camera Registration OR by Navigating to Main Menu > Camera > Registration
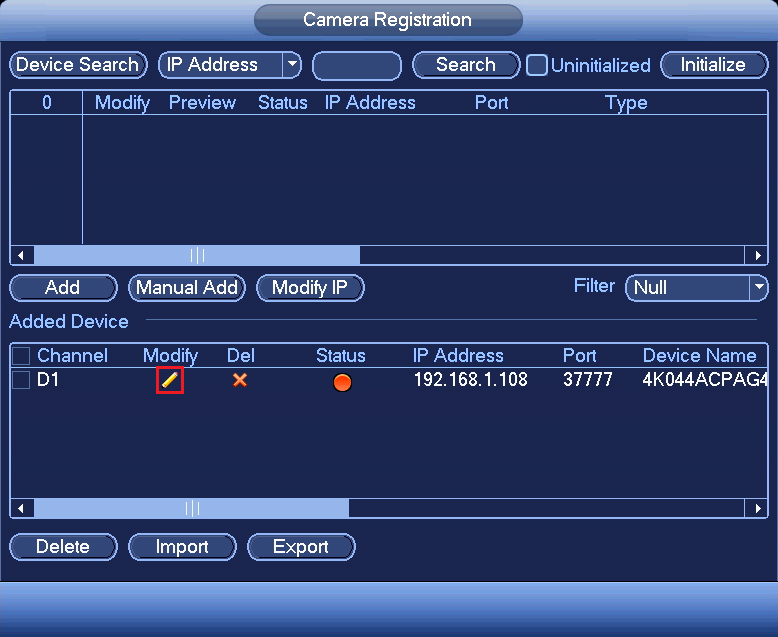
Click on the Modify pencil  of the camera with the error. It's Status will likely be red.
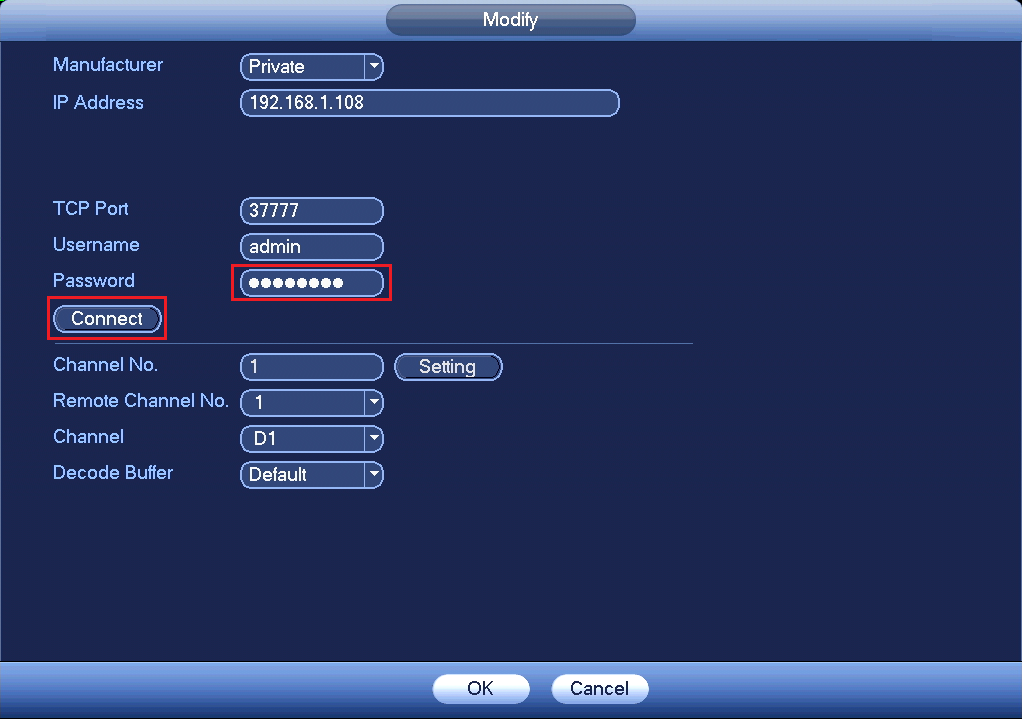
Enter the password of the Camera (You would have set this during the initialisation process in Config Tool) and click Connect, then OK.
If you still see the Account Locked error, you may need to reboot the camera by unplugging it briefly.
If you don't know the password of the Camera you will have to reset it.
Reset IP Camera Guide
Turret Cameras
Reset Button under Flap
AI turret cameras, or turret cameras built post 2021 usually have their reset button located under a flap next to the MicroSD card slot. Press and hold the reset button for 30 seconds while the camera is powered on to reset the camera.

Reset Button on Mainboard
Cameras built pre-2021 require the camera to be opened to expose the mainboard.
Once opened, the button will on the edge of the mainboard (see left image), press and hold this button for 30 seconds while the camera is powered on. In some cases you may need to undo two screws holding the mainboard in place, as the the button may be on the underside or on the second board.
When no button can be found, the reset may be performed by shorting two copper pads (see right image) for 30 seconds using a paperclip while the camera is powered on.

Turret Camera reset locations for specific models
|
VSIPC-4DIRMG You will need to undo some screws to lift up the mainboard to access this reset button. |
 |
|
VSIP1MPVDMINIIRC VSIP3MPVDMINIIRC |
 |
|
VSIP4MPVDMINIIRCA3.6 You will have to undo 2x screws on the metal plate in order to lift up the mainboard to find this reset. |
 |
|
VSIPE4MPVDMINIIRCB2.8 VSIPE6MPVDMINIIRC3.6 VSIPC-6DIRC |
 |
| VSIPE8MPVDIRMG |  |
|
VSIP4MPVDIRME |
 |
Vandal Dome Cameras
To access the reset button on large vandal dome cameras, you will need to first remove the vandal dome (see left image) by removing 3 screws.
The most common style of reset button will be the one in the middle image. Press and hold it for 30 seconds while the camera is powered on to reset it.
If there is no button, there may be copper pads you can short out for 30 seconds to reset the camera (right side of right image). There may also be four silver pads located where the reset button would usually be (left side of right image) you can short out two of vertically or diagonally for 30 seconds to reset the camera. Do not attempt to short any other part of the camera as you may cause irreversible damage.

Large Vandal Dome Cameras
To access the reset button on large vandal dome cameras, you will need to first remove the vandal dome (see left image) by removing 3 screws.
The reset button will then be located toward the edge of the housing, recessed into the plastic (see right image). Press and hold the button for 30 seconds to reset the camera.
Vandal Dome Camera reset locations for specific models
|
VSIPC-4DIRD Short out the two silver pins (E.g. by using a paperclip) for 30 seconds while the camera is powered on. OR short out the two copper coloured holes (Right side of image) |
 |
|
VSIPC-4DIRMD Press and hold the button for 30 seconds OR if no button exists, short out 2 silver pins diagonally with wire for 30 seconds |
 |
| VSIP4MPVDIRMD |  |
| VSIP3MPVDIRM2.8-12 |  |
|
VSIP3MPVDMINIIR (Mainboard may be black instead of green) VSIP4MPVDMINIIR |
 |
| VSIP2MPVDIRLV2 VSIPE8MPVDIRM |
 |
Bullet Cameras
Most Bullet Cameras will have a flap that will reveal the MicroSD card slot and reset button. Press and hold the button for 30 seconds to reset the camera. Some cameras will not have a reset button, instead they will have two copper pads (see right image) which you can short out with a paperclip for 30 seconds to reset the camera.

Bullet cameras without a flap
For cameras without a reset flap you will need to remove the front of the camera (e.g by unscrewing it for cylindrical cameras) to access the reset button. Some cameras will have a physical button to press and hold for 30 seconds to reset it. Other cameras (see right image) will have copper pads to short out for 30 seconds to reset the camera.

Bullet Camera reset locations for specific models
|
VSIPC-4BIRS Short out two of the copper pads (E.g by using a paperclip) for 30 seconds while the camera is powered on. |
 |
|
VSIP3MPFBIRM2.8-12 Short out two of the copper pads (E.g by using a paperclip) for 30 seconds while the camera is powered on. |
 |
|
VSIP4MPFBIRM2.8-12 Short out two of the silver pins (E.g by using a paperclip) for 30 seconds while the camera is powered on. |
 |
|
VSIP4MPFBIRMD VSIP8MPFBIRMD |
 |
| VSIPE2MPFBMINIIR |
 |
PTZ Cameras
PTZ Camera reset locations for specific models
|
VIP2MPPTZIRW You will have to undo 4 screws on the back to get access. |
 |
|
VSIP2MPPTZCV3 Remove the outer shell and round lens cover (4 x Phillips screws) Press & hold button for 30 seconds. |
 |
|
VSIP2MPPTZV3 There will be two screws on opposite sides that you will need to remove to take the plastic housing off. Then Press & hold the gold button for 30 seconds to reset the camera. |
 
|
Fisheye Cameras
To reset a fisheye camera, you will need to undo three screws on the base of the camera to expose the mainboard.
Once the Mainboard is exposed, press and hold the reset button for 30 seconds to reset the camera.

You will then need to initialise and add the camera to the recorder again.
Camera Initialisation Guide
Initialising a camera is the process of setting a password on it. All cameras manufactured post 2018 need to be initialised before use.
If connected to the POE Port of an NVR manufacturer post 2018 this process should happen automatically.
Option 1 - Initialisation via the Web Interface
The Camera will need to be connected to the Laptop via an Ethernet cable.
You can access the Web Interface by entering the camera's IP address into the address bar of Internet Explorer. 192.168.1.108 is the default IP of our cameras.
You may need to change the IP address of your computer to reach it.
How to change the IP Address of your computer
Windows 10
- Open Settings.
- Select Network & Internet.

- Select Status, then Change Adapter Options.

-
Right-click the network adapter you want to change the IP address for, and select Properties.

-
Double-click the Internet Protocol Version 4 (TCP/IPv4) item.

- Click Use the following IP address and enter an IP address in the same range as the device you are trying to access. (E.g when trying to access 192.168.1.108 use a IP address in the 192.168.1.x range.) Note: This cannot be the same as the device you are trying to connect to or any other device on the same network. Save your changes on both windows.

- Type the IP address of the device you are trying to access into the address bar of your web browser.
- Once finished configuring the device, change the adapter settings back to normal by following steps 1-5 and clicking Obtain an IP address automatically.
Windows 11
1. In the Windows search bar at the bottom of the page, type Control Panel and press enter.
2. Select Network and Internet.

3. Select Network and Sharing Centre.

4. Select the link for Connections in the network that you want to change the IP address for.

5. Select Properties.

6. Double-click the Internet Protocol Version 4 (TCP/IPv4) item.

7. Click Use the following IP address and enter an IP address in the same range as the device you are trying to access. (E.g when trying to access 192.168.1.108 use a IP address in the 192.168.1.x range.) Note: This cannot be the same as the device you are trying to connect to or any other device on the same network. Save your changes on both windows.

8. Type the IP address of the device you are trying to access into the address bar of your web browser.
9. Once finished configuring the device, change the adapter settings back to normal by following steps 1-6 and clicking Obtain an IP address automatically.
See the video below for a visual guide of the steps above:
Shortcut
1. In the Windows search bar at the bottom of the page, type Ncpa.cpl and press enter.
2. Right-click the network adapter you want to change the IP address for, and select Properties.
3. Select the Internet Protocol Version 4 (TCP/IPv4) item.

4. Click Use the following IP address and enter an IP address in the same range as the device you are trying to access. (E.g when trying to access 192.168.1.108 use a IP address in the 192.168.1.x range.) Note: This cannot be the same as the device you are trying to connect to or any other device on the same network. Save your changes on both windows.

5. Type the IP address of the device you are trying to access into the address bar of your web browser.
6. Once finished configuring the device, change the adapter settings back to normal by following steps 1-3 and clicking Obtain an IP address automatically.
See the video below for a visual guide of the steps above:
Delete
How to initialise a camera via Web interface 5.0
- Select your Region and Language.
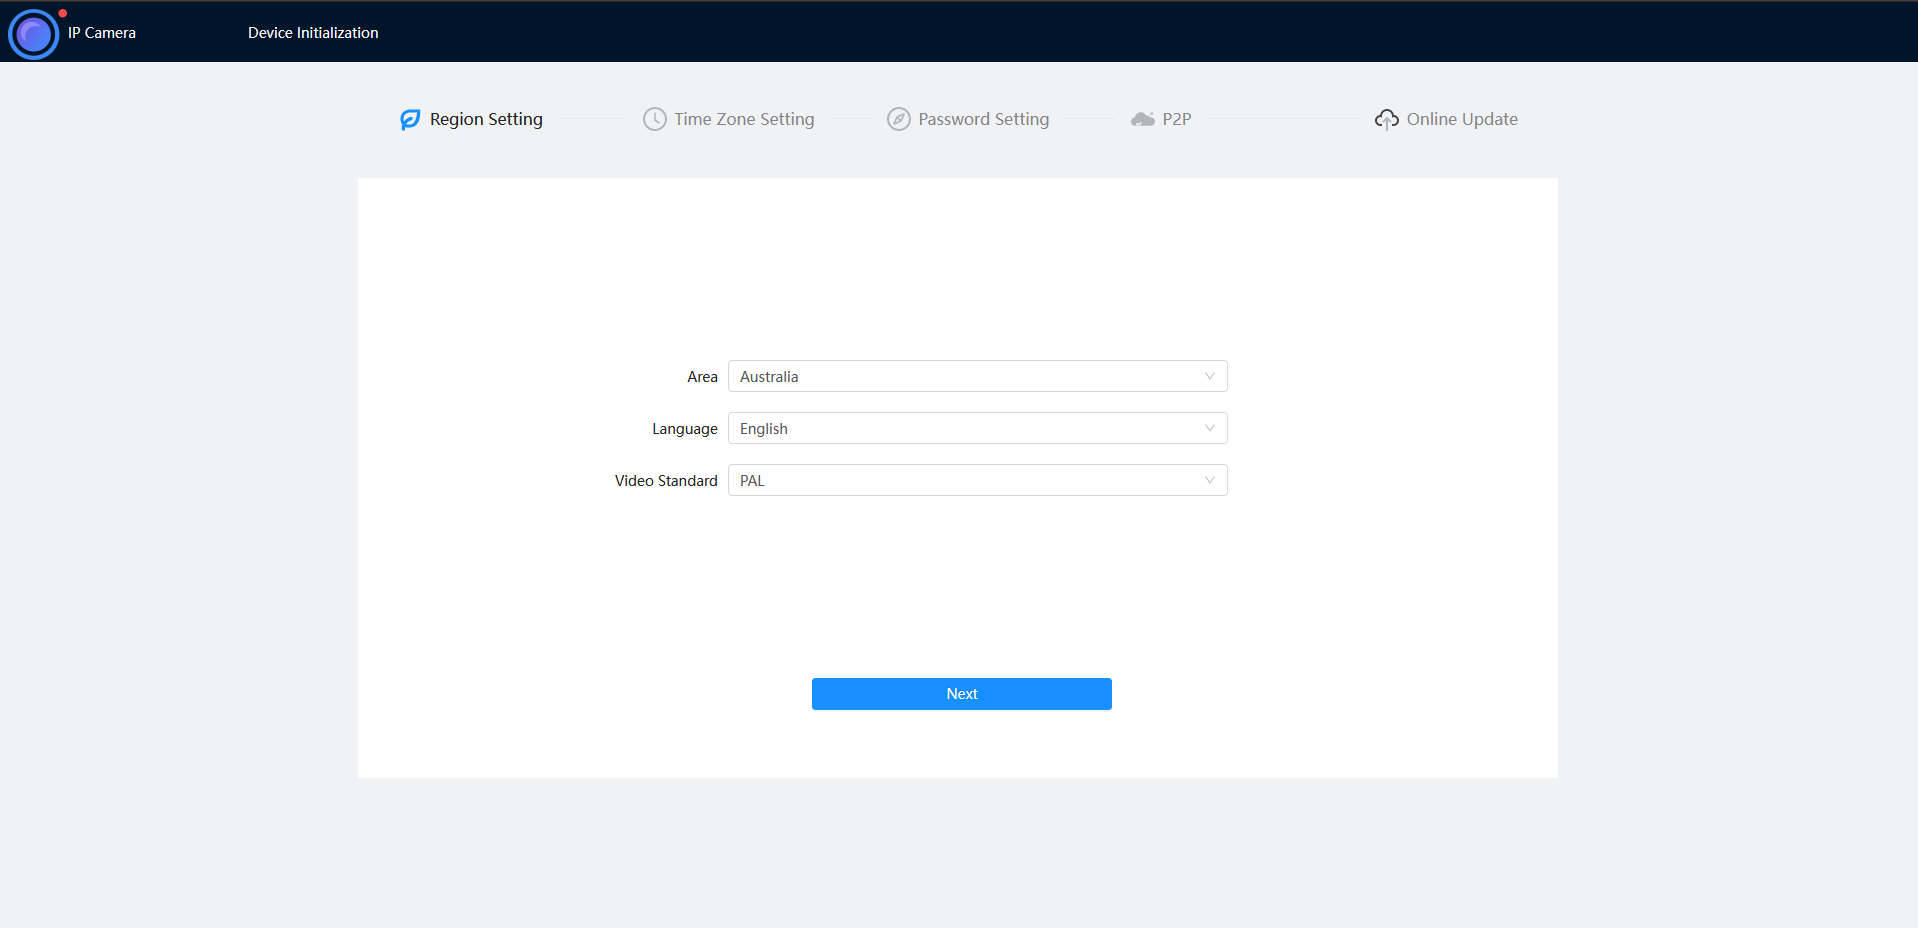
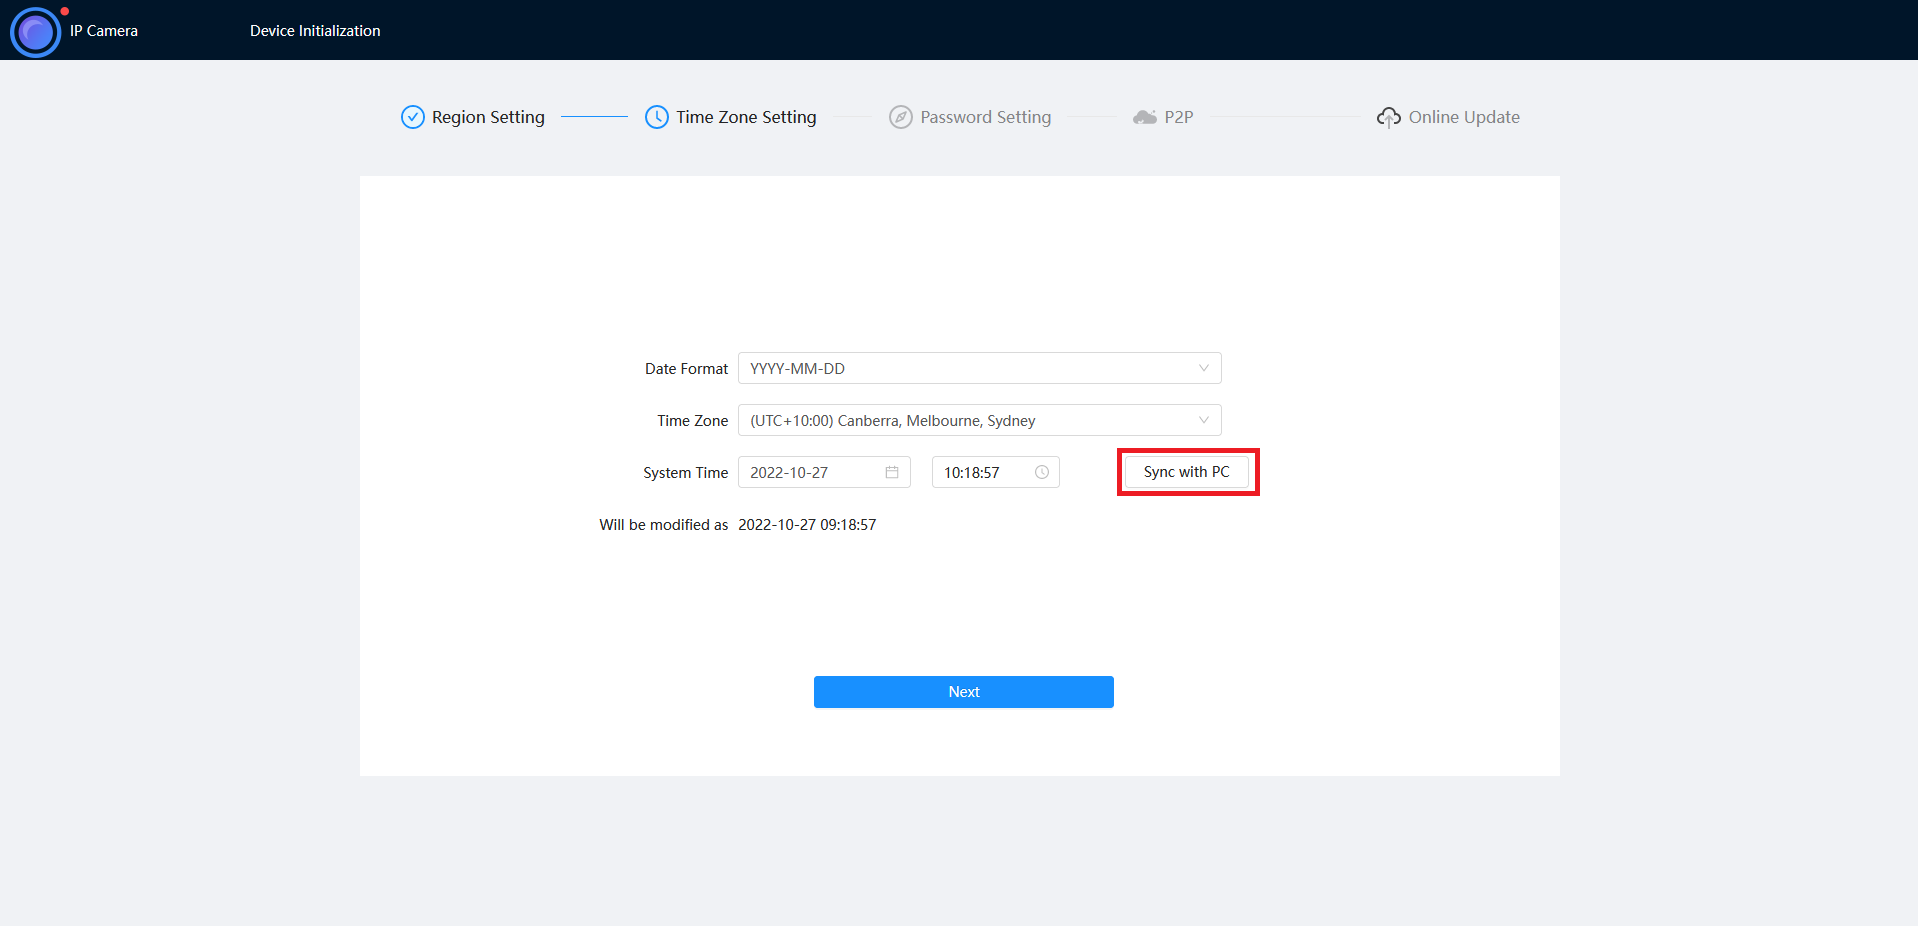
- Select your Time Zone, then press Sync with PC to sync your cameras time with the PCs time.
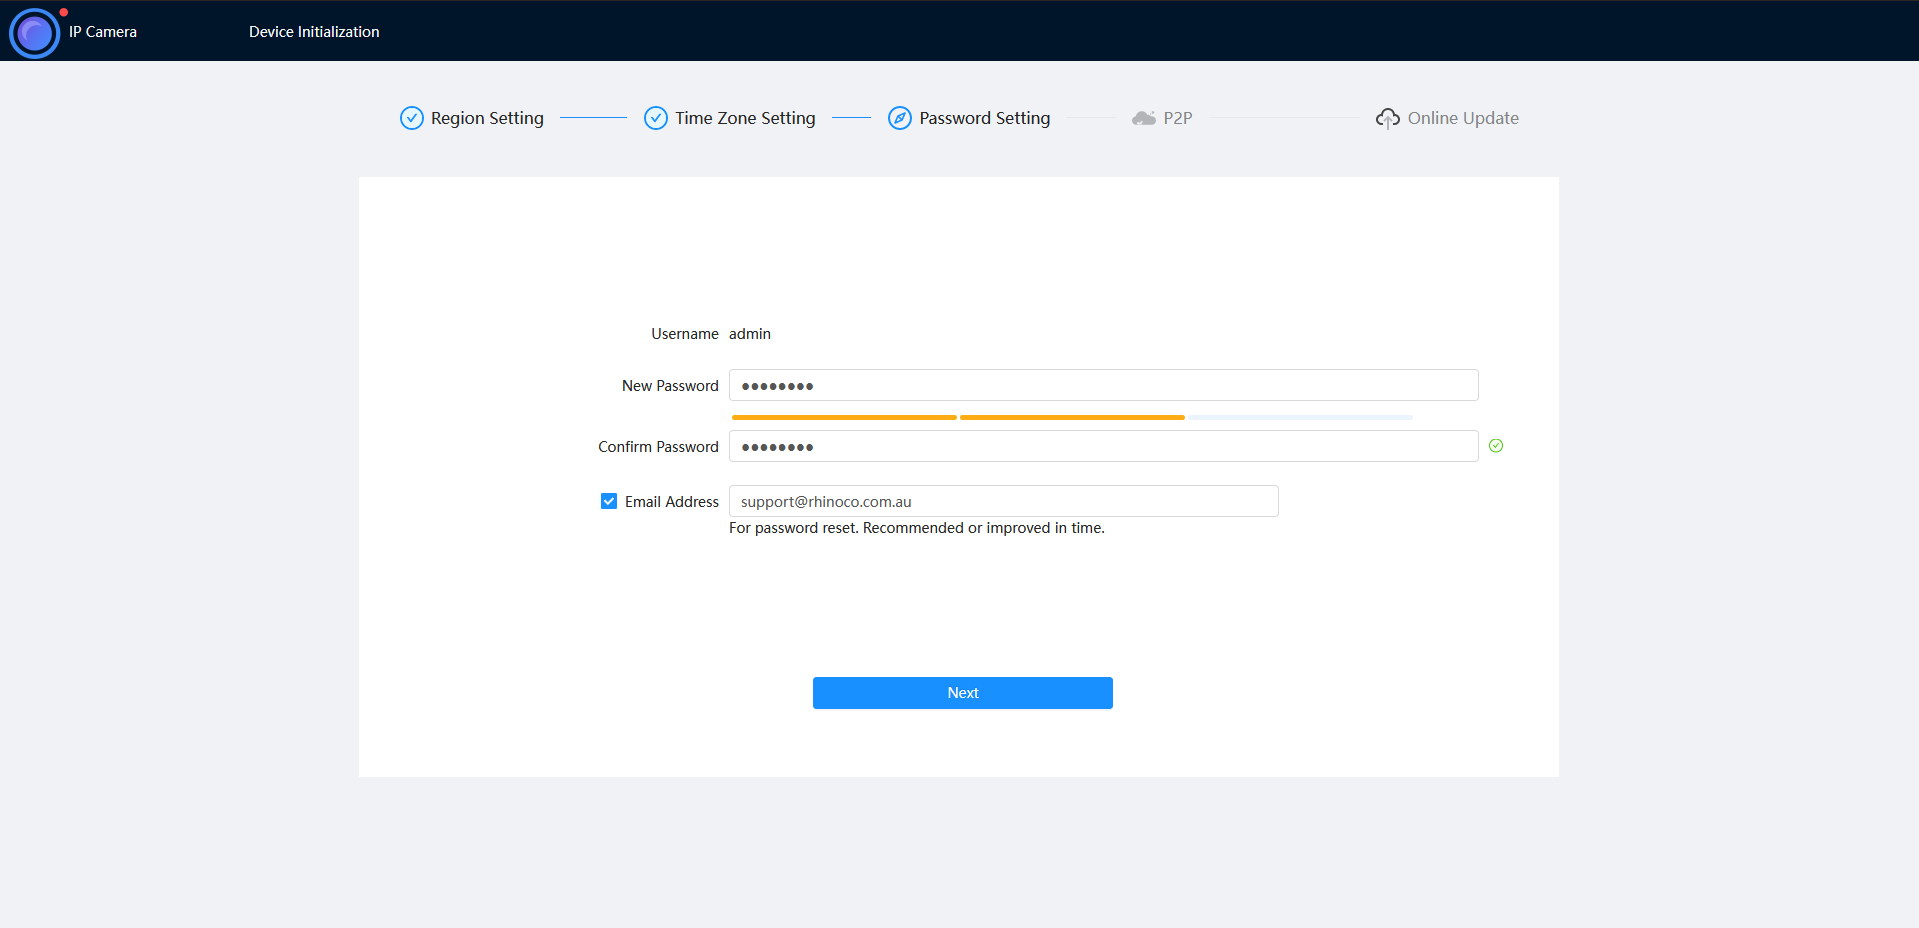
- Enter a password and recovery email.
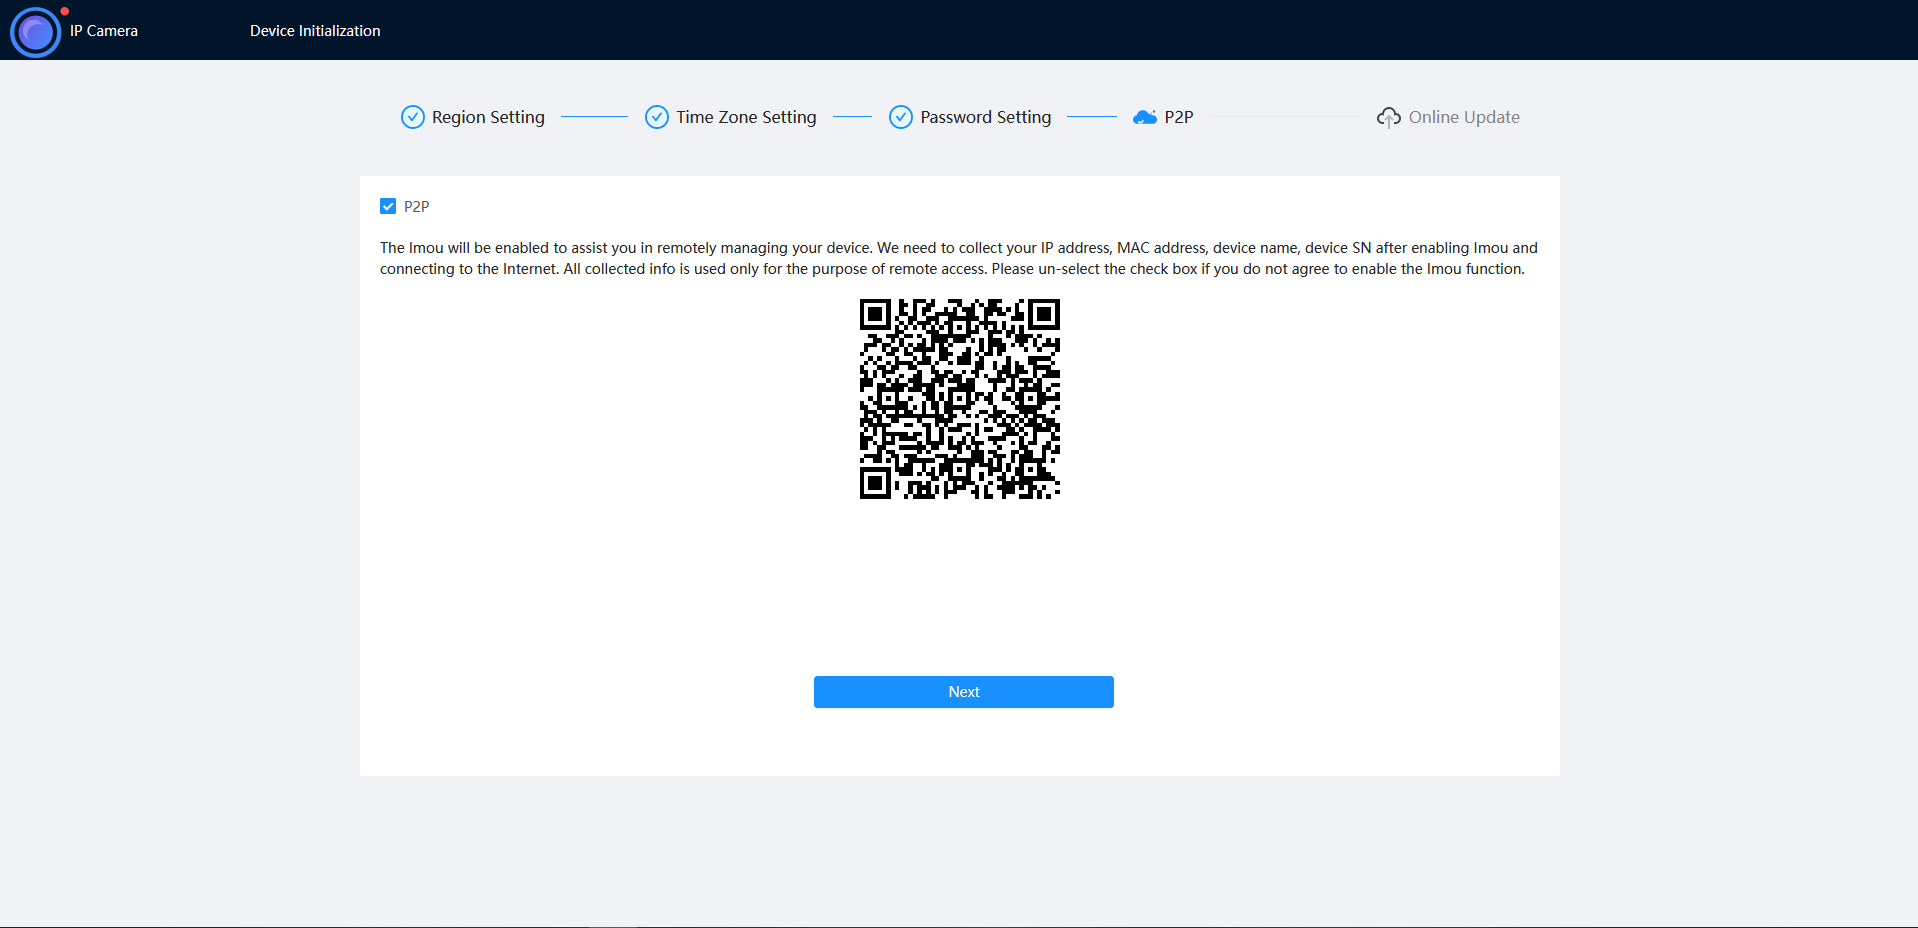
- Ensure P2P is enabled, then press Next.
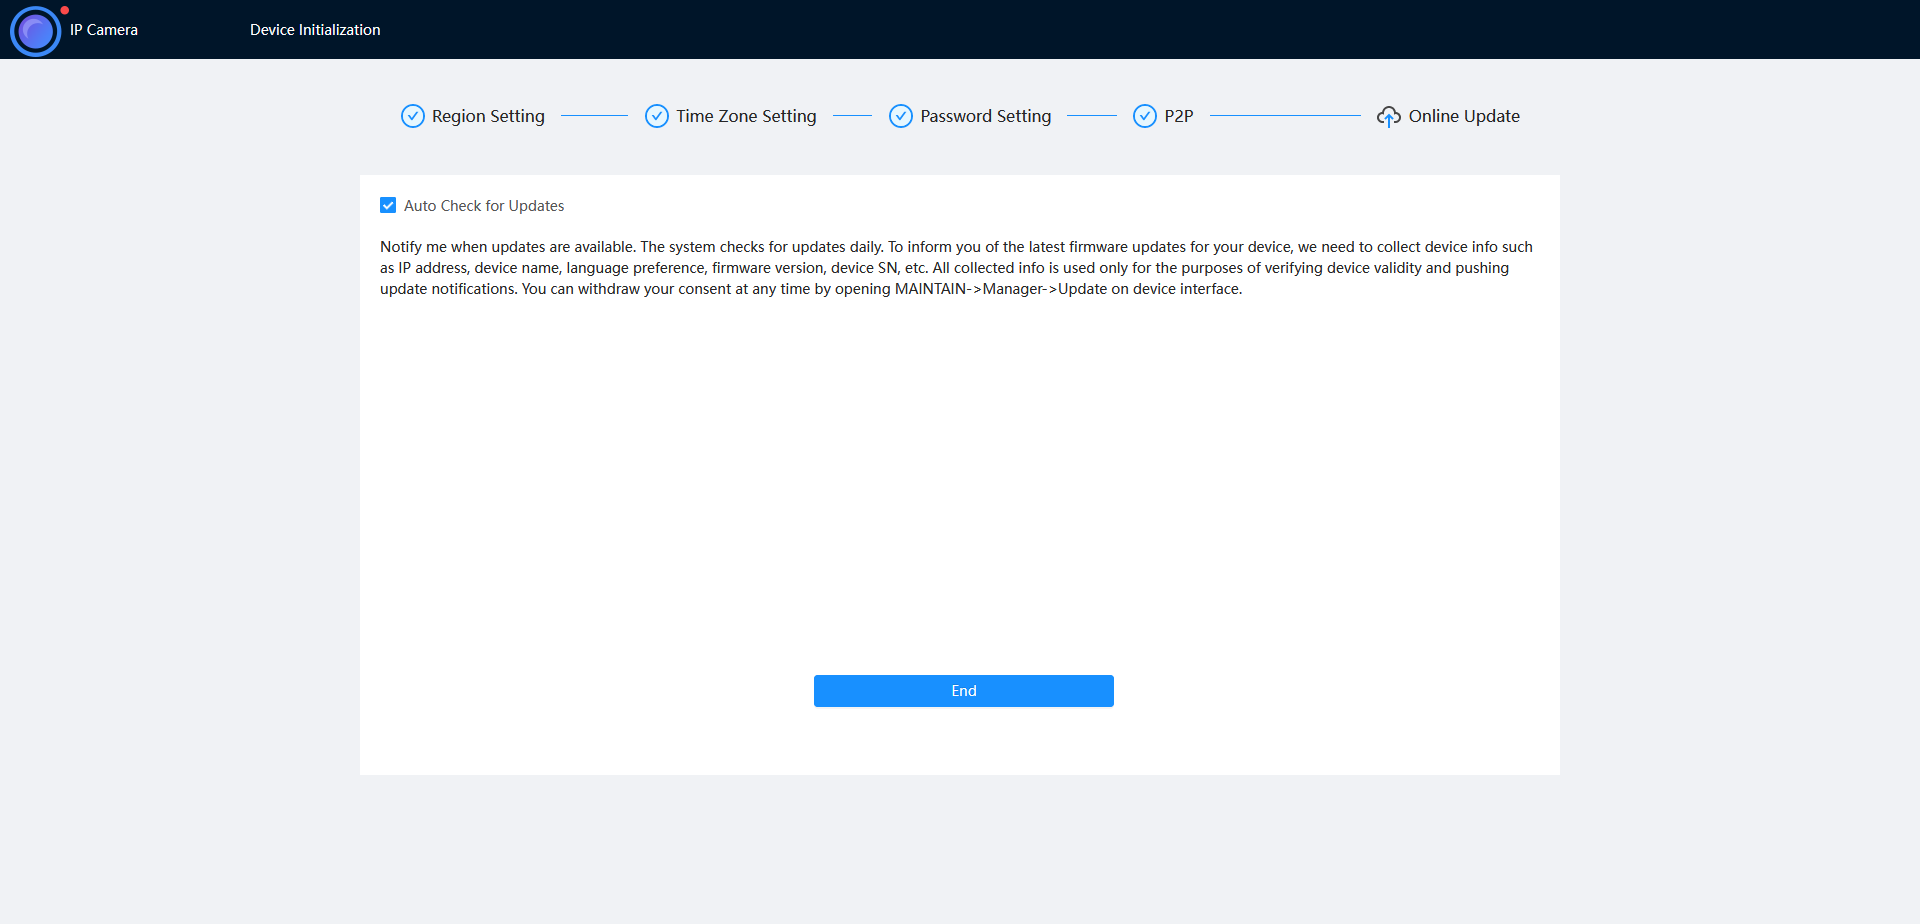
- Click End.
How to initialise a camera via Web interface 3.0
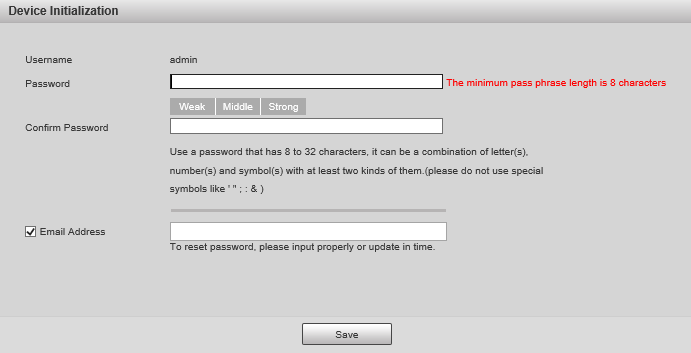
Initialize the camera by entering a new password (It will need to be at least 8 characters long), then click Save.
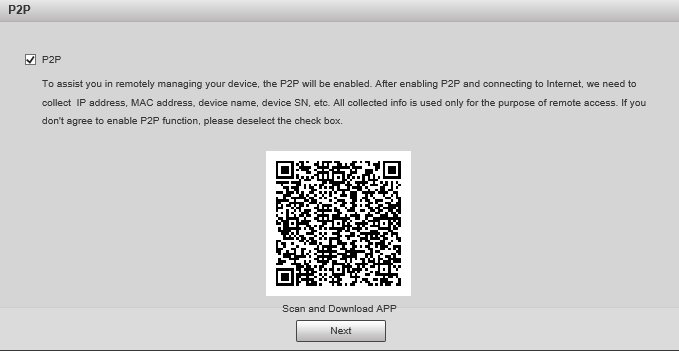
Ensure P2P is enabled and click Next
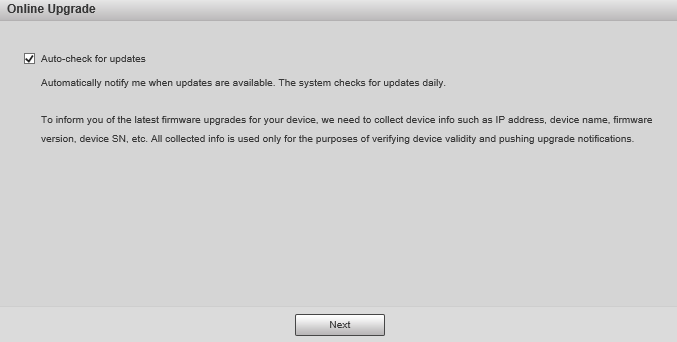
Click Next.
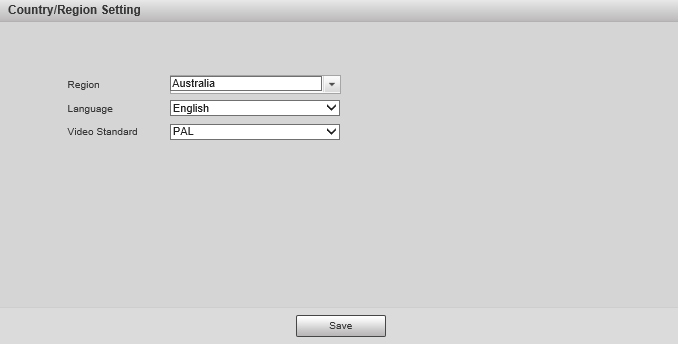
If prompted, select a region and click Save
DeleteOption 2 - Initialisation via the Config Tool
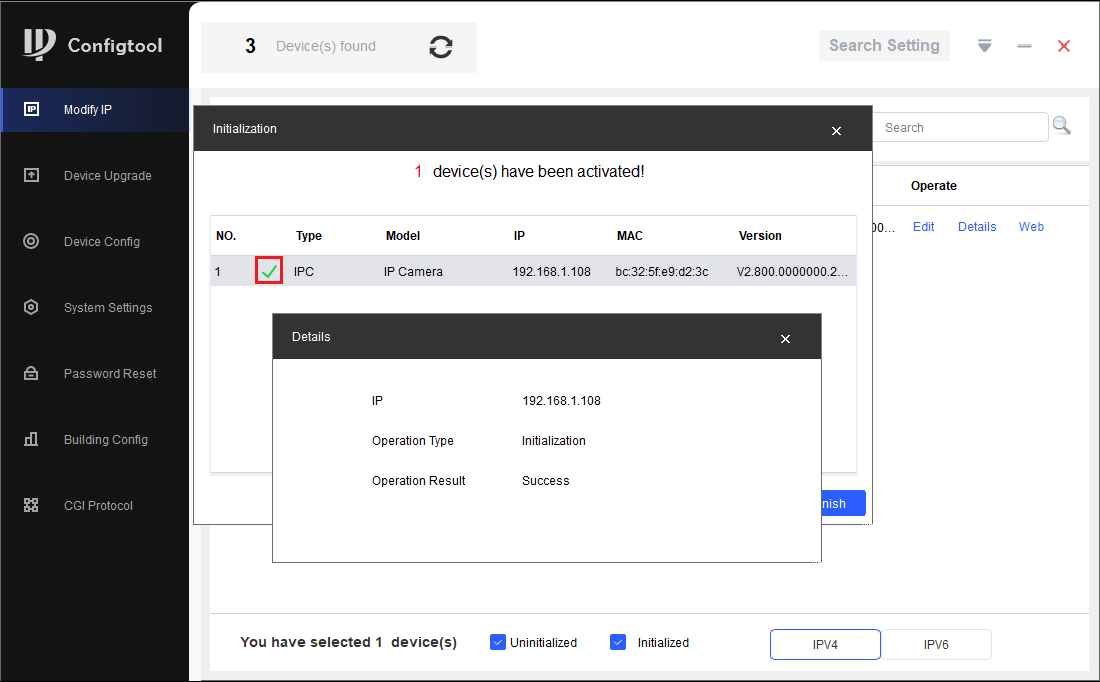
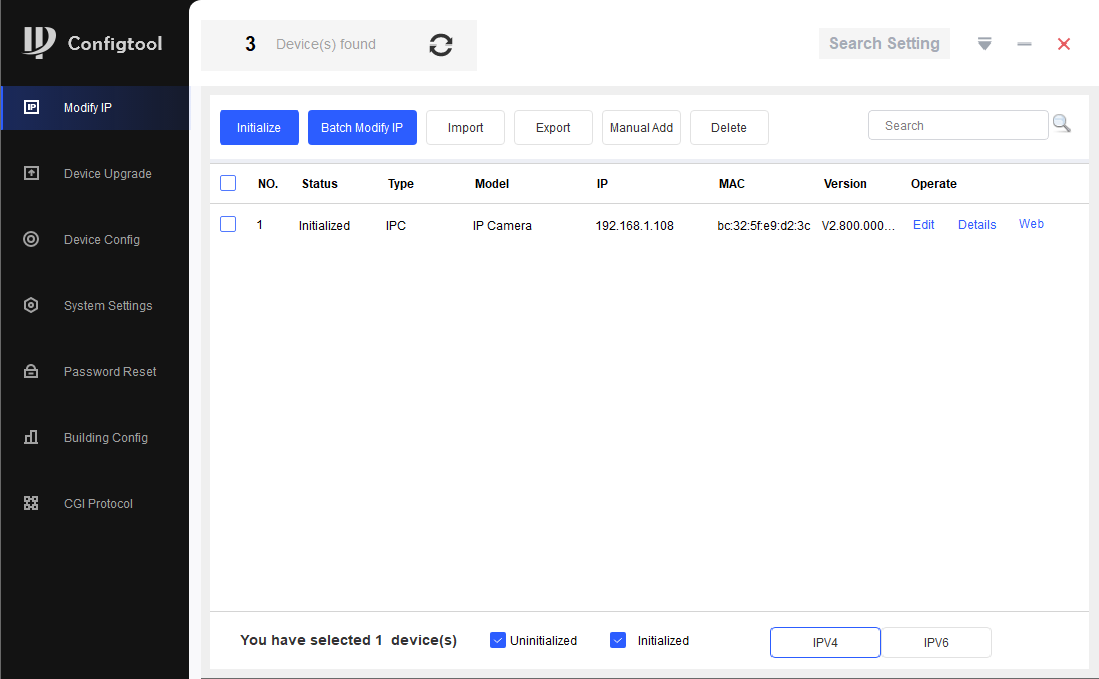
The initialisation process can also be performed using the latest version of our Config Tool - Please see the images below showing how this is done. To speed up the process the Config Tool also allows you to initialise multiple cameras at once.
- Download and open Config Tool.
- Put a check in the box
 next to the device you would like to Initialise, and select the Initialize button.
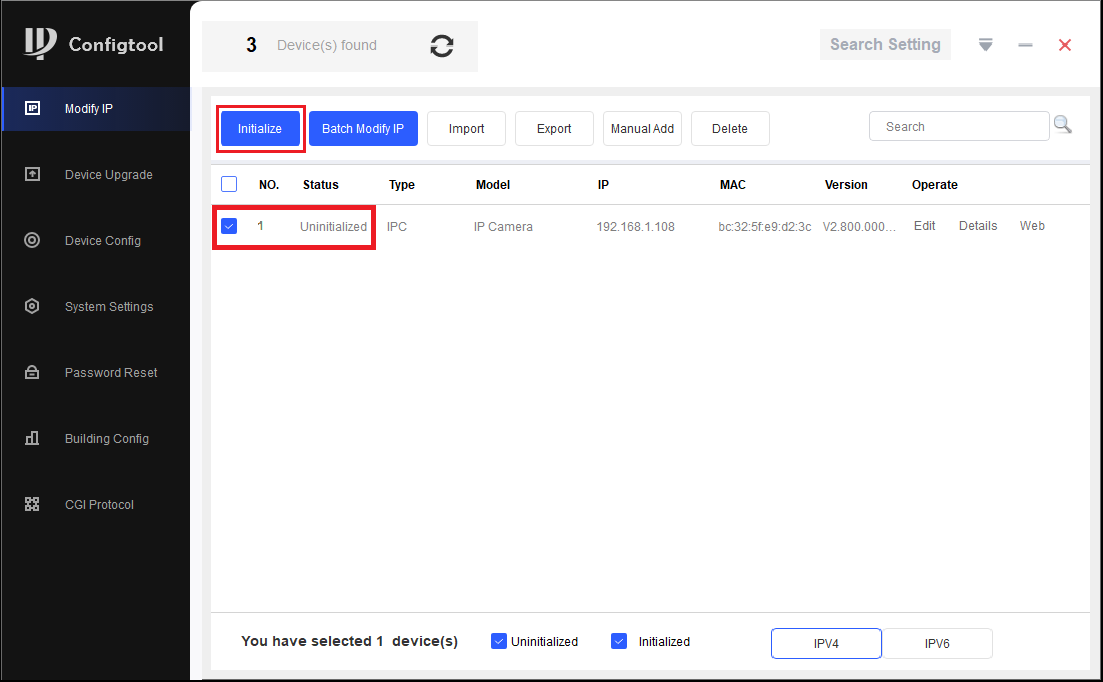
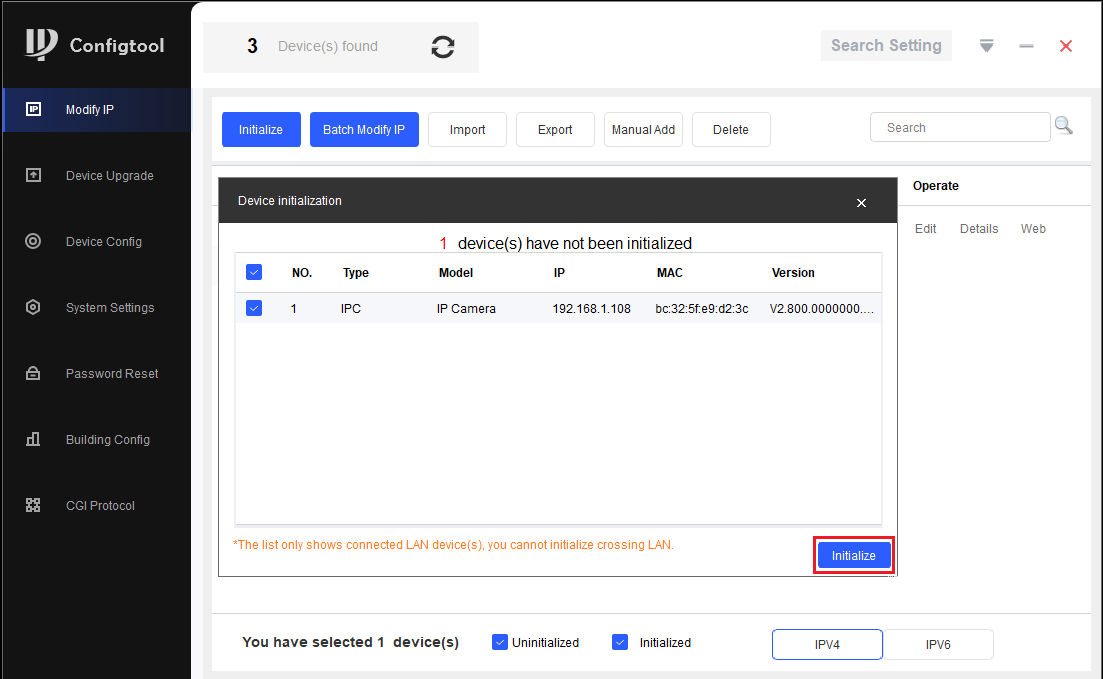
- Select the Initialize button.
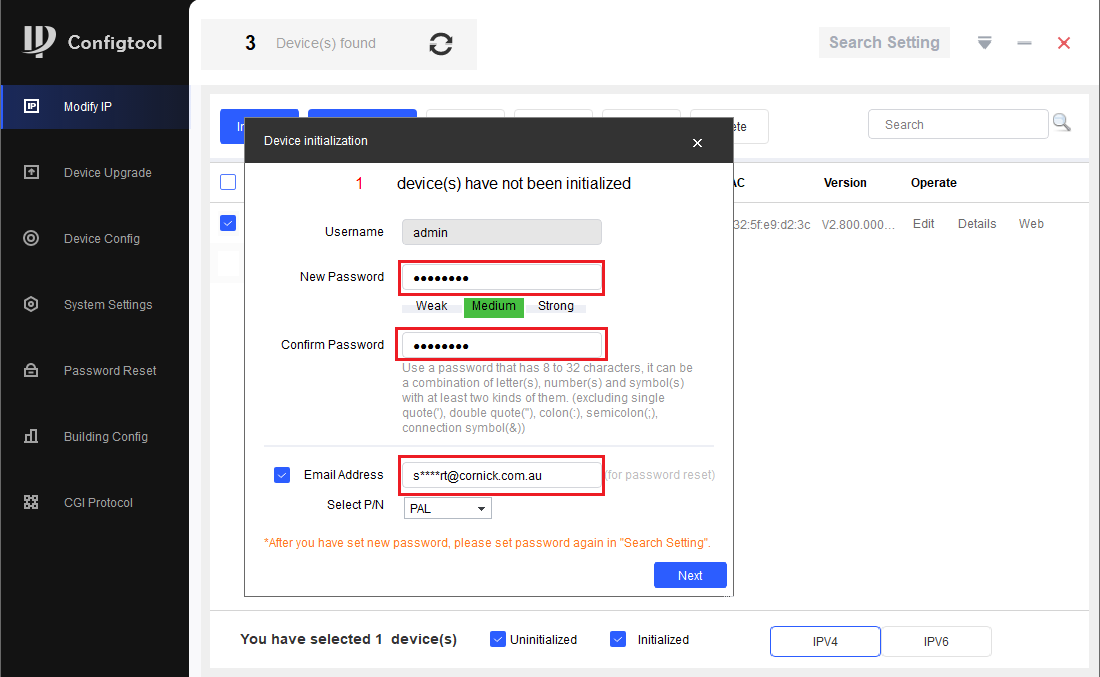
- Enter a password, that is at least 8 characters, and is a mix of letters and numbers. Enter an email address, this will be used if the password is ever forgotten. Select Next.
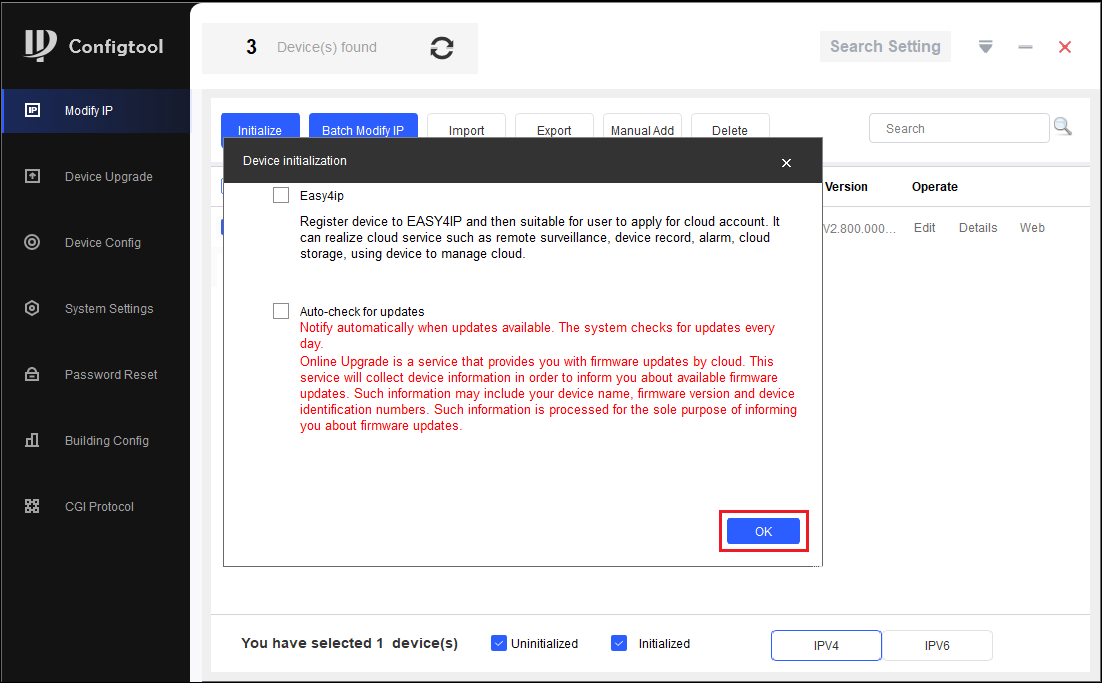
- Depending on the installation requirements, you can check or uncheck the boxes for Easy4IP (P2P Remote Access) and Auto-check for updates. Select OK.
- If the status shows as Initialized, the process was completed successfully.
Camera plugged into back of an NVR
If you know the password of the camera, you will just need to update the password of the camera in Camera Registration.
(Black GUI) Update Password in Camera Registration
Open Camera Registration by right clicking and selecting Main Menu > Camera > Camera List

Click on the Modify pencil of the camera with the error. It's Status will likely be red.

Enter the password of the Camera (You would have set this during the initialisation process in Config Tool) and click "Connect", then "OK".
If you still see the Account Locked error, you may need to reboot the camera by unplugging it briefly.
(Blue GUI) Update Password in Camera Registration
Open Camera Registration by right clicking and selecting "Camera Registration" OR by Navigating to Main Menu > Camera > Registration

Click on the Modify pencil of the camera with the error. It's Status will likely be red.

Enter the password of the Camera (You would have set this during the initialisation process in Config Tool) and click "Connect", then "OK".
If you still see the Account Locked error, you may need to reboot the camera by unplugging it briefly.
If you don't know the password of the camera, you will need to reset it.
Reset IP Camera Guide
Turret Cameras
Reset Button under Flap
AI turret cameras, or turret cameras built post 2021 usually have their reset button located under a flap next to the MicroSD card slot. Press and hold the reset button for 30 seconds while the camera is powered on to reset the camera.

Reset Button on Mainboard
Cameras built pre-2021 require the camera to be opened to expose the mainboard.
Once opened, the button will on the edge of the mainboard (see left image), press and hold this button for 30 seconds while the camera is powered on. In some cases you may need to undo two screws holding the mainboard in place, as the the button may be on the underside or on the second board.
When no button can be found, the reset may be performed by shorting two copper pads (see right image) for 30 seconds using a paperclip while the camera is powered on.

Turret Camera reset locations for specific models
|
VSIPC-4DIRMG You will need to undo some screws to lift up the mainboard to access this reset button. |
 |
|
VSIP1MPVDMINIIRC VSIP3MPVDMINIIRC |
 |
|
VSIP4MPVDMINIIRCA3.6 You will have to undo 2x screws on the metal plate in order to lift up the mainboard to find this reset. |
 |
|
VSIPE4MPVDMINIIRCB2.8 VSIPE6MPVDMINIIRC3.6 VSIPC-6DIRC |
 |
| VSIPE8MPVDIRMG |  |
|
VSIP4MPVDIRME |
 |
Vandal Dome Cameras
To access the reset button on large vandal dome cameras, you will need to first remove the vandal dome (see left image) by removing 3 screws.
The most common style of reset button will be the one in the middle image. Press and hold it for 30 seconds while the camera is powered on to reset it.
If there is no button, there may be copper pads you can short out for 30 seconds to reset the camera (right side of right image). There may also be four silver pads located where the reset button would usually be (left side of right image) you can short out two of vertically or diagonally for 30 seconds to reset the camera. Do not attempt to short any other part of the camera as you may cause irreversible damage.

Large Vandal Dome Cameras
To access the reset button on large vandal dome cameras, you will need to first remove the vandal dome (see left image) by removing 3 screws.
The reset button will then be located toward the edge of the housing, recessed into the plastic (see right image). Press and hold the button for 30 seconds to reset the camera.
Vandal Dome Camera reset locations for specific models
|
VSIPC-4DIRD Short out the two silver pins (E.g. by using a paperclip) for 30 seconds while the camera is powered on. OR short out the two copper coloured holes (Right side of image) |
 |
|
VSIPC-4DIRMD Press and hold the button for 30 seconds OR if no button exists, short out 2 silver pins diagonally with wire for 30 seconds |
 |
| VSIP4MPVDIRMD |  |
| VSIP3MPVDIRM2.8-12 |  |
|
VSIP3MPVDMINIIR (Mainboard may be black instead of green) VSIP4MPVDMINIIR |
 |
| VSIP2MPVDIRLV2 VSIPE8MPVDIRM |
 |
Bullet Cameras
Most Bullet Cameras will have a flap that will reveal the MicroSD card slot and reset button. Press and hold the button for 30 seconds to reset the camera. Some cameras will not have a reset button, instead they will have two copper pads (see right image) which you can short out with a paperclip for 30 seconds to reset the camera.

Bullet cameras without a flap
For cameras without a reset flap you will need to remove the front of the camera (e.g by unscrewing it for cylindrical cameras) to access the reset button. Some cameras will have a physical button to press and hold for 30 seconds to reset it. Other cameras (see right image) will have copper pads to short out for 30 seconds to reset the camera.

Bullet Camera reset locations for specific models
|
VSIPC-4BIRS Short out two of the copper pads (E.g by using a paperclip) for 30 seconds while the camera is powered on. |
 |
|
VSIP3MPFBIRM2.8-12 Short out two of the copper pads (E.g by using a paperclip) for 30 seconds while the camera is powered on. |
 |
|
VSIP4MPFBIRM2.8-12 Short out two of the silver pins (E.g by using a paperclip) for 30 seconds while the camera is powered on. |
 |
|
VSIP4MPFBIRMD VSIP8MPFBIRMD |
 |
| VSIPE2MPFBMINIIR |
 |
PTZ Cameras
PTZ Camera reset locations for specific models
|
VIP2MPPTZIRW You will have to undo 4 screws on the back to get access. |
 |
|
VSIP2MPPTZCV3 Remove the outer shell and round lens cover (4 x Phillips screws) Press & hold button for 30 seconds. |
 |
|
VSIP2MPPTZV3 There will be two screws on opposite sides that you will need to remove to take the plastic housing off. Then Press & hold the gold button for 30 seconds to reset the camera. |
 
|
Fisheye Cameras
To reset a fisheye camera, you will need to undo three screws on the base of the camera to expose the mainboard.
Once the Mainboard is exposed, press and hold the reset button for 30 seconds to reset the camera.

Assuming The cameras have been set to ‘Out of the box’ Factory Default state or a ‘Password compatible’ state.
and
Assuming the cameras have been connected as seen above.
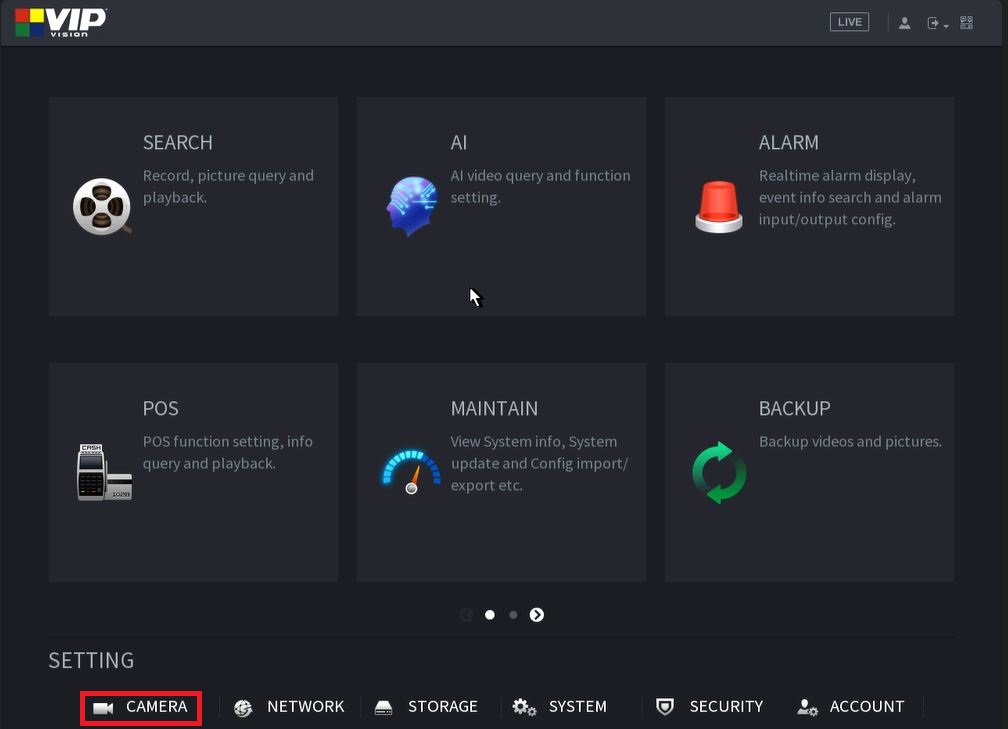
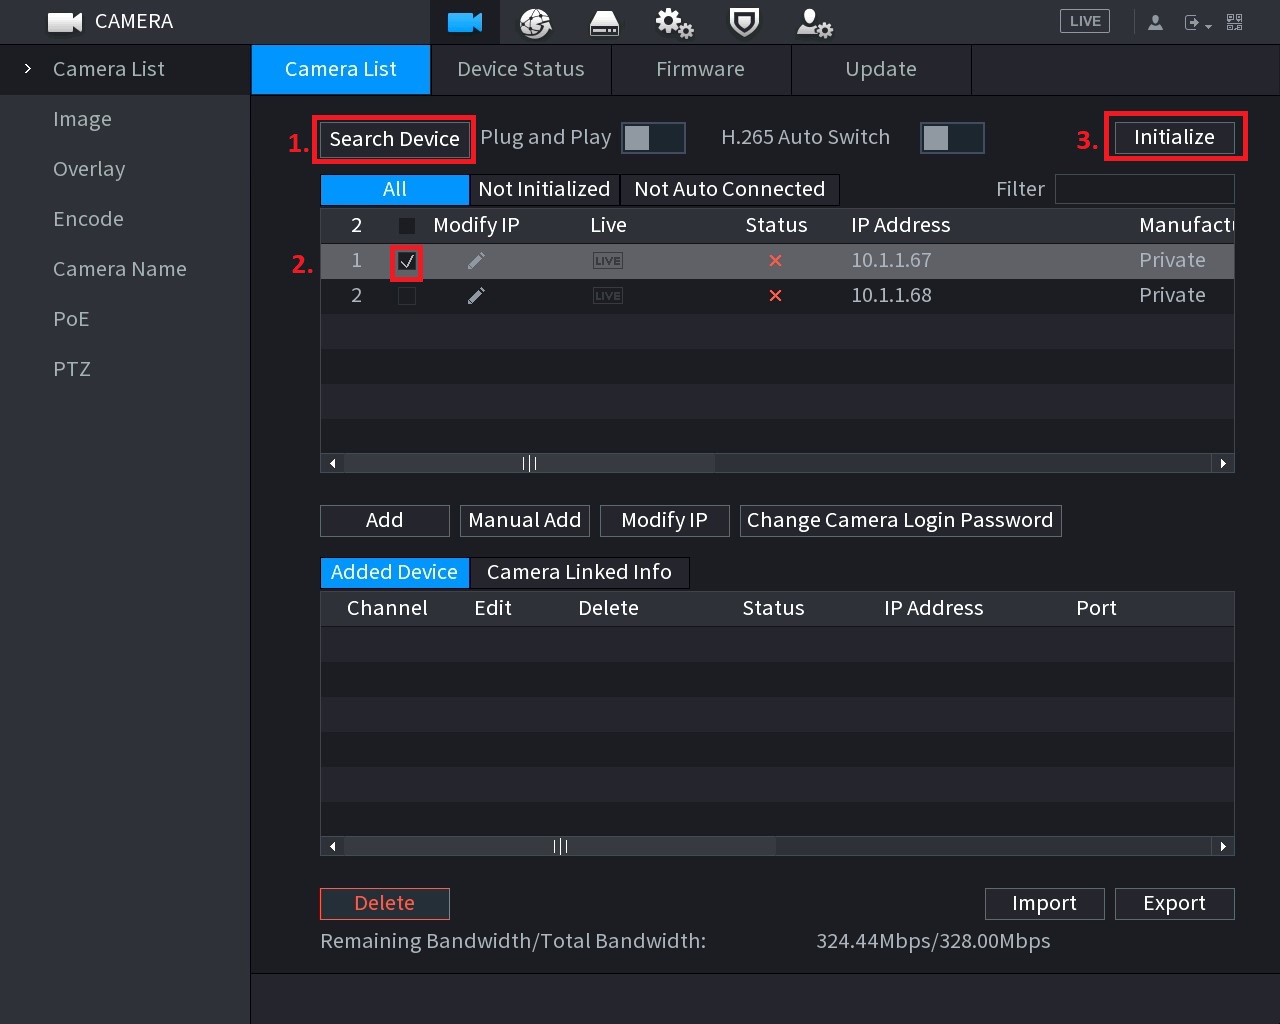
Initializing Camera
 |
|
 |
|
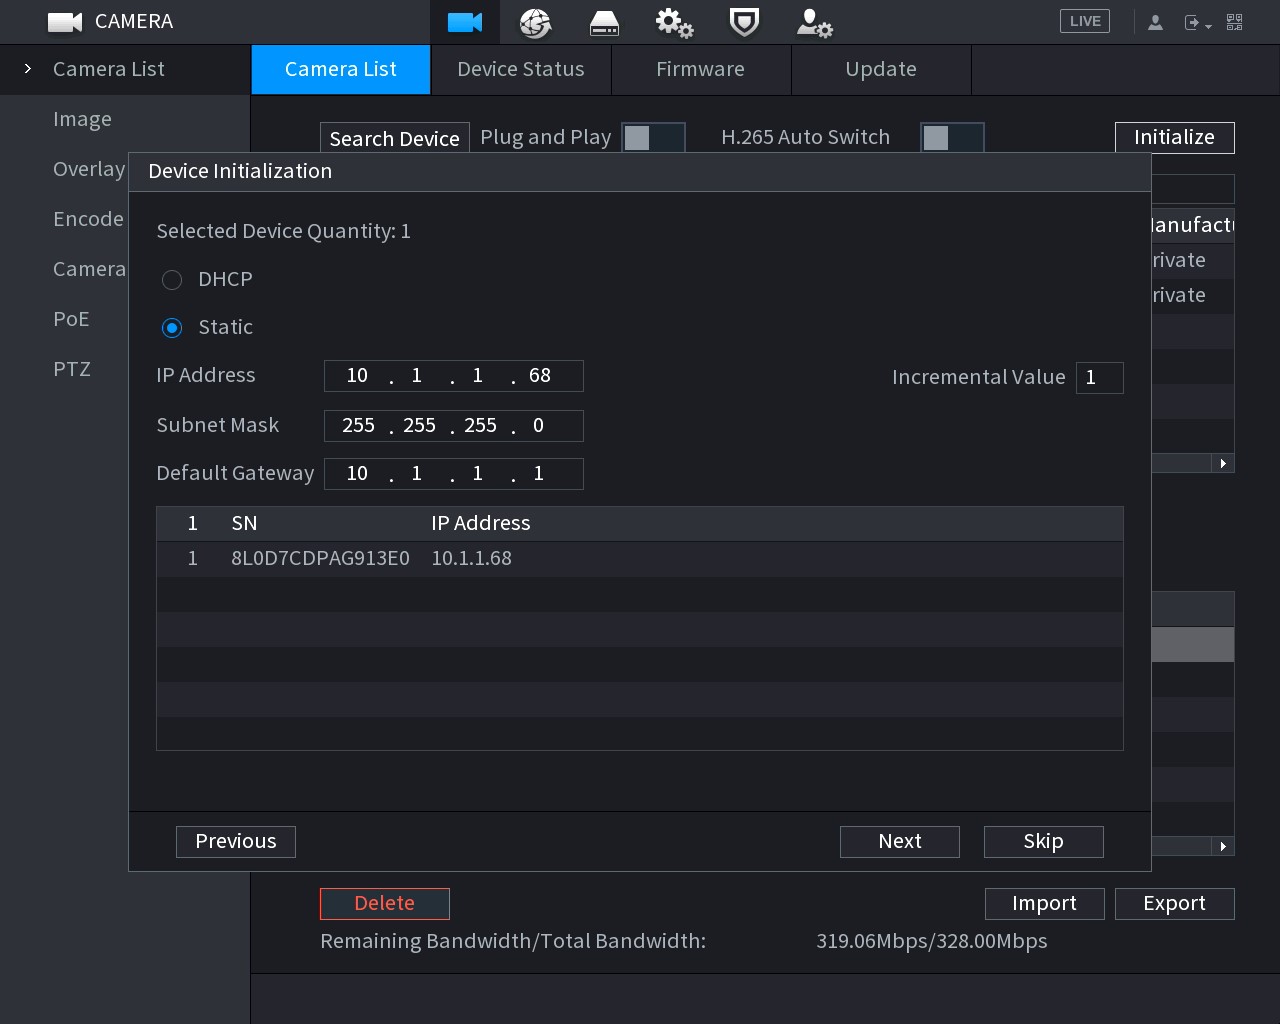 |
Initialize IP Address |
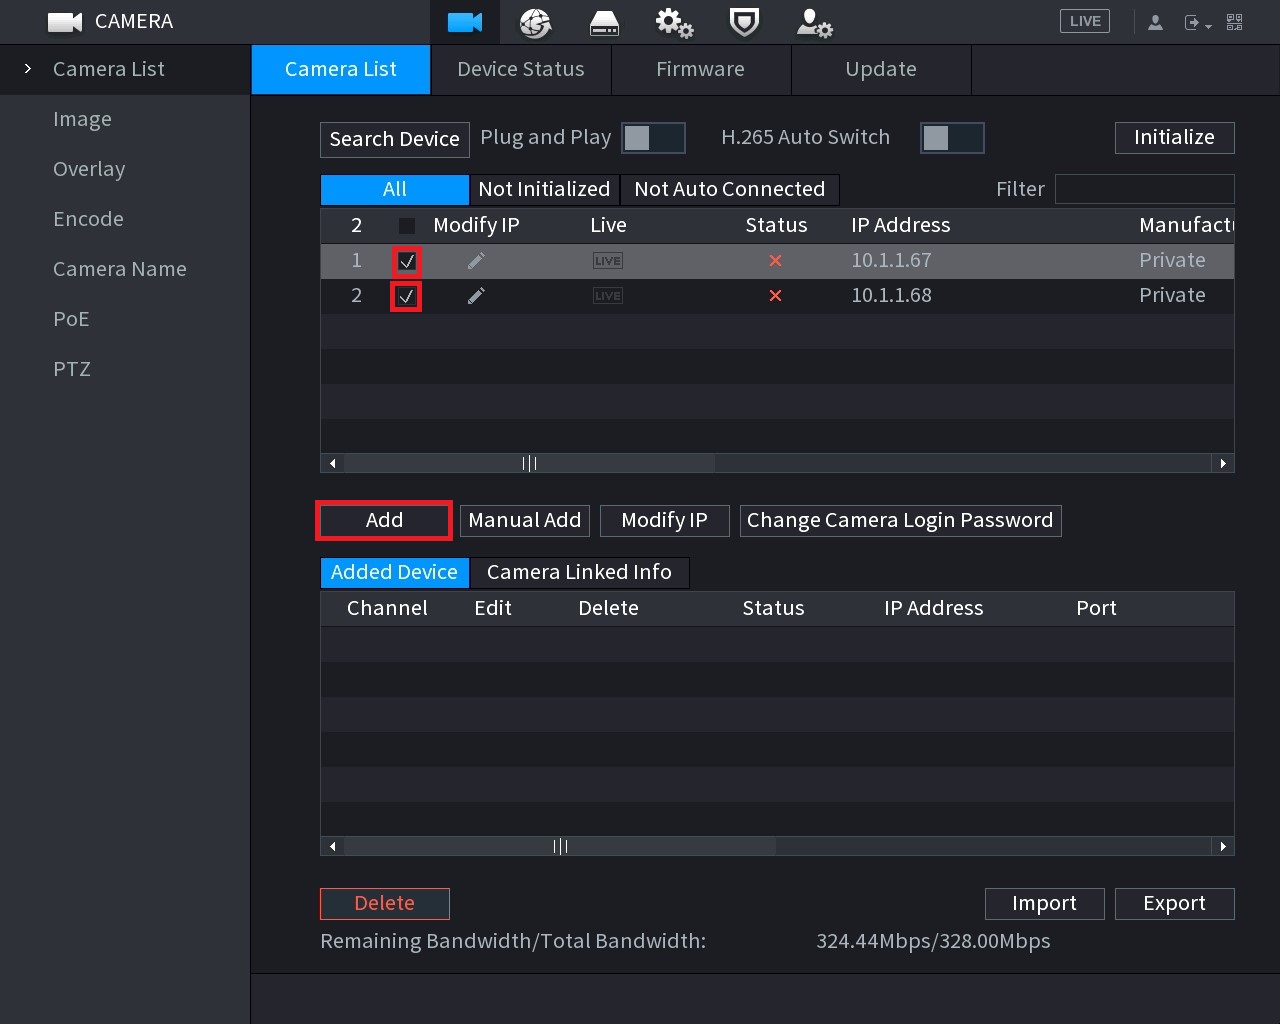 |
Add Camera |
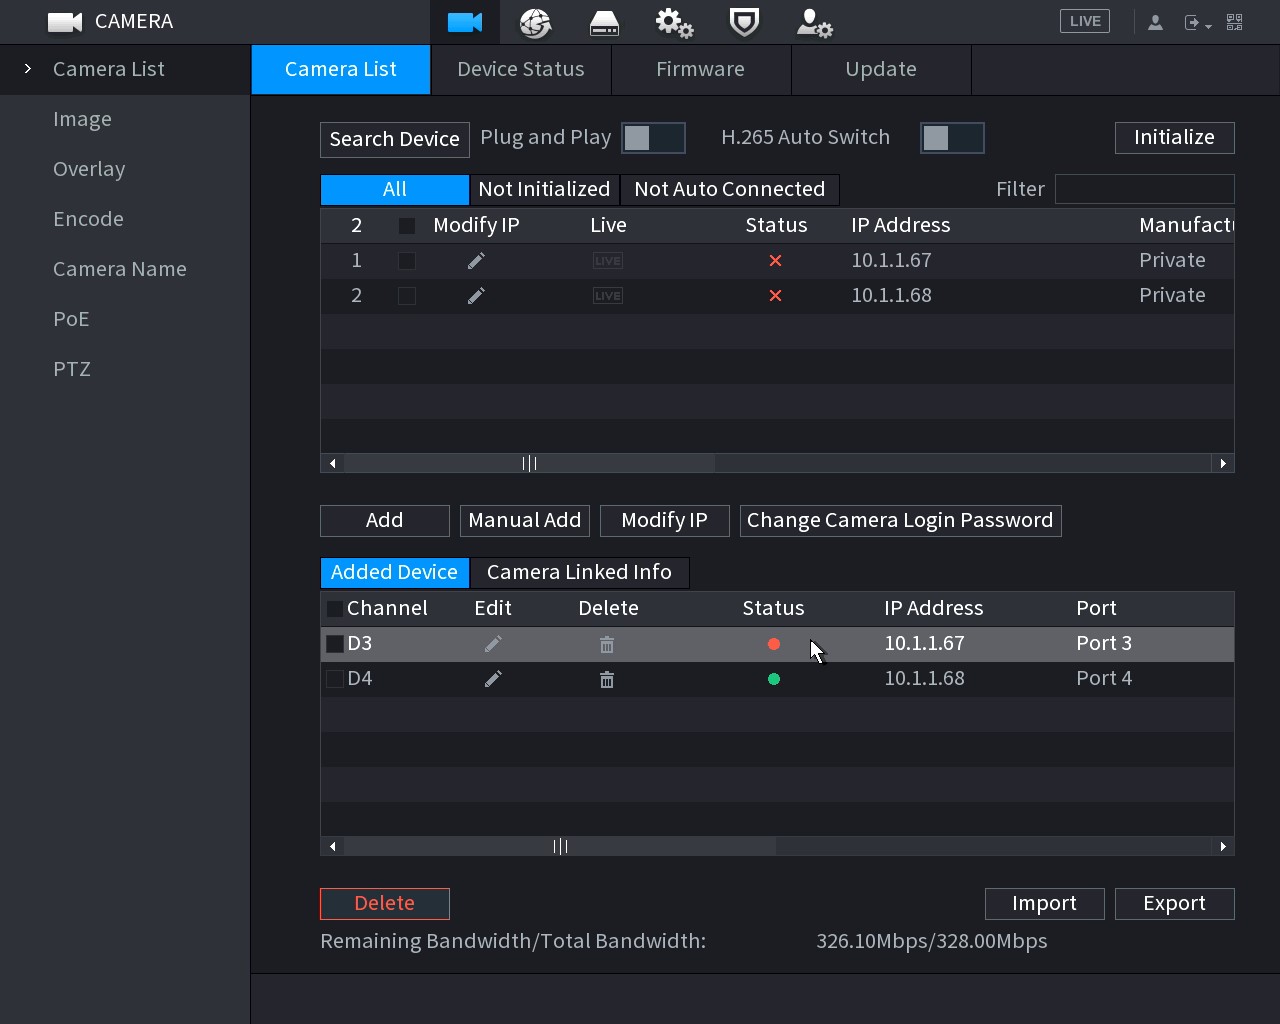 |
Wait for Status to change Red → Green |
Manually Adding Camera
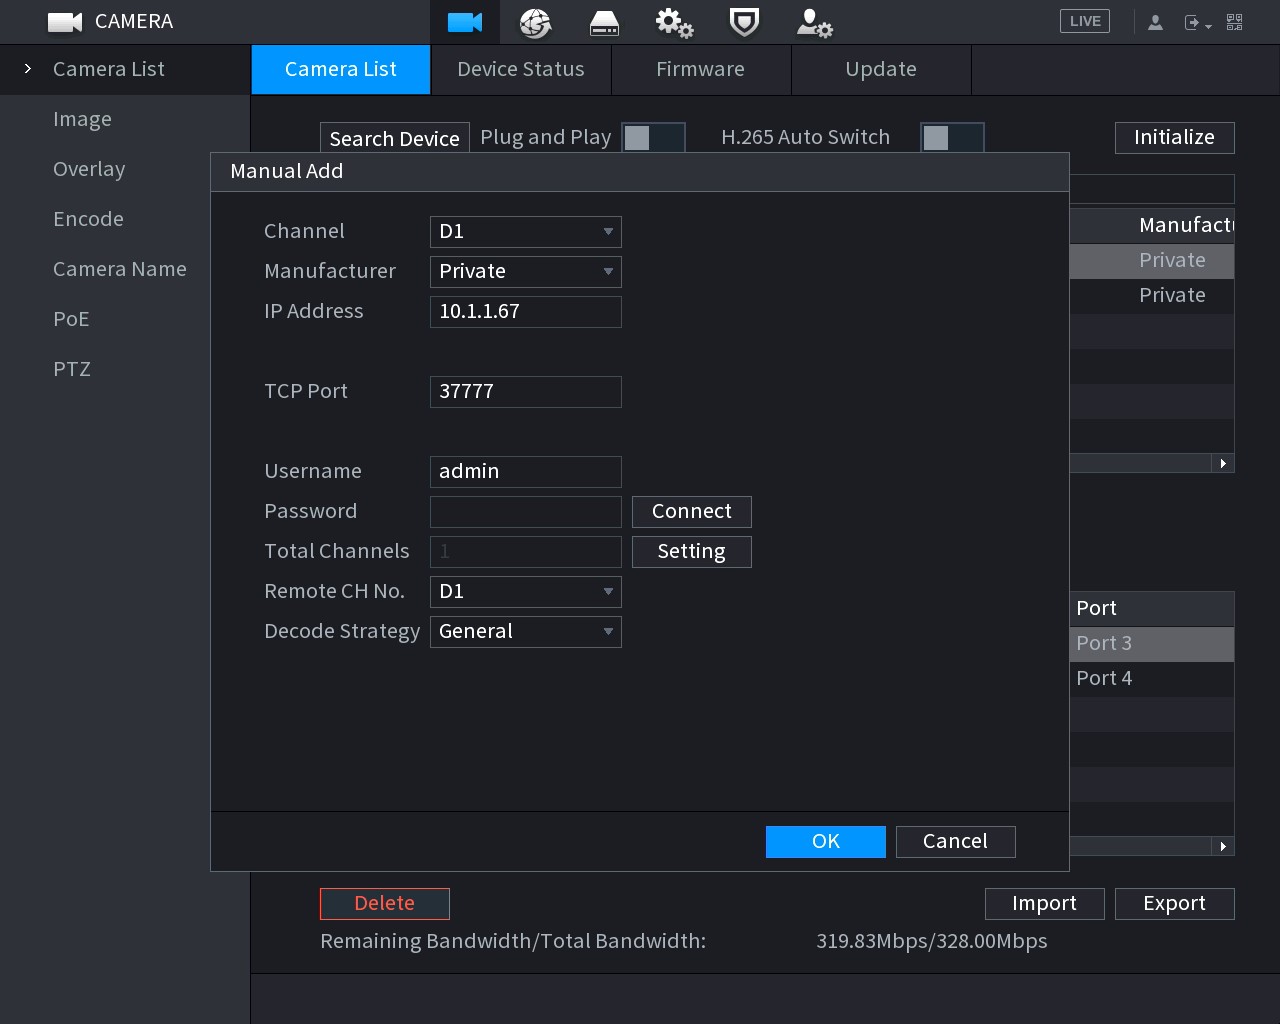
Manually adding a camera is how you can add either problematic cameras or 3rd party camera
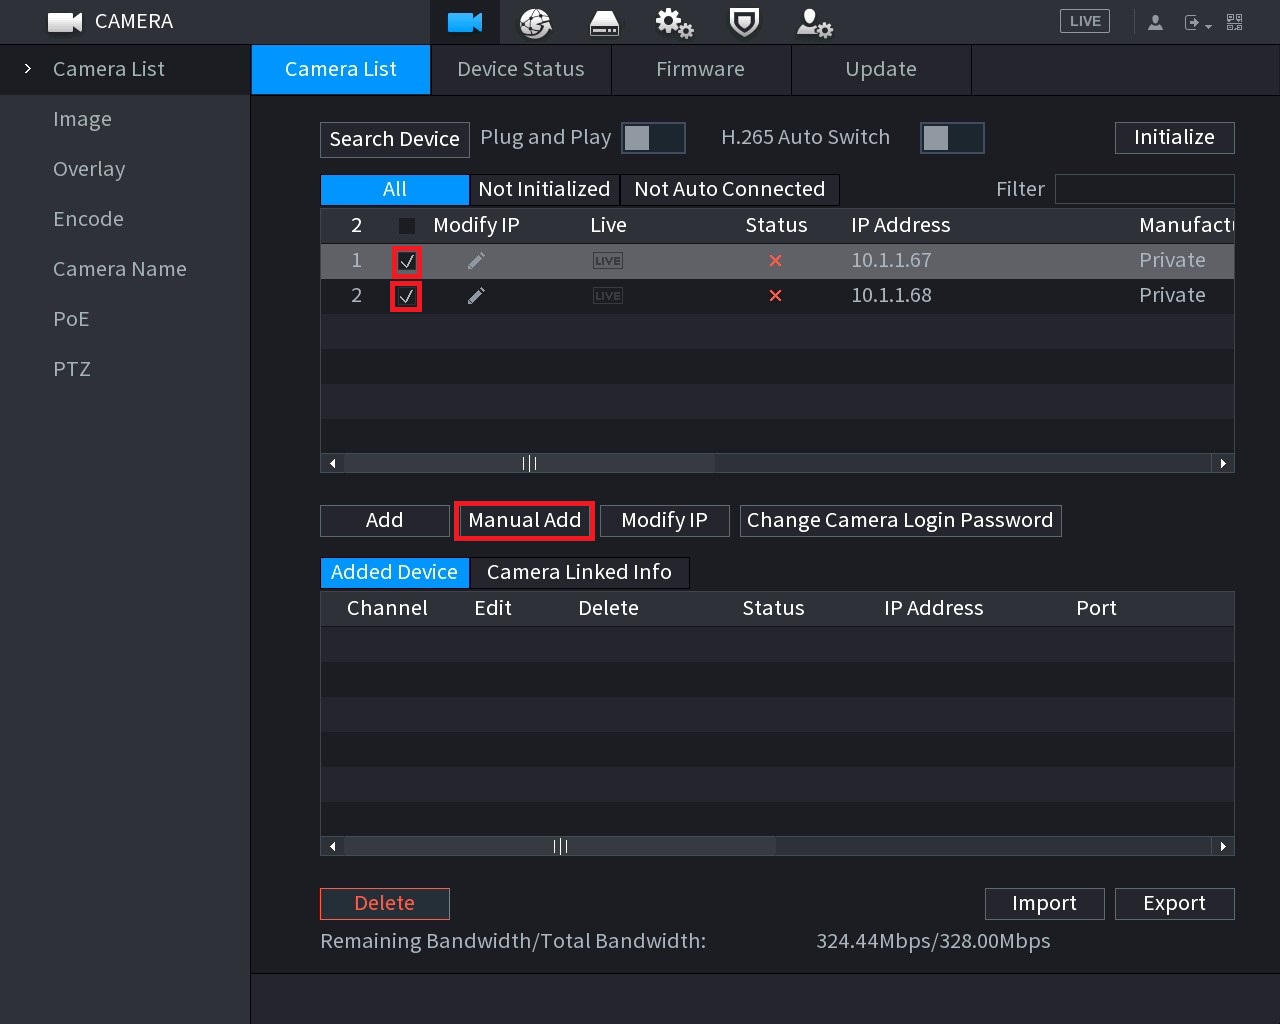
By changing Manufacturer you can adapt other 3rd party cameras.
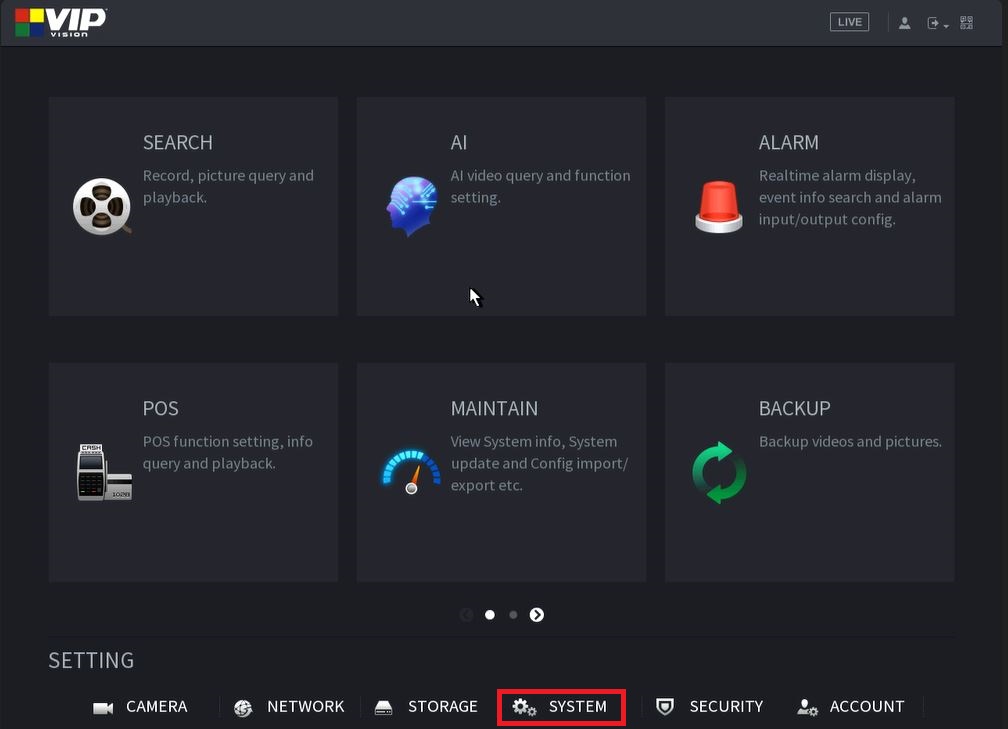
Date Time
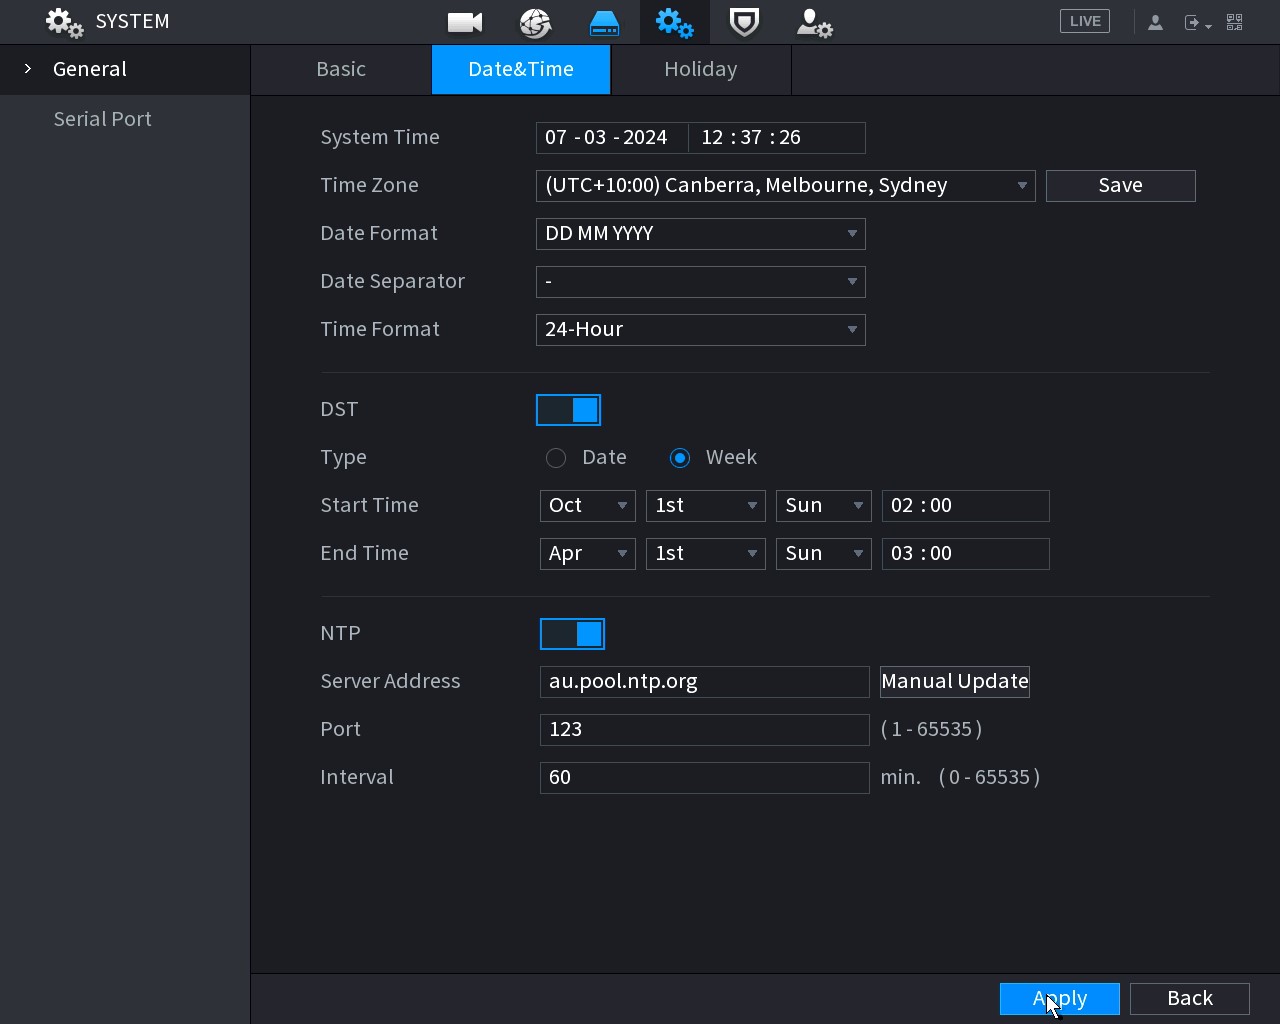 |
Set time according to The NTP Server Addr on left has shown to be adequate for most uses. |
Record Scheduling
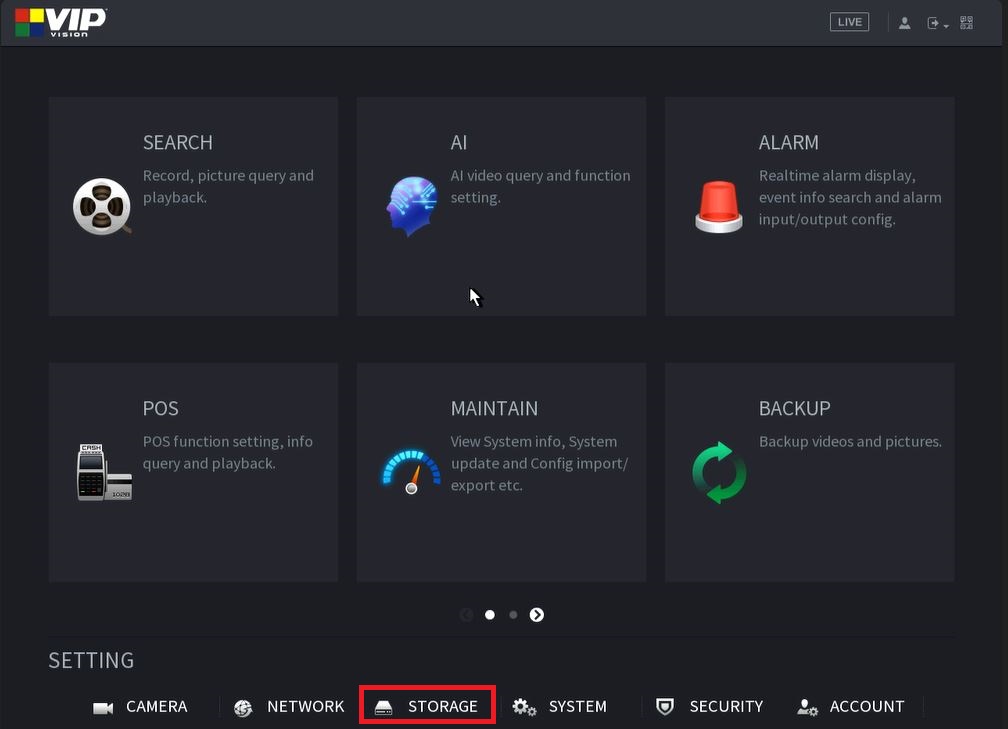
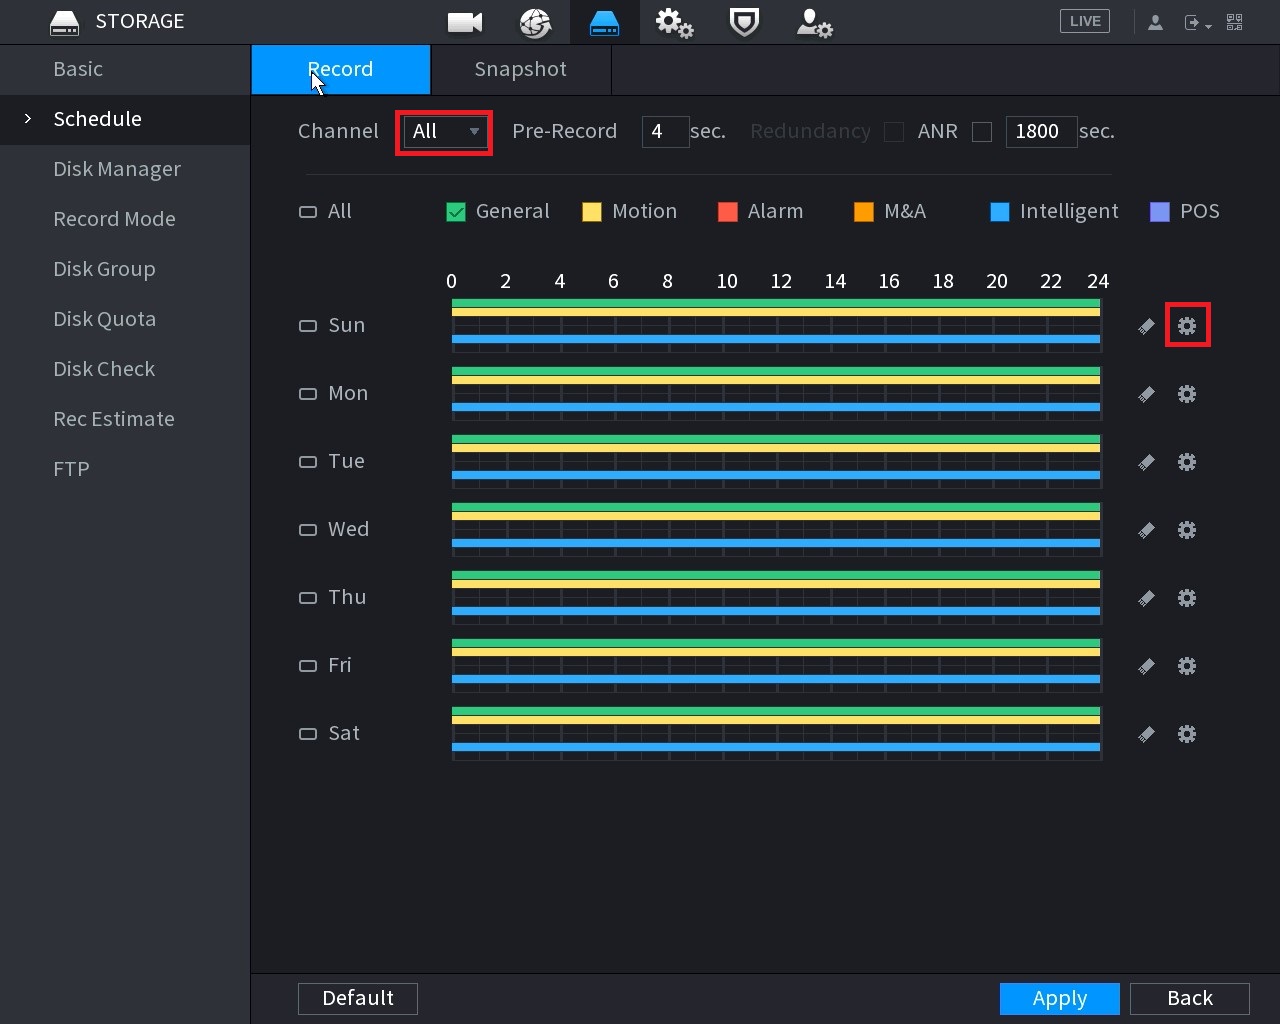 |
Set Storage → Record settings on when you want the unit to record and what type of activation/record do you want
Motion - Starts recording (+ Pre record) when motion is detected. *Requires Alarm → Motion detection to be active.
Alarm - Activated when external alarm pin is active.
M&A - (Motion & Alarm)
Intelligent - Used for Smart Motion Detection (SMD) ,IVS Rules and other AI detection means.
POS - Point of Sales, (Not recommended) JMSC via IP |
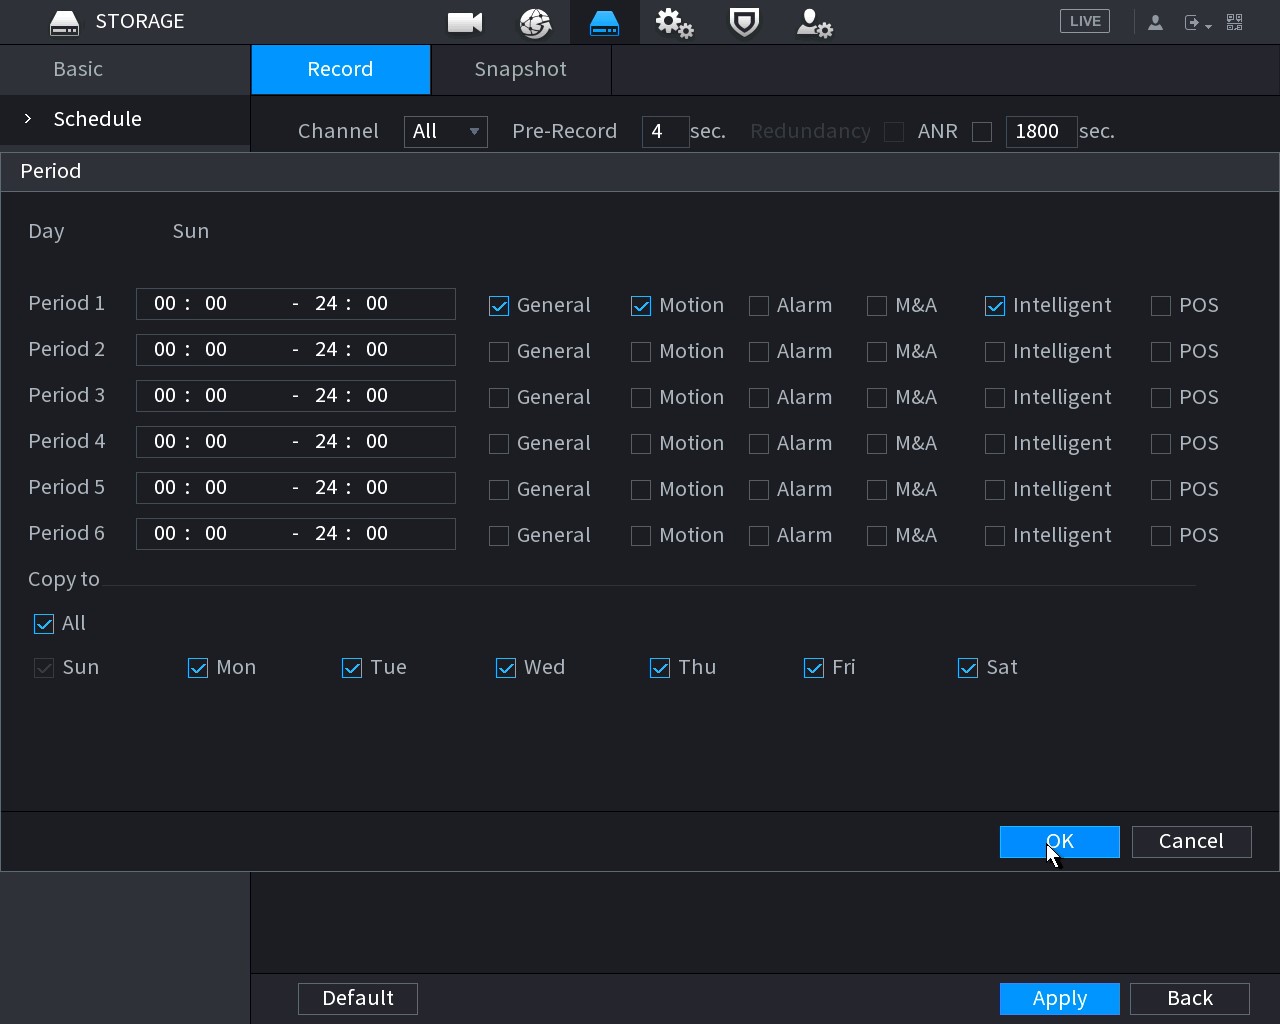 |
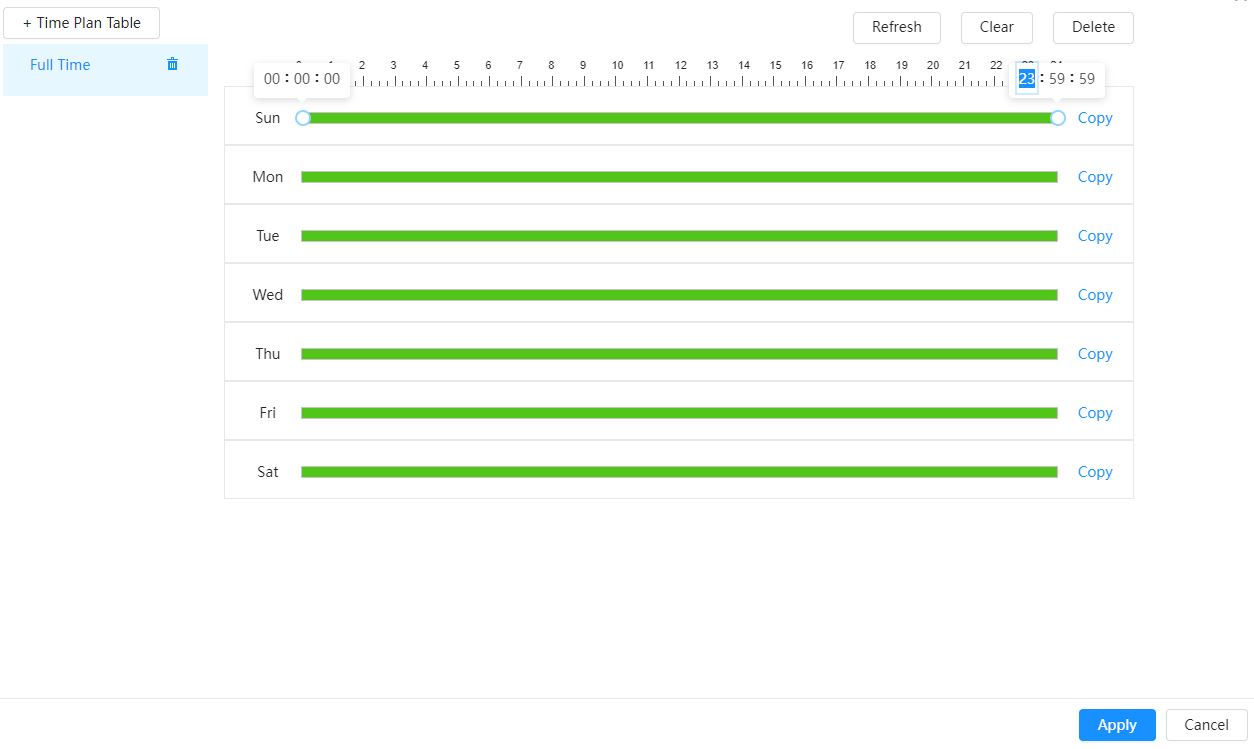
Clicking  Icon opens Period Adjustment Icon opens Period Adjustment |
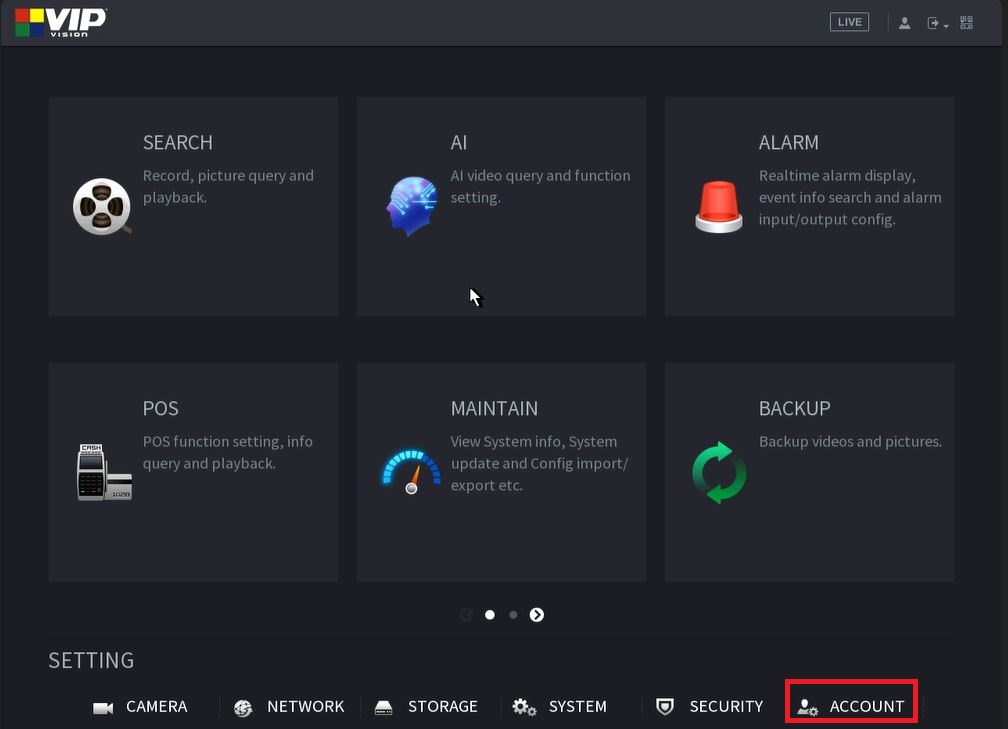
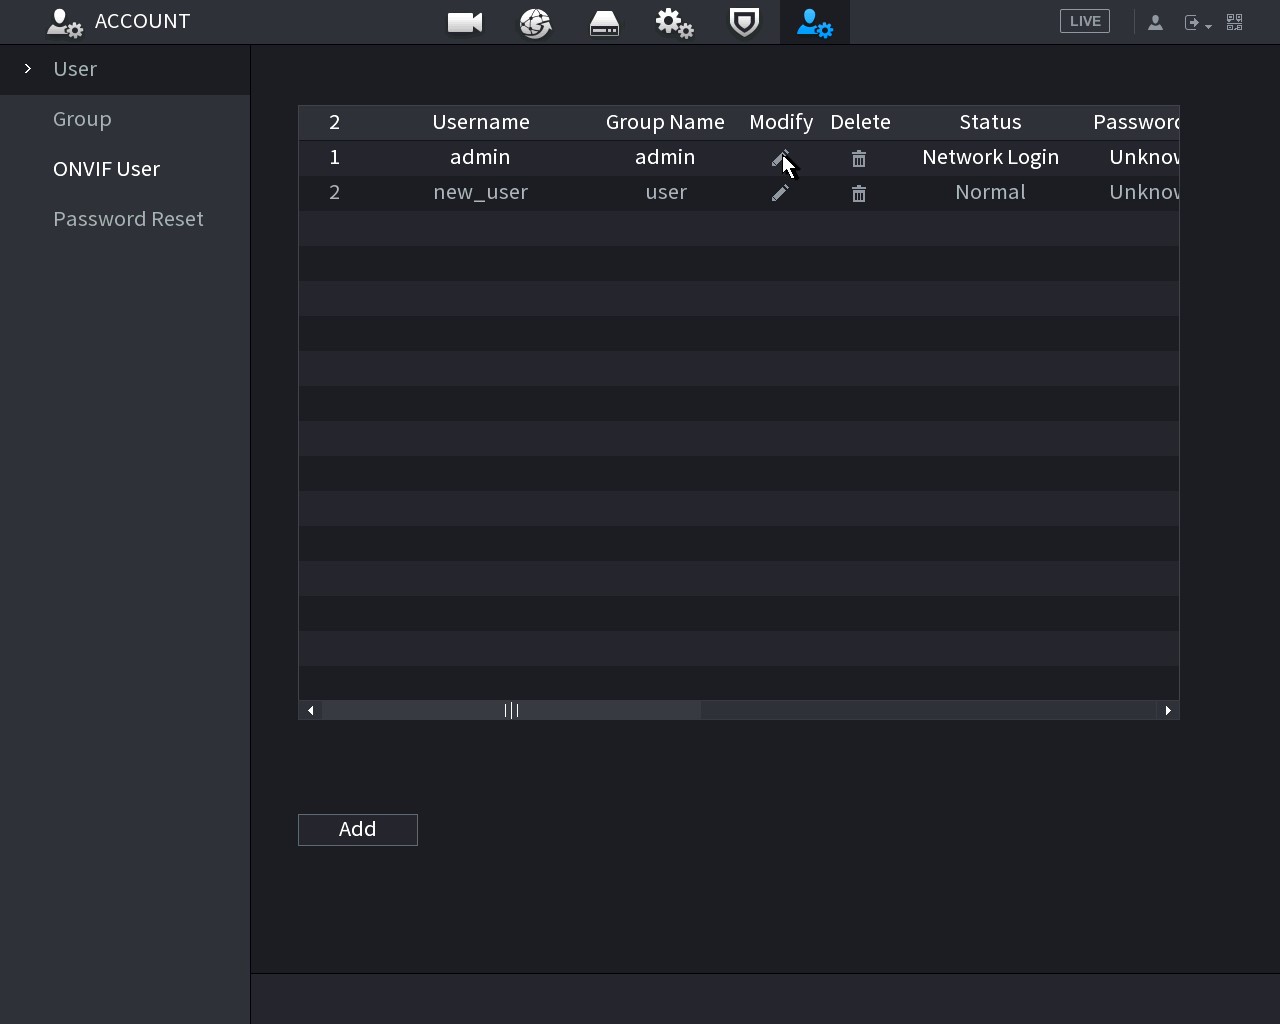
Changing Password
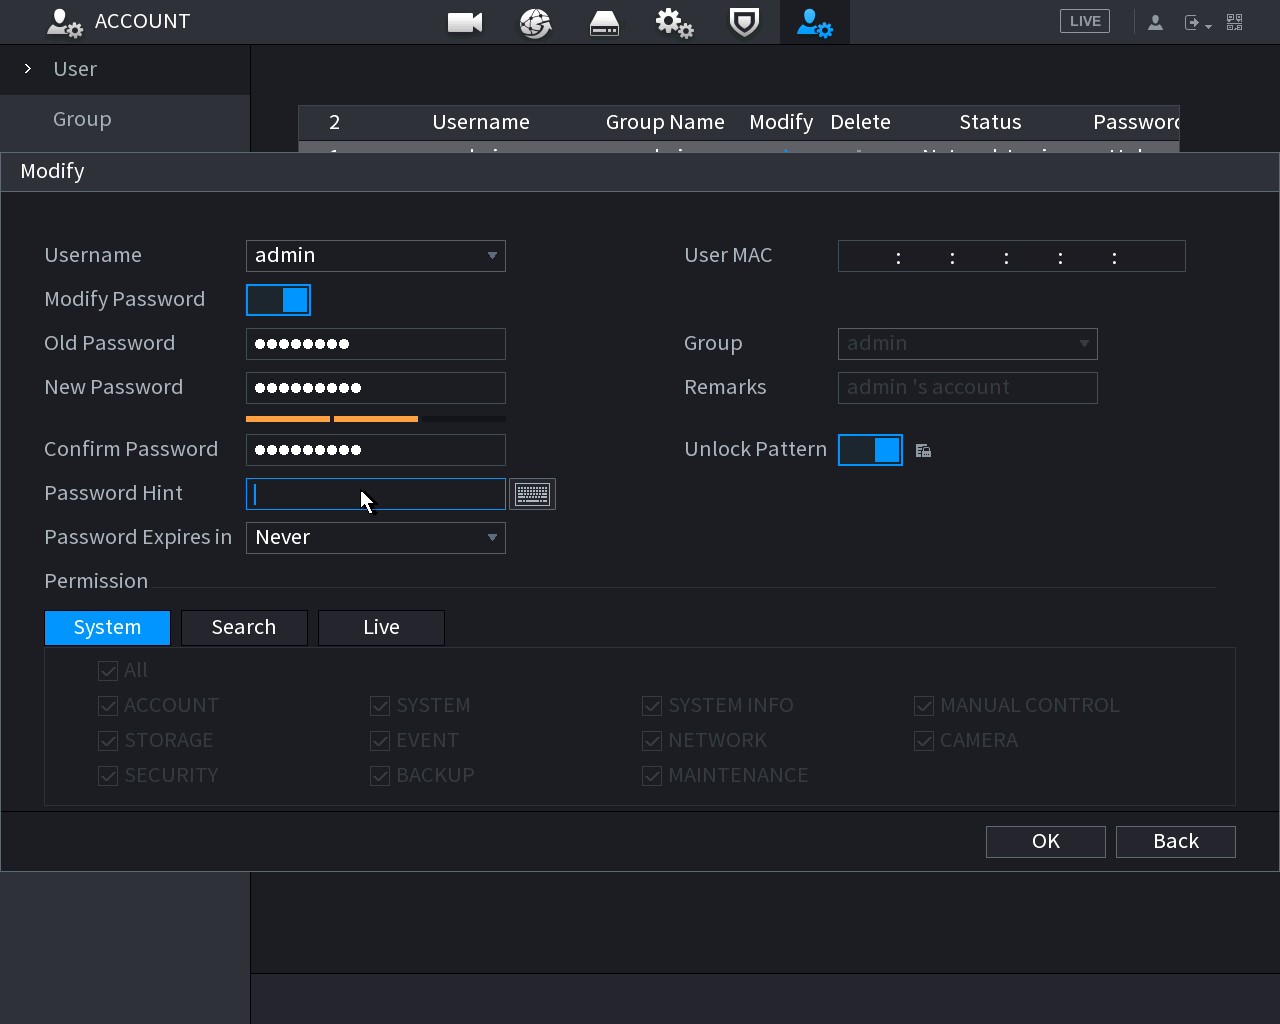
Setting up Events and Triggers
How to schedule IVS and Motion Detection Periods
Motion Detection
Motion Detection Period Scheduling via the NVR
- Navigate to Alarm > Video Detection > Motion Detection.
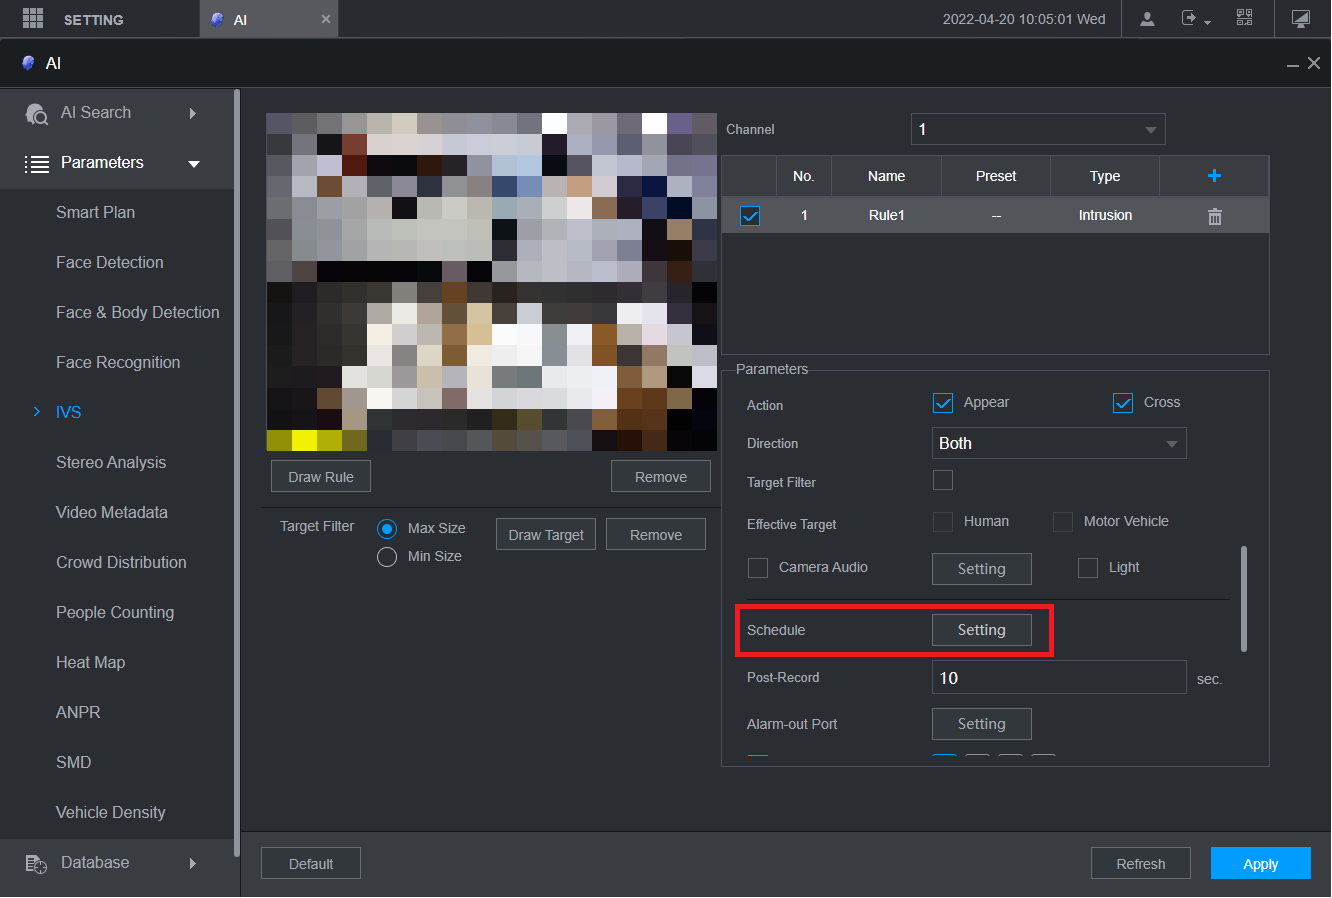
- Select the Setting button next to Schedule.
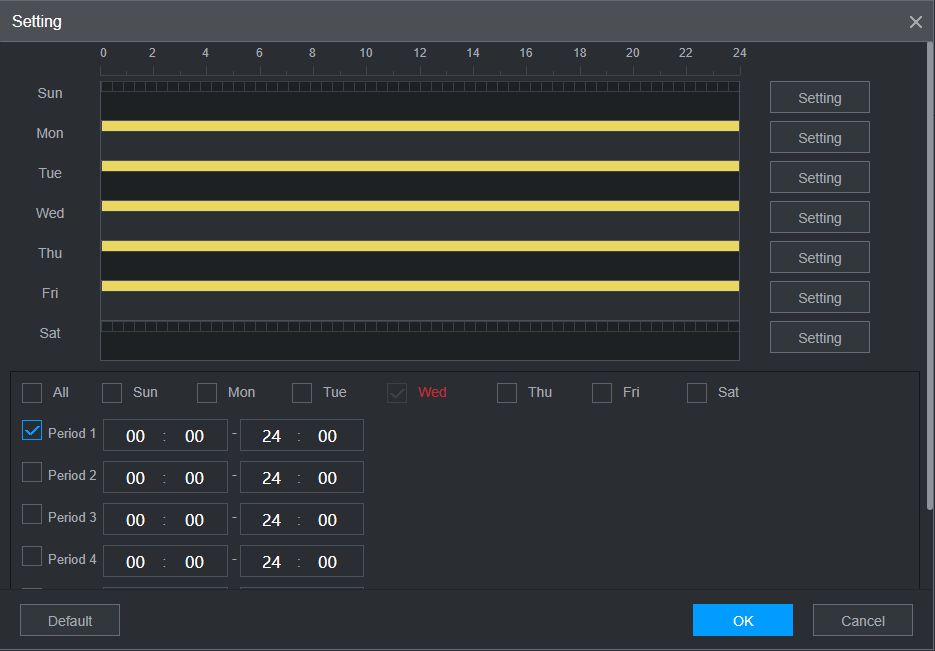
- Adjust the Schedule to suit your requirements, then click OK.
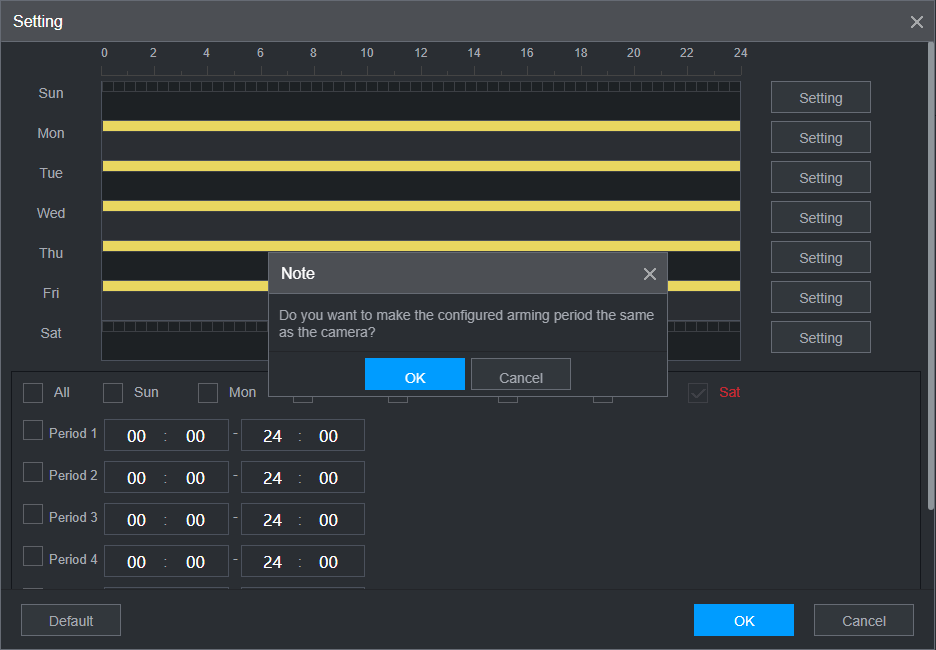
- Click OK on the prompt Do you want to make the configured arming period the same as the camera?
Motion Detection Period Scheduling via Camera Web Interface
1. Log into the camera's web interface
How to log into the camera's web interface
There are two methods to connect to an IP camera's web interface, depending on how the camera is connected to the recorder. The reason to connect directly to the web interface, is to adjust specific settings that are unable to be setup from the recorder. Such as PTZ camera idle motion settings, and ANPR camera settings.
Accessing Cameras that are directly connected to an NVR
When using a recorder with inbuilt PoE ports, the cameras that are connected will automatically get assigned an IP address from the recorder.
In order to login to the camera, we first need to login to the NVR. This method works on recorders that are using the black user interface.
- Connect your computer to the same network as the recorder.

- If there is internet access, your computer should receive an IP address in the same IP address range of the recorder. If your computer does not receive an IP address or there is no modem/router, see the "Changing the IP address on a Windows Computer" section to statically assign an IP address in the same range as the recorders IP address.
- On the recorder, go to Main Menu > Network. Note down the IP address of the recorder.
- On the computer, open Internet Explorer and enter the IP address of the recorder.

- If the computer is able to see the recorder, you will see a login page. Enter the recorders username and password.

- Select Setting > Camera > Camera List.


- Next to each camera, there will be a
 icon. Select the icon next to the camera you wish to connect to.
- A new page will open, bringing up the login page for the camera. Enter the username and password for the camera. Usually, the username is admin, and the password is the same as the recorder.


Connecting to cameras that are connected via a PoE switch.
This guide requires that the recorder and camera are already setup for network access. If the camera is not currently connected to the NVR, you may need to assign an IP address to your PC/Laptop Manually, see the "Changing the IP address on a Windows Computer" below to statically assign an IP address in the same range as the cameras IP address.
Changing the IP address on a Windows Computer - If no Modem/Router is connected
Follow the below steps to manually assign an IP address to a Windows computer, this will need to be done if the recorder/camera you are connecting to is not connected to a local network where DHCP is being assigned to devices.
Windows 10
- Open Settings.
- Select Network & Internet.

- Select Status, then Change Adapter Options.

-
Right-click the network adapter you want to change the IP address for, and select Properties.

-
Double-click the Internet Protocol Version 4 (TCP/IPv4) item.

- Click Use the following IP address and enter an IP address in the same range as the device you are trying to access. (E.g when trying to access 192.168.1.108 use a IP address in the 192.168.1.x range.) Note: This cannot be the same as the device you are trying to connect to or any other device on the same network. Save your changes on both windows.

- Type the IP address of the device you are trying to access into the address bar of your web browser.
- Once finished configuring the device, change the adapter settings back to normal by following steps 1-5 and clicking Obtain an IP address automatically.
Windows 11
1. In the Windows search bar at the bottom of the page, type Control Panel and press enter.
2. Select Network and Internet.

3. Select Network and Sharing Centre.

4. Select the link for Connections in the network that you want to change the IP address for.

5. Select Properties.

6. Double-click the Internet Protocol Version 4 (TCP/IPv4) item.

7. Click Use the following IP address and enter an IP address in the same range as the device you are trying to access. (E.g when trying to access 192.168.1.108 use a IP address in the 192.168.1.x range.) Note: This cannot be the same as the device you are trying to connect to or any other device on the same network. Save your changes on both windows.

8. Type the IP address of the device you are trying to access into the address bar of your web browser.
9. Once finished configuring the device, change the adapter settings back to normal by following steps 1-6 and clicking Obtain an IP address automatically.
See the video below for a visual guide of the steps above:
Shortcut
1. In the Windows search bar at the bottom of the page, type Ncpa.cpl and press enter.
2. Right-click the network adapter you want to change the IP address for, and select Properties.
3. Select the Internet Protocol Version 4 (TCP/IPv4) item.

4. Click Use the following IP address and enter an IP address in the same range as the device you are trying to access. (E.g when trying to access 192.168.1.108 use a IP address in the 192.168.1.x range.) Note: This cannot be the same as the device you are trying to connect to or any other device on the same network. Save your changes on both windows.

5. Type the IP address of the device you are trying to access into the address bar of your web browser.
6. Once finished configuring the device, change the adapter settings back to normal by following steps 1-3 and clicking Obtain an IP address automatically.
See the video below for a visual guide of the steps above:
- Connect the computer to the same network as the cameras.

- Download the Config tool program.
- Once the download is complete, extract the zip file, and open the ConfigTool.exe file.

- Select the
 button, devices that are found on the network will be listed.
 - Click the Web button next to the camera you would like to login to.

- A new page will open, bringing up the login page for the camera. Enter the username and password for the camera. Usually, the username is admin, and the password is the same as the recorder.


2. Navigate to Setting > Event > Video Detection > Motion Detection 3. Click on Setting next to Period.
 4. Fill out the Period Settings, then click Save.
5. Click Save.
IVS (Tripwire, Intrusion, etc)
IVS Period Scheduling via NVR
When editing the IVS rule, select the
- Navigate to the IVS rule you wish to edit.

- Select the Setting button next to Schedule.
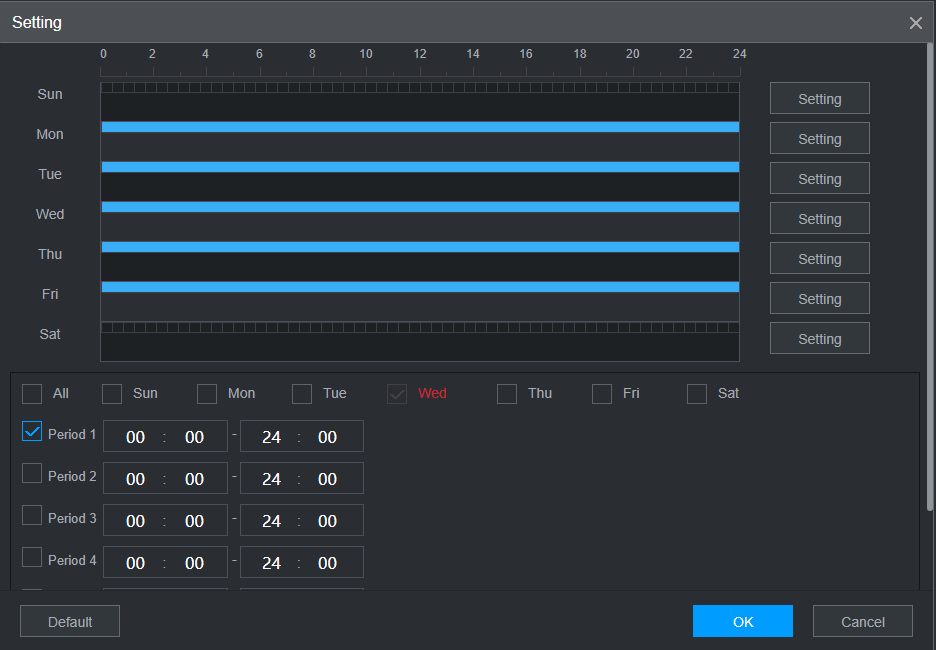
- Adjust the Schedule to suit your requirements, then click OK.
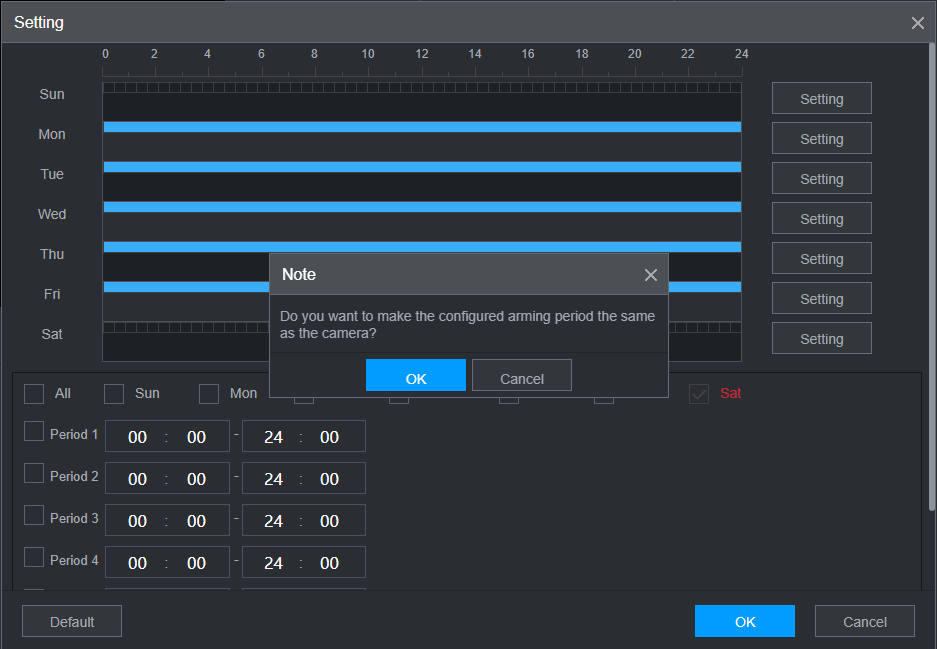
- Click OK on the prompt Do you want to make the configured arming period the same as the camera?
IVS Period Scheduling via Camera Web Interface (Old GUI - Grey)
1. Log into the camera's web interface
How to log into the camera's web interface
There are two methods to connect to an IP camera's web interface, depending on how the camera is connected to the recorder. The reason to connect directly to the web interface, is to adjust specific settings that are unable to be setup from the recorder. Such as PTZ camera idle motion settings, and ANPR camera settings.
Accessing Cameras that are directly connected to an NVR
When using a recorder with inbuilt PoE ports, the cameras that are connected will automatically get assigned an IP address from the recorder.
In order to login to the camera, we first need to login to the NVR. This method works on recorders that are using the black user interface.
- Connect your computer to the same network as the recorder.

- If there is internet access, your computer should receive an IP address in the same IP address range of the recorder. If your computer does not receive an IP address or there is no modem/router, see the "Changing the IP address on a Windows Computer" section to statically assign an IP address in the same range as the recorders IP address.
- On the recorder, go to Main Menu > Network. Note down the IP address of the recorder.
- On the computer, open Internet Explorer and enter the IP address of the recorder.

- If the computer is able to see the recorder, you will see a login page. Enter the recorders username and password.

- Select Setting > Camera > Camera List.


- Next to each camera, there will be a
 icon. Select the icon next to the camera you wish to connect to.
- A new page will open, bringing up the login page for the camera. Enter the username and password for the camera. Usually, the username is admin, and the password is the same as the recorder.


Connecting to cameras that are connected via a PoE switch.
This guide requires that the recorder and camera are already setup for network access. If the camera is not currently connected to the NVR, you may need to assign an IP address to your PC/Laptop Manually, see the "Changing the IP address on a Windows Computer" below to statically assign an IP address in the same range as the cameras IP address.
Changing the IP address on a Windows Computer - If no Modem/Router is connected
Follow the below steps to manually assign an IP address to a Windows computer, this will need to be done if the recorder/camera you are connecting to is not connected to a local network where DHCP is being assigned to devices.
Windows 10
- Open Settings.
- Select Network & Internet.

- Select Status, then Change Adapter Options.

-
Right-click the network adapter you want to change the IP address for, and select Properties.

-
Double-click the Internet Protocol Version 4 (TCP/IPv4) item.

- Click Use the following IP address and enter an IP address in the same range as the device you are trying to access. (E.g when trying to access 192.168.1.108 use a IP address in the 192.168.1.x range.) Note: This cannot be the same as the device you are trying to connect to or any other device on the same network. Save your changes on both windows.

- Type the IP address of the device you are trying to access into the address bar of your web browser.
- Once finished configuring the device, change the adapter settings back to normal by following steps 1-5 and clicking Obtain an IP address automatically.
Windows 11
1. In the Windows search bar at the bottom of the page, type Control Panel and press enter.
2. Select Network and Internet.

3. Select Network and Sharing Centre.

4. Select the link for Connections in the network that you want to change the IP address for.

5. Select Properties.

6. Double-click the Internet Protocol Version 4 (TCP/IPv4) item.

7. Click Use the following IP address and enter an IP address in the same range as the device you are trying to access. (E.g when trying to access 192.168.1.108 use a IP address in the 192.168.1.x range.) Note: This cannot be the same as the device you are trying to connect to or any other device on the same network. Save your changes on both windows.

8. Type the IP address of the device you are trying to access into the address bar of your web browser.
9. Once finished configuring the device, change the adapter settings back to normal by following steps 1-6 and clicking Obtain an IP address automatically.
See the video below for a visual guide of the steps above:
Shortcut
1. In the Windows search bar at the bottom of the page, type Ncpa.cpl and press enter.
2. Right-click the network adapter you want to change the IP address for, and select Properties.
3. Select the Internet Protocol Version 4 (TCP/IPv4) item.

4. Click Use the following IP address and enter an IP address in the same range as the device you are trying to access. (E.g when trying to access 192.168.1.108 use a IP address in the 192.168.1.x range.) Note: This cannot be the same as the device you are trying to connect to or any other device on the same network. Save your changes on both windows.

5. Type the IP address of the device you are trying to access into the address bar of your web browser.
6. Once finished configuring the device, change the adapter settings back to normal by following steps 1-3 and clicking Obtain an IP address automatically.
See the video below for a visual guide of the steps above:
- Connect the computer to the same network as the cameras.

- Download the Config tool program.
- Once the download is complete, extract the zip file, and open the ConfigTool.exe file.

- Select the
 button, devices that are found on the network will be listed.
 - Click the Web button next to the camera you would like to login to.

- A new page will open, bringing up the login page for the camera. Enter the username and password for the camera. Usually, the username is admin, and the password is the same as the recorder.


2. Navigate to Setting > Event > IVS
3. Click on Setting next to Period.
4. Fill out the Period Settings, then click Save. 5. Click Save.
IVS Period Scheduling via Camera Web Interface (New GUI - White/Blue)
1. Log into the camera's web interface
How to log into the camera's web interface
How to Login to Web Interface of an IP Camera
There are two methods to connect to an IP Camera, depending on how the camera is ...
2. Navigate to IP Camera > AI >
('IP Camera' top left at main meu)
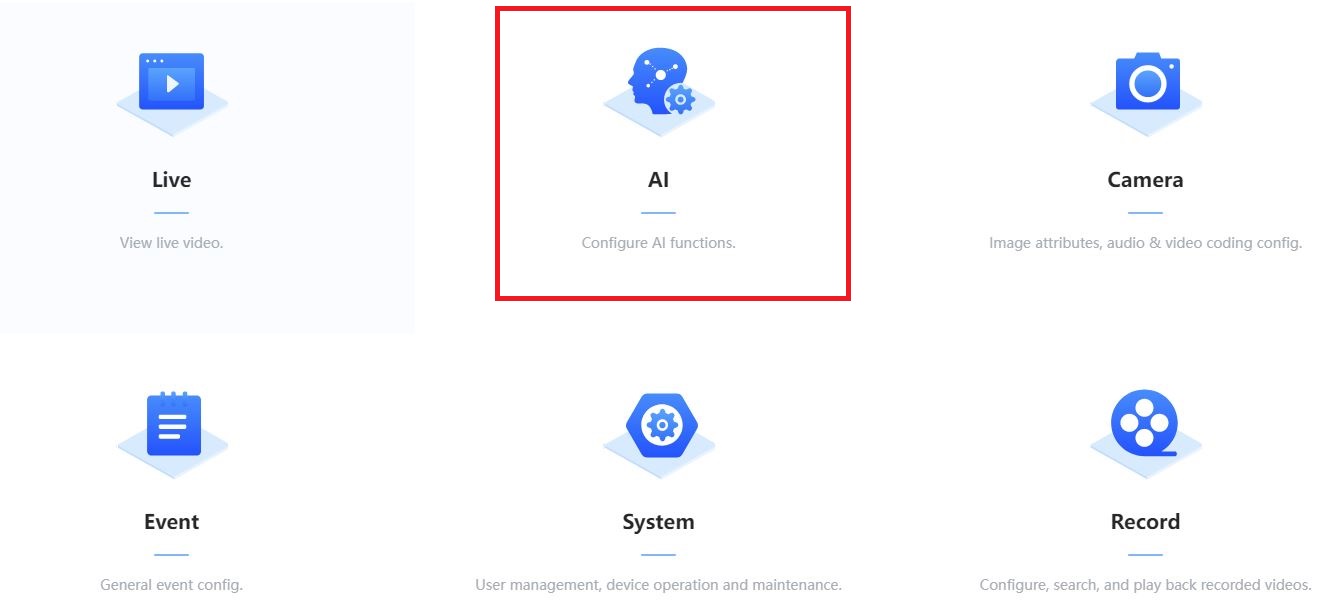
3. Enable IVS click Next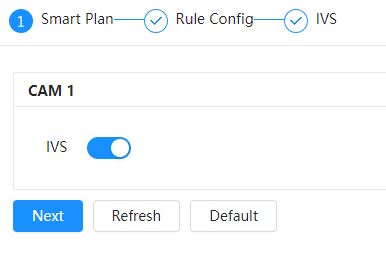
5. Draw Rule (Yellow line)
6. Change Schedule (Optional)
7. Add or Remove Event Linkage depending on what action you want (Snapshot, Record, Alarm, etc)
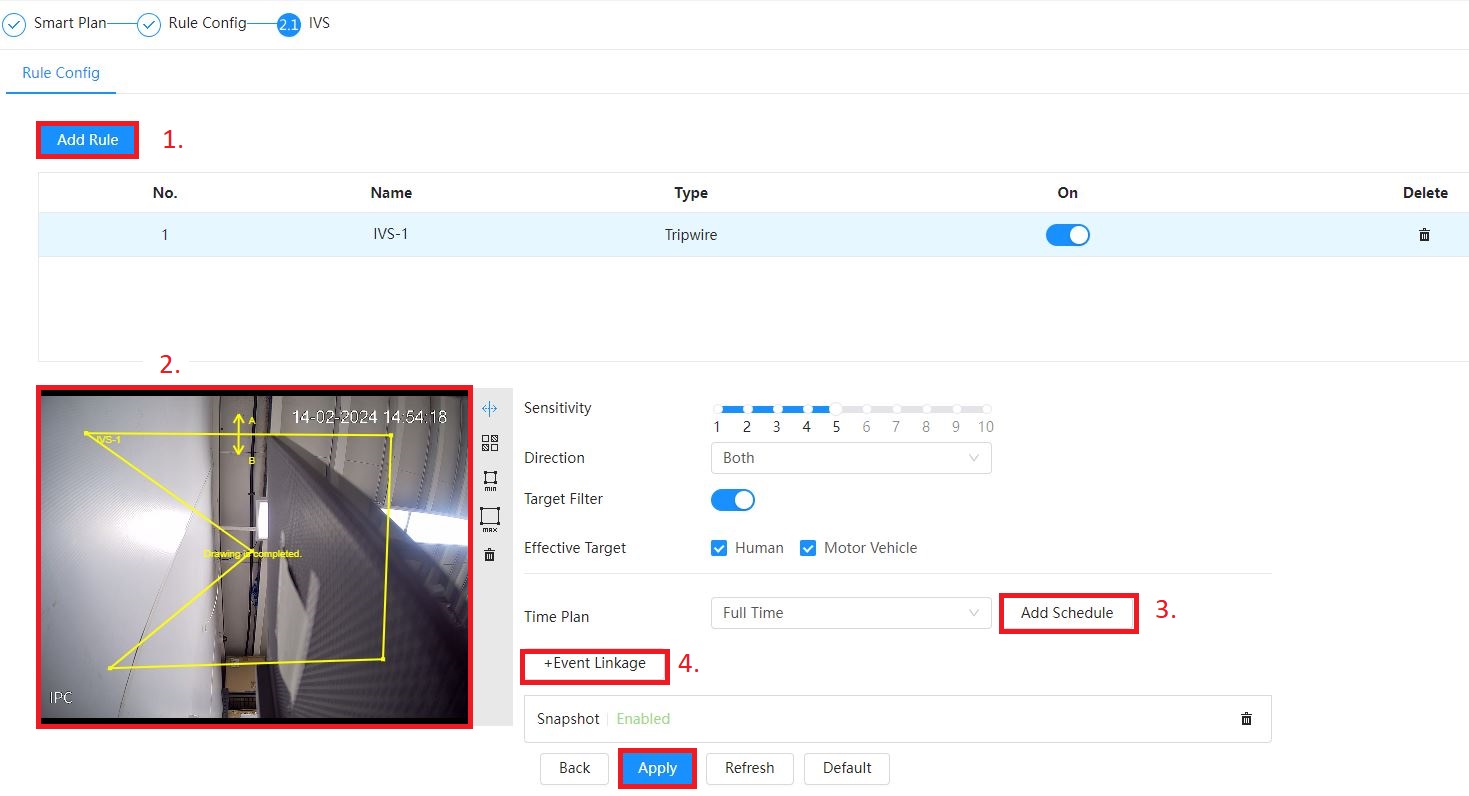
How to Schedule Notifications
Scheduling Notifications via NVR Disarming
On newer versions of firmware notifications for events (IVS, Motion, etc) can be disabled if disarming is active on an NVR.
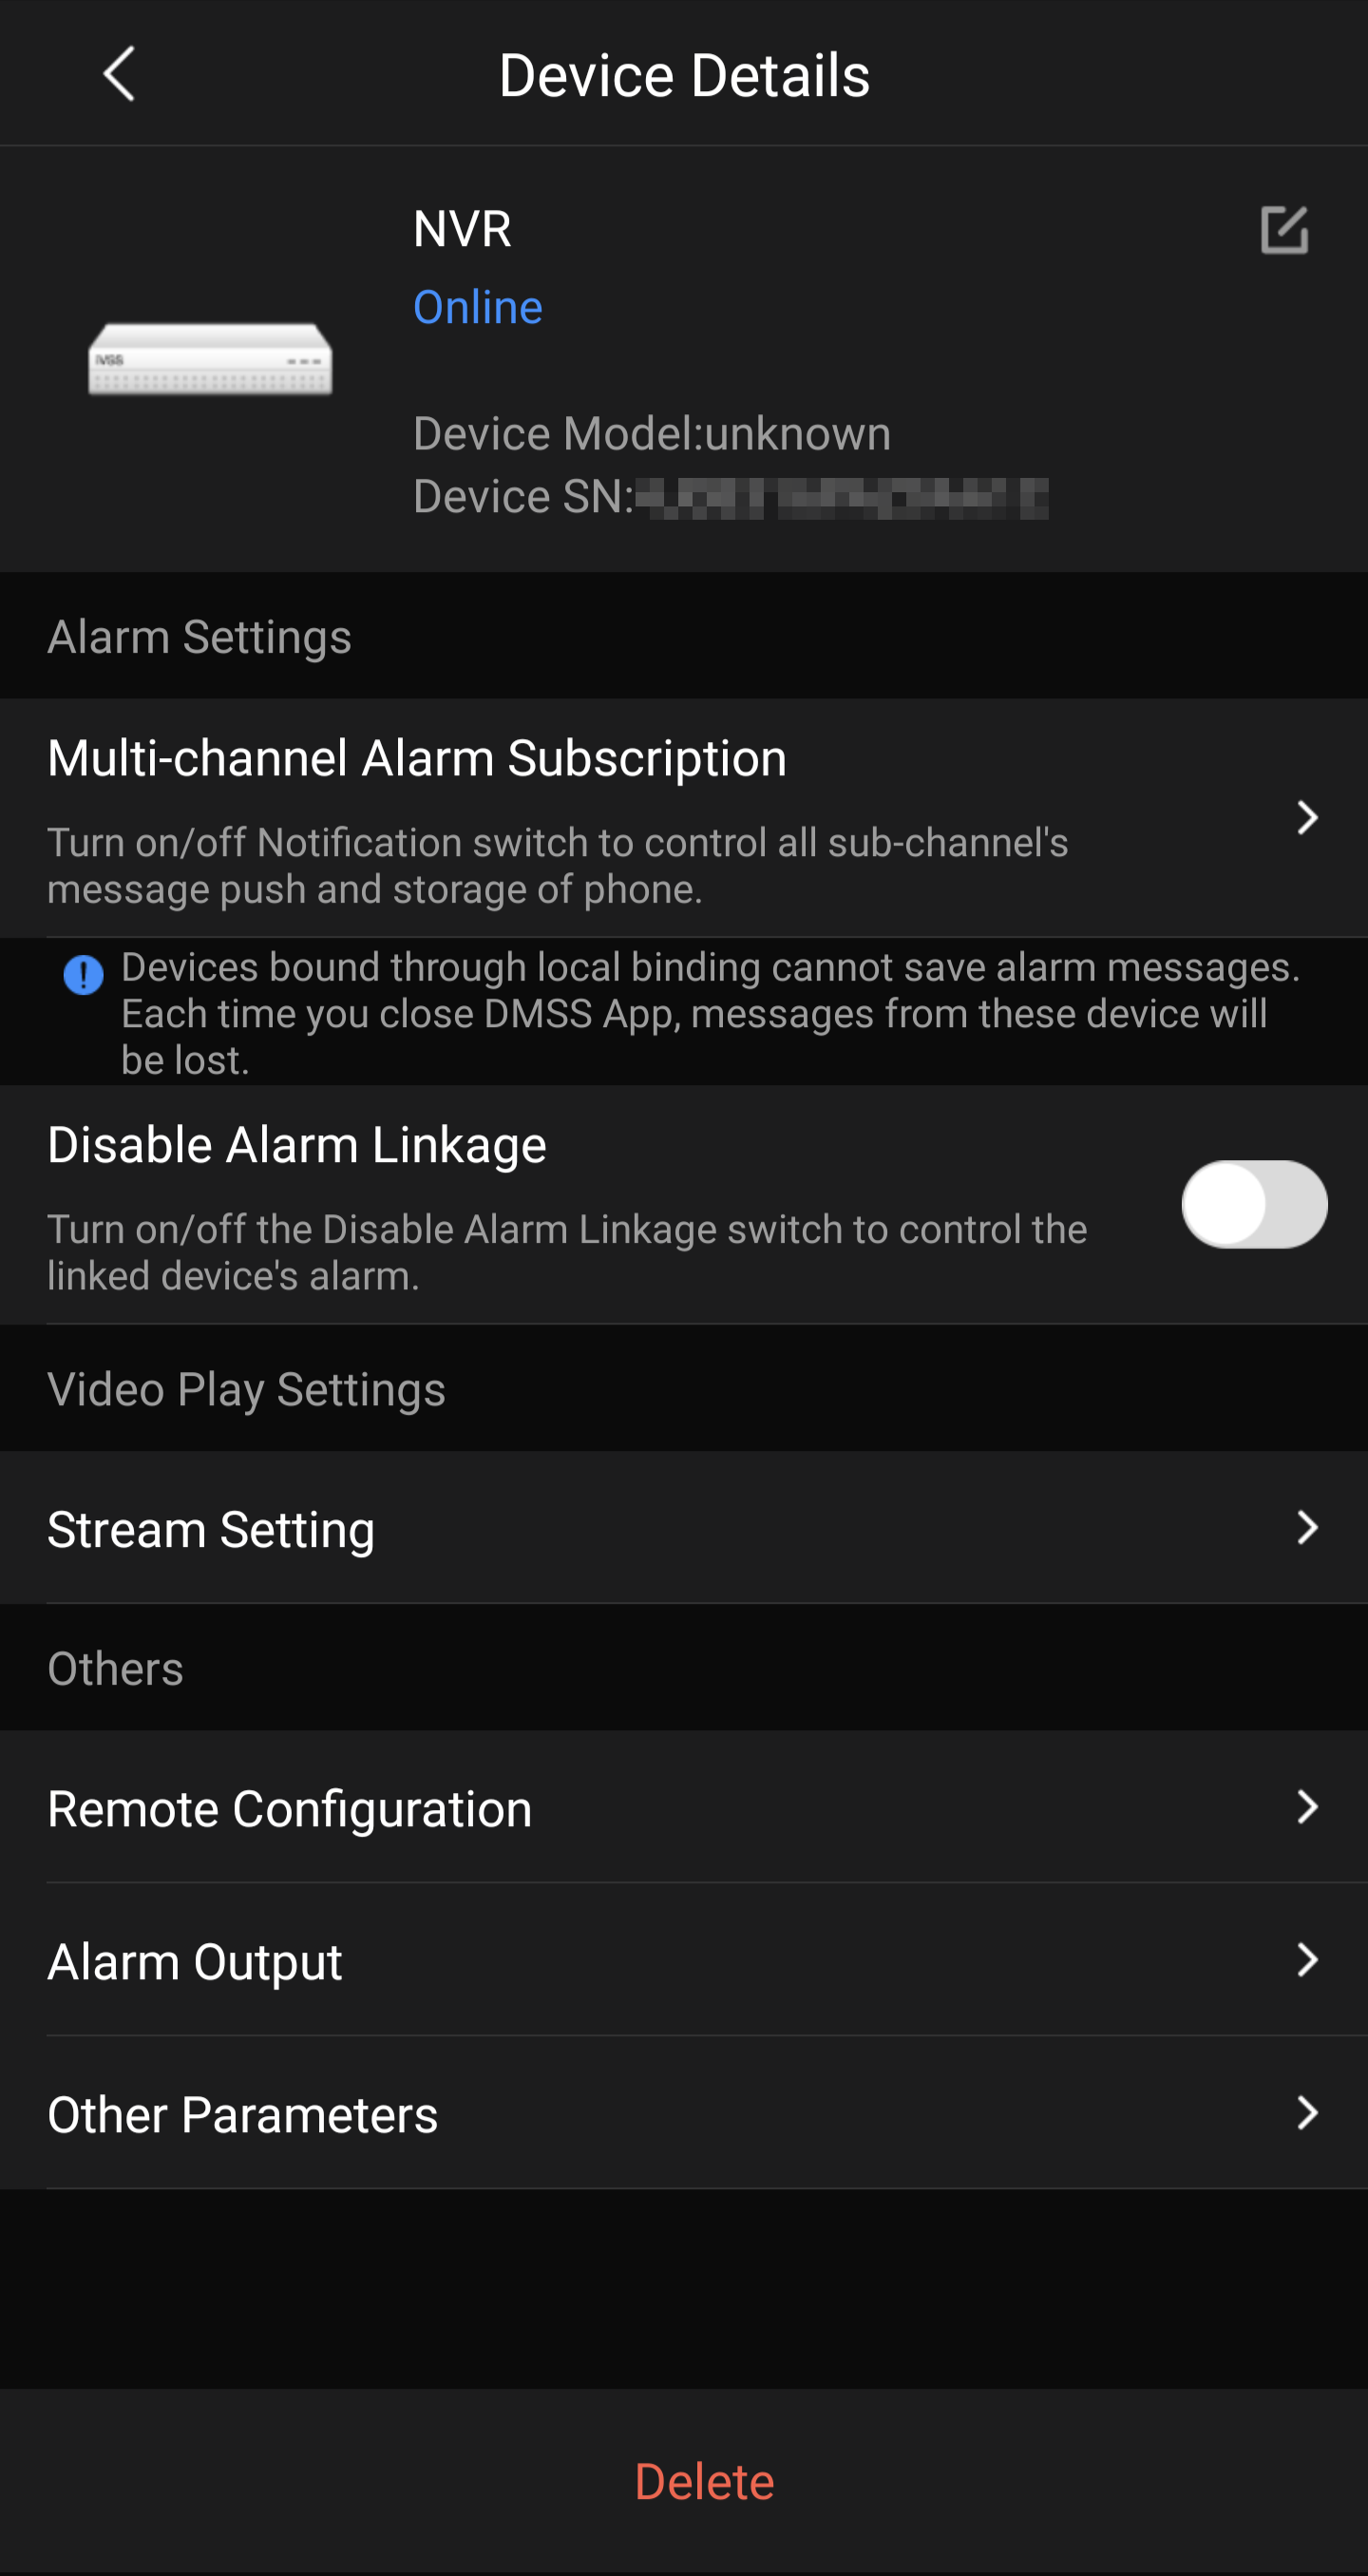
Disarming can be activated via the NVR under Alarm > Disarming and on the DMSS app under Device Details > Disable Alarm Linkage. Disarming can also be schedule under Alarm > Disarming on the NVR.
How to schedule Notifications via the NVR's disarming period
- Navigate to Main Menu > Alarm > Disarming
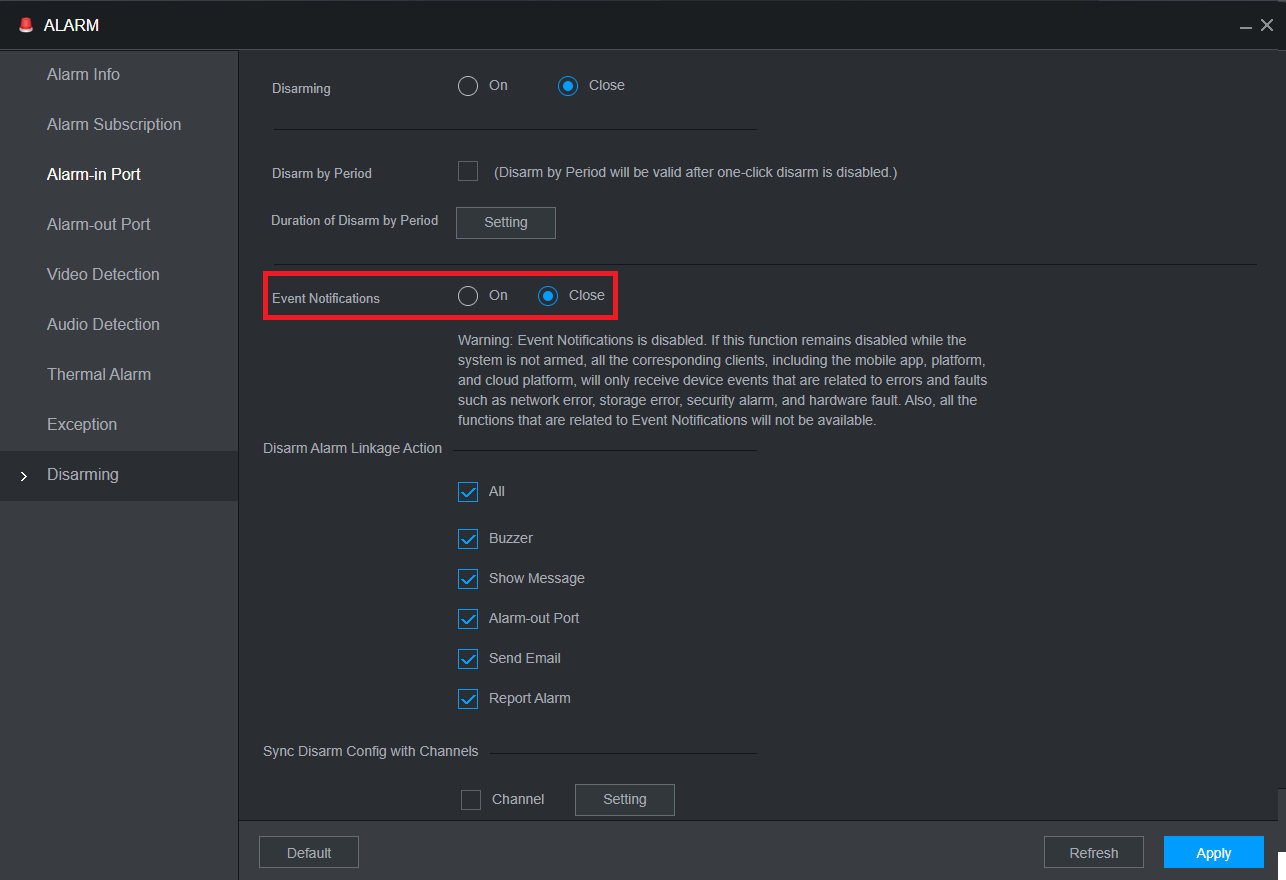
- Set Event Notifications to Close/Off, click OK on the prompt, then click Apply.
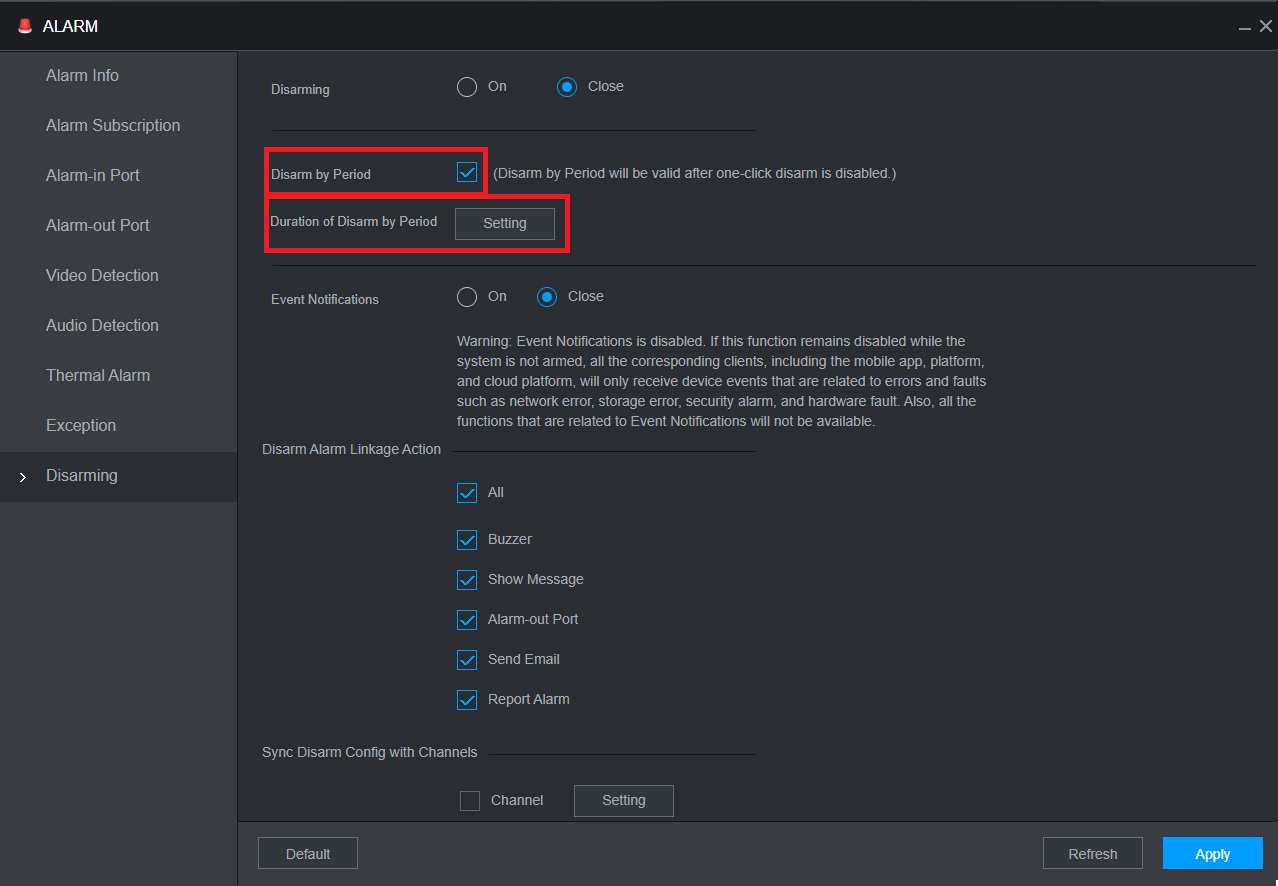
- Enable Disarm by Period, then click Setting next to Duration of Disarm by Period.
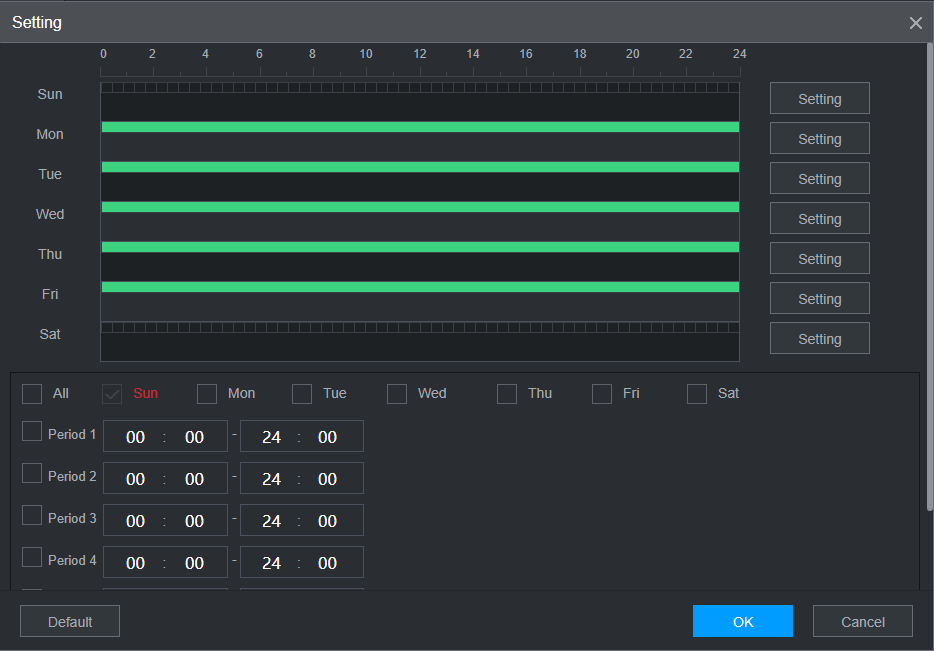
- Set the Schedule, then click OK. Then click Apply.
Scheduling the Notifications in DMSS
In the current version of DMSS, for each compatible device you can set an active notification period.
Currently there is no way to schedule different time periods for different days. The same 24h time period applies to all 7 days of the week.
How to Schedule Notifications in DMSS
 |
Tap on
 next to the device you want to schedule notifications for. next to the device you want to schedule notifications for.Then on the pop-up tap Device Details |
 |
Tap on Notification
|
 |
Tap on Period Settings
|

|
Set the Start and End time for the active period you wish to receive notifications for.
This will apply to ALL days of the week
Tap |
Changing the active hours of Motion Detection and IVS
If your notifications are for Motion Detection or IVS and you wish to have a different active notification period for different days of the week, there is a workaround.
In the Web Interface of the camera you can set the active hours for the IVS rule or Motion Detection to only be active during the hours you want to receive notifications. Please be advised that if you configure your camera to do this Motion Detection and IVS will not be active outside of these hours; no IVS or Motion will be triggered or recorded.
How to Change the Active Hours of Motion Detection and IVS
Motion Detection
Motion Detection Period Scheduling via the NVR
- Navigate to Alarm > Video Detection > Motion Detection.

- Select the Setting button next to Schedule.

- Adjust the Schedule to suit your requirements, then click OK.

- Click OK on the prompt Do you want to make the configured arming period the same as the camera?
Motion Detection Period Scheduling via Camera Web Interface
1. Log into the camera's web interface
How to log into the camera's web interface
There are two methods to connect to an IP camera's web interface, depending on how the camera is connected to the recorder. The reason to connect directly to the web interface, is to adjust specific settings that are unable to be setup from the recorder. Such as PTZ camera idle motion settings, and ANPR camera settings.
Accessing Cameras that are directly connected to an NVR
When using a recorder with inbuilt PoE ports, the cameras that are connected will automatically get assigned an IP address from the recorder.
In order to login to the camera, we first need to login to the NVR. This method works on recorders that are using the black user interface.
- Connect your computer to the same network as the recorder.

- If there is internet access, your computer should receive an IP address in the same IP address range of the recorder. If your computer does not receive an IP address or there is no modem/router, see the "Changing the IP address on a Windows Computer" section to statically assign an IP address in the same range as the recorders IP address.
- On the recorder, go to Main Menu > Network. Note down the IP address of the recorder.
- On the computer, open Internet Explorer and enter the IP address of the recorder.

- If the computer is able to see the recorder, you will see a login page. Enter the recorders username and password.

- Select Setting > Camera > Camera List.


- Next to each camera, there will be a
 icon. Select the icon next to the camera you wish to connect to.
- A new page will open, bringing up the login page for the camera. Enter the username and password for the camera. Usually, the username is admin, and the password is the same as the recorder.


Connecting to cameras that are connected via a PoE switch.
This guide requires that the recorder and camera are already setup for network access. If the camera is not currently connected to the NVR, you may need to assign an IP address to your PC/Laptop Manually, see the "Changing the IP address on a Windows Computer" below to statically assign an IP address in the same range as the cameras IP address.
Changing the IP address on a Windows Computer - If no Modem/Router is connected
Follow the below steps to manually assign an IP address to a Windows computer, this will need to be done if the recorder/camera you are connecting to is not connected to a local network where DHCP is being assigned to devices.
Windows 10
- Open Settings.
- Select Network & Internet.

- Select Status, then Change Adapter Options.

-
Right-click the network adapter you want to change the IP address for, and select Properties.

-
Double-click the Internet Protocol Version 4 (TCP/IPv4) item.

- Click Use the following IP address and enter an IP address in the same range as the device you are trying to access. (E.g when trying to access 192.168.1.108 use a IP address in the 192.168.1.x range.) Note: This cannot be the same as the device you are trying to connect to or any other device on the same network. Save your changes on both windows.

- Type the IP address of the device you are trying to access into the address bar of your web browser.
- Once finished configuring the device, change the adapter settings back to normal by following steps 1-5 and clicking Obtain an IP address automatically.
Windows 11
1. In the Windows search bar at the bottom of the page, type Control Panel and press enter.
2. Select Network and Internet.

3. Select Network and Sharing Centre.

4. Select the link for Connections in the network that you want to change the IP address for.

5. Select Properties.

6. Double-click the Internet Protocol Version 4 (TCP/IPv4) item.

7. Click Use the following IP address and enter an IP address in the same range as the device you are trying to access. (E.g when trying to access 192.168.1.108 use a IP address in the 192.168.1.x range.) Note: This cannot be the same as the device you are trying to connect to or any other device on the same network. Save your changes on both windows.

8. Type the IP address of the device you are trying to access into the address bar of your web browser.
9. Once finished configuring the device, change the adapter settings back to normal by following steps 1-6 and clicking Obtain an IP address automatically.
See the video below for a visual guide of the steps above:
Shortcut
1. In the Windows search bar at the bottom of the page, type Ncpa.cpl and press enter.
2. Right-click the network adapter you want to change the IP address for, and select Properties.
3. Select the Internet Protocol Version 4 (TCP/IPv4) item.

4. Click Use the following IP address and enter an IP address in the same range as the device you are trying to access. (E.g when trying to access 192.168.1.108 use a IP address in the 192.168.1.x range.) Note: This cannot be the same as the device you are trying to connect to or any other device on the same network. Save your changes on both windows.

5. Type the IP address of the device you are trying to access into the address bar of your web browser.
6. Once finished configuring the device, change the adapter settings back to normal by following steps 1-3 and clicking Obtain an IP address automatically.
See the video below for a visual guide of the steps above:
- Connect the computer to the same network as the cameras.

- Download the Config tool program.
- Once the download is complete, extract the zip file, and open the ConfigTool.exe file.

- Select the
 button, devices that are found on the network will be listed.
 - Click the Web button next to the camera you would like to login to.

- A new page will open, bringing up the login page for the camera. Enter the username and password for the camera. Usually, the username is admin, and the password is the same as the recorder.


2. Navigate to Setting > Event > Video Detection > Motion Detection 3. Click on Setting next to Period.
 4. Fill out the Period Settings, then click Save.
5. Click Save.
IVS (Tripwire, Intrusion, etc)
IVS Period Scheduling via NVR
When editing the IVS rule, select the
- Navigate to the IVS rule you wish to edit.

- Select the Setting button next to Schedule.

- Adjust the Schedule to suit your requirements, then click OK.

- Click OK on the prompt Do you want to make the configured arming period the same as the camera?
IVS Period Scheduling via Camera Web Interface (Old GUI - Grey)
1. Log into the camera's web interface
How to log into the camera's web interface
There are two methods to connect to an IP camera's web interface, depending on how the camera is connected to the recorder. The reason to connect directly to the web interface, is to adjust specific settings that are unable to be setup from the recorder. Such as PTZ camera idle motion settings, and ANPR camera settings.
Accessing Cameras that are directly connected to an NVR
When using a recorder with inbuilt PoE ports, the cameras that are connected will automatically get assigned an IP address from the recorder.
In order to login to the camera, we first need to login to the NVR. This method works on recorders that are using the black user interface.
- Connect your computer to the same network as the recorder.

- If there is internet access, your computer should receive an IP address in the same IP address range of the recorder. If your computer does not receive an IP address or there is no modem/router, see the "Changing the IP address on a Windows Computer" section to statically assign an IP address in the same range as the recorders IP address.
- On the recorder, go to Main Menu > Network. Note down the IP address of the recorder.
- On the computer, open Internet Explorer and enter the IP address of the recorder.

- If the computer is able to see the recorder, you will see a login page. Enter the recorders username and password.

- Select Setting > Camera > Camera List.


- Next to each camera, there will be a
 icon. Select the icon next to the camera you wish to connect to.
- A new page will open, bringing up the login page for the camera. Enter the username and password for the camera. Usually, the username is admin, and the password is the same as the recorder.


Connecting to cameras that are connected via a PoE switch.
This guide requires that the recorder and camera are already setup for network access. If the camera is not currently connected to the NVR, you may need to assign an IP address to your PC/Laptop Manually, see the "Changing the IP address on a Windows Computer" below to statically assign an IP address in the same range as the cameras IP address.
Changing the IP address on a Windows Computer - If no Modem/Router is connected
Follow the below steps to manually assign an IP address to a Windows computer, this will need to be done if the recorder/camera you are connecting to is not connected to a local network where DHCP is being assigned to devices.
Windows 10
- Open Settings.
- Select Network & Internet.

- Select Status, then Change Adapter Options.

-
Right-click the network adapter you want to change the IP address for, and select Properties.

-
Double-click the Internet Protocol Version 4 (TCP/IPv4) item.

- Click Use the following IP address and enter an IP address in the same range as the device you are trying to access. (E.g when trying to access 192.168.1.108 use a IP address in the 192.168.1.x range.) Note: This cannot be the same as the device you are trying to connect to or any other device on the same network. Save your changes on both windows.

- Type the IP address of the device you are trying to access into the address bar of your web browser.
- Once finished configuring the device, change the adapter settings back to normal by following steps 1-5 and clicking Obtain an IP address automatically.
Windows 11
1. In the Windows search bar at the bottom of the page, type Control Panel and press enter.
2. Select Network and Internet.

3. Select Network and Sharing Centre.

4. Select the link for Connections in the network that you want to change the IP address for.

5. Select Properties.

6. Double-click the Internet Protocol Version 4 (TCP/IPv4) item.

7. Click Use the following IP address and enter an IP address in the same range as the device you are trying to access. (E.g when trying to access 192.168.1.108 use a IP address in the 192.168.1.x range.) Note: This cannot be the same as the device you are trying to connect to or any other device on the same network. Save your changes on both windows.

8. Type the IP address of the device you are trying to access into the address bar of your web browser.
9. Once finished configuring the device, change the adapter settings back to normal by following steps 1-6 and clicking Obtain an IP address automatically.
See the video below for a visual guide of the steps above:
Shortcut
1. In the Windows search bar at the bottom of the page, type Ncpa.cpl and press enter.
2. Right-click the network adapter you want to change the IP address for, and select Properties.
3. Select the Internet Protocol Version 4 (TCP/IPv4) item.

4. Click Use the following IP address and enter an IP address in the same range as the device you are trying to access. (E.g when trying to access 192.168.1.108 use a IP address in the 192.168.1.x range.) Note: This cannot be the same as the device you are trying to connect to or any other device on the same network. Save your changes on both windows.

5. Type the IP address of the device you are trying to access into the address bar of your web browser.
6. Once finished configuring the device, change the adapter settings back to normal by following steps 1-3 and clicking Obtain an IP address automatically.
See the video below for a visual guide of the steps above:
- Connect the computer to the same network as the cameras.

- Download the Config tool program.
- Once the download is complete, extract the zip file, and open the ConfigTool.exe file.

- Select the
 button, devices that are found on the network will be listed.
 - Click the Web button next to the camera you would like to login to.

- A new page will open, bringing up the login page for the camera. Enter the username and password for the camera. Usually, the username is admin, and the password is the same as the recorder.


2. Navigate to Setting > Event > IVS
3. Click on Setting next to Period.
4. Fill out the Period Settings, then click Save. 5. Click Save.
IVS Period Scheduling via Camera Web Interface (New GUI - White/Blue)
1. Log into the camera's web interface
How to log into the camera's web interface
How to Login to Web Interface of an IP Camera
There are two methods to connect to an IP Camera, depending on how the camera is ...
2. Navigate to IP Camera > AI >
('IP Camera' top left at main meu)

3. Enable IVS click Next
5. Draw Rule (Yellow line)
6. Change Schedule (Optional)
7. Add or Remove Event Linkage depending on what action you want (Snapshot, Record, Alarm, etc)

Setting up Mobile Application
In order for the unit to send notifications
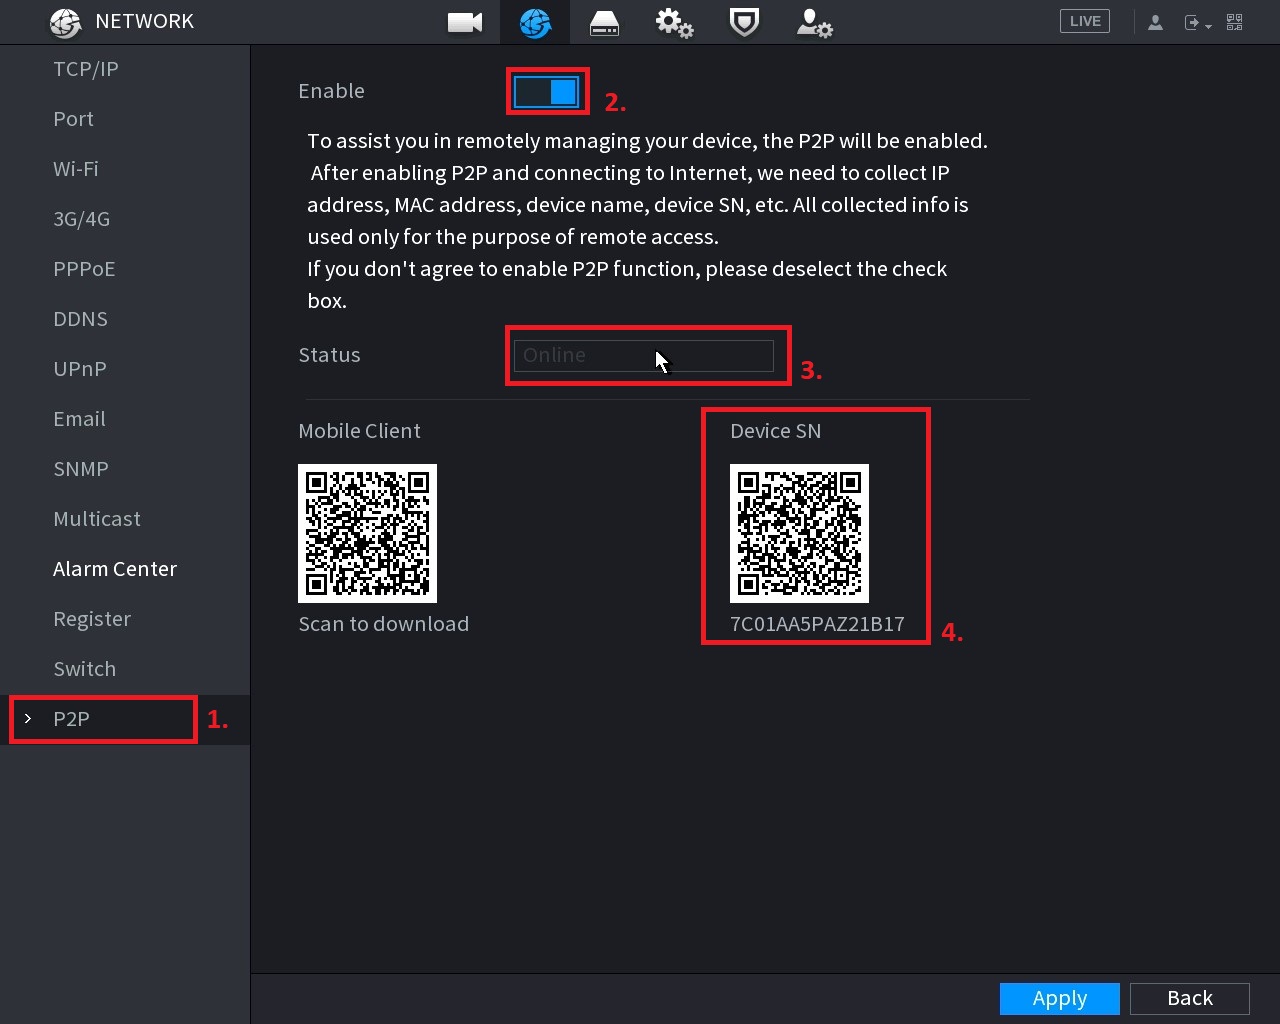
the P2P setting in the Network Menu needs to be enabled
and the Network settings need to be correct
and give you an "online" status in the P2P menu.
How to add devices to DMSS mobile app
 DMSS is a remote surveillance app that can be used to view your Devices remotely.
It can be used access Live view, Recorded playback, get event notifications, and receive calls and unlock door stations away from home.
DMSS can be found on the Google Play store and iOS App Store.
How to add devices to DMSS via P2P
1. Select the Plus Icon At the Top Right.

2. If you are Not Logged in DMSS will give you this Message. At which you can either Log In or continue to add the device as a Local Device.

3. Select Scan QR Code

4. Scan the QR code for your Device's Serial Number, then click Next
Info
The QR code can be found at Main Menu > Network > P2P (or Easy4IP) on a recorder AND on the box the device came in.

5. After scanning your Serial Number It Will Appear in the Box.
Note
The Security code Dialog box is for only for certain Devices are not usually associated with NVR's and Cameras and can be Ignored.
Select Next.

6. Select the type of device you wish to add.
NVR for an NVR for a recorder with IP cameras
DVR/XVR for a recorder with CVI cameras
VTO for a Door Station
Wired Camera for a standalone Camera wired to a switch or router

7. Enter In details of the Device
i. Name Device, this is how you'll identify your device (home, office etc. ii. Enter Username of the device. iii. Enter The password of the Device
After you've entered those details select Save.

8. Confirm your Time Zone and DST is Set correctly. Select Next

9. This Is How It Will Appear on Your Home Screen

Adding Devices Via IP/Domain
If you wish to add a device to DMSS via it's IP address you will need to use Port Forwarding.
If you are unfamiliar with Port forwarding, we suggest that you use the P2P method outlined above.
1. Select Plus Button at top Right
2. Select IP/Domain

3. Select Add Mode If you to add via a different mode

4. Select on Which Protocol You Will be Using

5. Enter the NVR Information Address, Name, Username, Device Password and Select Save

Add Device Over Local Network
1. Select Plus Icon At the Top Right.

2. Select Search on LAN

3. Select Your Device From The ones Listed

4 . Select Add Mode And Select P2P or Domain (Note Selecting Domain/IP will allow access while on the same Network as the device)

Video Guide
Sharing Devices to Another Account
1. On Home Menu Select the 3 dots of the device you wish to share.

2. Select Share Device.

3. Enter the DMSS account you want it shared with and select what permissions you want that account to have access to.

4. Have the shared to account fully close and Reopen app. And the device should appear.
Revoking DMSS Shared Devices
If for any reason a shared needs to have their permission revoked follow Steps Below
1. On the Home Screen Select the Device you want to manage.

2. Select Share Device.

3. Select which Account you want to manage.
4. Select Cancel Sharing And Confirm

5. That User will no longer have access to the listed Device.
How to subscribe to notifications in the DMSS Mobile App
 |
DMSS is a remote surveillance app that can be used to access your security products remotely. You can configure a whole range of push notifications in the DMSS app.
|
Enabling Notifications On DMSS
1. On the Home Page select the three dots of the device.

2. Then Select Device Details

3. Select Message

4. Select Notification and turn it for its Blue

5. Select Receive Messages and Send Notifications if you want DMSS to log and send Notifications.
Then Select Message Type

6. Select Notification type the you want to receive.
Note you will only receive notifications types that already enabled on your device ( e.g. Intrusion/tripwire is set up and enabled in IVS)

7. Select which Channels you want to get notifications from.

8. Back out to the home screen and select device details again. Ensure that notifications on there is also enabled.

9. An example of a Notification

Notification on Intercom
While adding Intercoms to the DMSS app,
The Intercom unit should be added under a DMSS account.
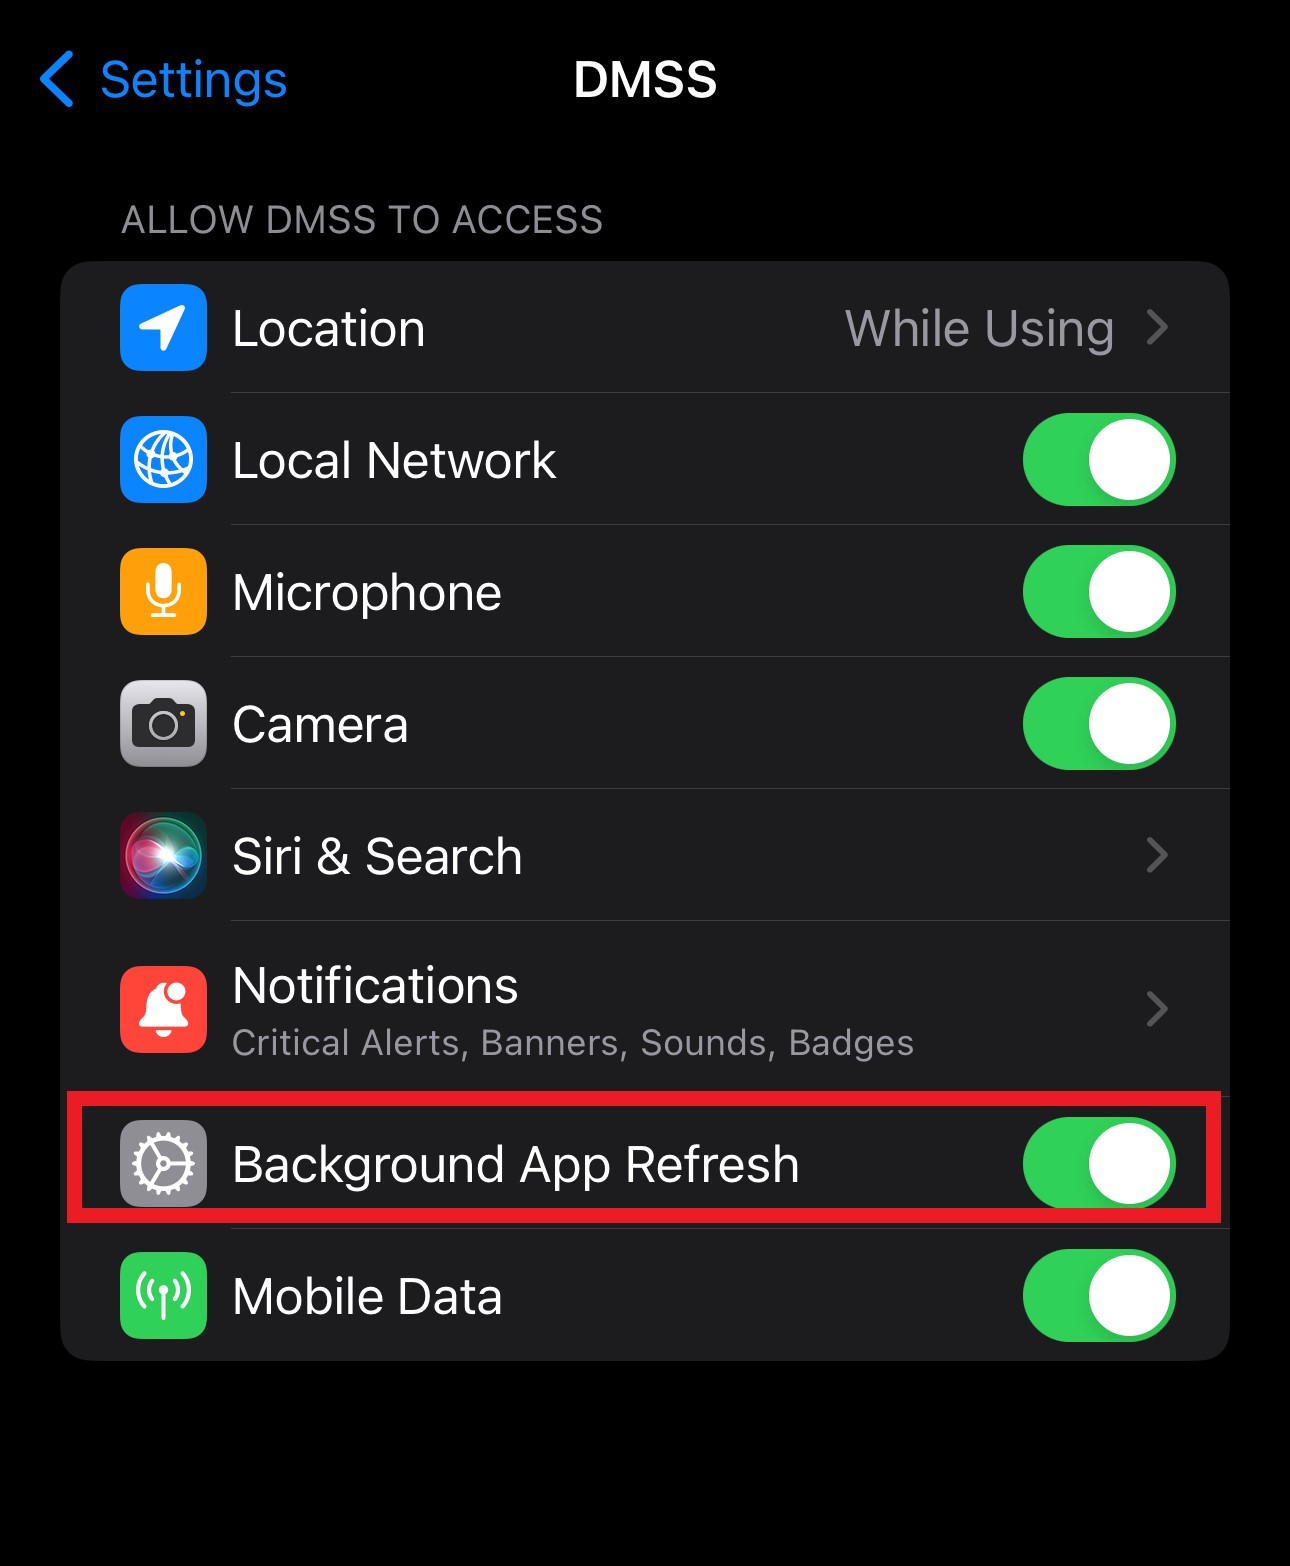
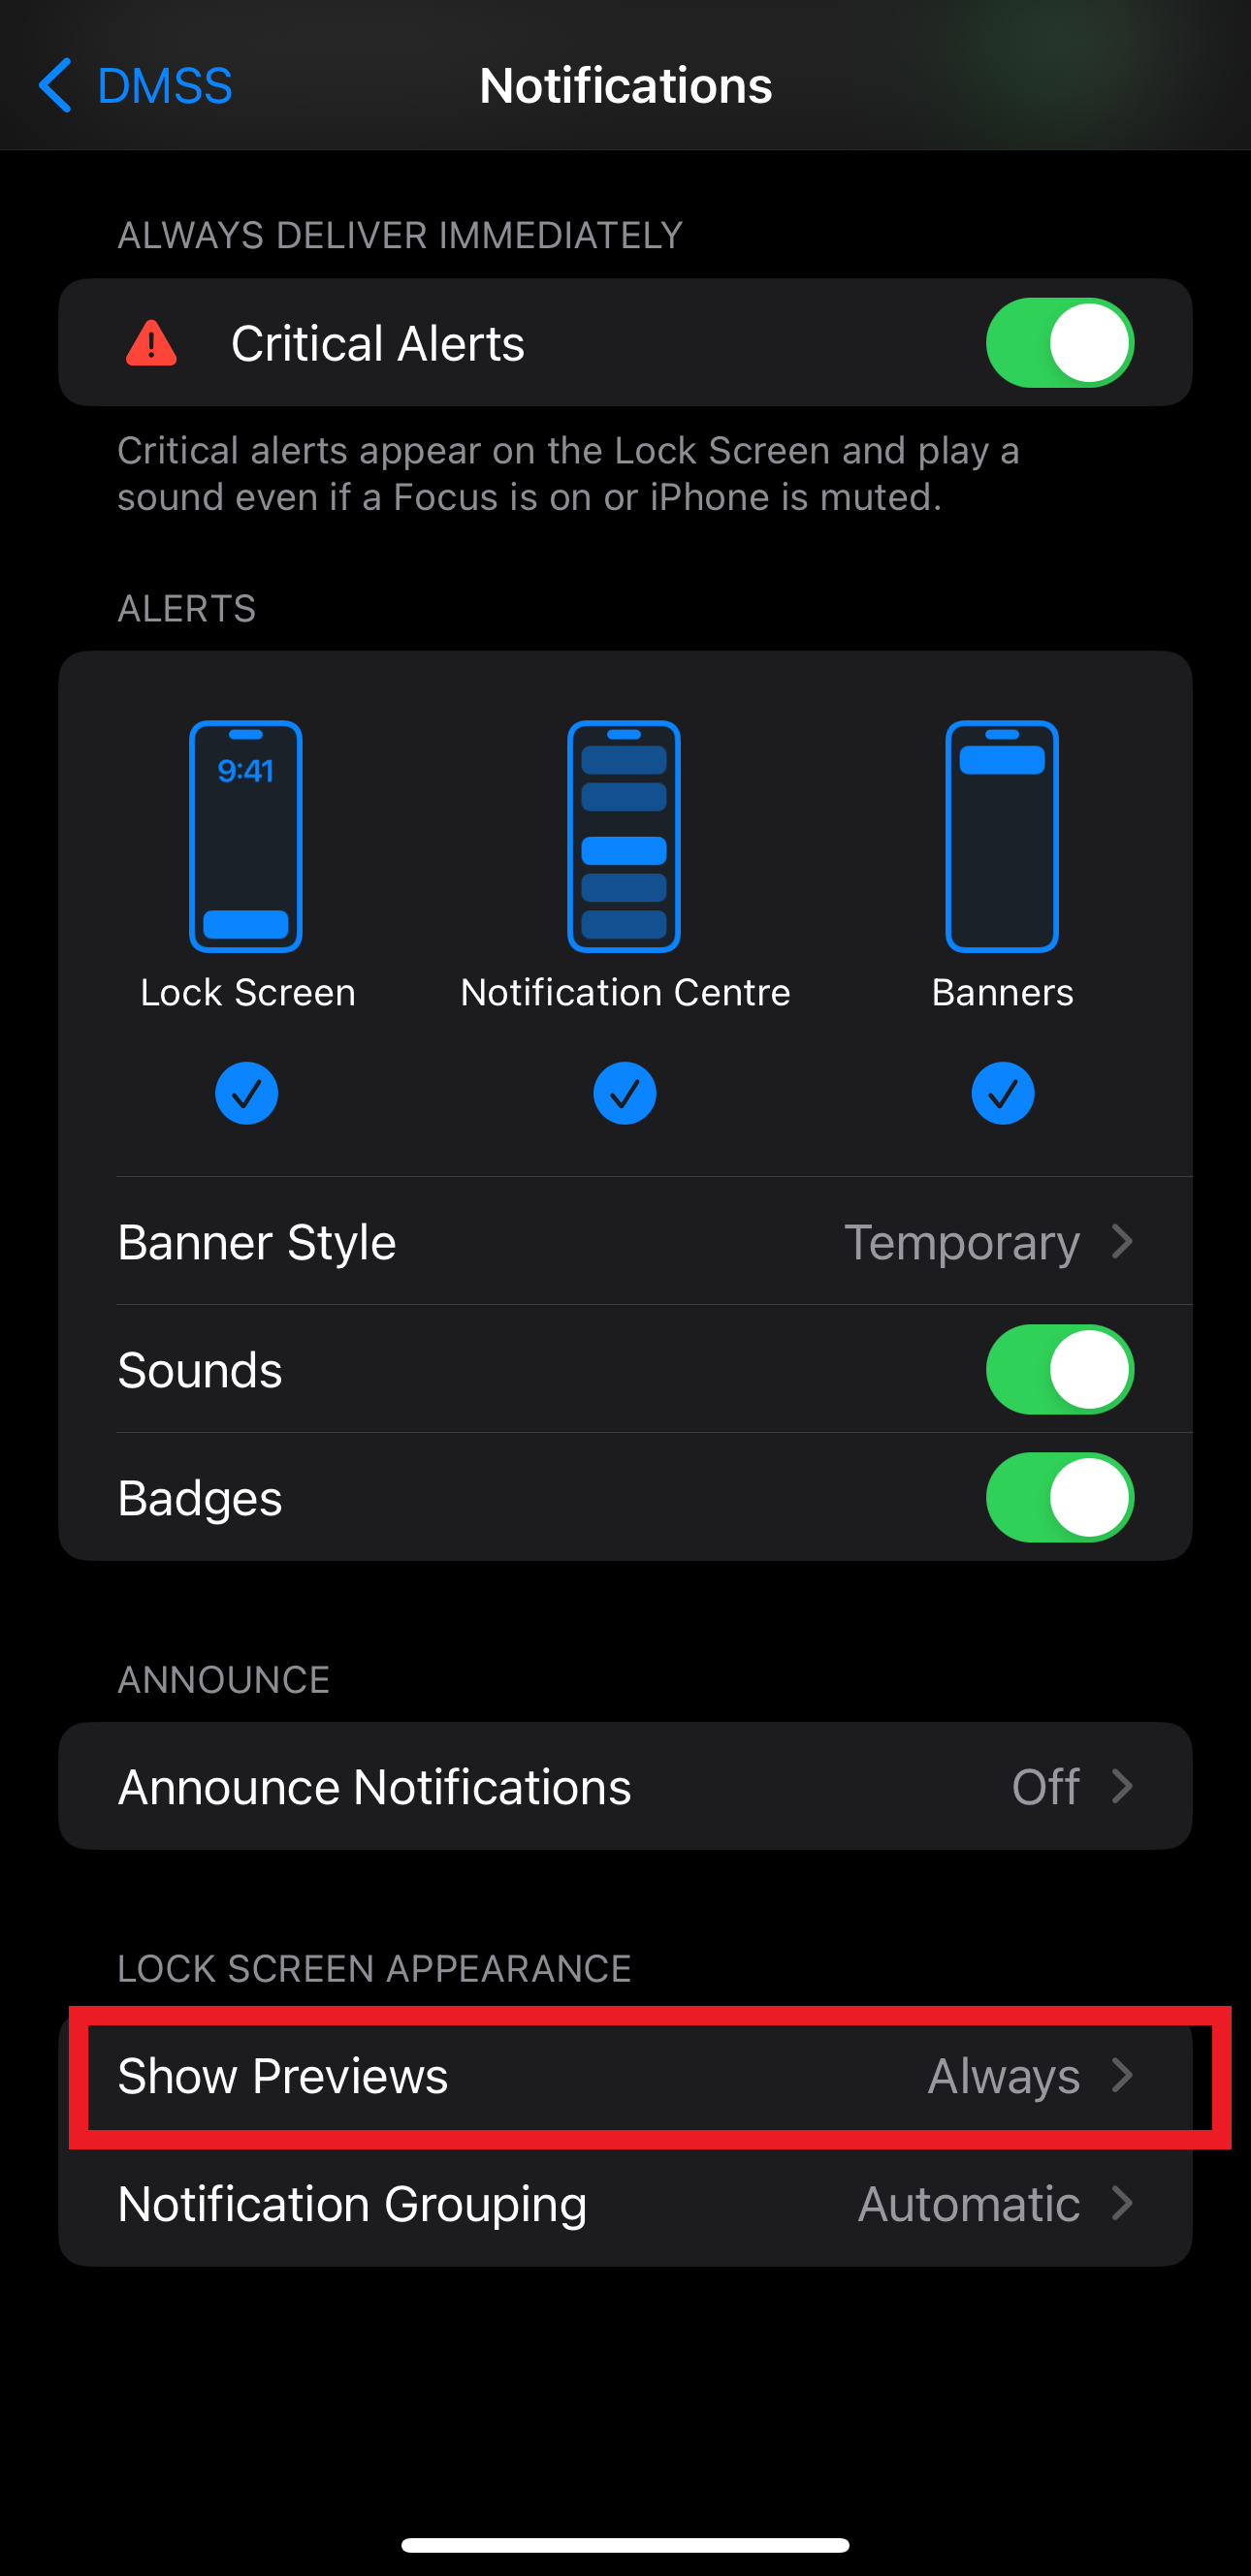
Also, make sure the Background app refresh is 'enabled' and also the show previews is set to 'Always'
Video Guide


 modify pencil
 , then Save