Whether you're replacing your router, moving to a new home, or setting up your network for the first time, this guide will walk you through the steps to enable remote access for your security system.
On some networks such as a business, the P2P protocol may be blocked, in this case contact your IT department about solutions such as port forwarding.
Connection Diagram
When wanting to connect your device to a network ensure that the Lan connection is in correct port and that there are and green light that is illuminated and an orange light that is flashing.
Correct Lan Connection

NVR Connected to router.

NVR Connected to Switch 
Blue Interface
Change Network Settings
- Open Main Menu and select Network under the setting heading.

2. Enter your network details, Alternatively if you do not know your network details you can set DHCP to automatically get network information from the router. Select Apply.

DCHP Error
If you Encounter an Error that switch cannot be in the same Range, you must update the NVR POE switch to be in a different range. Change your Switch IP to 10.2.2.1 and Apply
Main Menu > Network > Switch.

P2P Setting
- Open Main Menu Select Network under the setting heading.
2. Select P2P Setting, Select Enable and Apply, it may take a minute or two for the status to show Connect Success.

Black Interface
Change Network Settings
- Open Main Menu And Select Network

2. Select TCP/IP and Select Modify NIC1 from the table above

3. Enter your network details, you can test the IP to see if it is free, Alternatively if you do not know your network details you can set DHCP to automatically get network information from the router. Select Ok and Apply.

DHCP Error
If you Encounter an Error that switch cannot be in the same Range, you must update the NVR POE switch to be in a different range. Change your Switch IP to 10.2.2.1 and Apply
Main Menu > Network > Switch.

P2P Setting
- On Main Select Network.
2. Select P2P, Select Enable and Apply, it may take a minute or two for the status to show online.

Remote Viewing (DMSS)
Adding Devices To DMSS
How to add devices to DMSS mobile app
 DMSS is a remote surveillance app that can be used to view your Devices remotely.
It can be used access Live view, Recorded playback, get event notifications, and receive calls and unlock door stations away from home.
DMSS can be found on the Google Play store and iOS App Store.
How to add devices to DMSS via P2P
1. Select the Plus Icon At the Top Right.

2. If you are Not Logged in DMSS will give you this Message. At which you can either Log In or continue to add the device as a Local Device.

3. Select Scan QR Code

4. Scan the QR code for your Device's Serial Number, then click Next
Info
The QR code can be found at Main Menu > Network > P2P (or Easy4IP) on a recorder AND on the box the device came in.

5. After scanning your Serial Number It Will Appear in the Box.
Note
The Security code Dialog box is for only for certain Devices are not usually associated with NVR's and Cameras and can be Ignored.
Select Next.

6. Select the type of device you wish to add.
NVR for an NVR for a recorder with IP cameras
DVR/XVR for a recorder with CVI cameras
VTO for a Door Station
Wired Camera for a standalone Camera wired to a switch or router

7. Enter In details of the Device
i. Name Device, this is how you'll identify your device (home, office etc. ii. Enter Username of the device. iii. Enter The password of the Device
After you've entered those details select Save.

8. Confirm your Time Zone and DST is Set correctly. Select Next

9. This Is How It Will Appear on Your Home Screen

Adding Devices Via IP/Domain
If you wish to add a device to DMSS via it's IP address you will need to use Port Forwarding.
If you are unfamiliar with Port forwarding, we suggest that you use the P2P method outlined above.
1. Select Plus Button at top Right
2. Select IP/Domain

3. Select Add Mode If you to add via a different mode

4. Select on Which Protocol You Will be Using

5. Enter the NVR Information Address, Name, Username, Device Password and Select Save

Add Device Over Local Network
1. Select Plus Icon At the Top Right.
2. Select Search on LAN

3. Select Your Device From The ones Listed

4 . Select Add Mode And Select P2P or Domain (Note Selecting Domain/IP will allow access while on the same Network as the device)

Video Guide
Sharing Devices to Another Account
1. On Home Menu Select the 3 dots of the device you wish to share.

2. Select Share Device.

3. Enter the DMSS account you want it shared with and select what permissions you want that account to have access to.

4. Have the shared to account fully close and Reopen app. And the device should appear.
Revoking DMSS Shared Devices
If for any reason a shared needs to have their permission revoked follow Steps Below
1. On the Home Screen Select the Device you want to manage.

2. Select Share Device.

3. Select which Account you want to manage.
4. Select Cancel Sharing And Confirm

5. That User will no longer have access to the listed Device.
Notifications on DMSS
How to subscribe to notifications in the DMSS Mobile App
 |
DMSS is a remote surveillance app that can be used to access your security products remotely. You can configure a whole range of push notifications in the DMSS app.
|
Enabling Notifications On DMSS
1. On the Home Page select the three dots of the device.

2. Then Select Device Details

3. Select Message

4. Select Notification and turn it for its Blue

5. Select Receive Messages and Send Notifications if you want DMSS to log and send Notifications.
Then Select Message Type

6. Select Notification type the you want to receive.
Note you will only receive notifications types that already enabled on your device ( e.g. Intrusion/tripwire is set up and enabled in IVS)

7. Select which Channels you want to get notifications from.

8. Back out to the home screen and select device details again. Ensure that notifications on there is also enabled.

9. An example of a Notification

Notification on Intercom
While adding Intercoms to the DMSS app,
The Intercom unit should be added under a DMSS account.
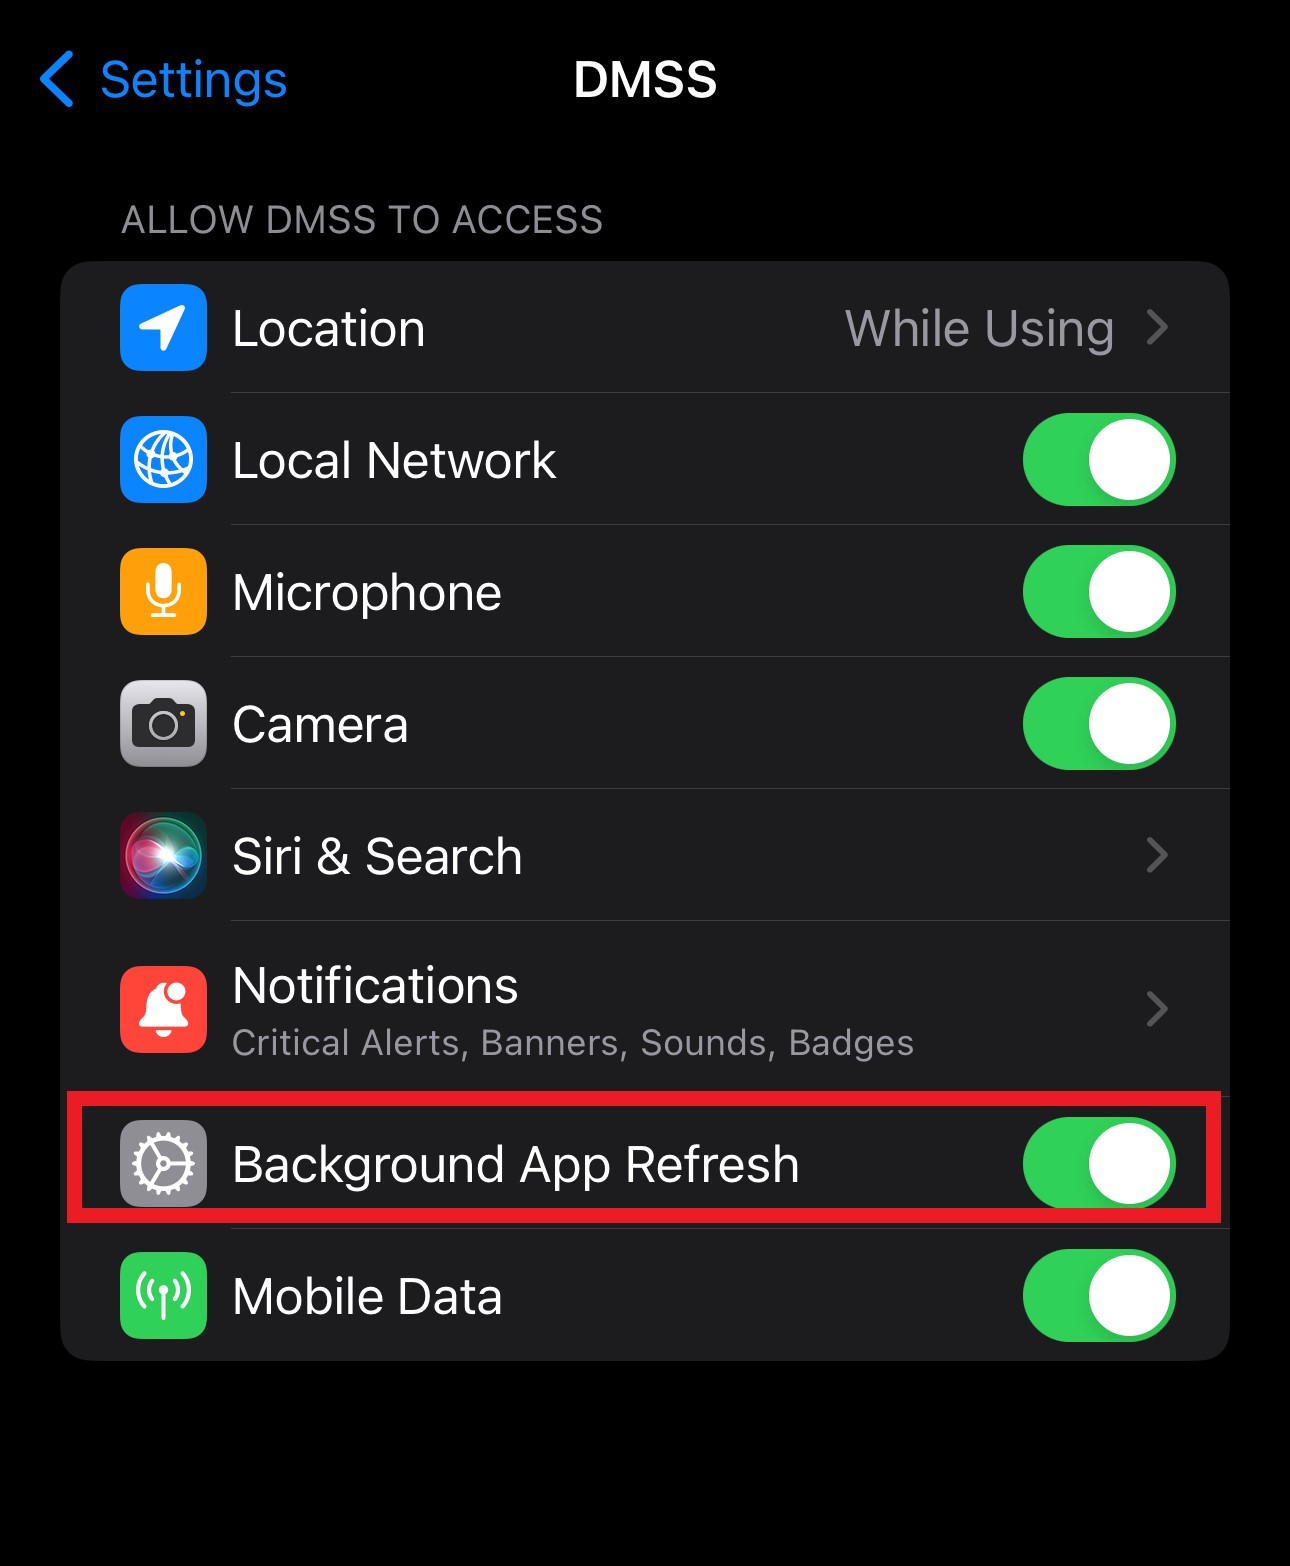
Also, make sure the Background app refresh is 'enabled' and also the show previews is set to 'Always'

Video Guide