Scheduling Notifications via NVR Disarming
On newer versions of firmware notifications for events (IVS, Motion, etc) can be disabled if disarming is active on an NVR.
Disarming can be activated via the NVR under Alarm > Disarming and on the DMSS app under Device Details > Disable Alarm Linkage. Disarming can also be schedule under Alarm > Disarming on the NVR.
How to schedule Notifications via the NVR's disarming period
- Navigate to Main Menu > Alarm > Disarming
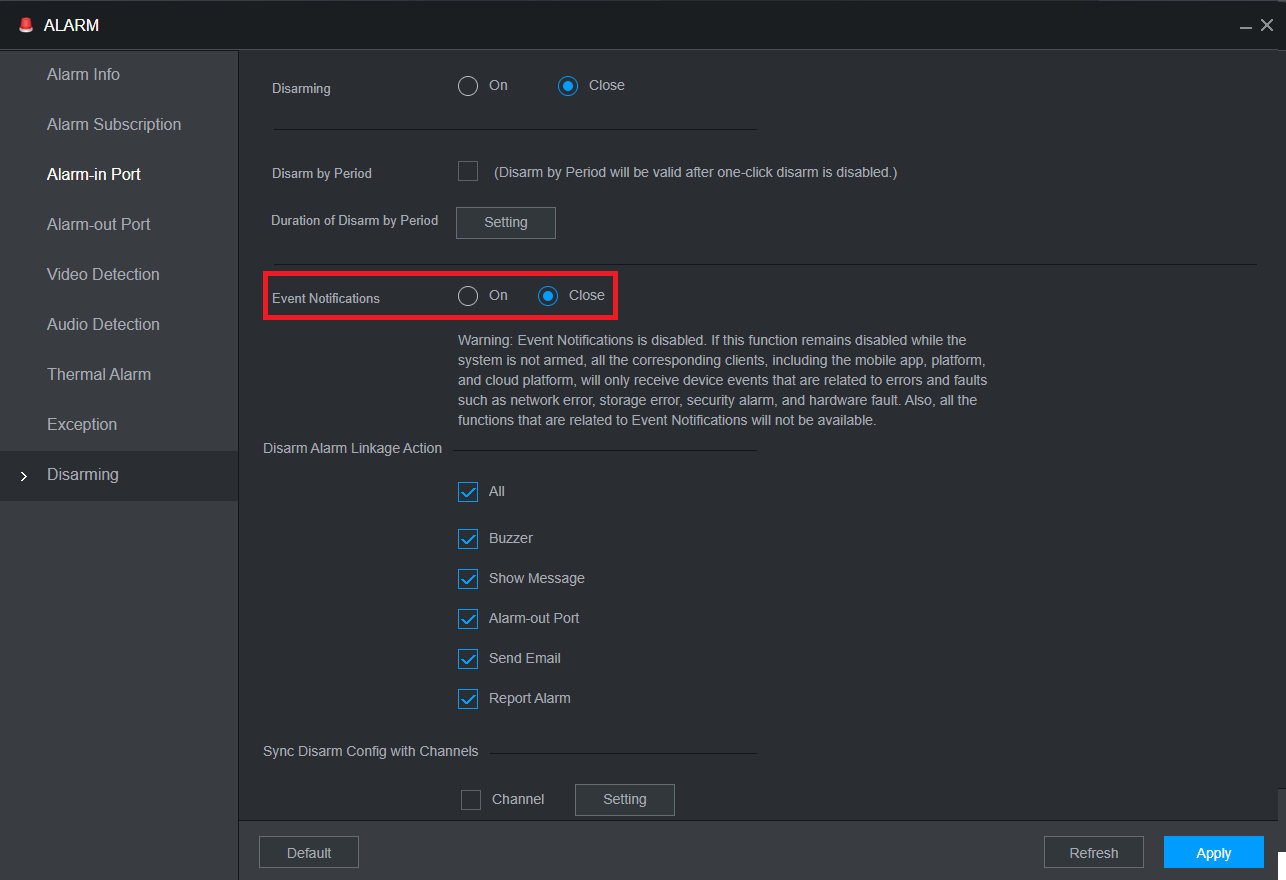
- Set Event Notifications to Close/Off, click OK on the prompt, then click Apply.
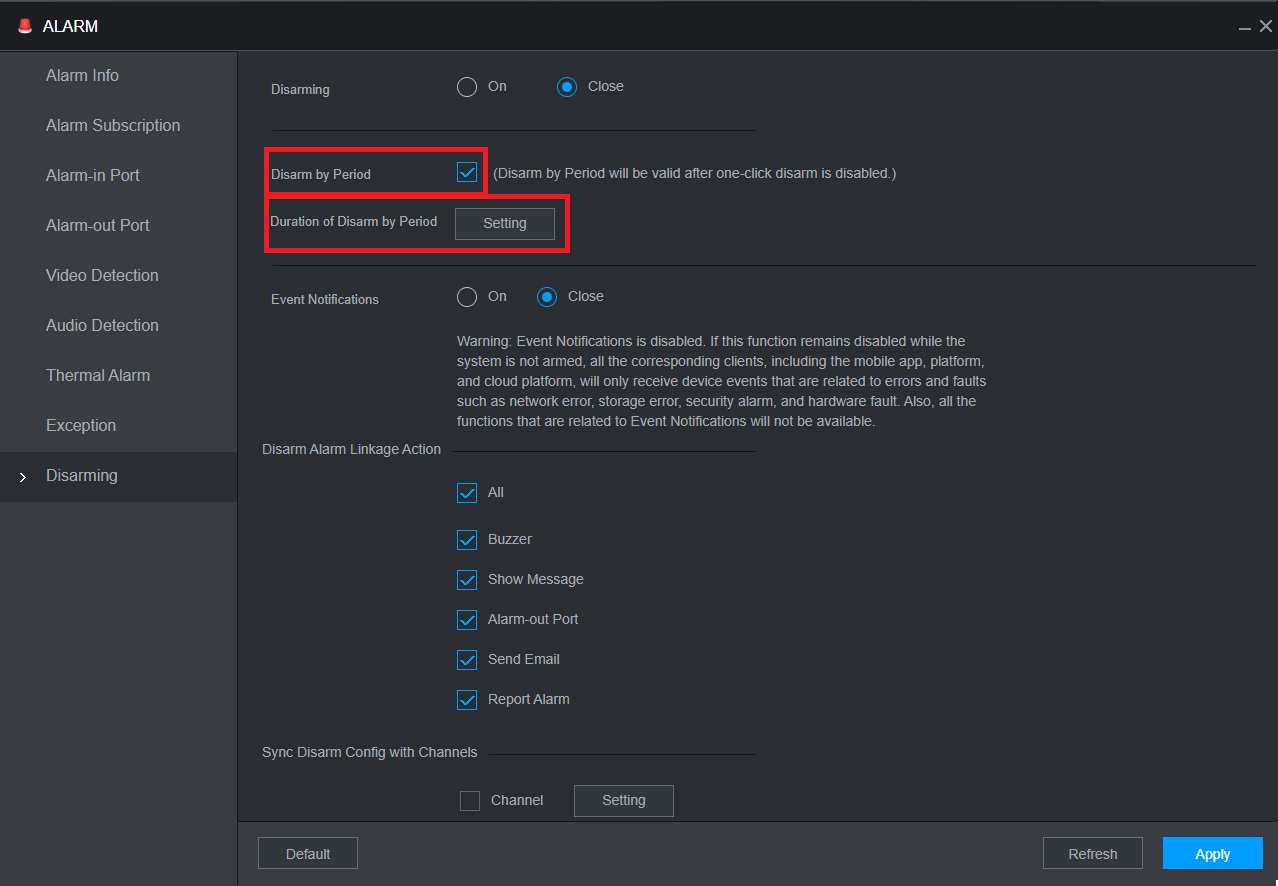
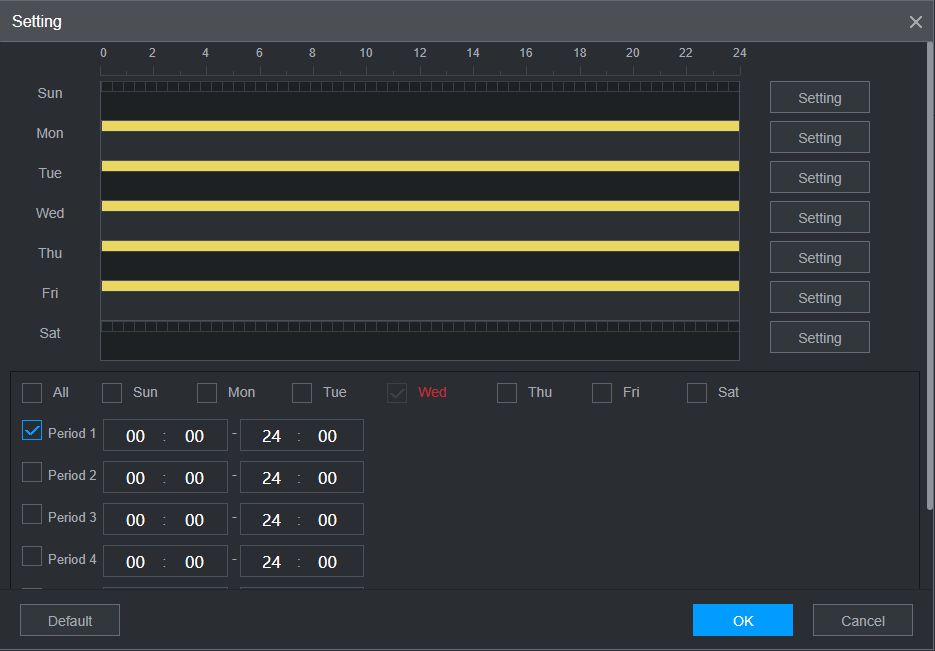
- Enable Disarm by Period, then click Setting next to Duration of Disarm by Period.
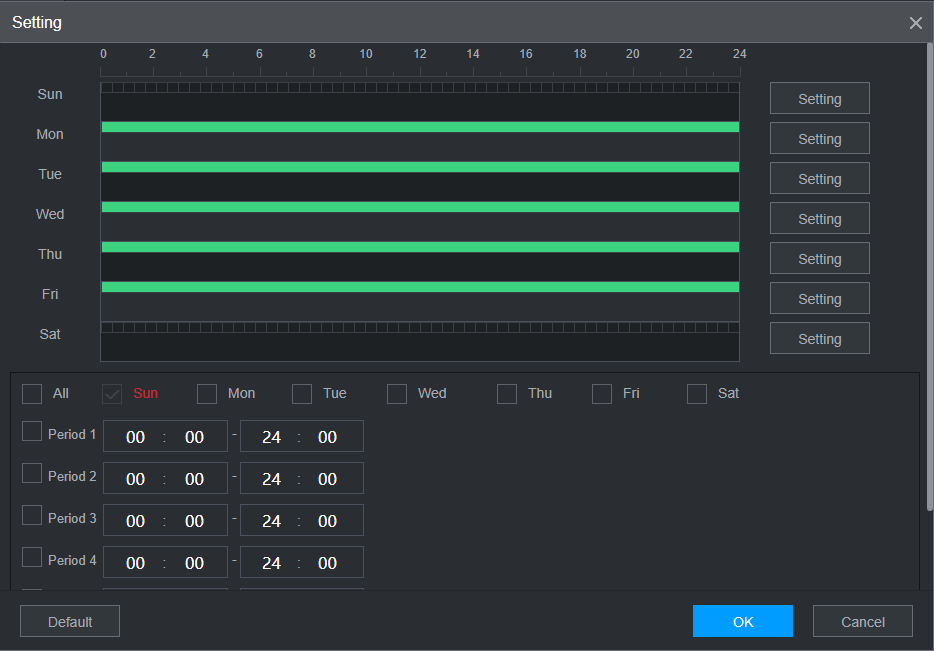
- Set the Schedule, then click OK. Then click Apply.
Scheduling the Notifications in DMSS
In the current version of DMSS, for each compatible device you can set an active notification period.
Currently there is no way to schedule different time periods for different days. The same 24h time period applies to all 7 days of the week.
How to Schedule Notifications in DMSS
 |
Tap on
 next to the device you want to schedule notifications for. next to the device you want to schedule notifications for.Then on the pop-up tap Device Details |
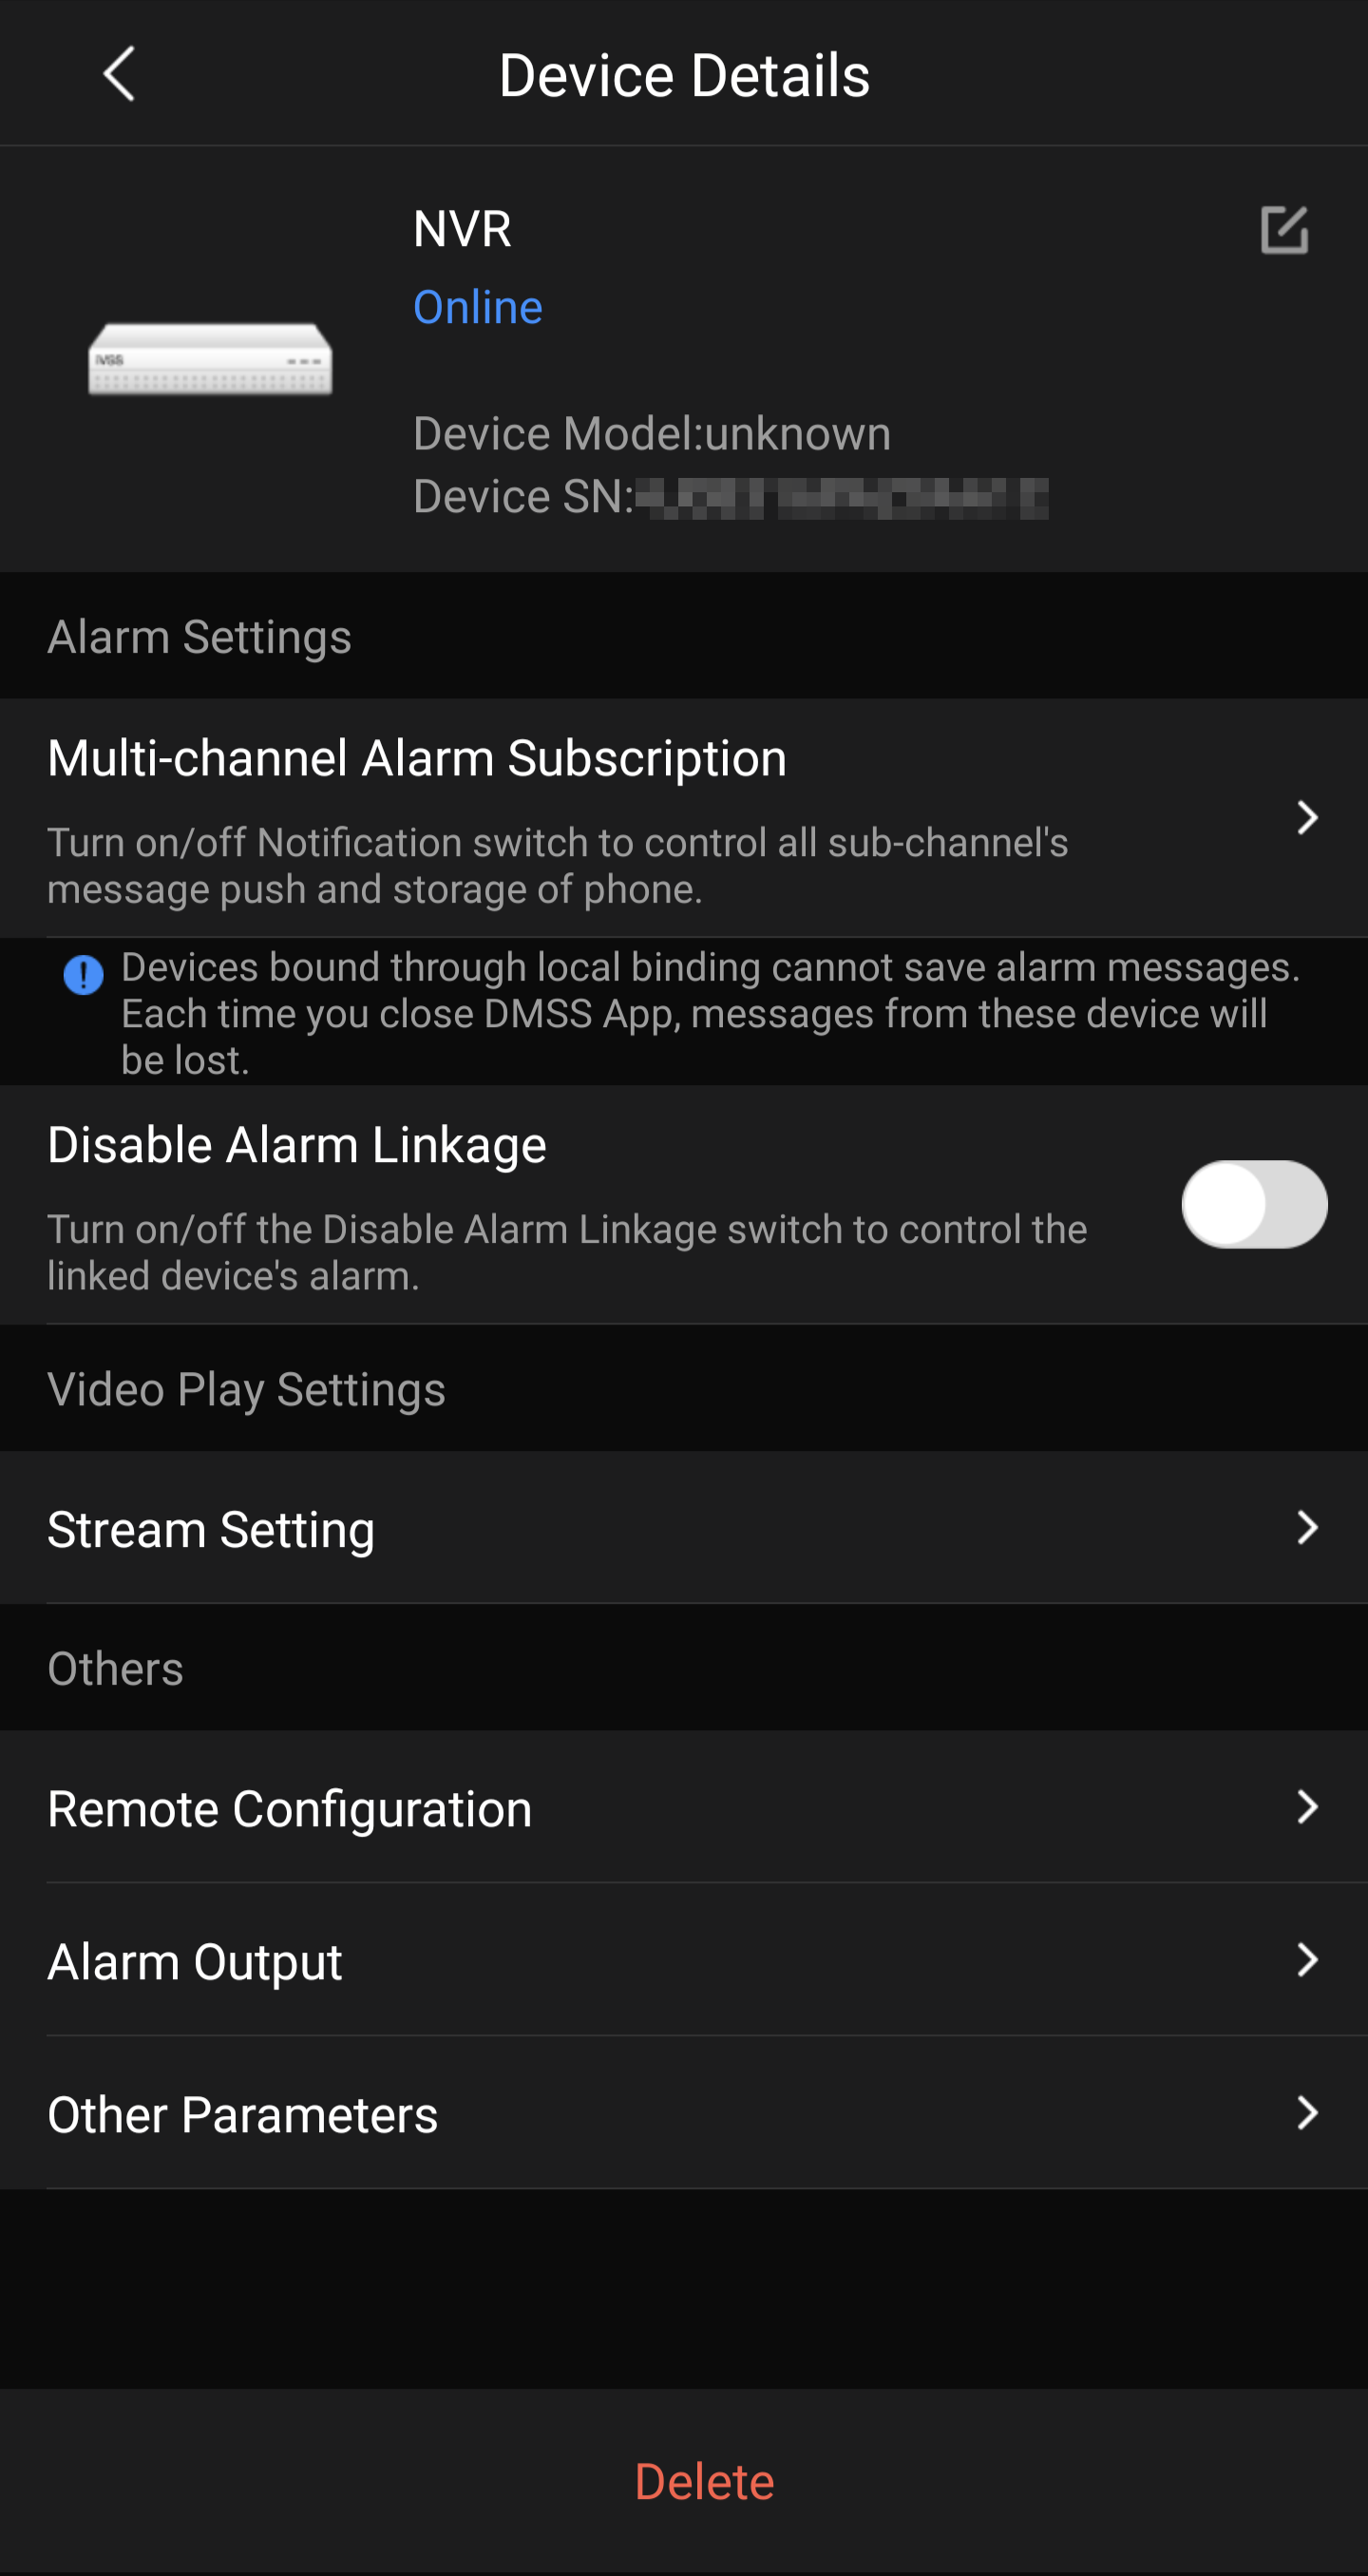 |
Tap on Notification
|
 |
Tap on Period Settings
|

|
Set the Start and End time for the active period you wish to receive notifications for.
This will apply to ALL days of the week
Tap |
 , then Save
Changing the active hours of Motion Detection and IVS
If your notifications are for Motion Detection or IVS and you wish to have a different active notification period for different days of the week, there is a workaround.
In the Web Interface of the camera you can set the active hours for the IVS rule or Motion Detection to only be active during the hours you want to receive notifications. Please be advised that if you configure your camera to do this Motion Detection and IVS will not be active outside of these hours; no IVS or Motion will be triggered or recorded.
How to Change the Active Hours of Motion Detection and IVS
Motion Detection
Motion Detection Period Scheduling via the NVR
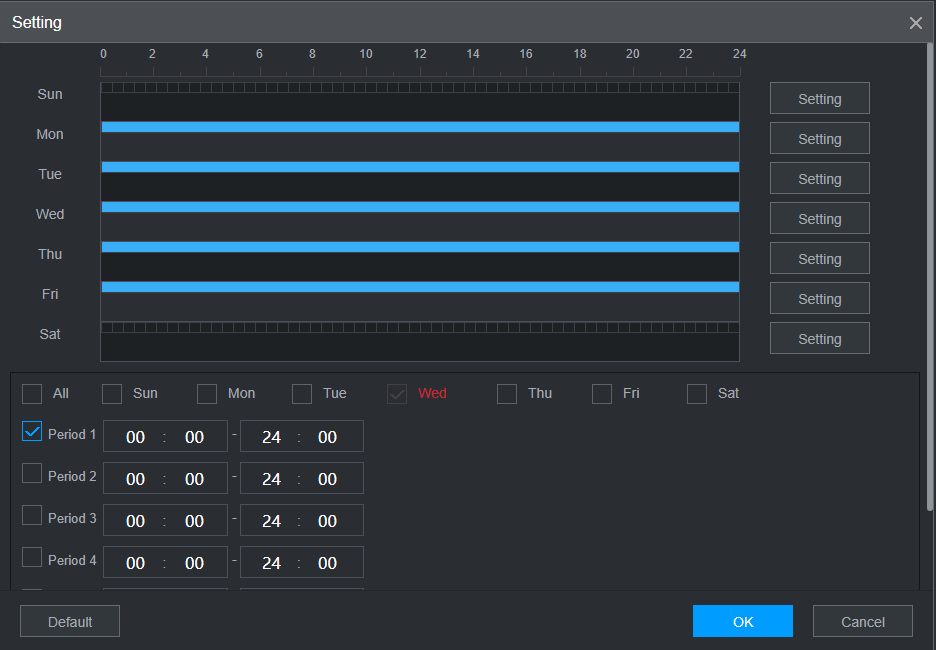
- Navigate to Alarm > Video Detection > Motion Detection.
- Select the Setting button next to Schedule.
- Adjust the Schedule to suit your requirements, then click OK.
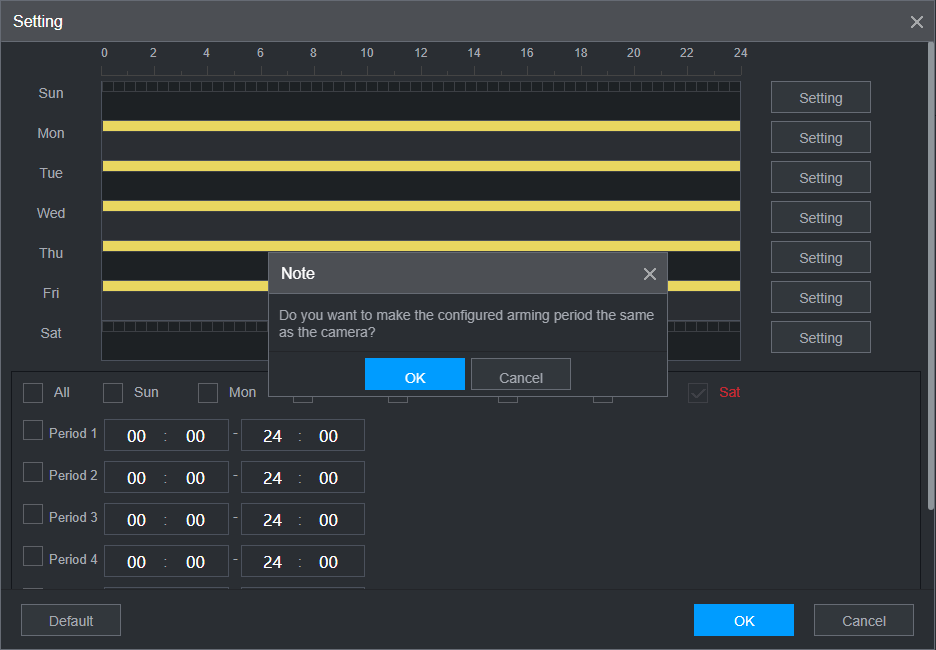
- Click OK on the prompt Do you want to make the configured arming period the same as the camera?
Motion Detection Period Scheduling via Camera Web Interface
1. Log into the camera's web interface
How to log into the camera's web interface
There are two methods to connect to an IP camera's web interface, depending on how the camera is connected to the recorder. The reason to connect directly to the web interface, is to adjust specific settings that are unable to be setup from the recorder. Such as PTZ camera idle motion settings, and ANPR camera settings.
Accessing Cameras that are directly connected to an NVR
When using a recorder with inbuilt PoE ports, the cameras that are connected will automatically get assigned an IP address from the recorder.
In order to login to the camera, we first need to login to the NVR. This method works on recorders that are using the black user interface.
- Connect your computer to the same network as the recorder.

- If there is internet access, your computer should receive an IP address in the same IP address range of the recorder. If your computer does not receive an IP address or there is no modem/router, see the "Changing the IP address on a Windows Computer" section to statically assign an IP address in the same range as the recorders IP address.
- On the recorder, go to Main Menu > Network. Note down the IP address of the recorder.
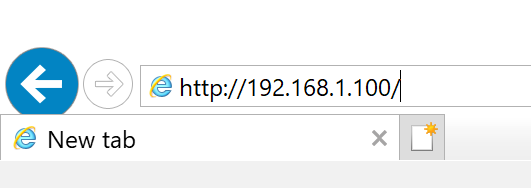
- On the computer, open Internet Explorer and enter the IP address of the recorder.
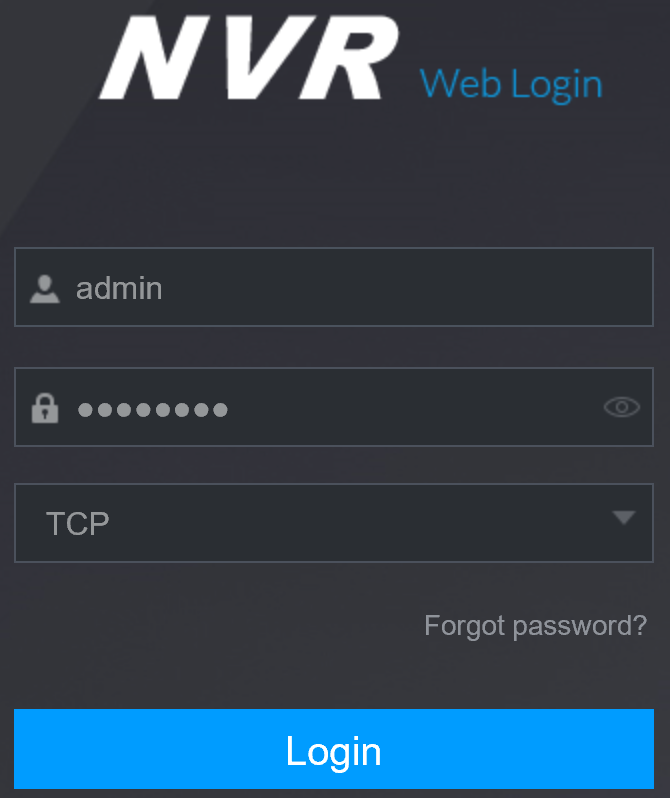
- If the computer is able to see the recorder, you will see a login page. Enter the recorders username and password.
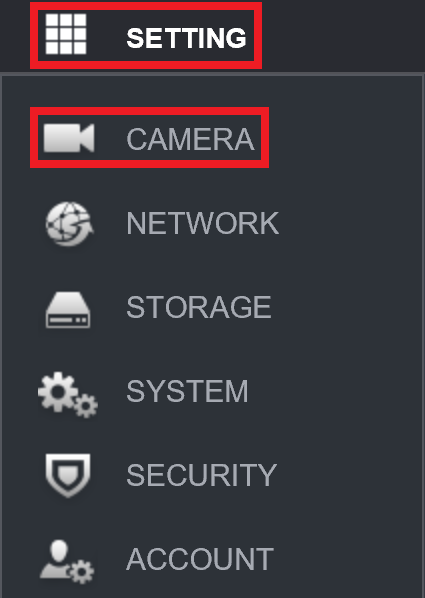
- Select Setting > Camera > Camera List.
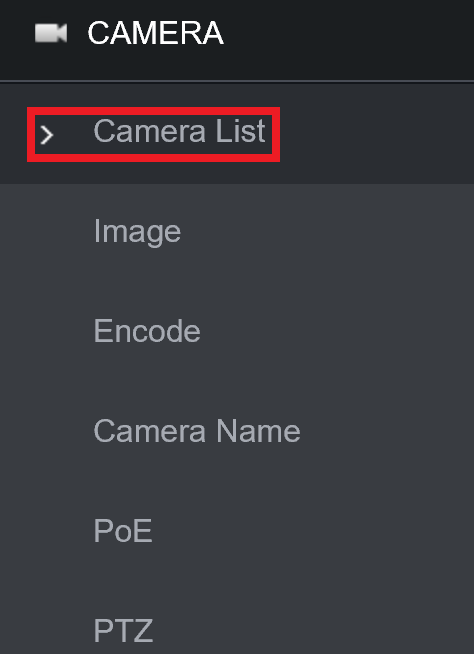
- Next to each camera, there will be a
 icon. Select the icon next to the camera you wish to connect to.
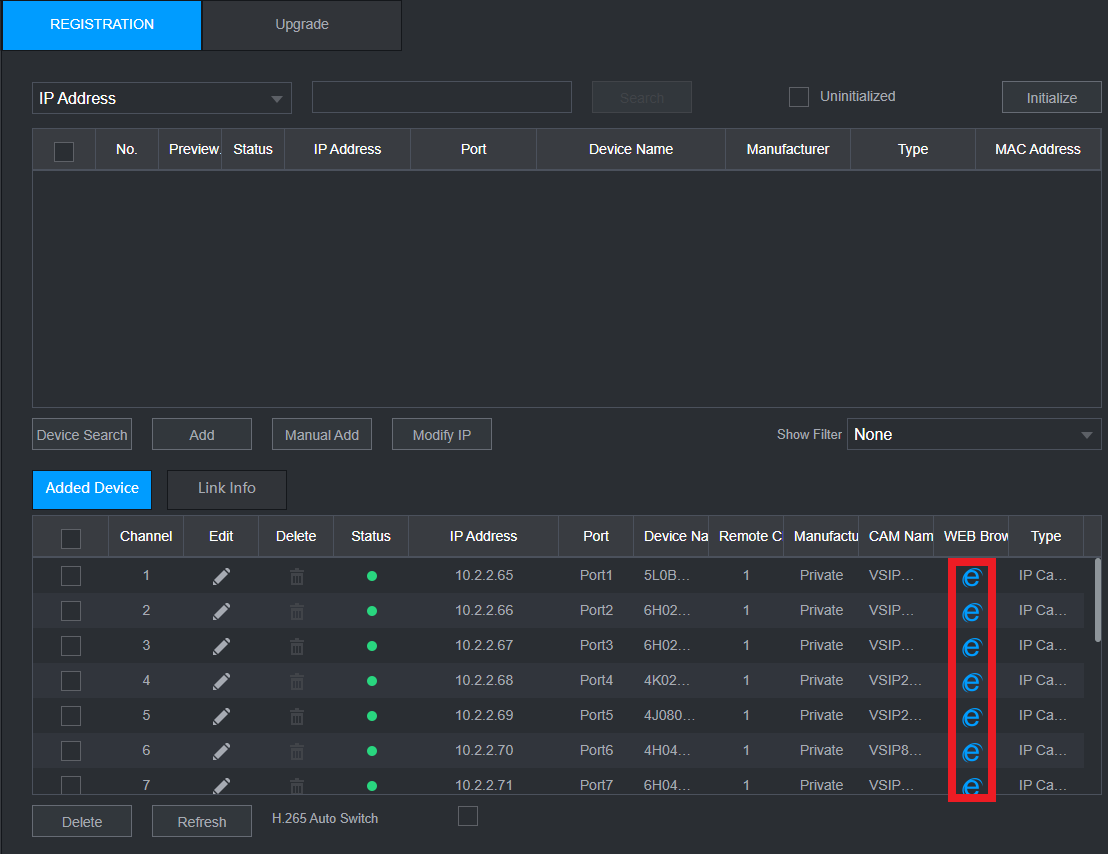
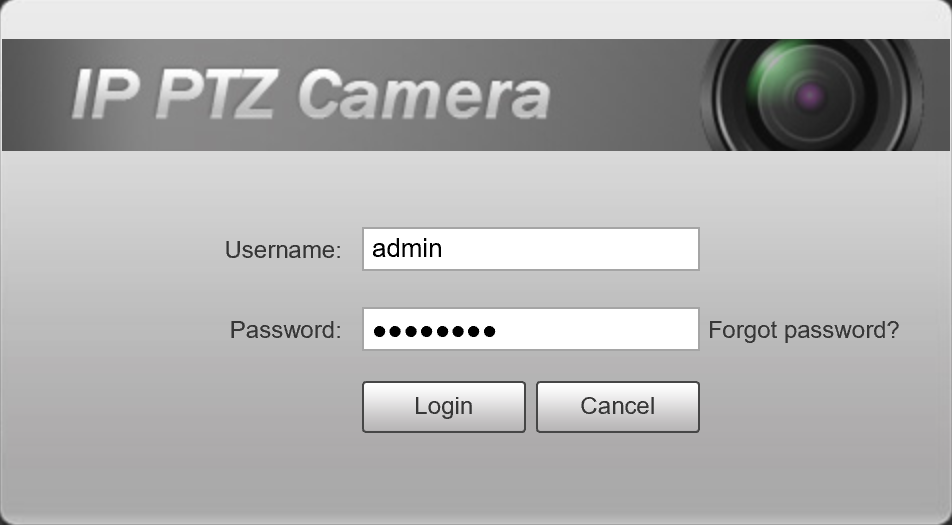
- A new page will open, bringing up the login page for the camera. Enter the username and password for the camera. Usually, the username is admin, and the password is the same as the recorder.


Connecting to cameras that are connected via a PoE switch.
This guide requires that the recorder and camera are already setup for network access. If the camera is not currently connected to the NVR, you may need to assign an IP address to your PC/Laptop Manually, see the "Changing the IP address on a Windows Computer" below to statically assign an IP address in the same range as the cameras IP address.
Changing the IP address on a Windows Computer - If no Modem/Router is connected
Follow the below steps to manually assign an IP address to a Windows computer, this will need to be done if the recorder/camera you are connecting to is not connected to a local network where DHCP is being assigned to devices.
Windows 10
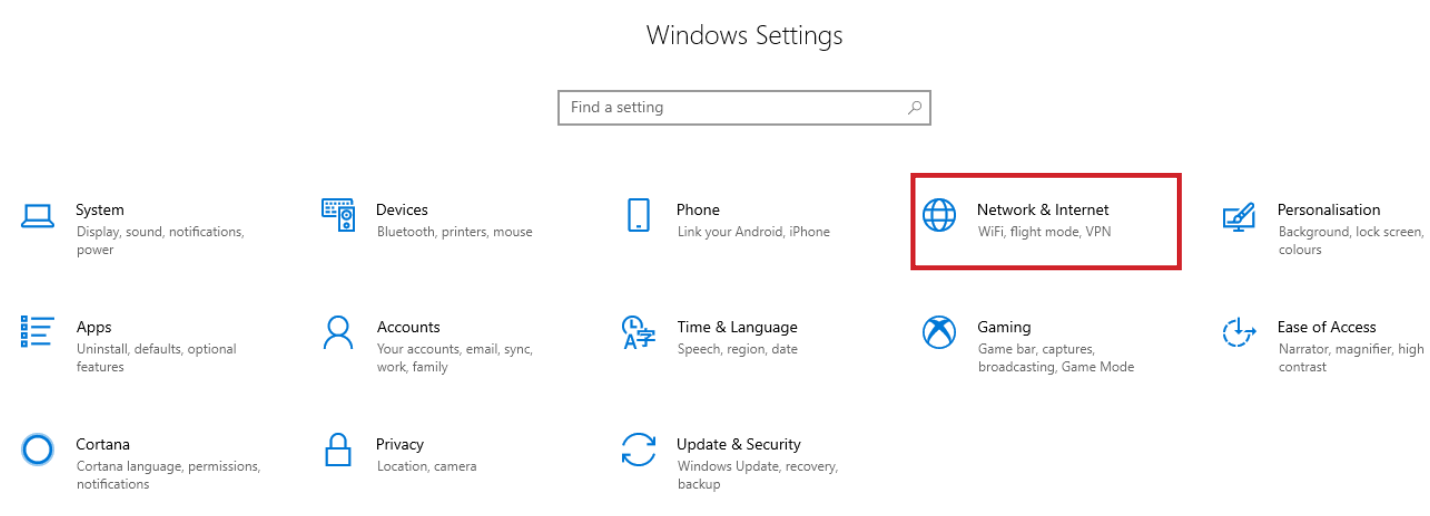
- Open Settings.
- Select Network & Internet.
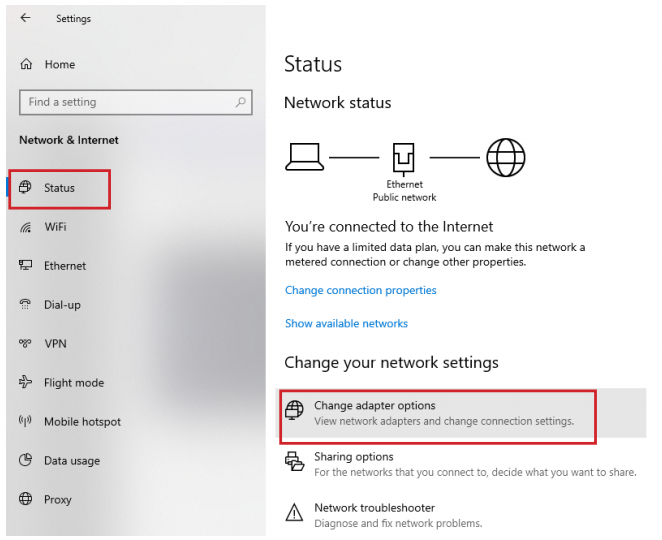
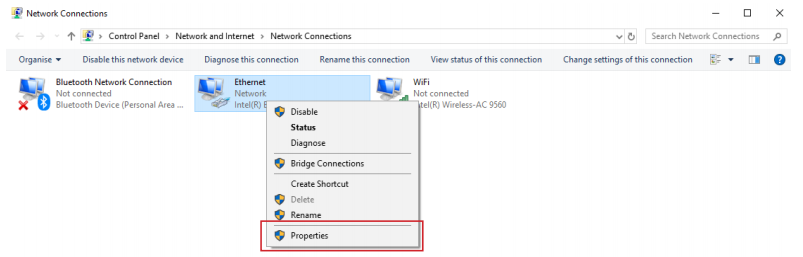
- Select Status, then Change Adapter Options.
-
Right-click the network adapter you want to change the IP address for, and select Properties.
-
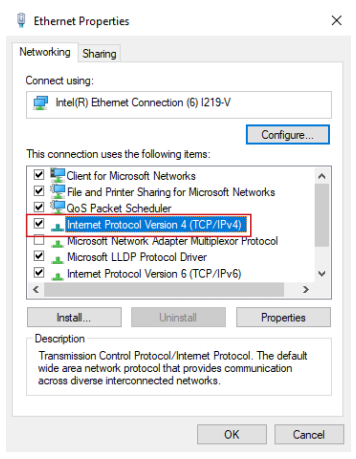
Double-click the Internet Protocol Version 4 (TCP/IPv4) item.
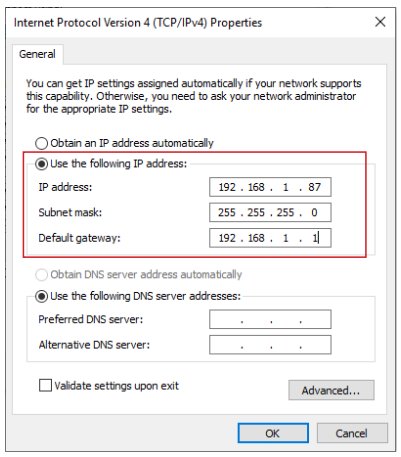
- Click Use the following IP address and enter an IP address in the same range as the device you are trying to access. (E.g when trying to access 192.168.1.108 use a IP address in the 192.168.1.x range.) Note: This cannot be the same as the device you are trying to connect to or any other device on the same network. Save your changes on both windows.
- Type the IP address of the device you are trying to access into the address bar of your web browser.
- Once finished configuring the device, change the adapter settings back to normal by following steps 1-5 and clicking Obtain an IP address automatically.
Windows 11
1. In the Windows search bar at the bottom of the page, type Control Panel and press enter.
2. Select Network and Internet.

3. Select Network and Sharing Centre.

4. Select the link for Connections in the network that you want to change the IP address for.

5. Select Properties.

6. Double-click the Internet Protocol Version 4 (TCP/IPv4) item.

7. Click Use the following IP address and enter an IP address in the same range as the device you are trying to access. (E.g when trying to access 192.168.1.108 use a IP address in the 192.168.1.x range.) Note: This cannot be the same as the device you are trying to connect to or any other device on the same network. Save your changes on both windows.

8. Type the IP address of the device you are trying to access into the address bar of your web browser.
9. Once finished configuring the device, change the adapter settings back to normal by following steps 1-6 and clicking Obtain an IP address automatically.
See the video below for a visual guide of the steps above:
Shortcut
1. In the Windows search bar at the bottom of the page, type Ncpa.cpl and press enter.
2. Right-click the network adapter you want to change the IP address for, and select Properties.
3. Select the Internet Protocol Version 4 (TCP/IPv4) item.

4. Click Use the following IP address and enter an IP address in the same range as the device you are trying to access. (E.g when trying to access 192.168.1.108 use a IP address in the 192.168.1.x range.) Note: This cannot be the same as the device you are trying to connect to or any other device on the same network. Save your changes on both windows.
5. Type the IP address of the device you are trying to access into the address bar of your web browser.
6. Once finished configuring the device, change the adapter settings back to normal by following steps 1-3 and clicking Obtain an IP address automatically.
See the video below for a visual guide of the steps above:
- Connect the computer to the same network as the cameras.
- Download the Config tool program.
- Once the download is complete, extract the zip file, and open the ConfigTool.exe file.
- Select the
 button, devices that are found on the network will be listed.
 - Click the Web button next to the camera you would like to login to.
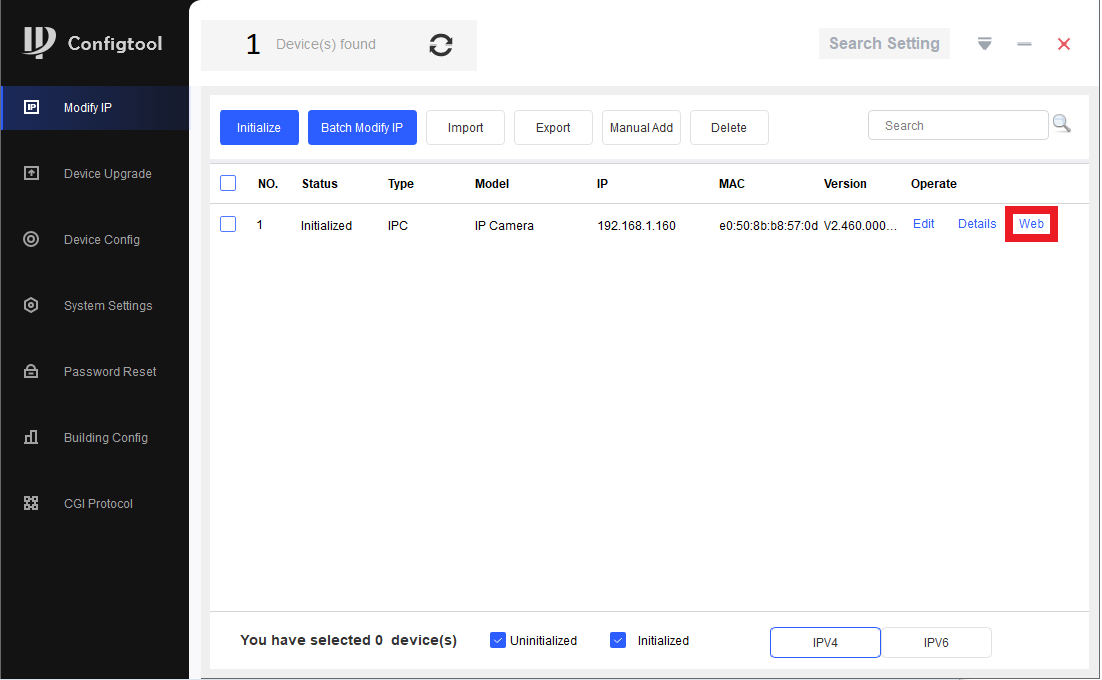
- A new page will open, bringing up the login page for the camera. Enter the username and password for the camera. Usually, the username is admin, and the password is the same as the recorder.
2. Navigate to Setting > Event > Video Detection > Motion Detection 3. Click on Setting next to Period.
 4. Fill out the Period Settings, then click Save.
5. Click Save.
IVS (Tripwire, Intrusion, etc)
IVS Period Scheduling via NVR
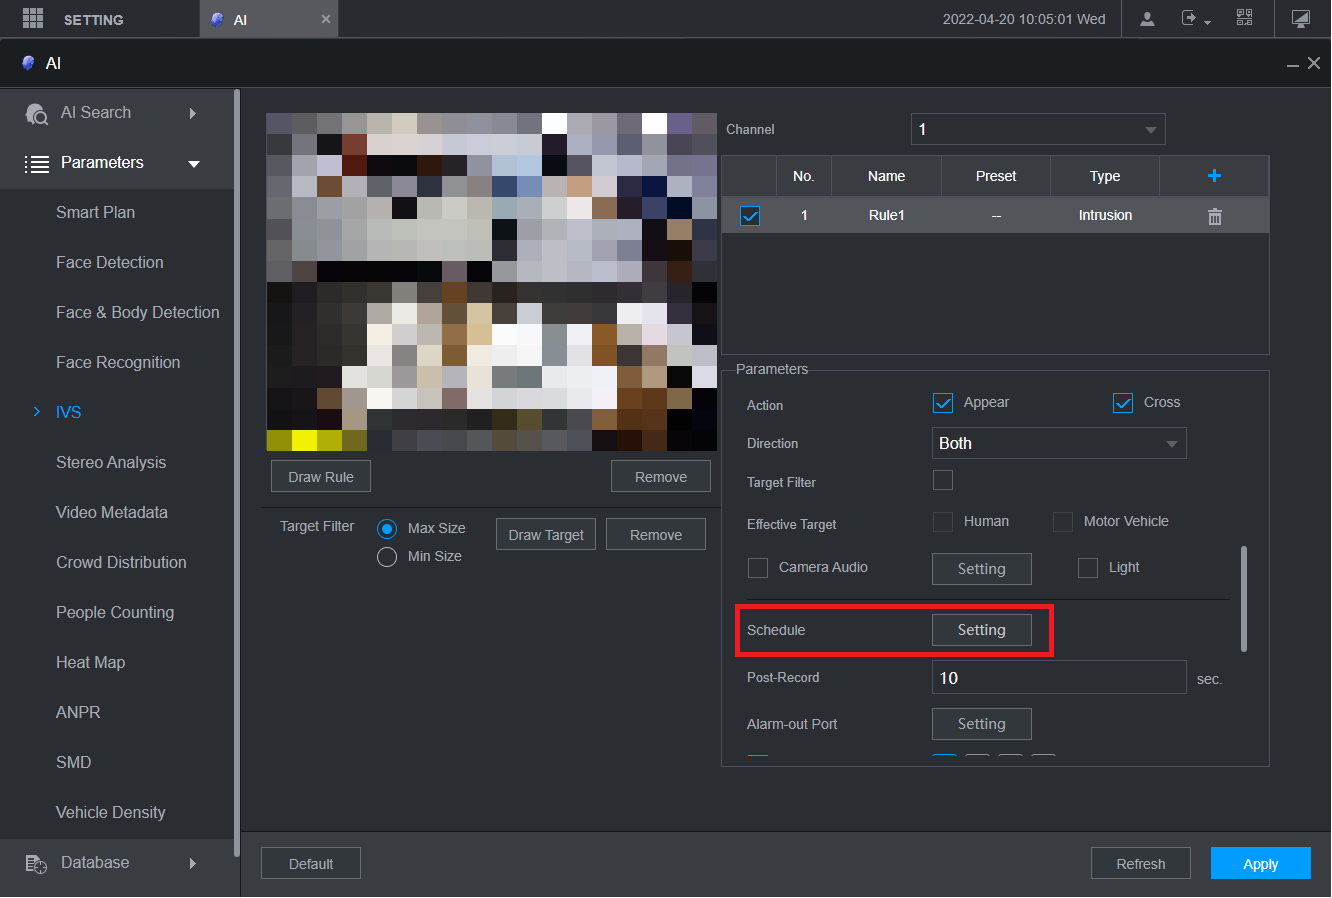
When editing the IVS rule, select the
- Navigate to the IVS rule you wish to edit.
- Select the Setting button next to Schedule.
- Adjust the Schedule to suit your requirements, then click OK.
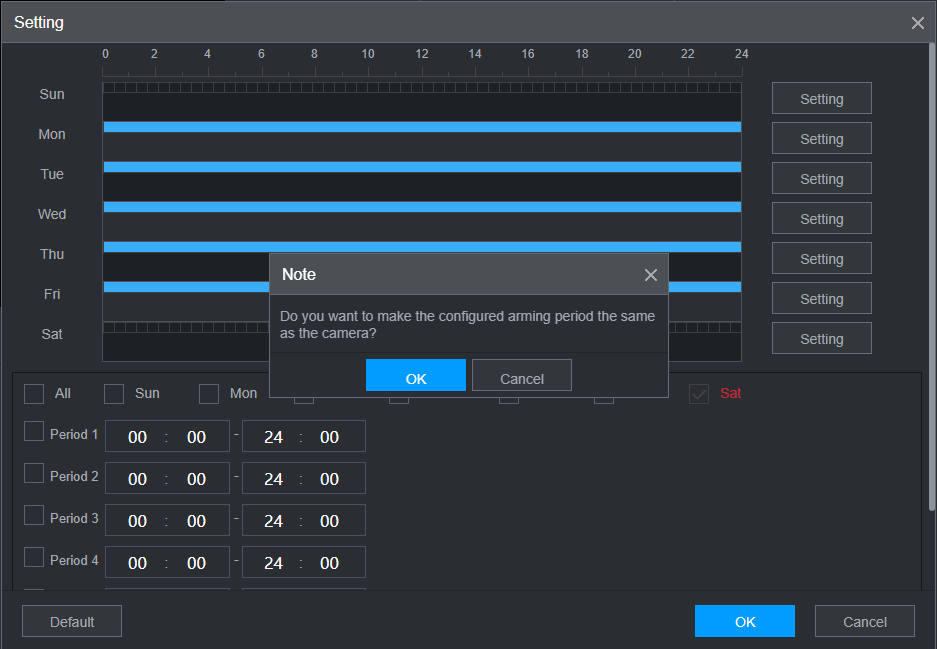
- Click OK on the prompt Do you want to make the configured arming period the same as the camera?
IVS Period Scheduling via Camera Web Interface (Old GUI - Grey)
1. Log into the camera's web interface
How to log into the camera's web interface
There are two methods to connect to an IP camera's web interface, depending on how the camera is connected to the recorder. The reason to connect directly to the web interface, is to adjust specific settings that are unable to be setup from the recorder. Such as PTZ camera idle motion settings, and ANPR camera settings.
Accessing Cameras that are directly connected to an NVR
When using a recorder with inbuilt PoE ports, the cameras that are connected will automatically get assigned an IP address from the recorder.
In order to login to the camera, we first need to login to the NVR. This method works on recorders that are using the black user interface.
- Connect your computer to the same network as the recorder.
- If there is internet access, your computer should receive an IP address in the same IP address range of the recorder. If your computer does not receive an IP address or there is no modem/router, see the "Changing the IP address on a Windows Computer" section to statically assign an IP address in the same range as the recorders IP address.
- On the recorder, go to Main Menu > Network. Note down the IP address of the recorder.
- On the computer, open Internet Explorer and enter the IP address of the recorder.
- If the computer is able to see the recorder, you will see a login page. Enter the recorders username and password.
- Select Setting > Camera > Camera List.
- Next to each camera, there will be a icon. Select the icon next to the camera you wish to connect to.
- A new page will open, bringing up the login page for the camera. Enter the username and password for the camera. Usually, the username is admin, and the password is the same as the recorder.
Connecting to cameras that are connected via a PoE switch.
This guide requires that the recorder and camera are already setup for network access. If the camera is not currently connected to the NVR, you may need to assign an IP address to your PC/Laptop Manually, see the "Changing the IP address on a Windows Computer" below to statically assign an IP address in the same range as the cameras IP address.
Changing the IP address on a Windows Computer - If no Modem/Router is connected
Follow the below steps to manually assign an IP address to a Windows computer, this will need to be done if the recorder/camera you are connecting to is not connected to a local network where DHCP is being assigned to devices.
Windows 10
- Open Settings.
- Select Network & Internet.
- Select Status, then Change Adapter Options.
-
Right-click the network adapter you want to change the IP address for, and select Properties.
-
Double-click the Internet Protocol Version 4 (TCP/IPv4) item.
- Click Use the following IP address and enter an IP address in the same range as the device you are trying to access. (E.g when trying to access 192.168.1.108 use a IP address in the 192.168.1.x range.) Note: This cannot be the same as the device you are trying to connect to or any other device on the same network. Save your changes on both windows.
- Type the IP address of the device you are trying to access into the address bar of your web browser.
- Once finished configuring the device, change the adapter settings back to normal by following steps 1-5 and clicking Obtain an IP address automatically.
Windows 11
1. In the Windows search bar at the bottom of the page, type Control Panel and press enter.
2. Select Network and Internet.
3. Select Network and Sharing Centre.
4. Select the link for Connections in the network that you want to change the IP address for.
5. Select Properties.
6. Double-click the Internet Protocol Version 4 (TCP/IPv4) item.
7. Click Use the following IP address and enter an IP address in the same range as the device you are trying to access. (E.g when trying to access 192.168.1.108 use a IP address in the 192.168.1.x range.) Note: This cannot be the same as the device you are trying to connect to or any other device on the same network. Save your changes on both windows.
8. Type the IP address of the device you are trying to access into the address bar of your web browser.
9. Once finished configuring the device, change the adapter settings back to normal by following steps 1-6 and clicking Obtain an IP address automatically.
See the video below for a visual guide of the steps above:
Shortcut
1. In the Windows search bar at the bottom of the page, type Ncpa.cpl and press enter.
2. Right-click the network adapter you want to change the IP address for, and select Properties.
3. Select the Internet Protocol Version 4 (TCP/IPv4) item.
4. Click Use the following IP address and enter an IP address in the same range as the device you are trying to access. (E.g when trying to access 192.168.1.108 use a IP address in the 192.168.1.x range.) Note: This cannot be the same as the device you are trying to connect to or any other device on the same network. Save your changes on both windows.
5. Type the IP address of the device you are trying to access into the address bar of your web browser.
6. Once finished configuring the device, change the adapter settings back to normal by following steps 1-3 and clicking Obtain an IP address automatically.
See the video below for a visual guide of the steps above:
- Connect the computer to the same network as the cameras.
- Download the Config tool program.
- Once the download is complete, extract the zip file, and open the ConfigTool.exe file.
- Select the button, devices that are found on the network will be listed.
- Click the Web button next to the camera you would like to login to.
- A new page will open, bringing up the login page for the camera. Enter the username and password for the camera. Usually, the username is admin, and the password is the same as the recorder.
2. Navigate to Setting > Event > IVS
3. Click on Setting next to Period.
4. Fill out the Period Settings, then click Save. 5. Click Save.
IVS Period Scheduling via Camera Web Interface (New GUI - White/Blue)
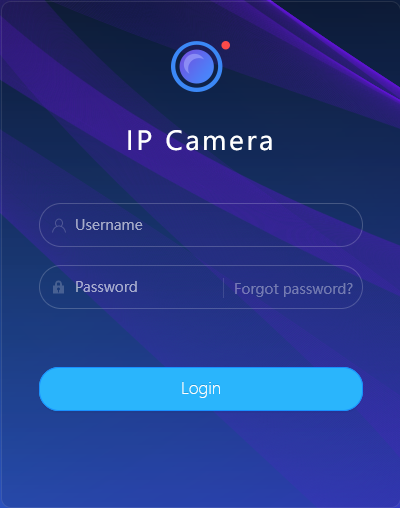
1. Log into the camera's web interface
How to log into the camera's web interface
How to Login to Web Interface of an IP Camera
There are two methods to connect to an IP Camera, depending on how the camera is ...
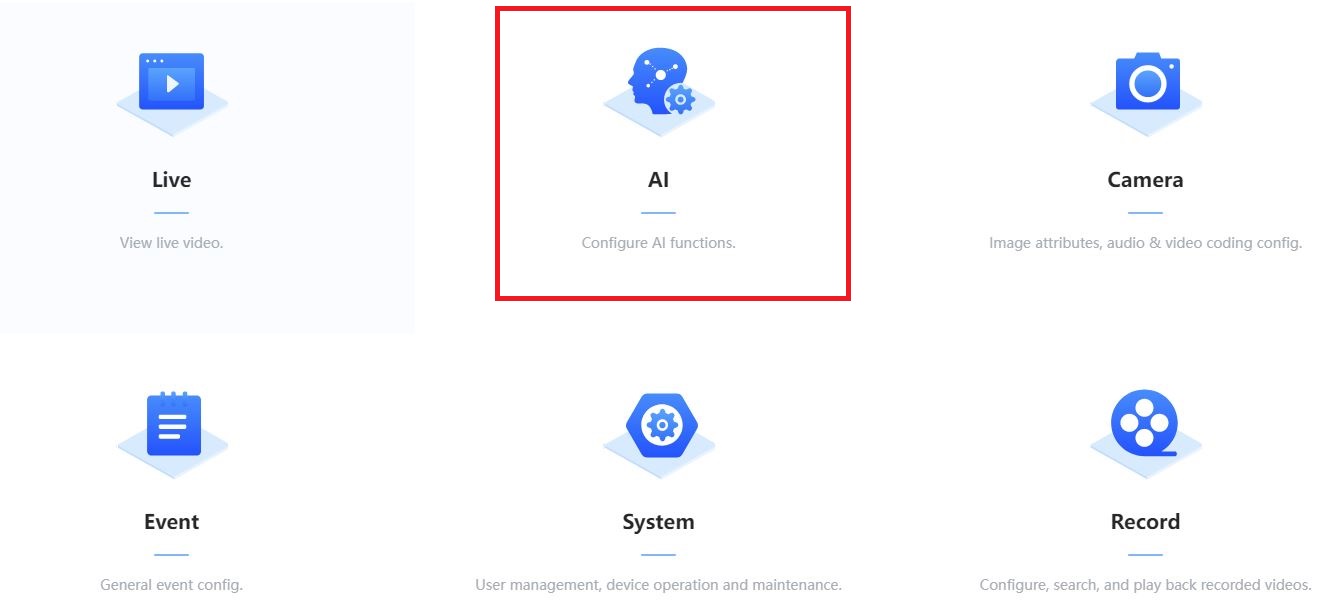
2. Navigate to IP Camera > AI >
('IP Camera' top left at main meu)
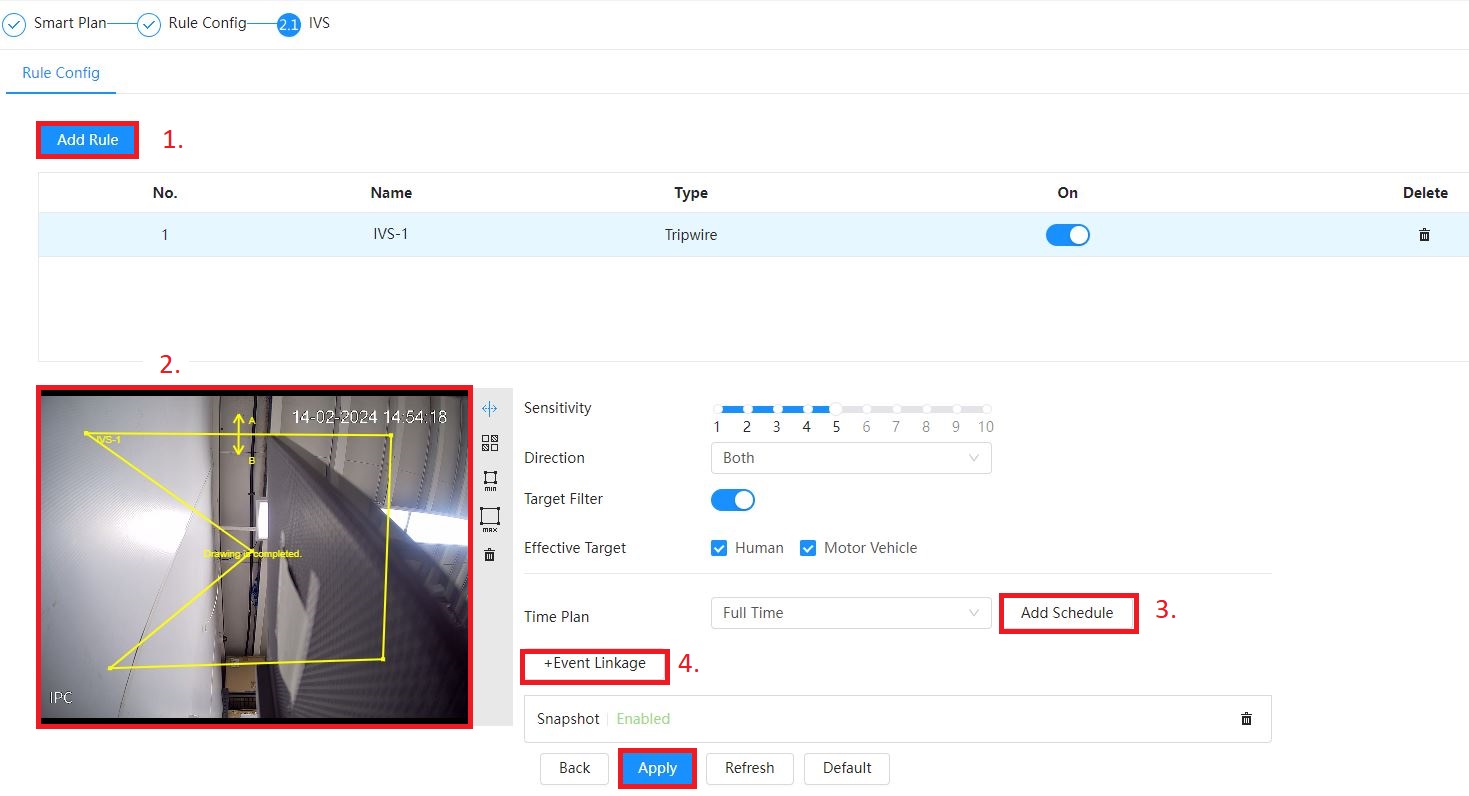
3. Enable IVS click Next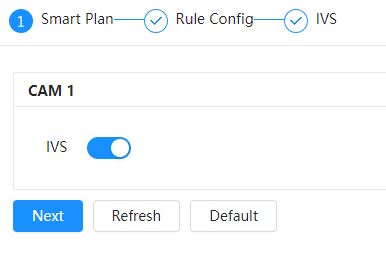 4. Click Add Rule
5. Draw Rule (Yellow line)
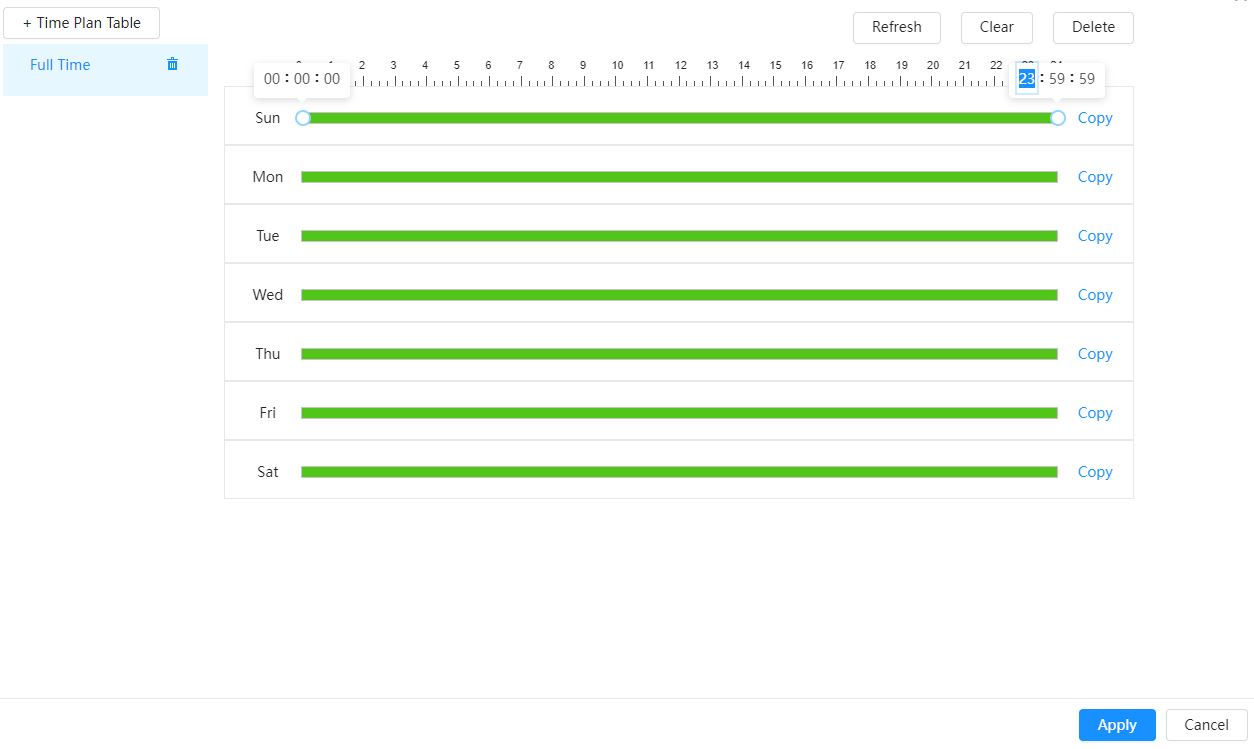
6. Change Schedule (Optional)
7. Add or Remove Event Linkage depending on what action you want (Snapshot, Record, Alarm, etc)