
To access the web interface of the camera, follow the guide below.
How to Login to Web Interface of an IP Camera
There are two methods to connect to an IP camera's web interface, depending on how the camera is connected to the recorder. The reason to connect directly to the web interface, is to adjust specific settings that are unable to be setup from the recorder. Such as PTZ camera idle motion settings, and ANPR camera settings.
Accessing Cameras that are directly connected to an NVR
When using a recorder with inbuilt PoE ports, the cameras that are connected will automatically get assigned an IP address from the recorder.
In order to login to the camera, we first need to login to the NVR. This method works on recorders that are using the black user interface.
- Connect your computer to the same network as the recorder.

- If there is internet access, your computer should receive an IP address in the same IP address range of the recorder. If your computer does not receive an IP address or there is no modem/router, see the "Changing the IP address on a Windows Computer" section to statically assign an IP address in the same range as the recorders IP address.
- On the recorder, go to Main Menu > Network. Note down the IP address of the recorder.
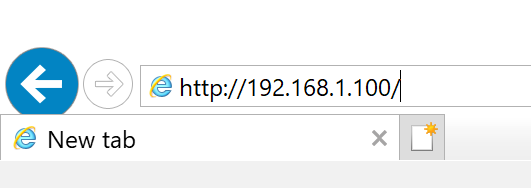
- On the computer, open Internet Explorer and enter the IP address of the recorder.
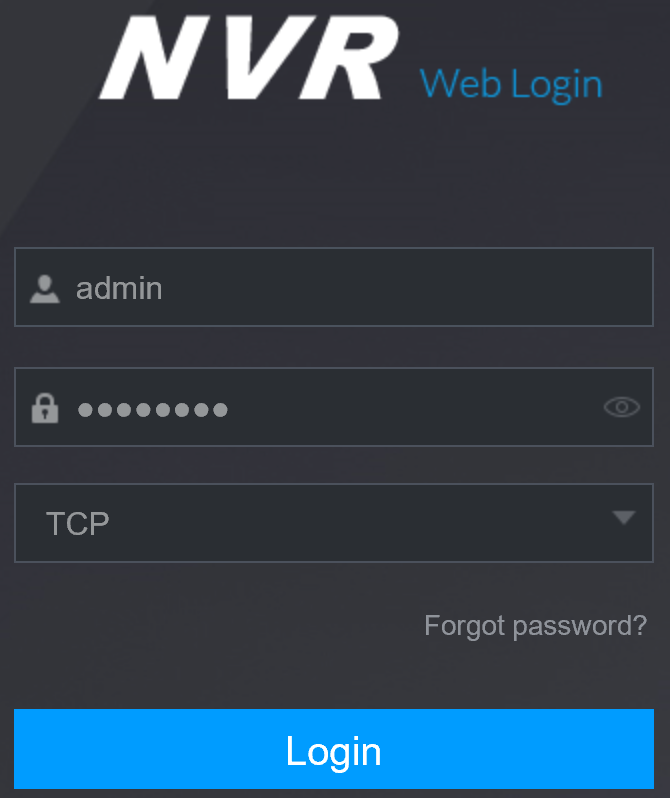
- If the computer is able to see the recorder, you will see a login page. Enter the recorders username and password.
- Select Setting > Camera > Camera List.
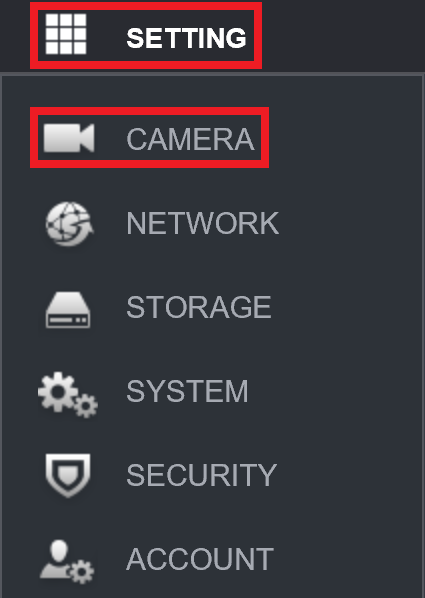
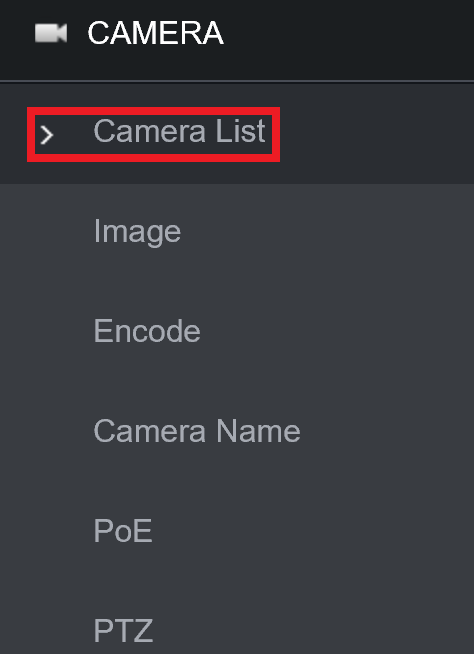
- Next to each camera, there will be a
 icon. Select the icon next to the camera you wish to connect to.
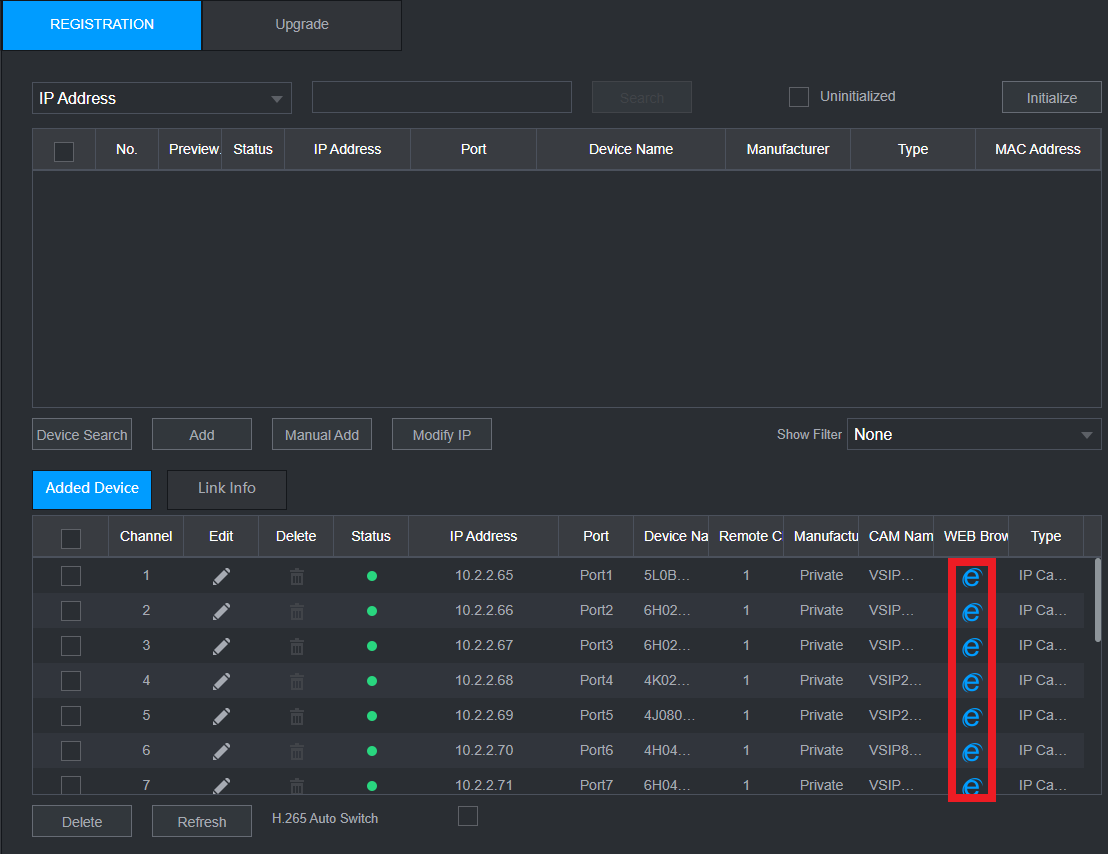
- A new page will open, bringing up the login page for the camera. Enter the username and password for the camera. Usually, the username is admin, and the password is the same as the recorder.


Connecting to cameras that are connected via a PoE switch.
This guide requires that the recorder and camera are already setup for network access. If the camera is not currently connected to the NVR, you may need to assign an IP address to your PC/Laptop Manually, see the "Changing the IP address on a Windows Computer" below to statically assign an IP address in the same range as the cameras IP address.
Changing the IP address on a Windows Computer - If no Modem/Router is connected
Follow the below steps to manually assign an IP address to a Windows computer, this will need to be done if the recorder/camera you are connecting to is not connected to a local network where DHCP is being assigned to devices.
Windows 10
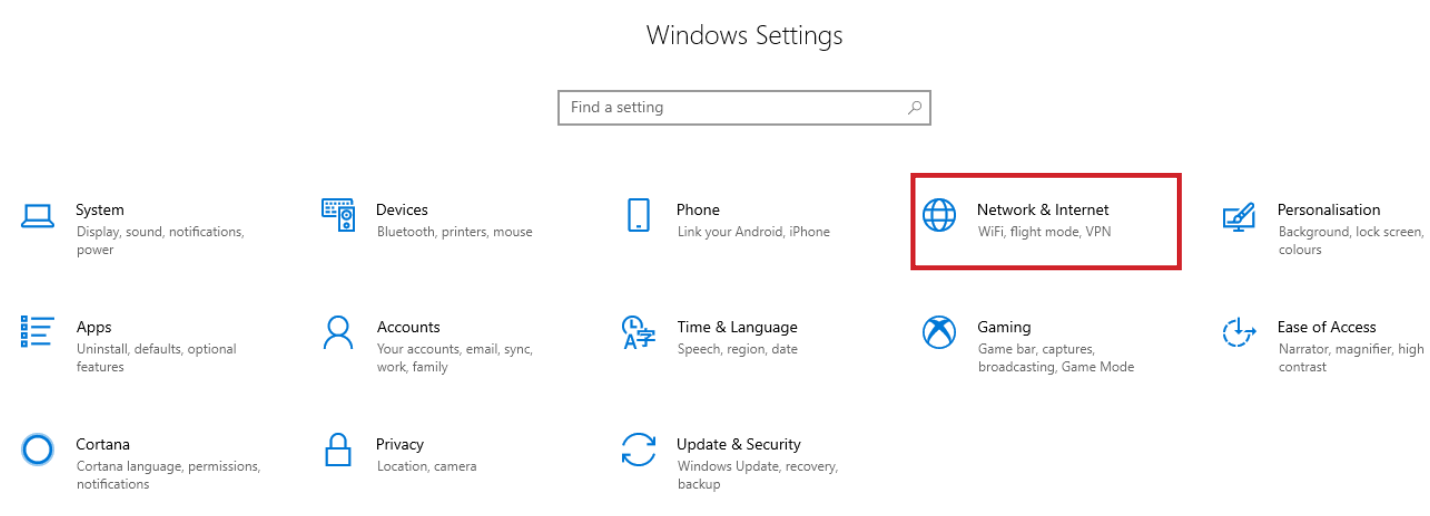
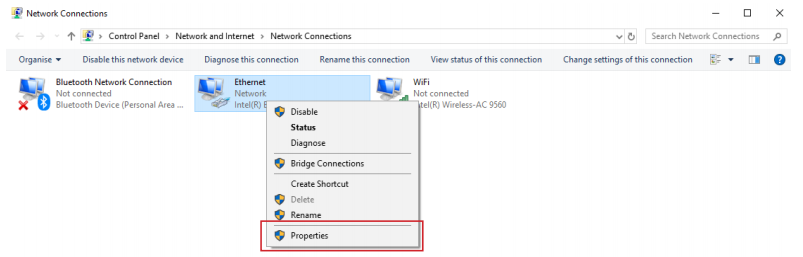
- Open Settings.
- Select Network & Internet.
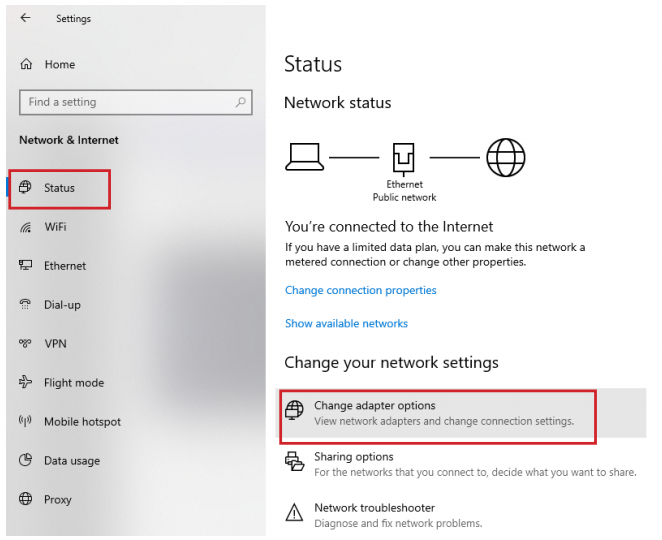
- Select Status, then Change Adapter Options.
-
Right-click the network adapter you want to change the IP address for, and select Properties.
-
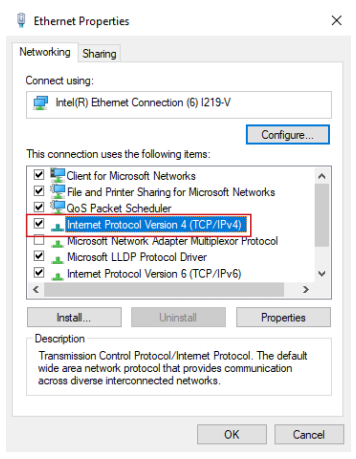
Double-click the Internet Protocol Version 4 (TCP/IPv4) item.
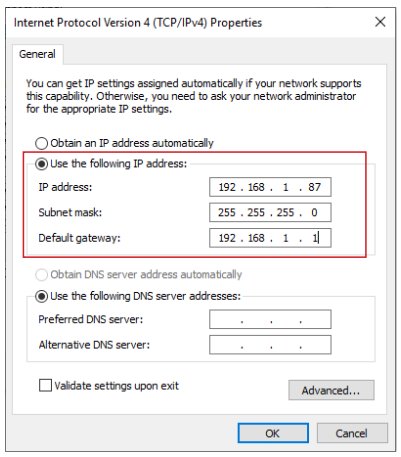
- Click Use the following IP address and enter an IP address in the same range as the device you are trying to access. (E.g when trying to access 192.168.1.108 use a IP address in the 192.168.1.x range.) Note: This cannot be the same as the device you are trying to connect to or any other device on the same network. Save your changes on both windows.
- Type the IP address of the device you are trying to access into the address bar of your web browser.
- Once finished configuring the device, change the adapter settings back to normal by following steps 1-5 and clicking Obtain an IP address automatically.
Windows 11
1. In the Windows search bar at the bottom of the page, type Control Panel and press enter.
2. Select Network and Internet.

3. Select Network and Sharing Centre.

4. Select the link for Connections in the network that you want to change the IP address for.

5. Select Properties.

6. Double-click the Internet Protocol Version 4 (TCP/IPv4) item.

7. Click Use the following IP address and enter an IP address in the same range as the device you are trying to access. (E.g when trying to access 192.168.1.108 use a IP address in the 192.168.1.x range.) Note: This cannot be the same as the device you are trying to connect to or any other device on the same network. Save your changes on both windows.

8. Type the IP address of the device you are trying to access into the address bar of your web browser.
9. Once finished configuring the device, change the adapter settings back to normal by following steps 1-6 and clicking Obtain an IP address automatically.
See the video below for a visual guide of the steps above:
Shortcut
1. In the Windows search bar at the bottom of the page, type Ncpa.cpl and press enter.
2. Right-click the network adapter you want to change the IP address for, and select Properties.
3. Select the Internet Protocol Version 4 (TCP/IPv4) item.

4. Click Use the following IP address and enter an IP address in the same range as the device you are trying to access. (E.g when trying to access 192.168.1.108 use a IP address in the 192.168.1.x range.) Note: This cannot be the same as the device you are trying to connect to or any other device on the same network. Save your changes on both windows.
5. Type the IP address of the device you are trying to access into the address bar of your web browser.
6. Once finished configuring the device, change the adapter settings back to normal by following steps 1-3 and clicking Obtain an IP address automatically.
See the video below for a visual guide of the steps above:
- Connect the computer to the same network as the cameras.
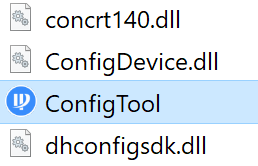
- Download the Config tool program.
- Once the download is complete, extract the zip file, and open the ConfigTool.exe file.
- Select the
 button, devices that are found on the network will be listed.
 - Click the Web button next to the camera you would like to login to.
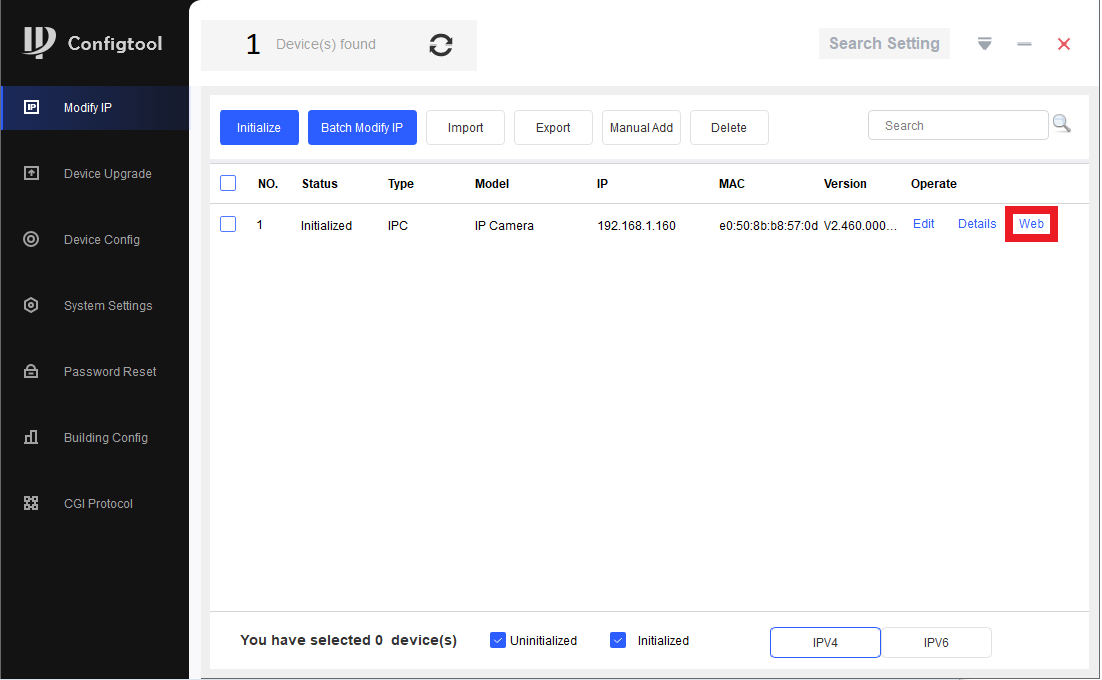
- A new page will open, bringing up the login page for the camera. Enter the username and password for the camera. Usually, the username is admin, and the password is the same as the recorder.
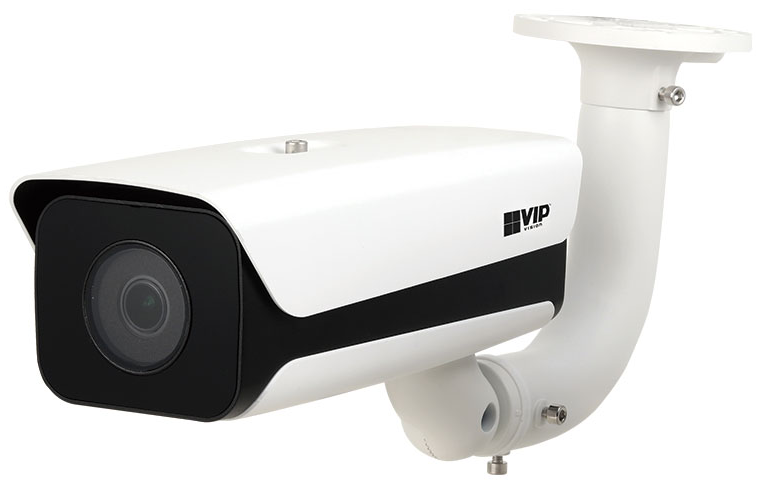
Standalone Camera Setup
Camera Mounting Requirements
Before installing the ANPR camera, please follow the below guidelines.
When using ANPR, the camera will need to be dedicated to the task. It will need to be focused on the entry point to the premises, not covering a wide area.
For example, it can be used in a driveway at an electric gate, or at a shopping centre with a boom gate.
The camera needs to get a clear image of the number plate.
At night, light emitted from the infrared illumination LEDs on the camera must reflect from the number plate and return into the camera lens. If the angle is too sharp, the light will bounce away from the lens and the number plate will not be readable.
At the same time, you must ensure that the camera is mounted in a location where it is not subjected to the direct beam from the vehicle headlights for long enough to get an image – halogen lights will overwhelm the image sensor resulting in glare that cannot be corrected by the software highlight compensation.
For installations where the ANPR camera is mounted to the side of the lane, the horizontal angle should be less than 30°.
For installations where the ANPR is mounted right above the lane, the vertical angle should be less than 30°.
The angle of the Number plate should be less than 5°.

Detection Speed:
VSIPNP-2BIRM-I or VSIPNP-2BIRM-I2:
The vehicle must not be travelling over 40Km/H.
VSIPNP-4BIRM-I3:
The vehicle must not be travelling over 80 Km/H
VSIPNP-4BIRM-I3-Z:
The vehicle must not be travelling over 120 Km/H
Example Installation Values:
VSIPNP-2BIRM-I or VSIPNP-2BIRM-I2:
The camera must be positioned no more then 10 meters horizontally from the number plate detection area.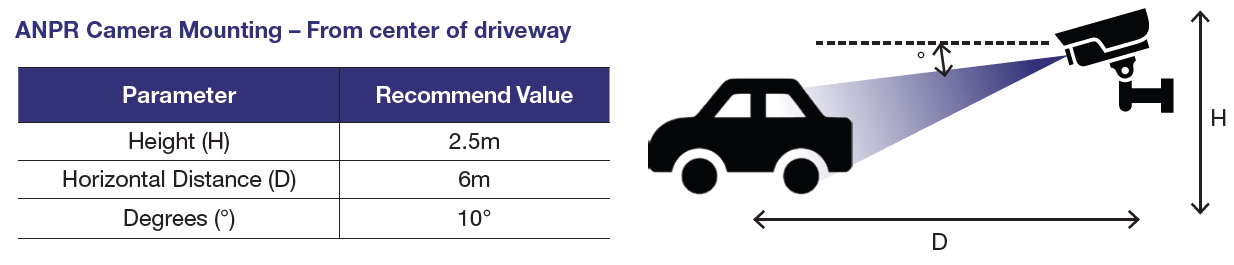
VSIPNP-4BIRM-I3 or VSIPNP-4BIRM-I3-Z:

Snapshot Line Setup
OLD GUI
To configure the ANPR settings on the camera, the camera needs to configured with a computer. The simplest way to achieve this is to connect the camera to a PoE Switch, and connect a computer to a PoE Switch.
1. Set your computer in the same IP address range of the camera, see this article.
2. Enter the IP address of the camera into a web browser (Internet Explorer recommended).
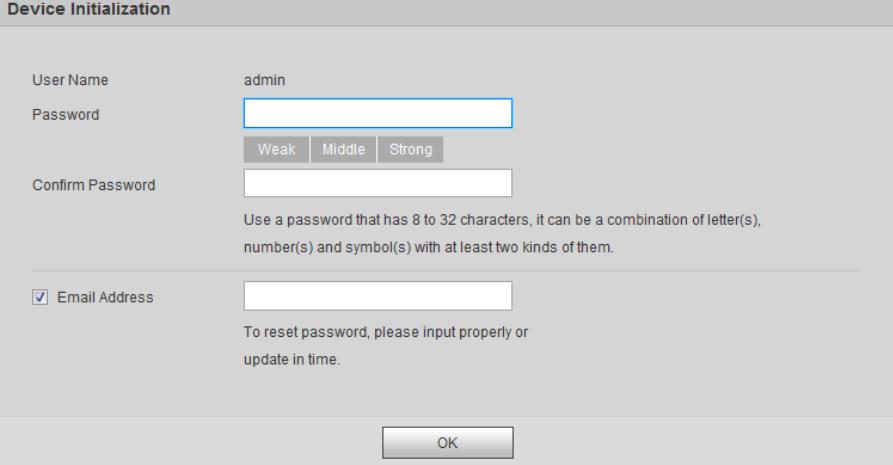
3. You will be prompted to login, enter the username and password. If the camera has never been connected to a recorder, you will be prompted to set a password, and email address.

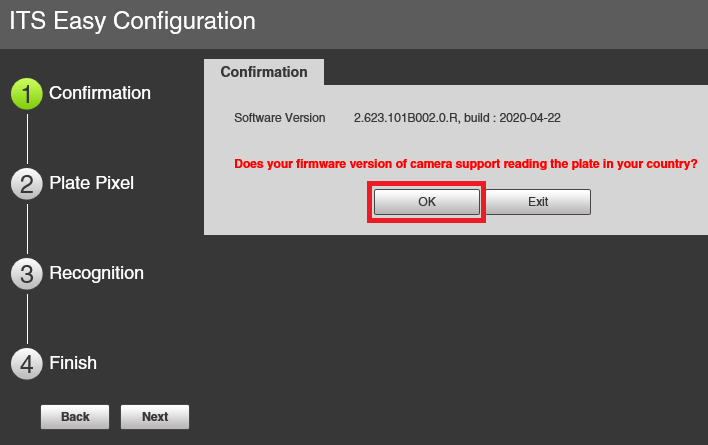
4. Select Guide.

5. Select OK to confirm your camera has the latest firmware installed.
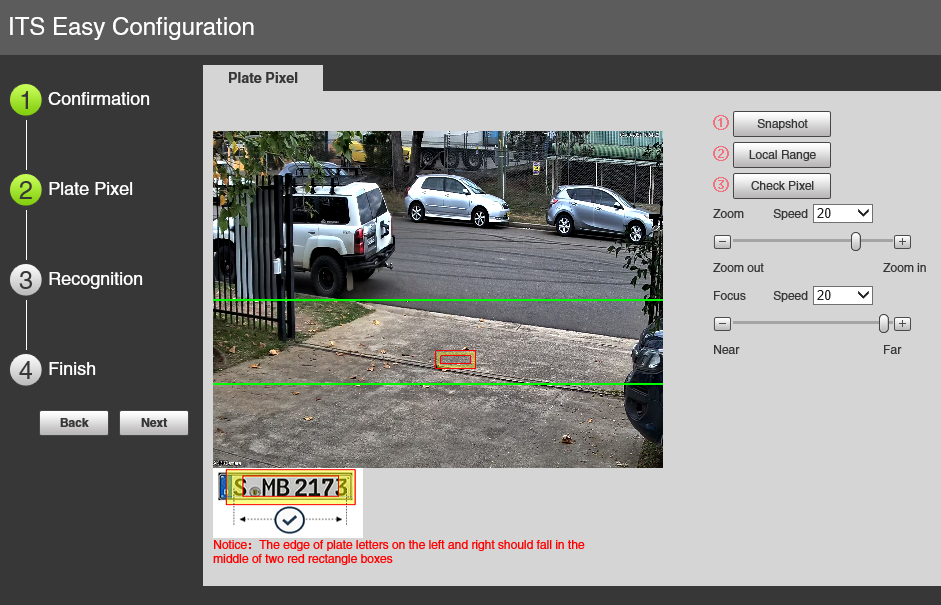
6. Zoom the camera into the area where the number plates will be. Select the Snapshot button, to freeze the image. Select the Local Range Button to digitally zoom in. Select the Red and Yellow box, and move it to where the number plates will be seen on screen.
7. Select Check Pixel, then Yes confirm your settings.
 8. Draw the Iden Area (Identification Area) and Snap Line (Snapshot Line). Select Finish once done.

9. The basic settings are now completed. Test the camera and ensure plates are getting recorder. If you wish to make additional adjustments, select the Config (LPR) button.

NEW GUI
To configure the ANPR settings on the camera, the camera needs to configured with a computer. The simplest way to achieve this is to connect the camera to a PoE Switch, and connect a computer to a PoE Switch.
1. Set your computer in the same IP address range of the camera, see this article.
2. Enter the IP address of the camera into a web browser (Internet Explorer recommended).
3.You will be prompted to login, enter the username and password. If the camera has never been connected to a recorder, you will be prompted to set a password, and email address.
4.Once logged in and on the Live View Page , click Rule Config

5.You should see a green Snapshot Triggering Line. Drag this line to specify the location of taking the snapshots. Drag and move the edges of the line to adjust the length of the line.
6.Set the Plate Algorithm (Australia ALG for Australia), Capture Direction and Vehicle Detection Sensitivity .
7. Apply the Changes
Adjusting Shutter Speed
OLD GUI
Depending on where the camera is installed, you may be required to manually adjust the shutter speed.
1. Select Setup.

2. Select Camera, then Attribute.
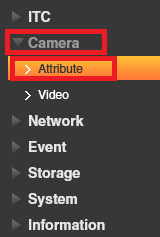
3. Select Shutter.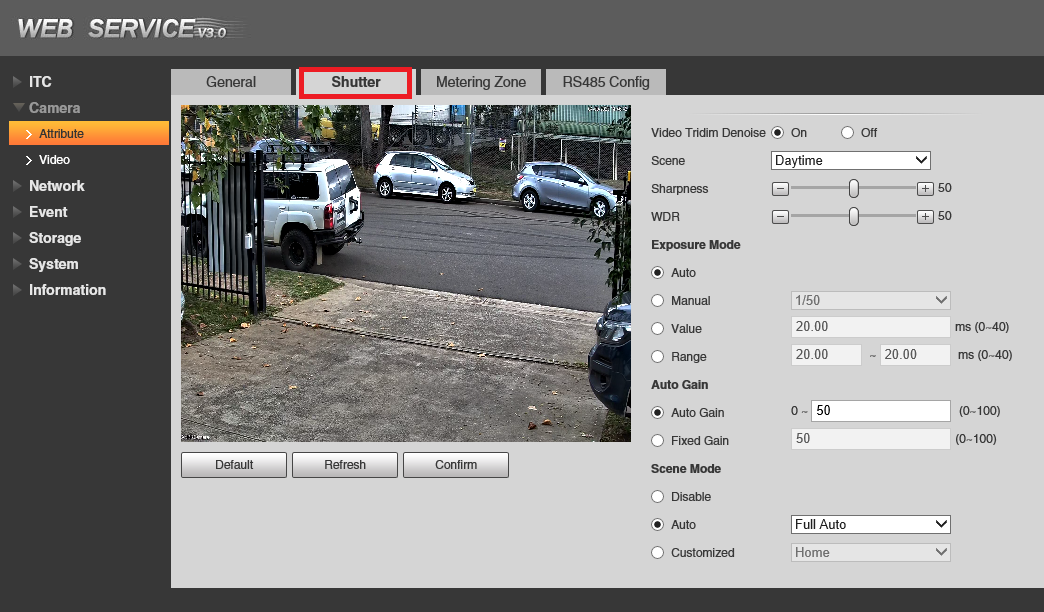
4. Adjust the shutter settings to suit the installation environment. Select Confirm to save your changes.
NEW GUI
Depending on where the camera is installed, you may be required to manually adjust the shutter speed.
1.Select the settings icon from the top right

2.Click Camera

3.Select Image>Shutter>Exposure. Make sure the mode is Manual to be able to manually change the settings.

4. Change Shutter to Custom and set the shutter speed.
5. Apply changes
Plate Query Search - Camera Web Interface
OLD GUI
To search number plates that the camera has captured, you will first need to log into the web interface of the camera.
1. Select Query.

2. Select Plate Query.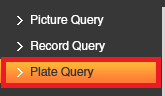 3. Enter the Date and Time period you wish to search for, the select Search.
4. If you wish to export this data (CSV Format), select the Export button.
NEW GUI
- Click on the Home Icon
 on the top

2.Click on Search

3.Select Snapshort Records and the desired time range , then search. Plate number can optionally be added to query for specific plates

4. Click on Search.
IR Settings
OLD GUI
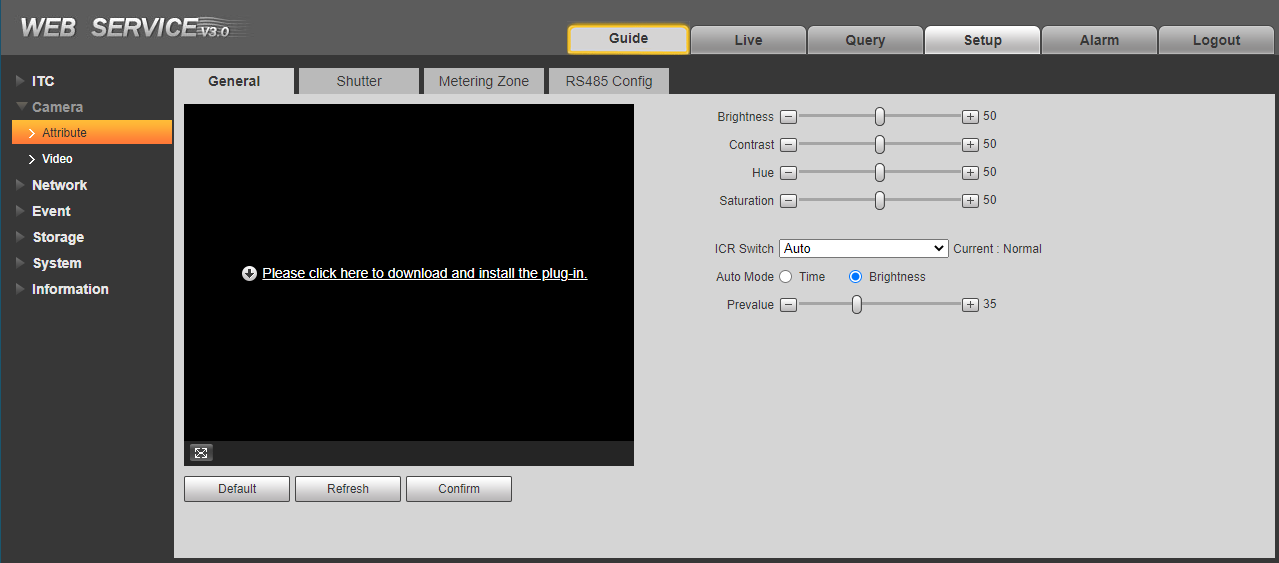
To adjust IR settings, login to the web interface of the camera, then navigate to the below.
Setup > Camera > Attribute > General
Auto Mode related to IR and has 2 settings
Time or Brightness(Auto)
Time can be used to set IR to activate/deactivate based on Time
Brightness is automatic, but you can increase the IR Strength.
NEW GUI
To adjust IR settings, login to the web interface of the camera, then navigate to the below.
On the Live view page , select Fill Light. You will have 2 options 1.White light and 2. IR Mode.
If you want IR , select IR mode. Then you can change the working mode to set it to 1.Always Off ,2. Always On or 3.Day/Night. If Day/Night mode is selected it will use the Day/Night settings set in drop box next to Day/Night . By default it is auto and it will automatically switch between colour and b/w mode .
Make sure you apply the settings by clicking on apply on the bottom.

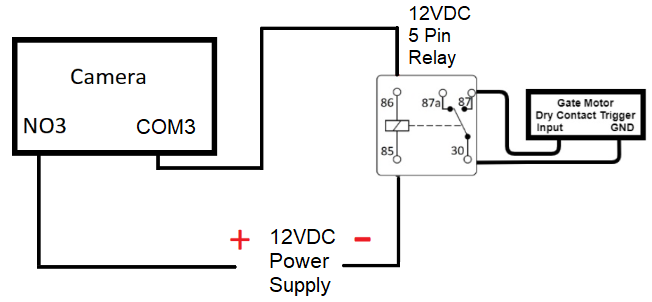
Camera Alarm Output - Wiring to an Electric Gate Motor
The below diagram covers how to wire the ANPR camera into a gate using a relay. This wiring is done directly from the camera, not the recorder (if being used). This assumes that the gate it is being connected to has an "Auto Close" function. e.g. Camera reads number plate, gate is opened. Gate is set to close after 60 seconds.
It is highly recommended to use a relay between a gate, as some gates can act sporadically if the relay is not used.
Ensure relay output 3 on the camera is used. Output 3 will also need to be select on the web interface of the camera for "Barrier Open".
Alarm Output Configuration
Once the camera is wired to the electric gate, follow the below steps to program the camera.
- Select Setup.

- Select Blocklist and Allowlist, then Barrier Control.
- Select NO3 for the Barrier Opening Function. (As wired in the previous step) Then select Confirm.
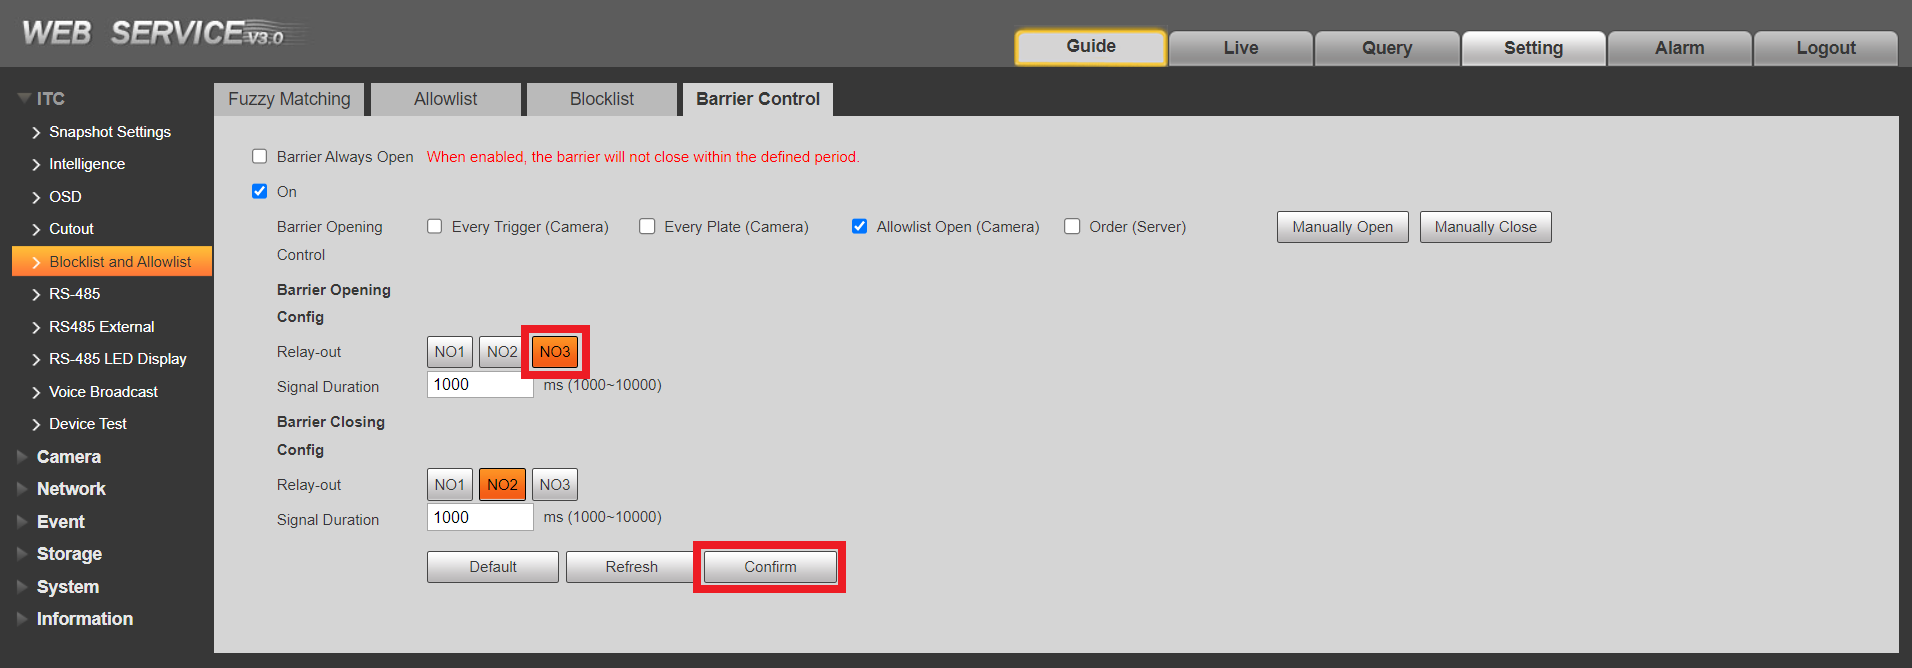
If you wish to test the wiring is correct, select the Manually Open button, this will manually trigger the relay on the camera.
Audio Broadcast Configuration
- Select the home Icon on the top right . Then select the ANPR page.

2. Select Audio Broadcast from the left column and click on Passing Vehicles Broadcast on the top. Select the configurations needed such as Plate No. , Exit Time etc. from the bottom box. Enable Config and click on apply to save the setting .

Setup and Search Using an NVR
Adding an ANPR Camera to an NVR
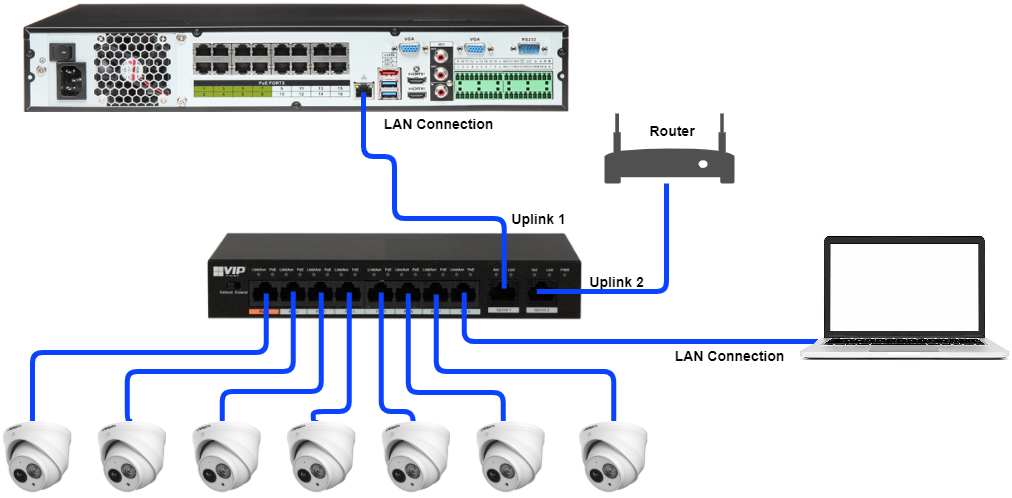
The ANPR Camera can be connected directly to the back of the NVR, or through an external PoE Switch.
Information on adding the cameras through an external PoE Switch can be found here.
Enable ANPR on an NVR
When connecting the camera to the NVR, there is some configuration that is required.
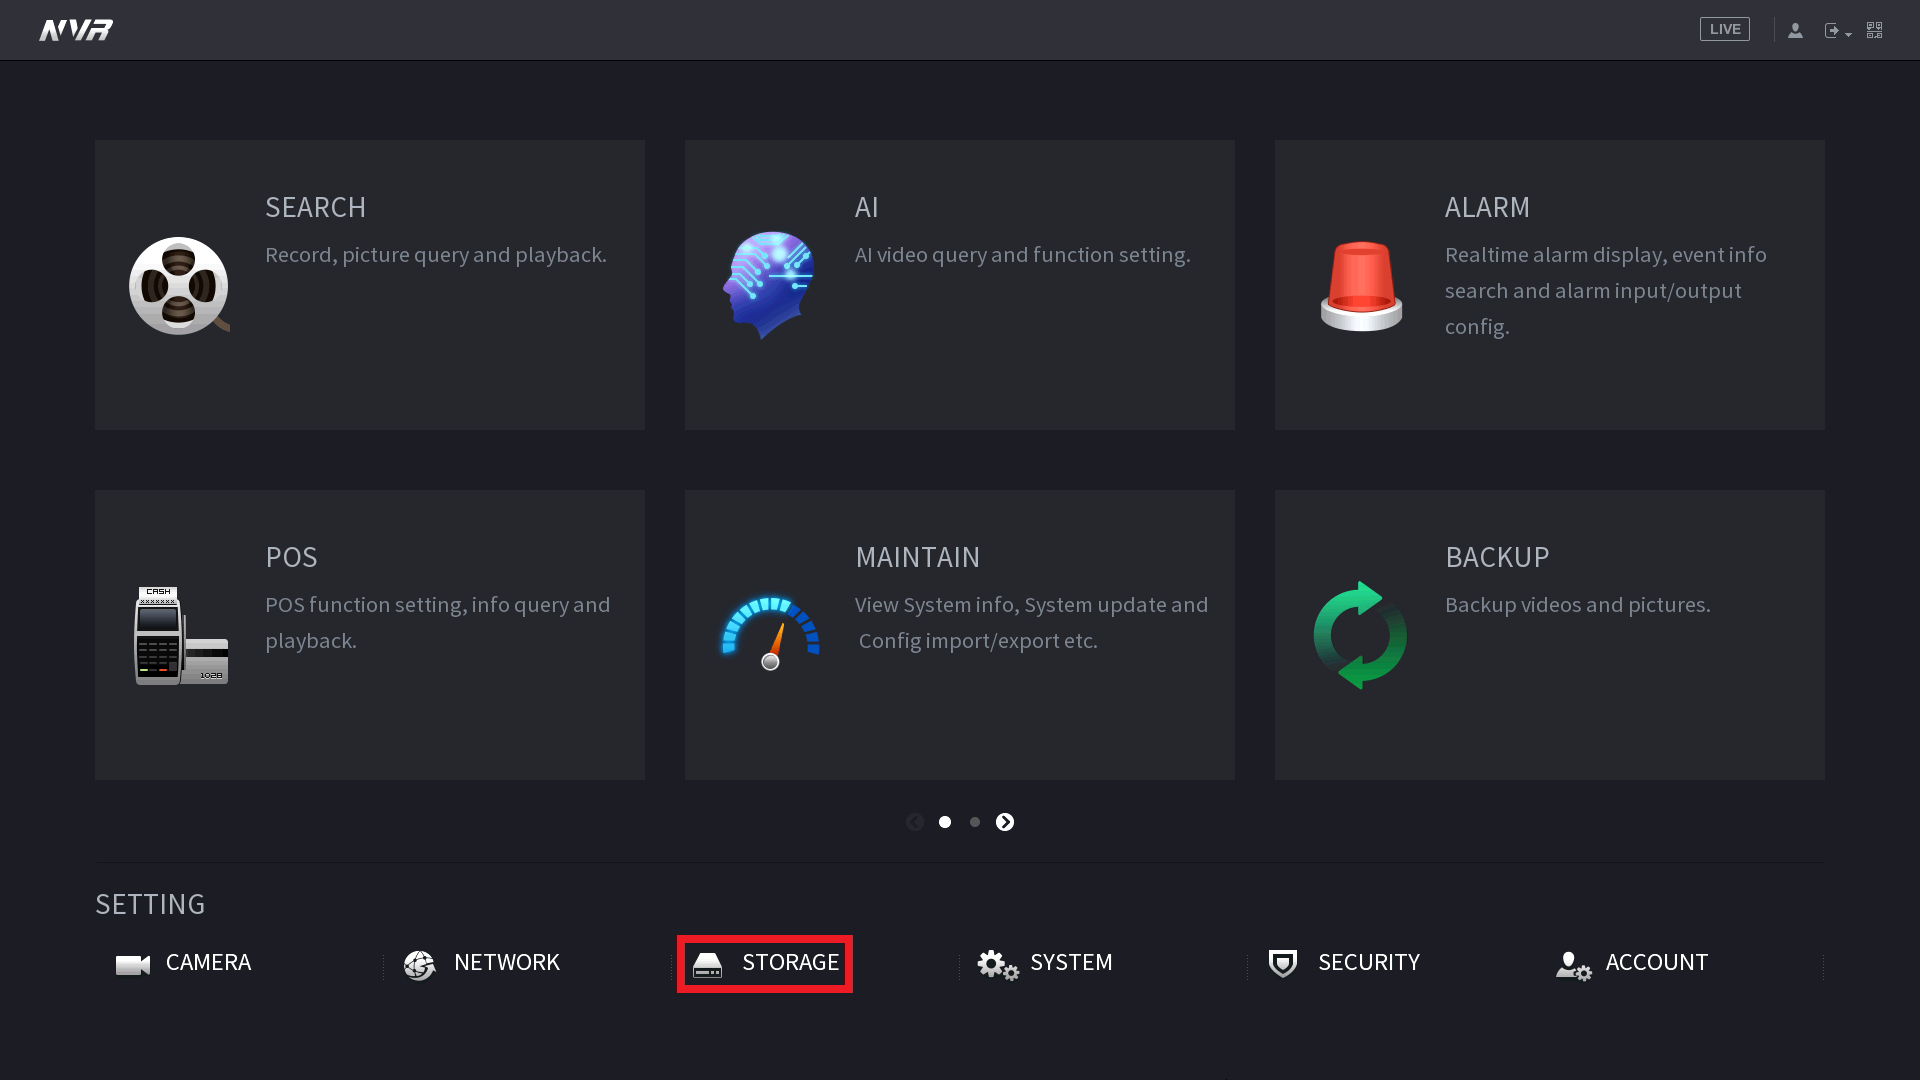
1. Right Click and select Main Menu.
2. Select Storage.
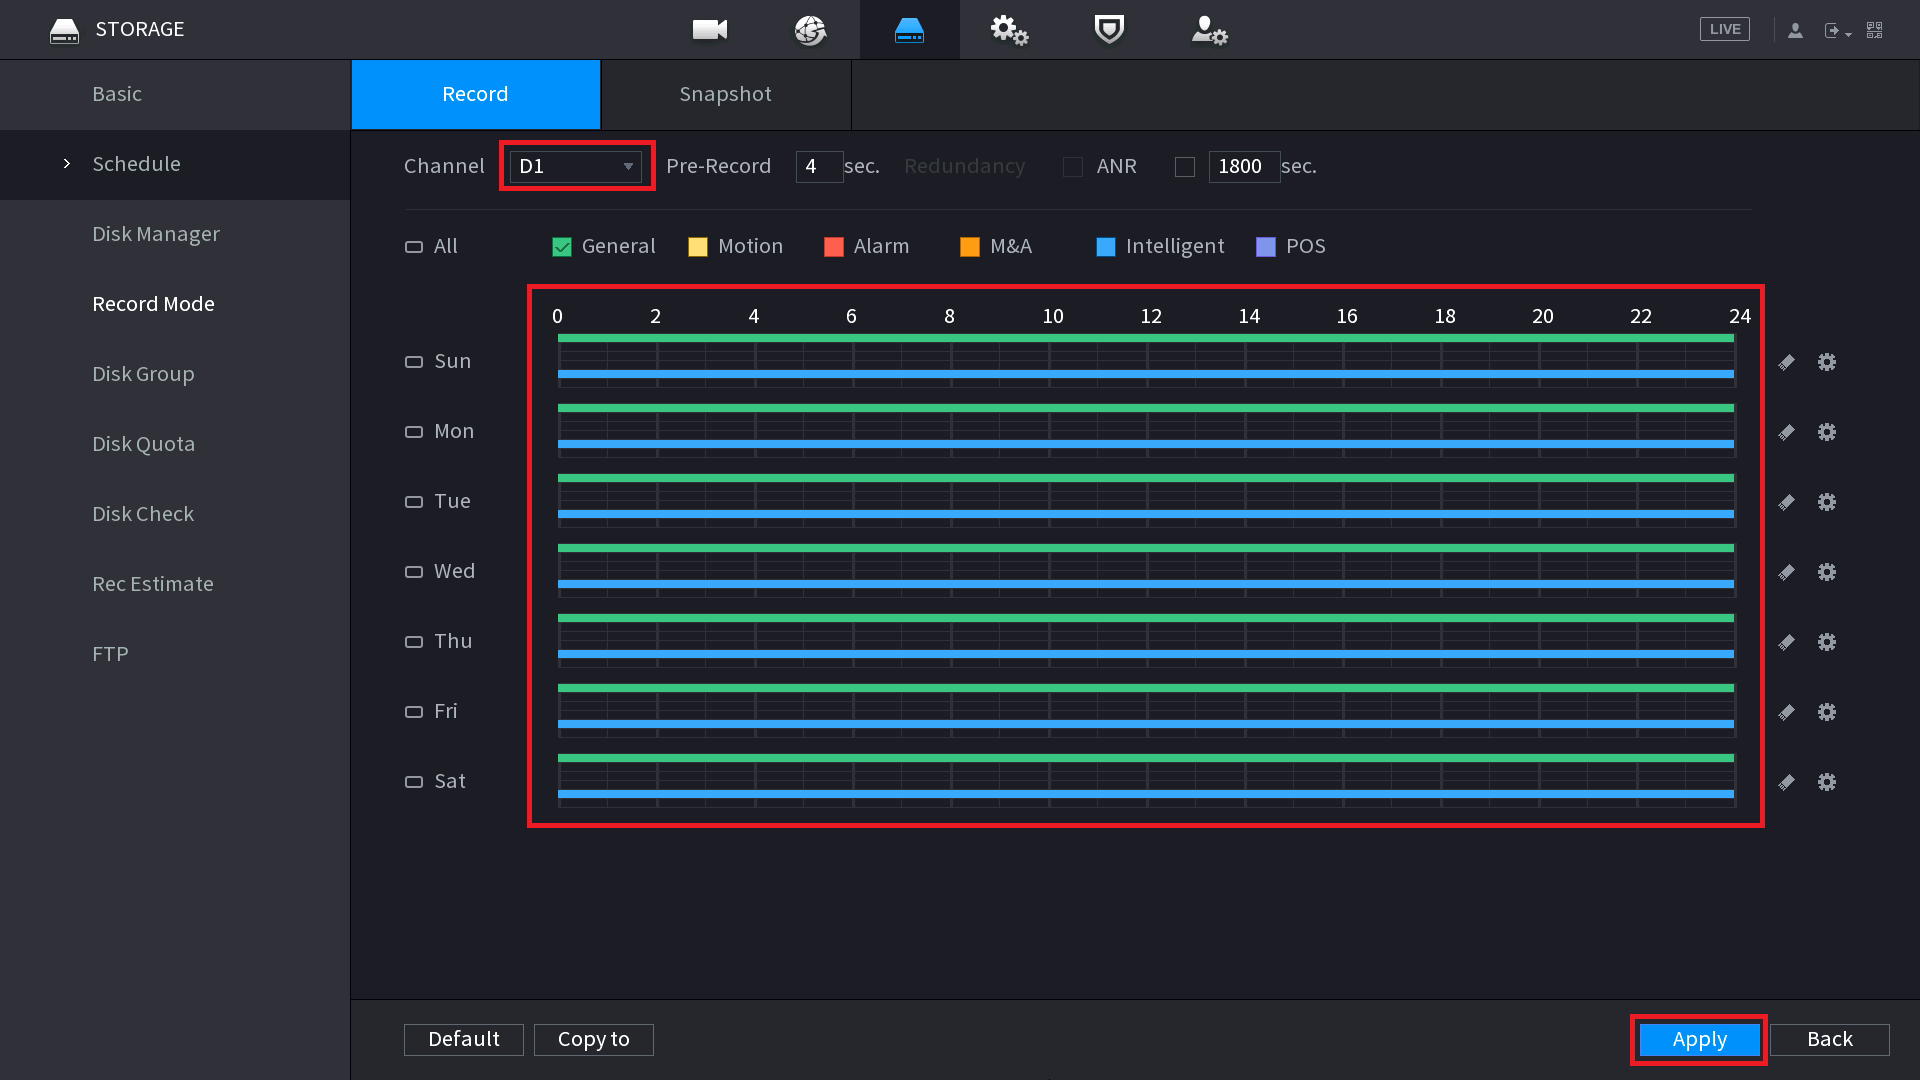
3. Select Schedule.
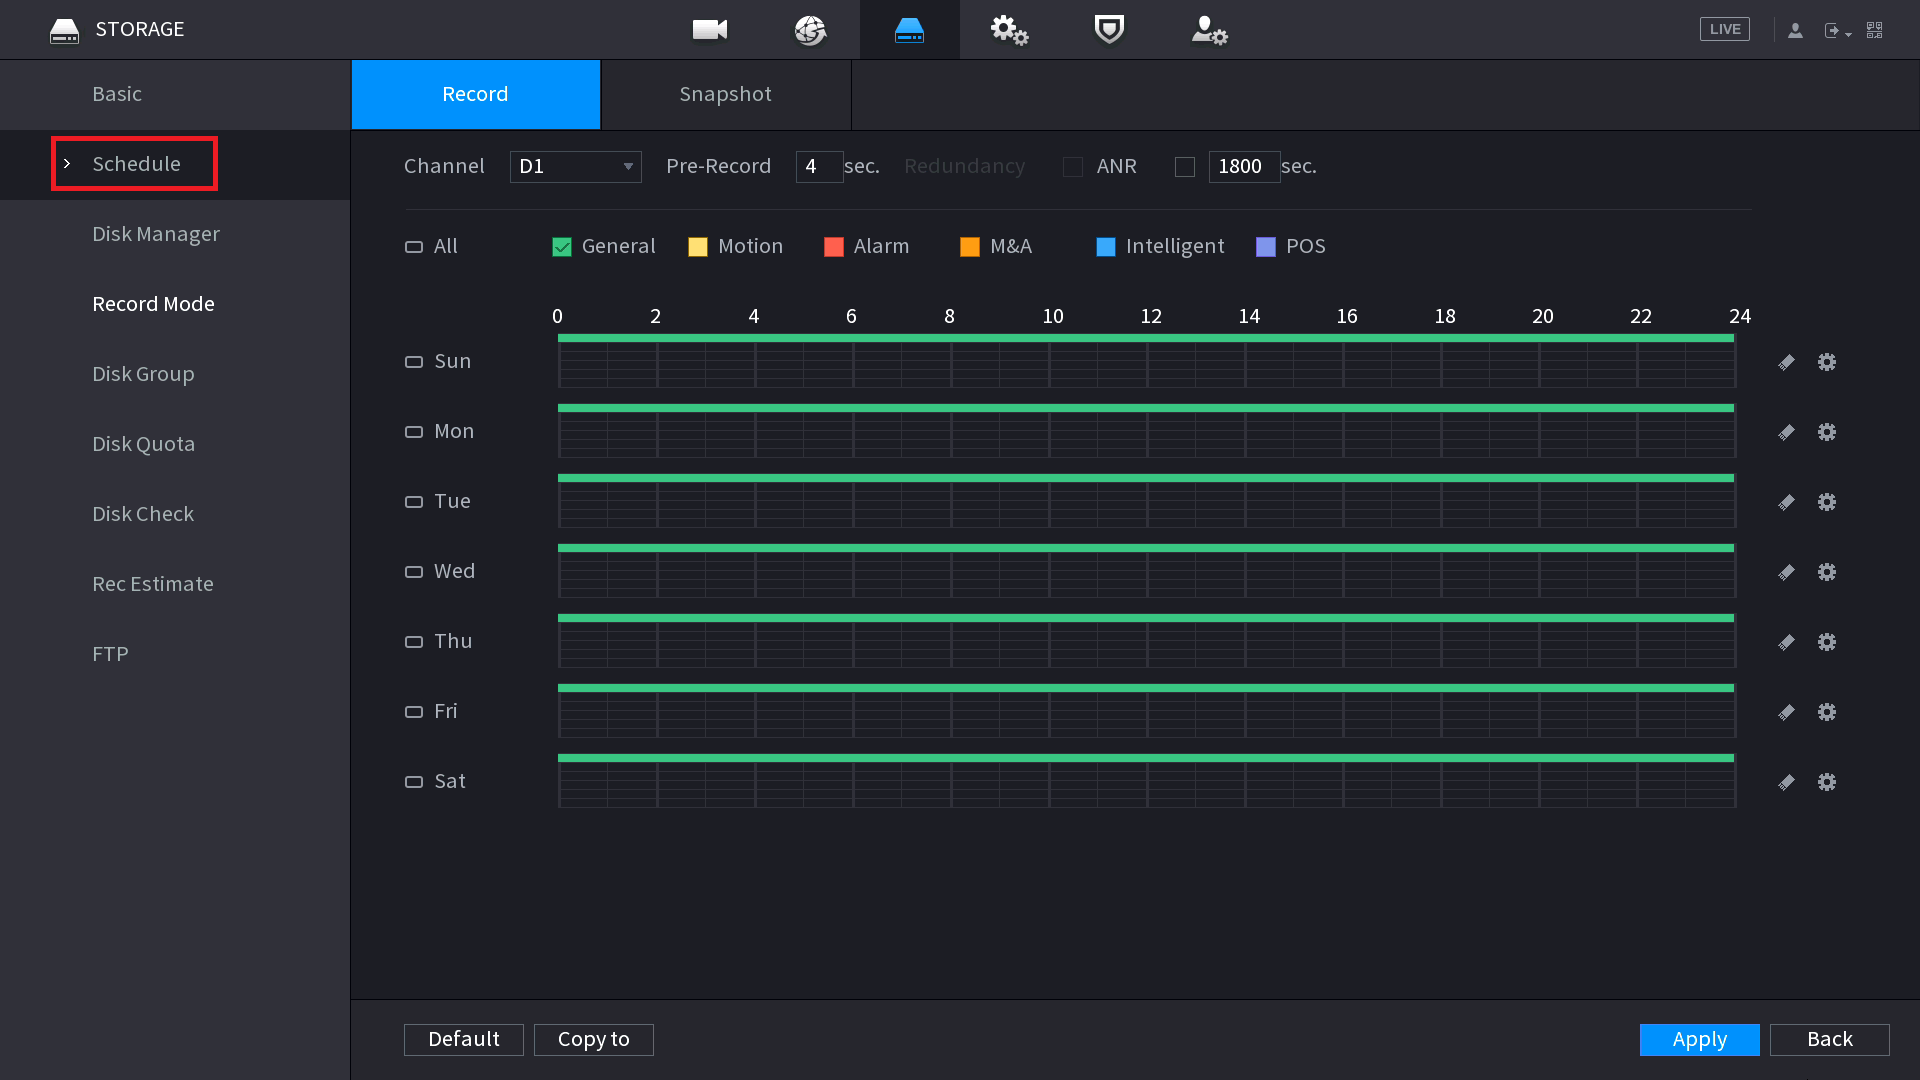
4. Select the Channel that the ANPR camera is connect to, and apply the Intelligent recording option. Select Apply.
5. Right Click to return to the Main Menu.
6. Select AI.
7. Select Parameters, then ANPR.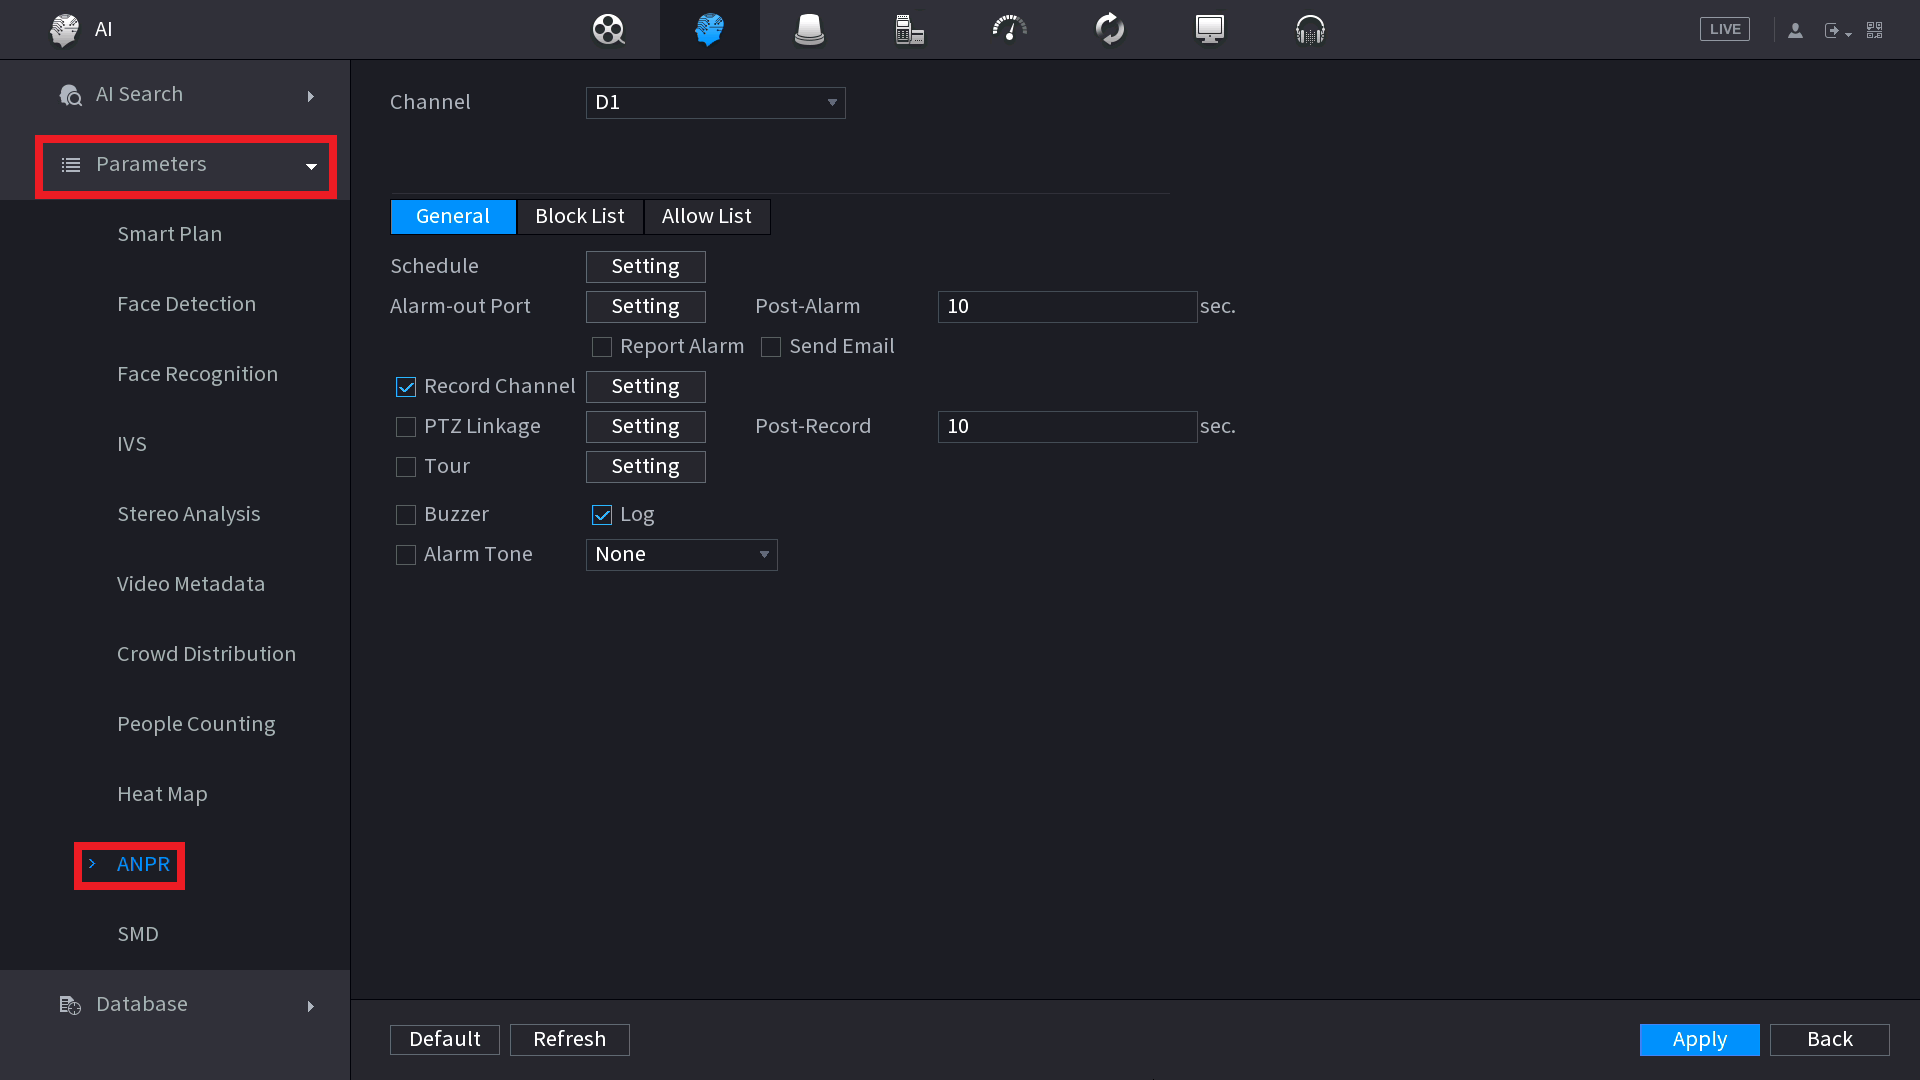
8. Select the Channel that the ANPR camera is connected to. Change the settings to suit the installation, e.g. set a schedule or enable an alarm output. These settings can be different between between the General Li Select Apply.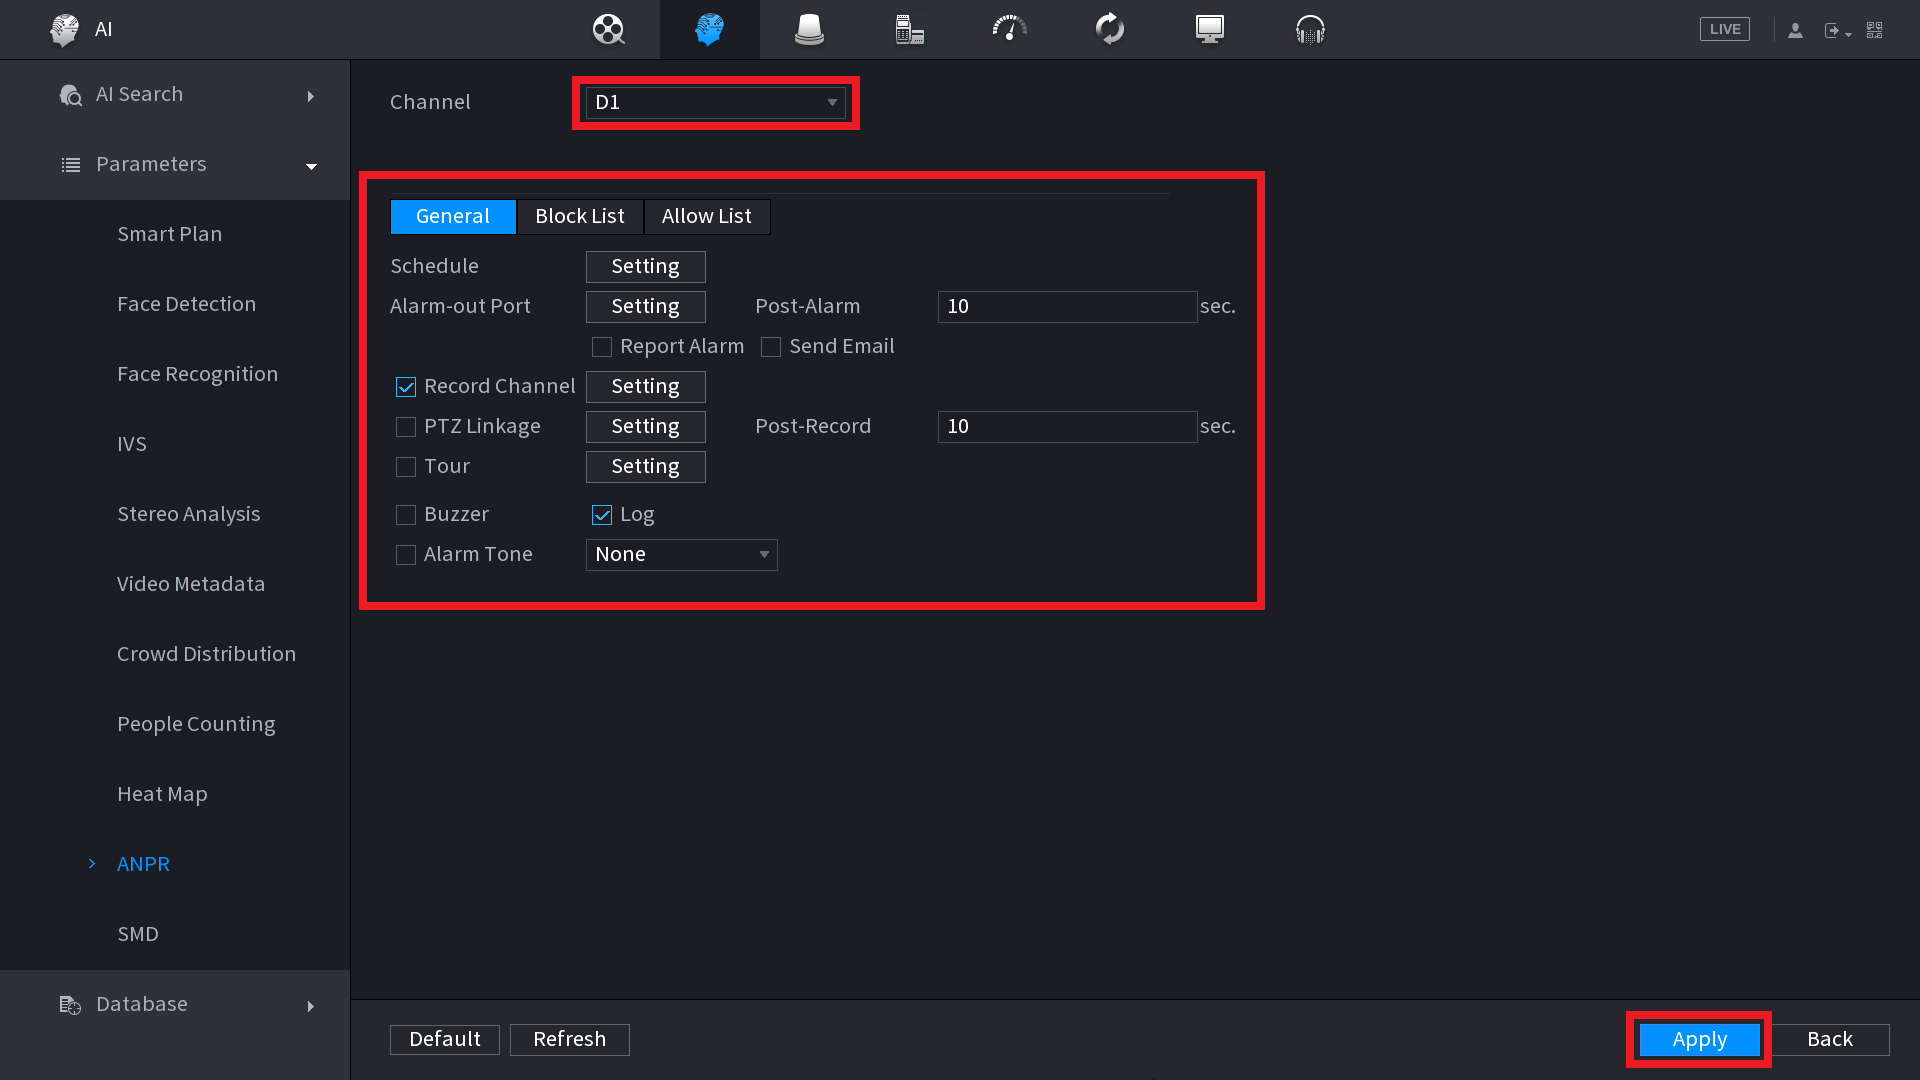
Configuring Block & Allow Lists on a NVR
1. Right Click and select Main Menu.
2. Select AI.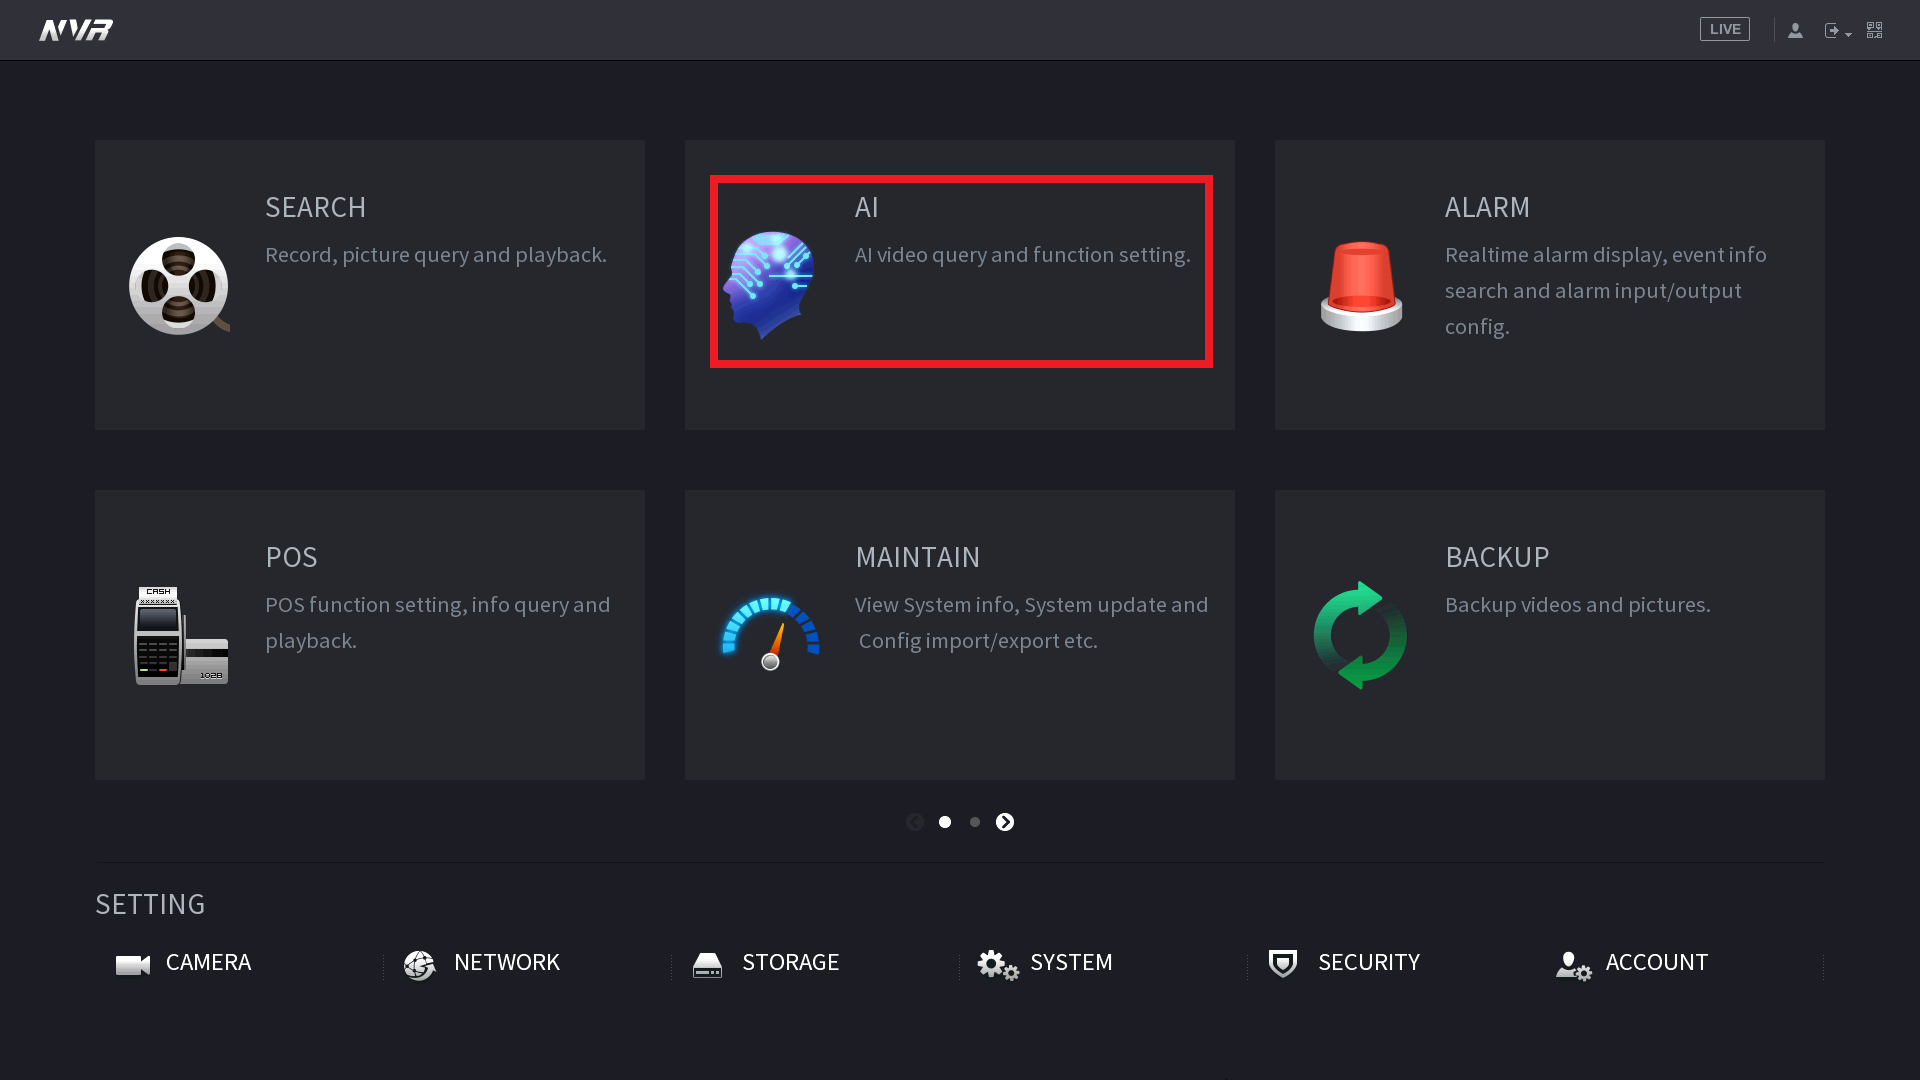
3. Select Database, then Block/Allow List.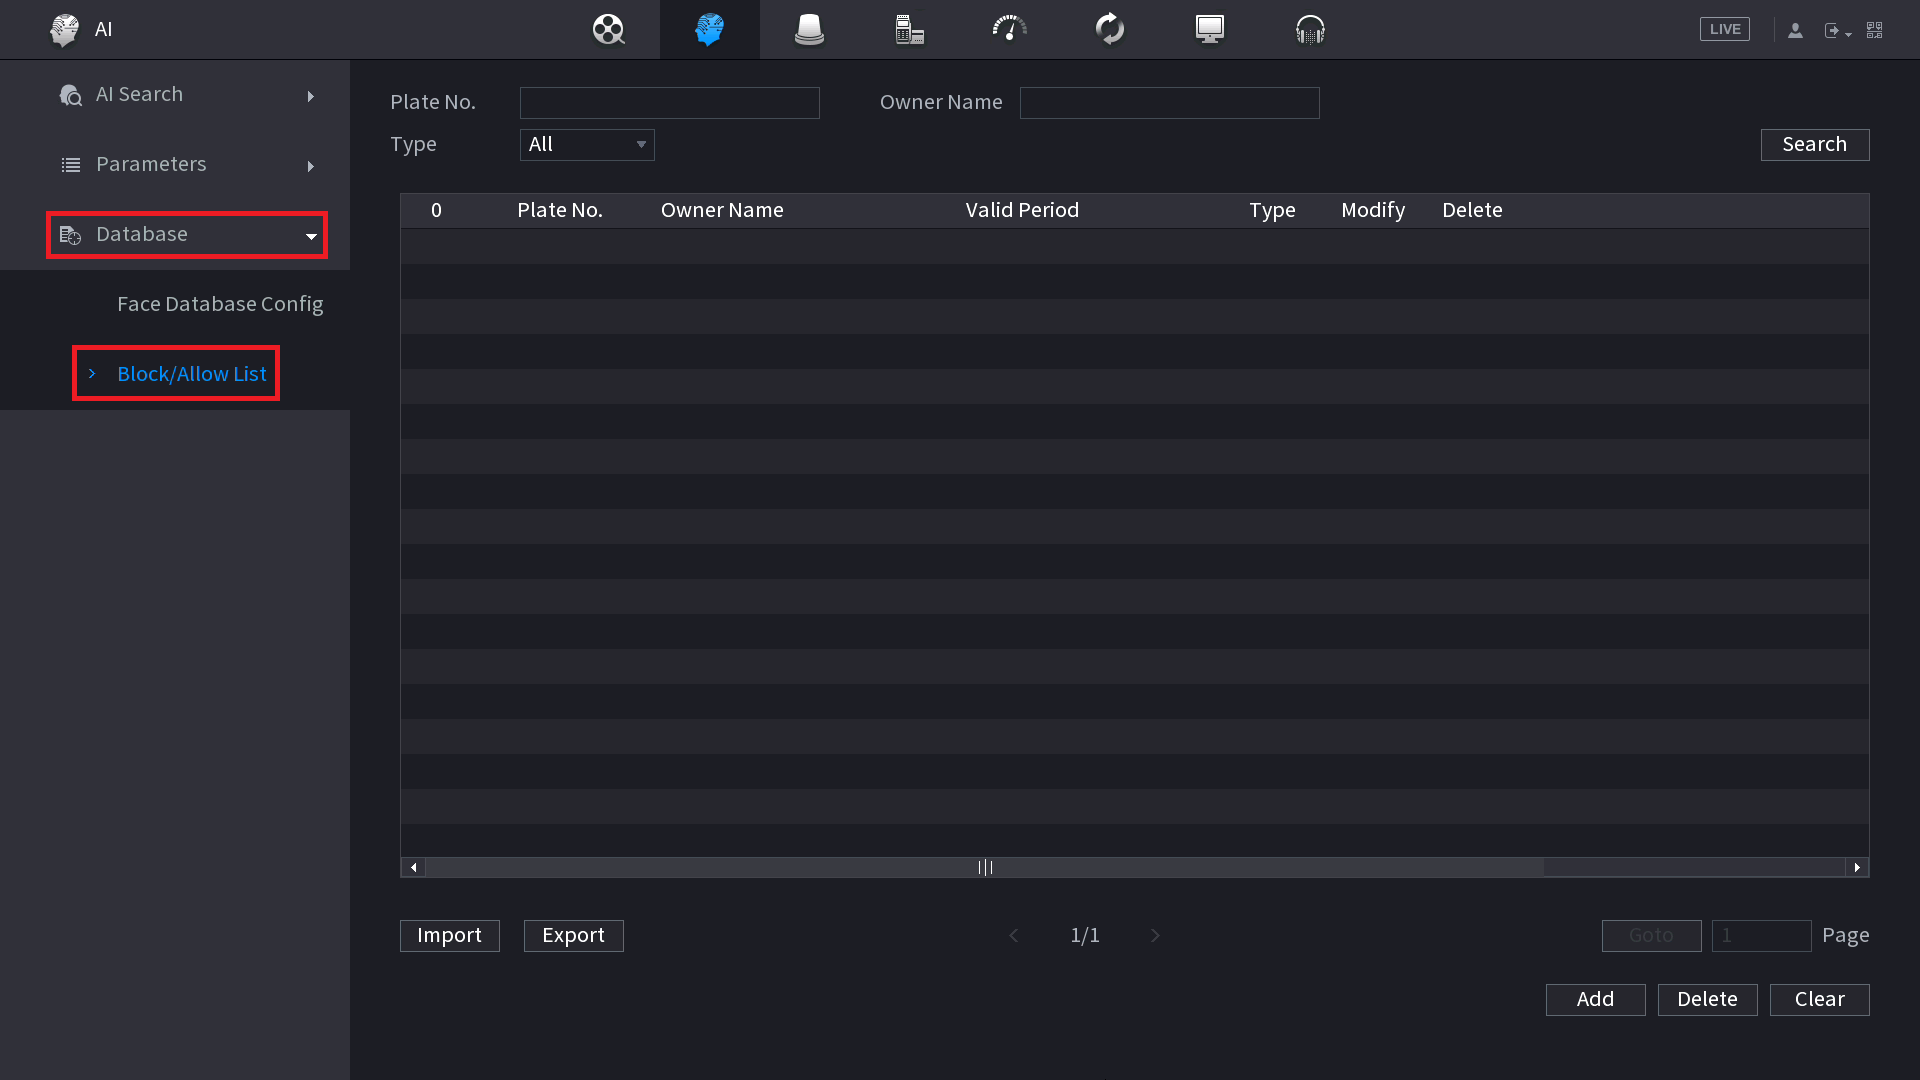
4. Select Add.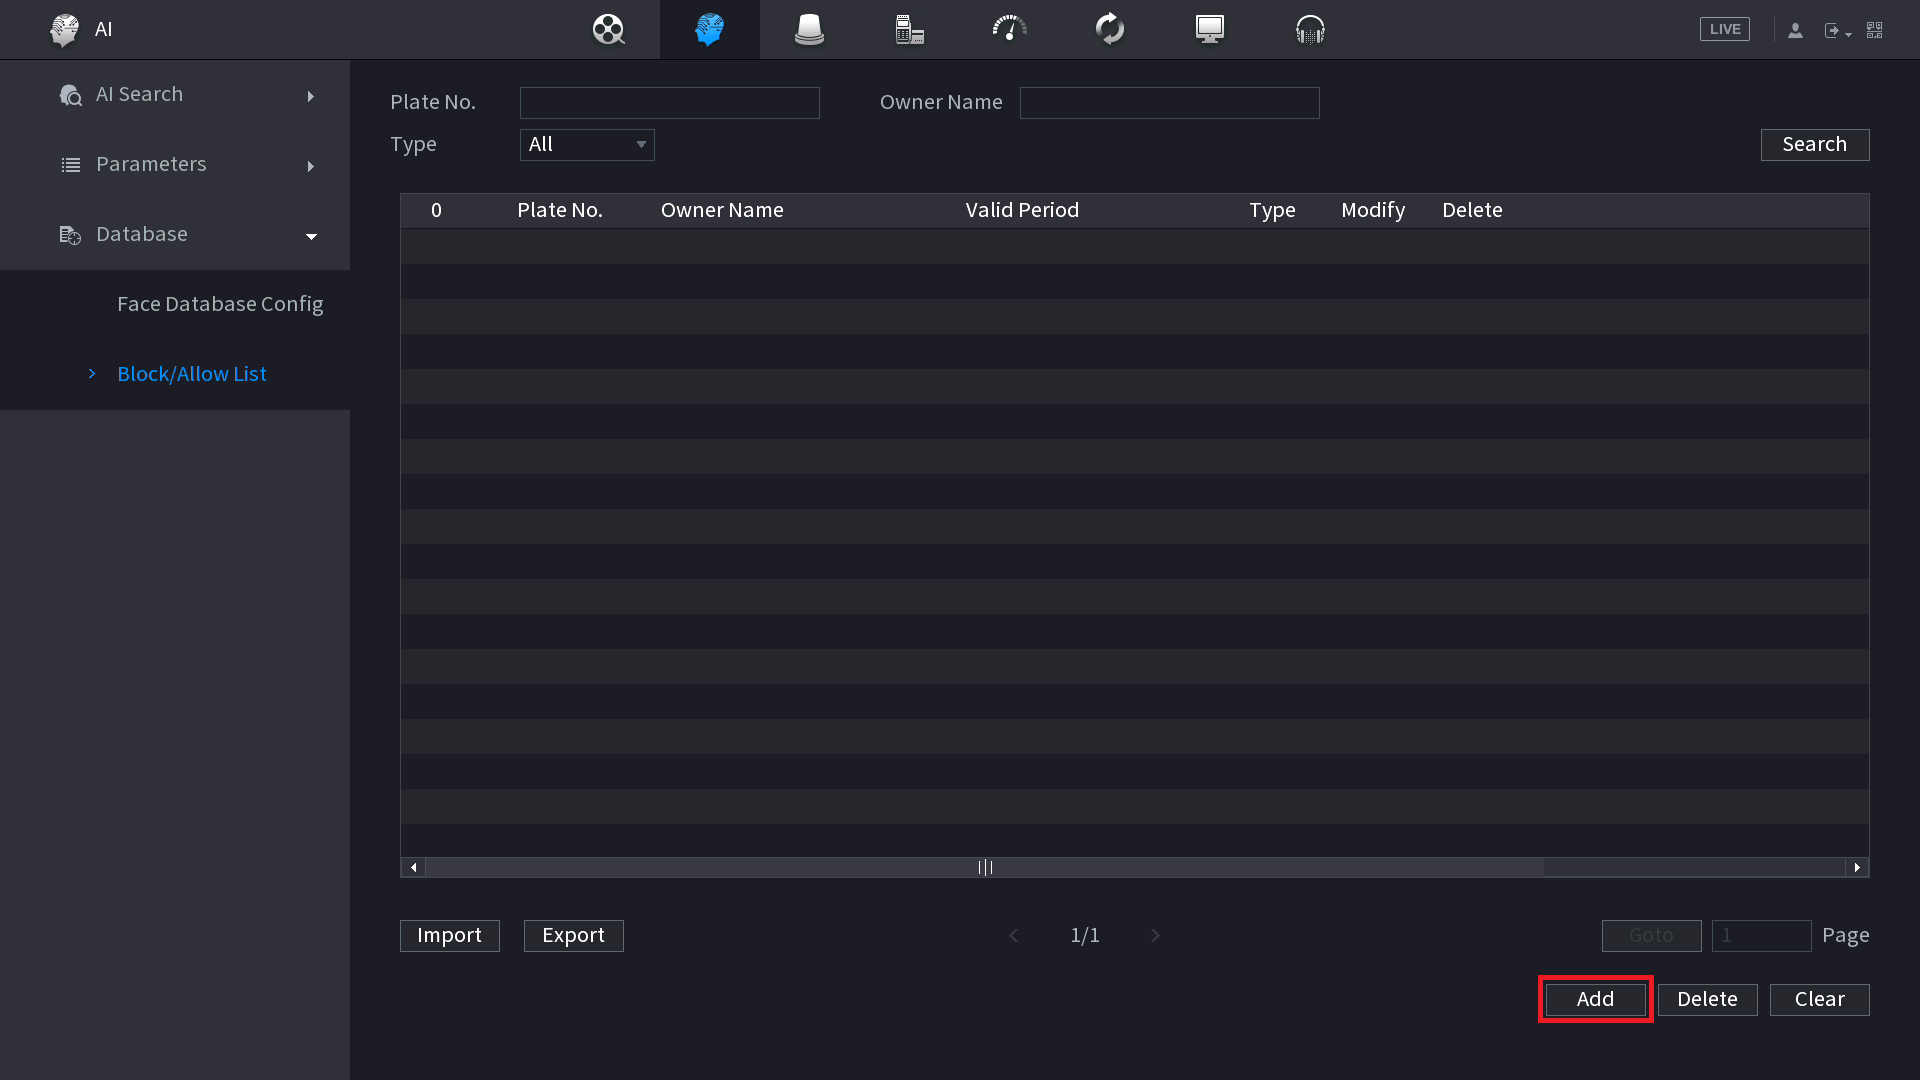
5. Enter the details of the Plate and Owner. Choose either the Allow List, or Black List, and set the period the rule will apply for. Select OK.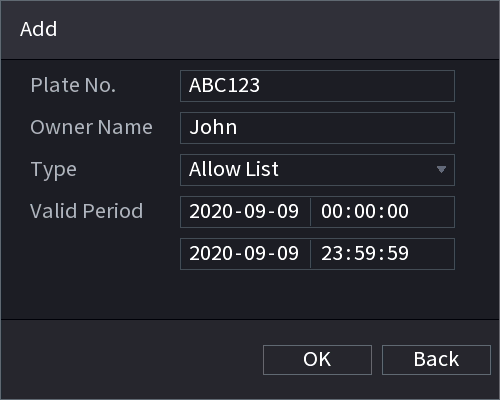
Number Plate Search on an NVR
Ensure ANPR is enable on the recorder, before trying to search for number plates.
1. Right Click and select Main Menu.
2. Select AI.
3. Select AI Search, then Motor Vehicle Detection.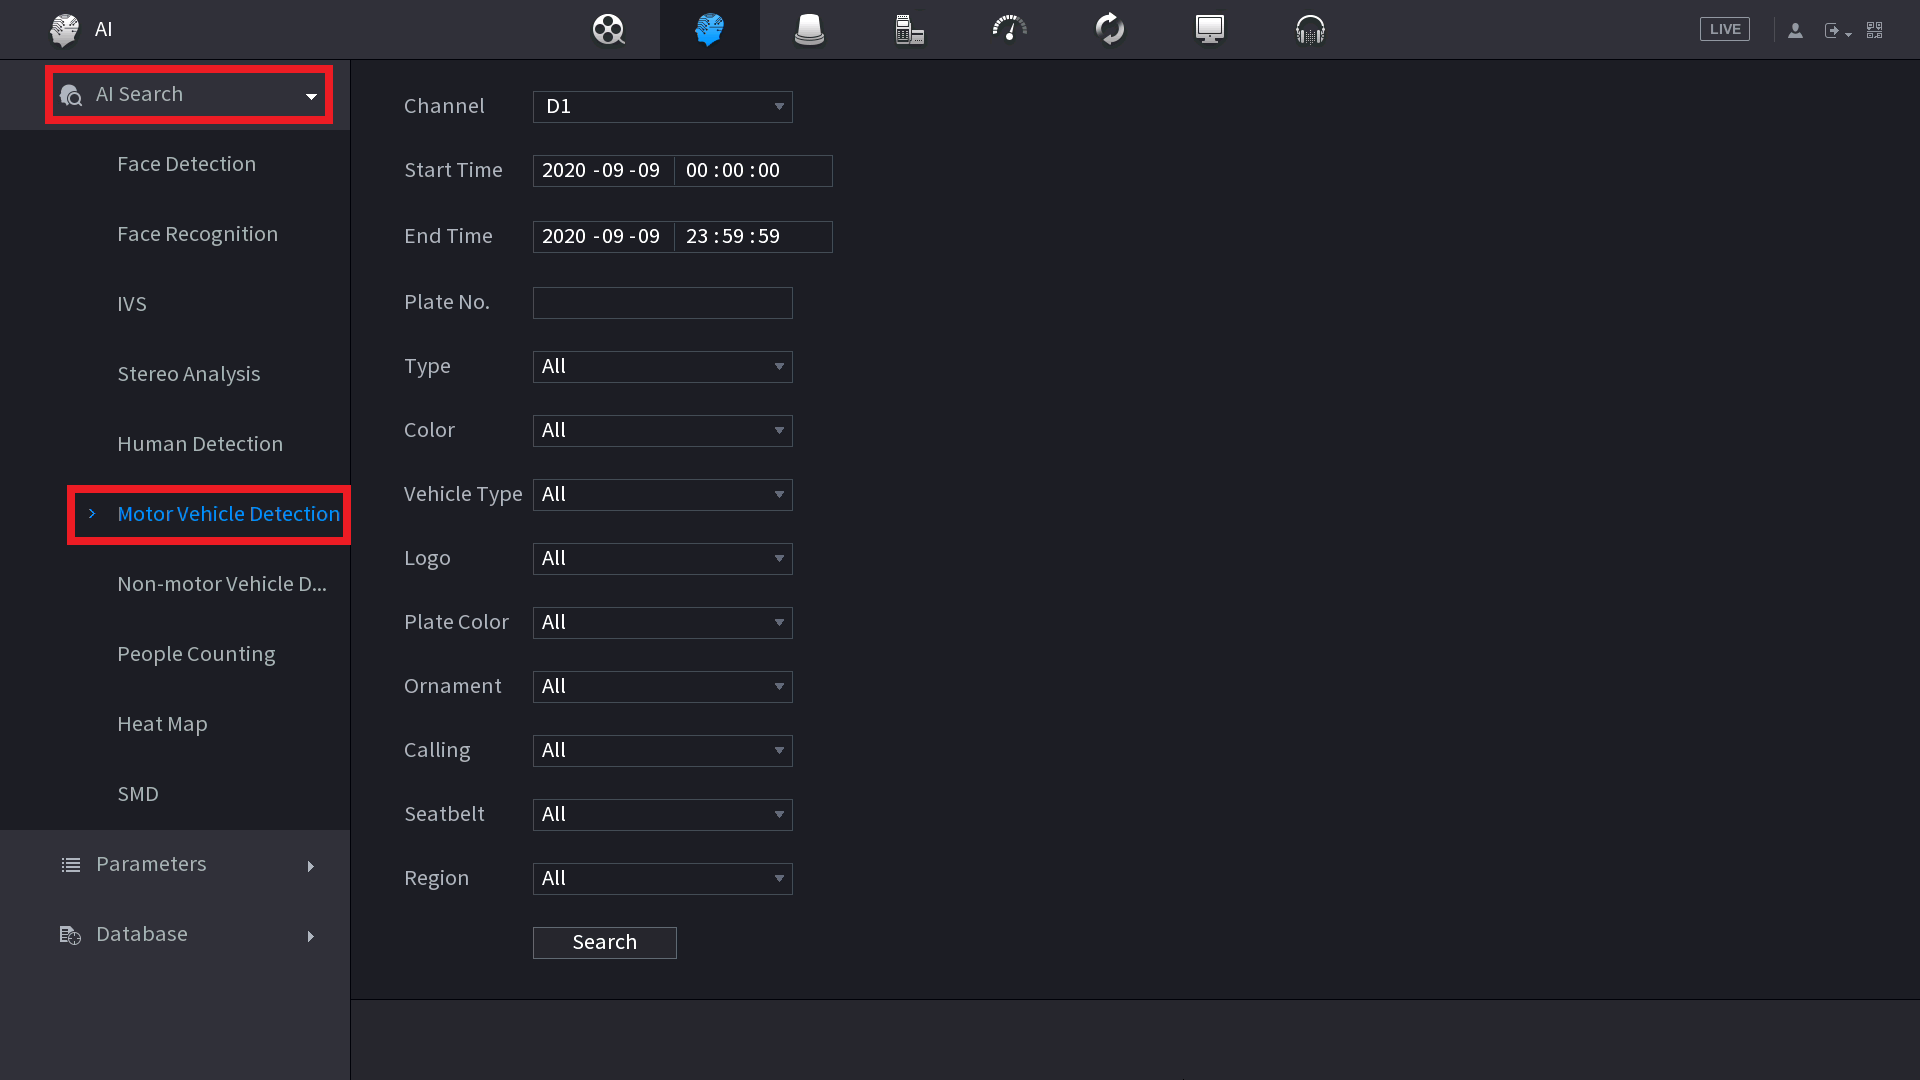
4. Select the Channel you wish to search, the Start Time and End Time, then enter a Plate No. (If you wish to search for all plates, leave the Plate No. field blank). Select Search.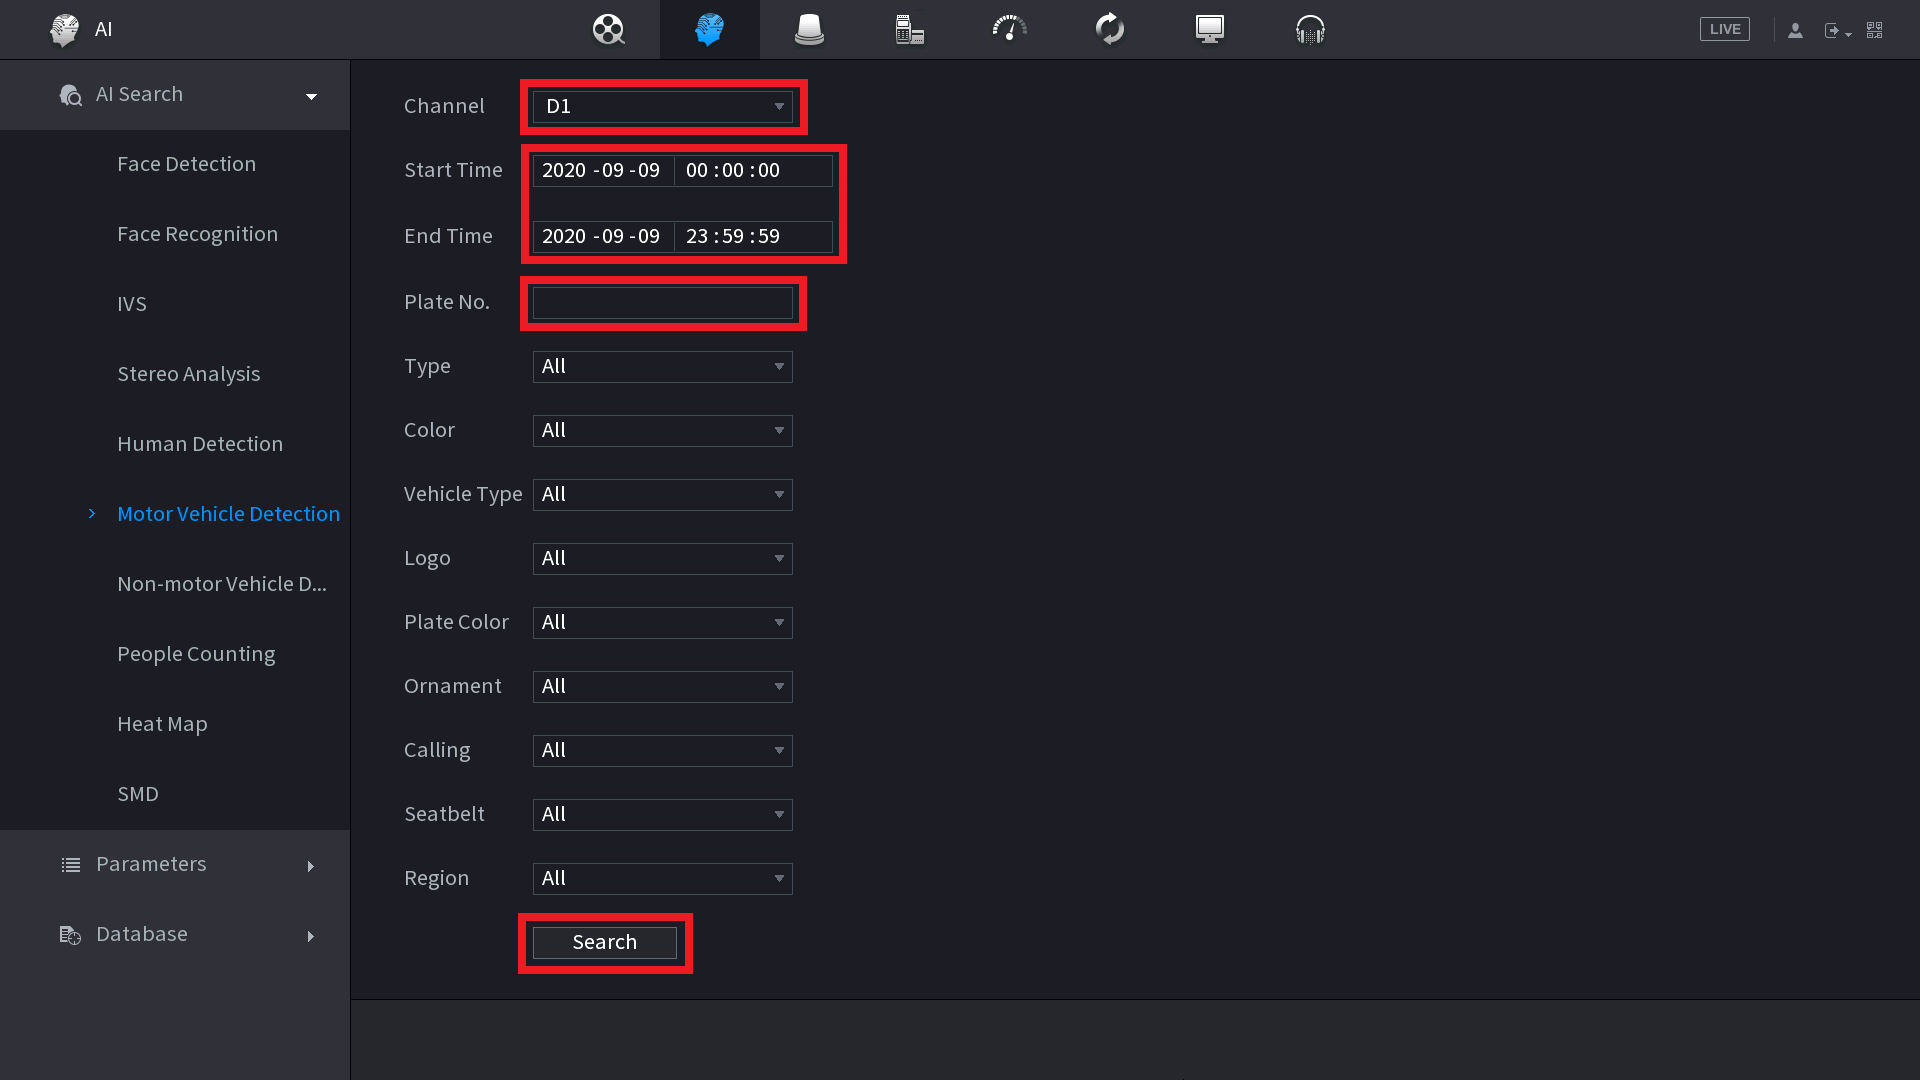
5. Search Results will be displayed, double click on the vehicle to show a preview.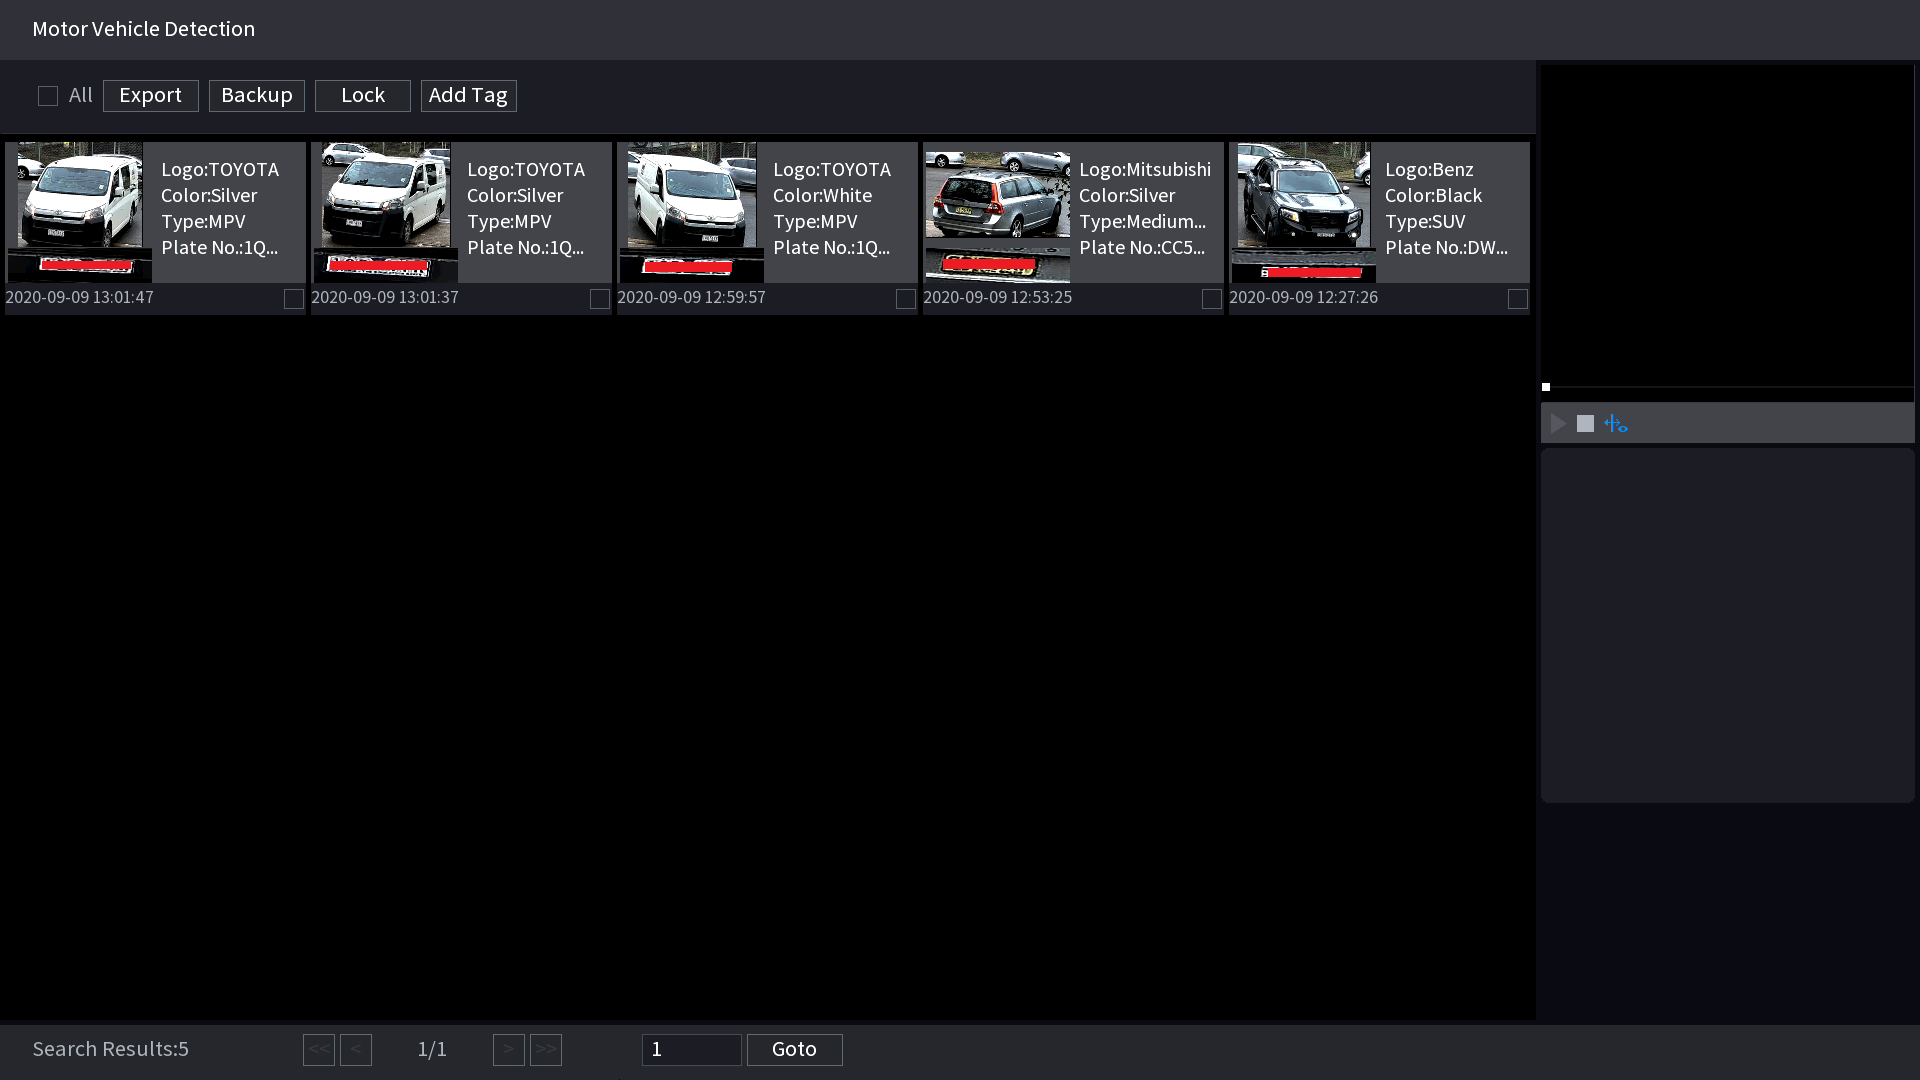
Enable/Disable Syncing Vehicle Blocklist/Allowlist between ANPR & NVR
Info
The below options is only available for NVRs on Type F or Type L 2022-03-22 firmware (or newer).
NVRs on older firmware or on different versions will not support this feature.
- Navigate to Main Menu > AI > Parameters > ANPR
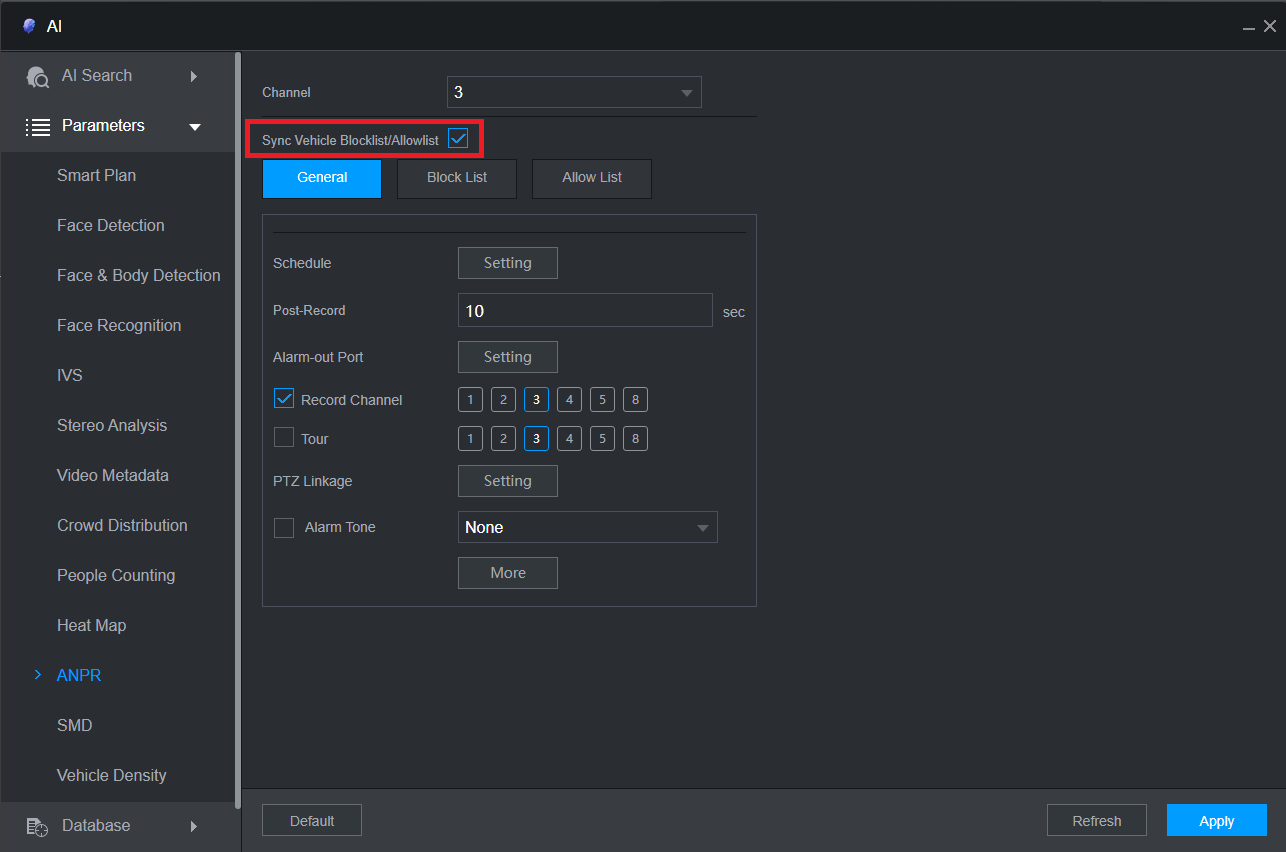
- Enable/Disable Sync Vehicle Blocklist/Allowlist, then select Apply.