Auto capture is a setting for the door station that allows you to capture your incoming call triggered by certain functions.
If you have not configured your intercom door station to your monitor please follow the below guides.
If you have not configured your intercom door station to your monitor please follow the guides here.
This setup method is intended for configuring single call-button Door Stations to call one or more Monitors in a group. It is the quickest setup method and does not require a computer unless adjusting settings such as door latch timing and date & time.
(SIP V4.5) One Key Configuration
- Choose a Monitor to be your Master Indoor Monitor. All configuration will be performed from this device. Do not configure any other monitor.
- Choose a Region and Language.


- Select Villa, then press OK.

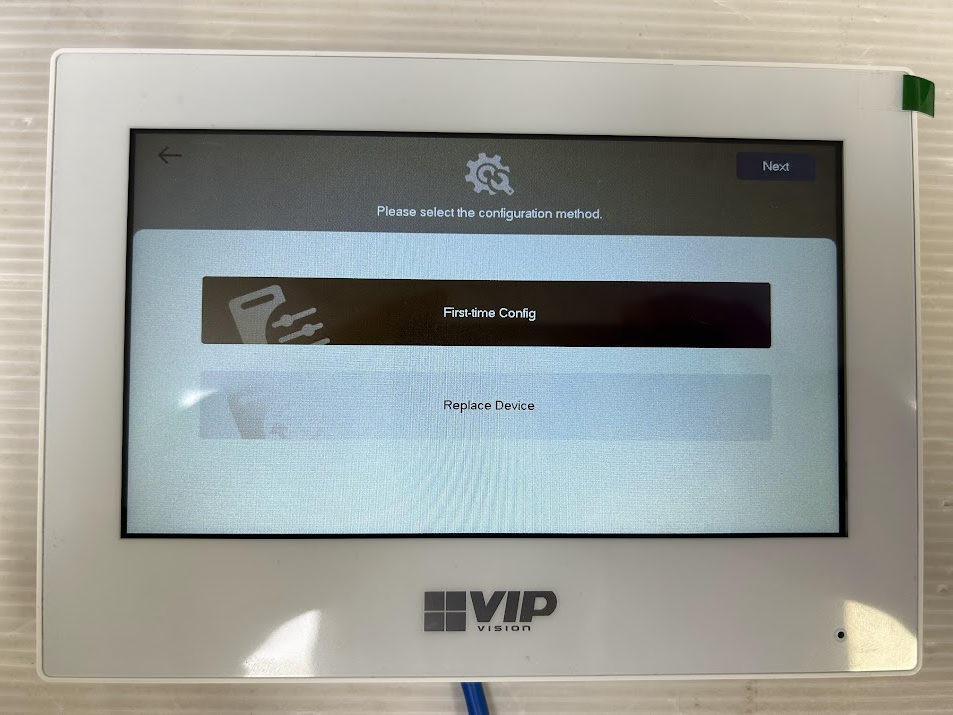
Select First-time Config, then press OK.

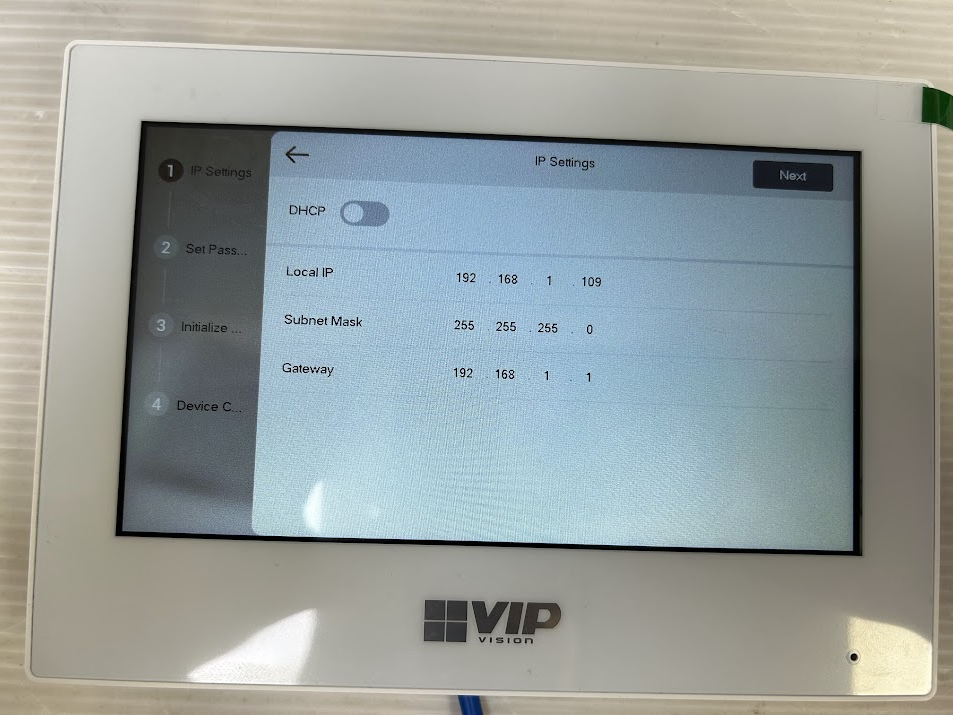
The monitor will search for a free IP address from your modem via DHCP. if successful, it will select DHCP, else, it will select Static IP and prompt you to set one manually. once an IP address is entered, press Next.

- Enter a 6 digit password and email to be used for all Monitors (VTH). This email will be used to reset the password of the monitors if needed in the future.

- Enter an 8-32 character password and email to be used for all Door Stations (VTO). This email will be used to reset the password of the door station if needed in the future.

- Press Batch Initialization. Once all devices are initialized, press Next.

- Press Edit next to the VTO marked as Main. Set the Date and Time Zone, then press OK. NOTE: Make sure time and date are set correctly, otherwise you may be unable to add the device to the app. Once configuration has been completed, the time and date can only be changed from the web interface of the Door Station.


- If you want to change the IP addresses of the other VTH or VTOs, press Edit/Change next to each device.
- Make sure your extension door station's (VTO) are configured to Sub.
- Press One-key Config. Once configuration is complete, the devices will reboot.

(SIP V4.7) One Key Configuration
1.Select the monitor you are going to use as the master monitor. All configuration will be performed on the master monitor. Do not configure any other monitors.
2. Using the search bar or the arrows at the bottom of the page, choose your region. Once your region is selected, press Next in the top right corner.
3. Using the arrows at the bottom of the page if needed, select your Language, then press Next.

4. Select Villa, then press Next.

5. Select First-time Config, then press Next.
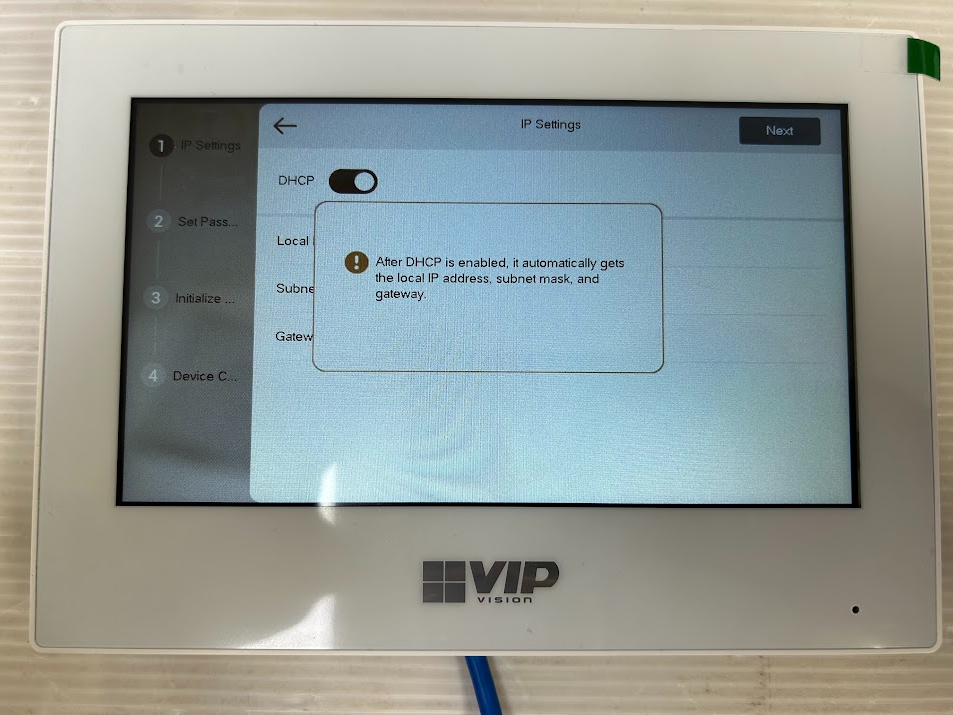
6.You will then be prompted to set the IP address of the monitor. If a modem/router is connected, enable DHCP. This will allow the monitor to automatically receive an IP address from your modem/router. If you want to manually enter an IP address, disable DHCP.
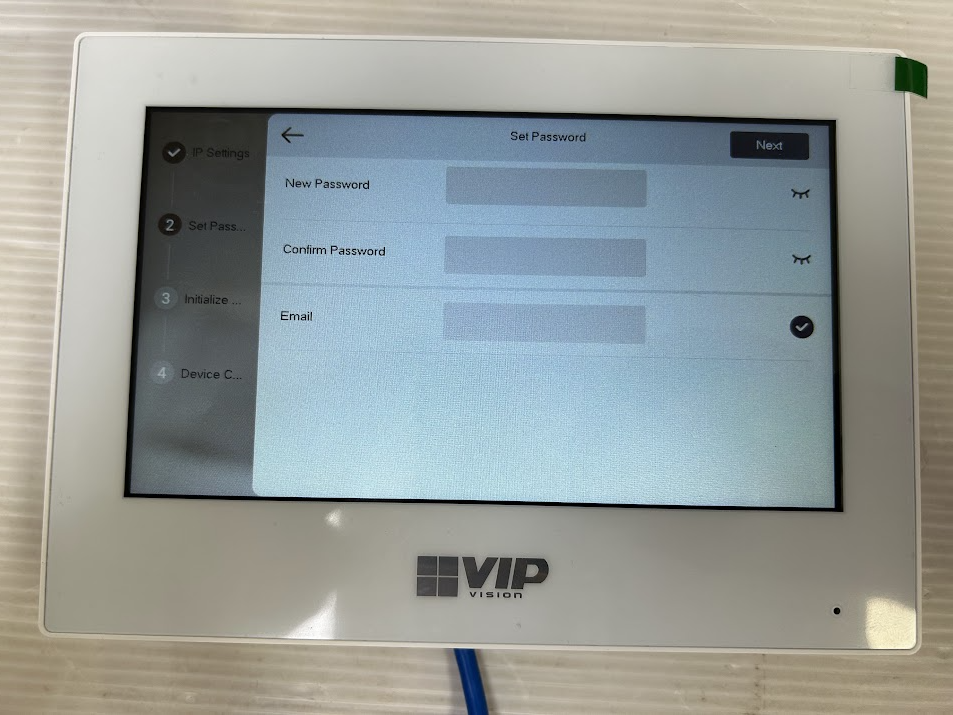
7.Set and confirm the password of your monitor. This password will sync to all devices connected (monitors and door stations).
Then enter an Email. This email will be used to reset the passwords of your devices if it is forgotten in the future. if you don't want to enter an email, untick the circle to the right of the email input box.
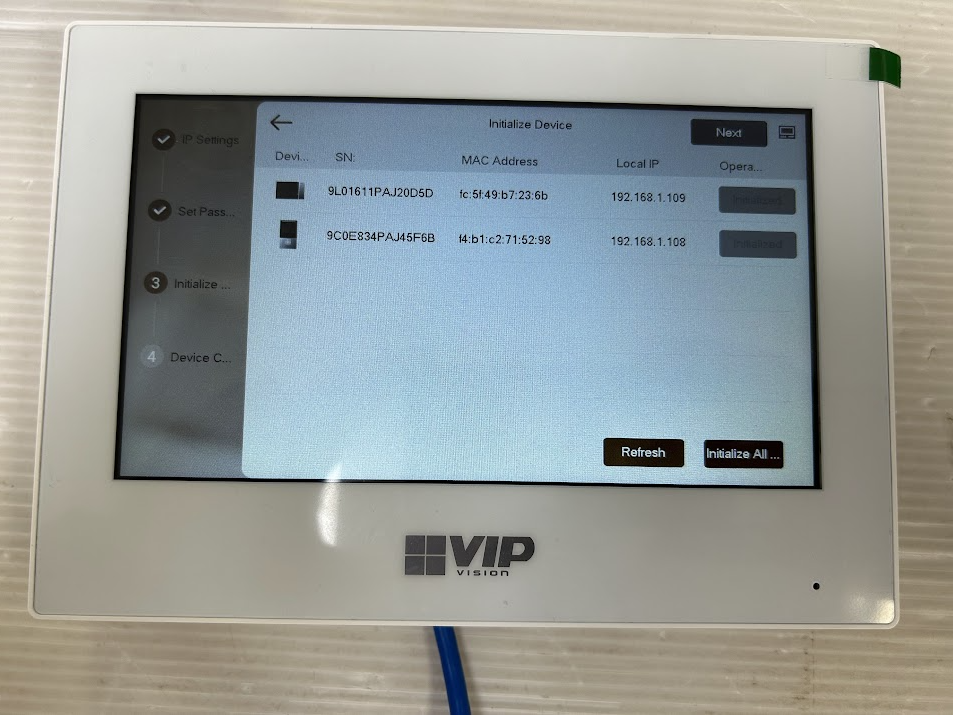
8. The monitor will prompt you to initialize the devices. Select Initialize All in the bottom right corner to initialize all the devices.
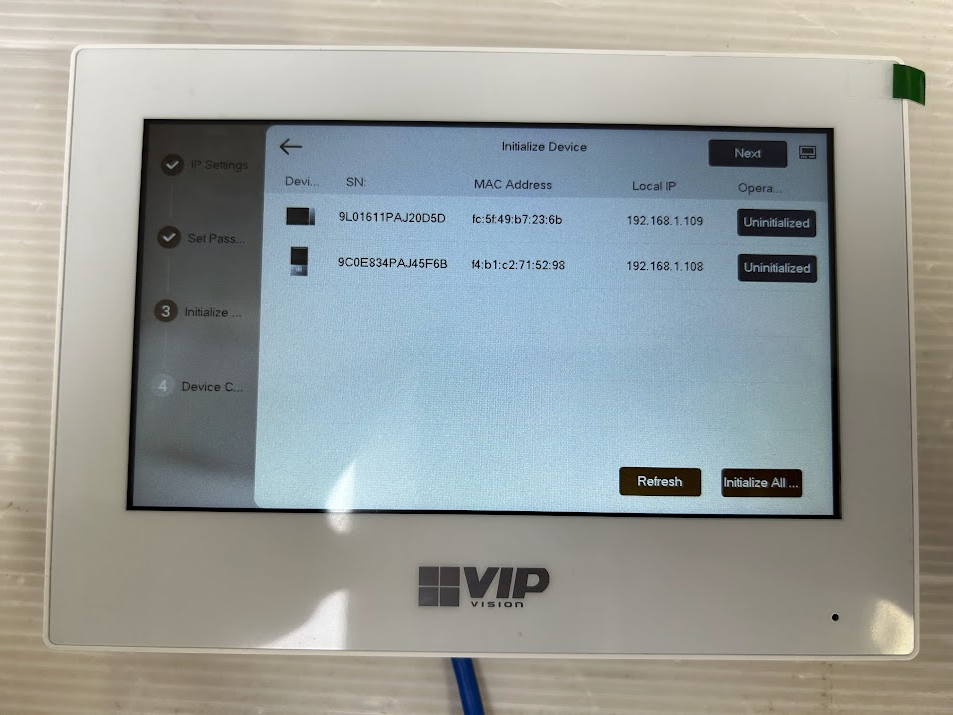
9. After the devices are initialized, press Next.
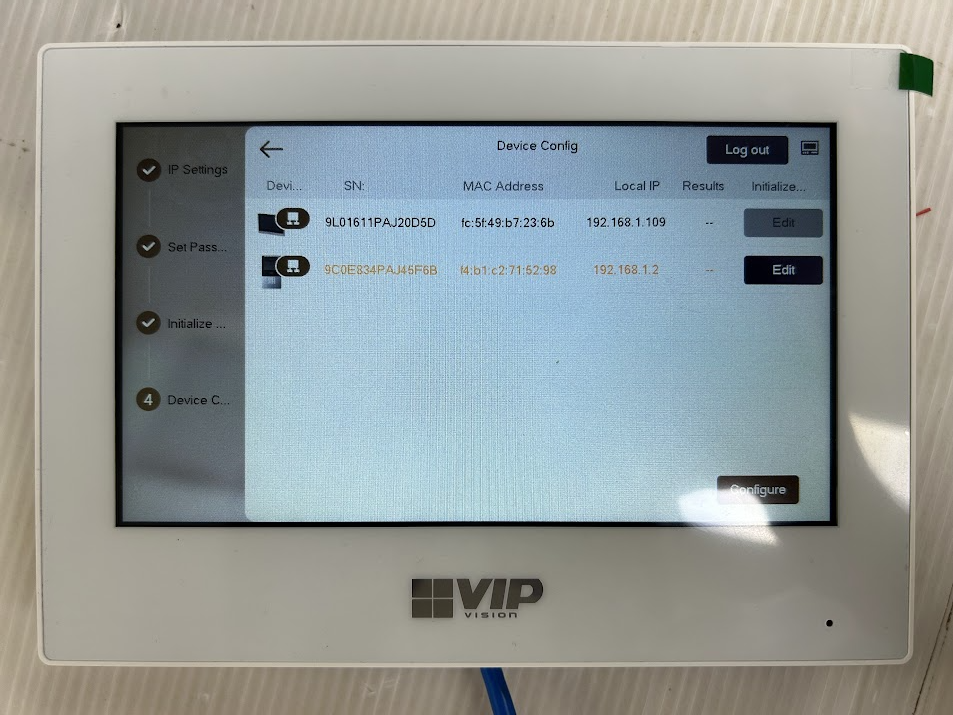
10. Press the Edit button next to door station.
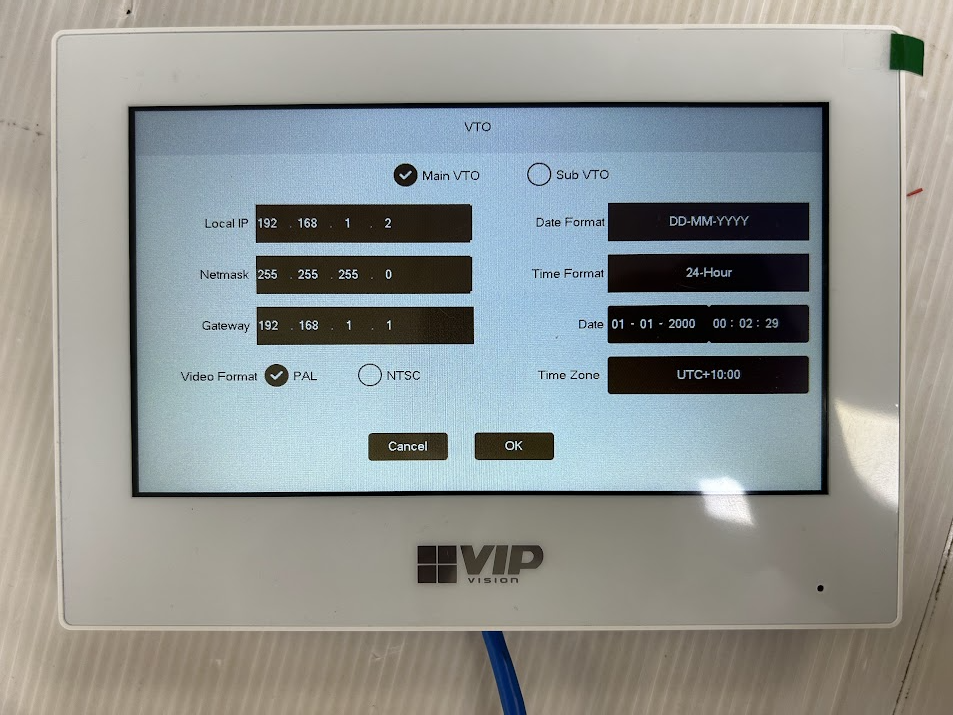
11. Ensure Main VTO is selected, then set the Date and Time to be correct. Then press OK to save changes.
12. Press Configure in the bottom right corner.

13. The monitor will then begin configuring the devices.
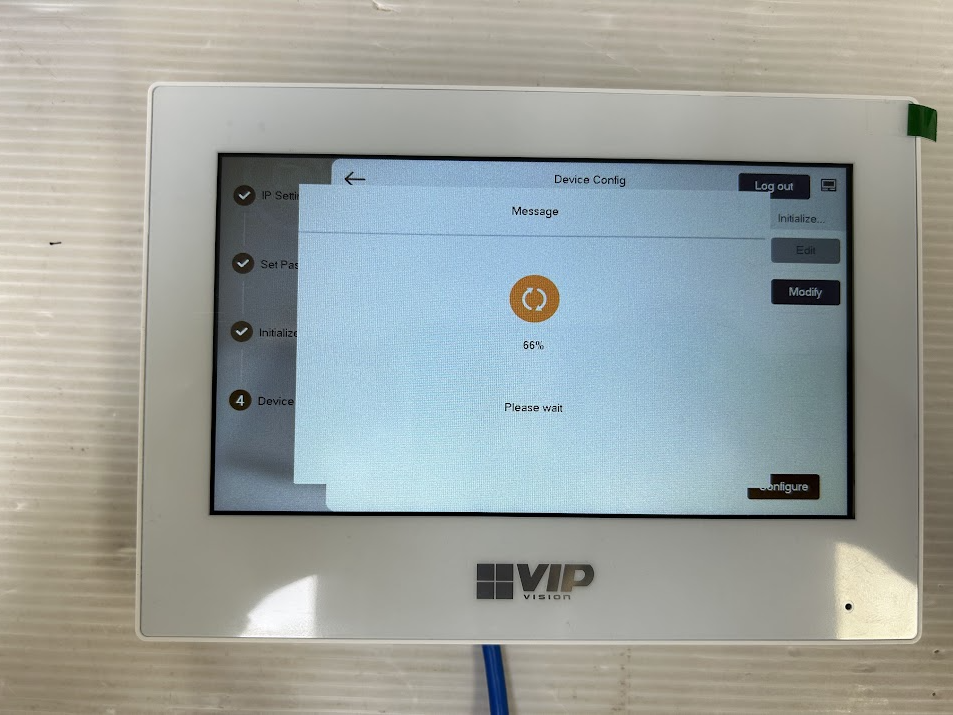
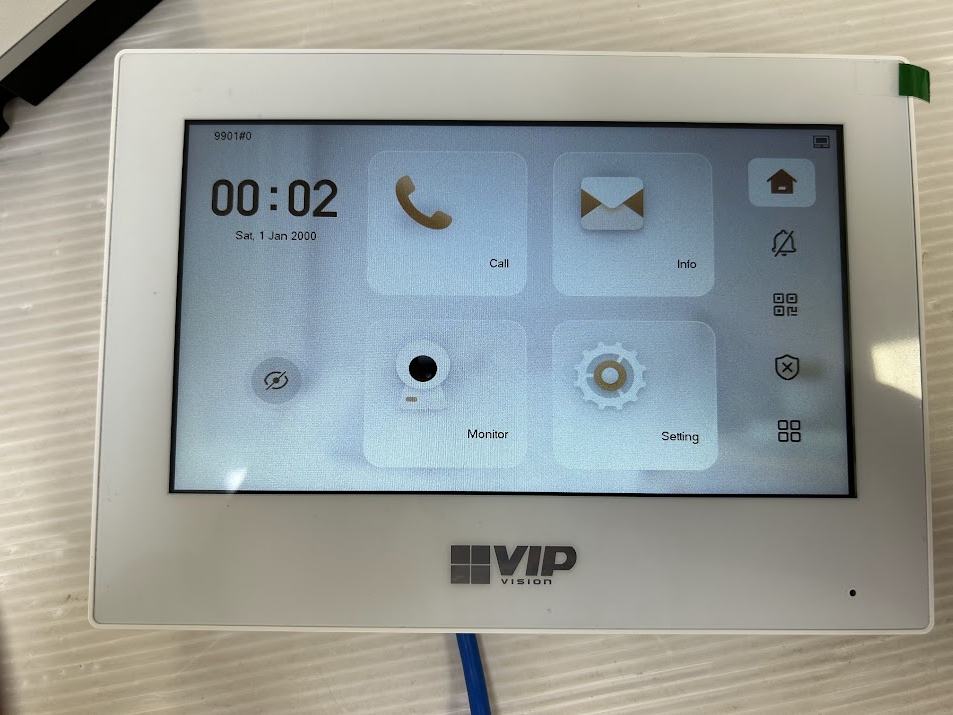
14. After the monitor is finished setting up, you should have a screen similar to below.
For Programming Intercom Devices below SIP V4.5 Firmware
(SIP V4.0) 1 Door Station & 1 Indoor Monitor
This method requires the least amount of time to setup and does not require a computer. However, a computer will be required to adjust settings such as door latch timing and date & time.
Below are the example details that we will be using for this guide. If you intend on connecting the intercom to your network for remote access, you will need to obtain the local IP address details for your network. Replace the example IP addresses with IP addresses suitable for your network.
Choosing IP Addresses
To find the IP range on a network, or to find available IP addresses, follow the steps below.
Windows
Finding the IP Range of a Network
This is useful if you are unsure what the network details are, or if you have requested pre-programming. When pre-programming devices, we require these details.
1. Connect a Windows PC / Laptop, open the start menu and type cmd.
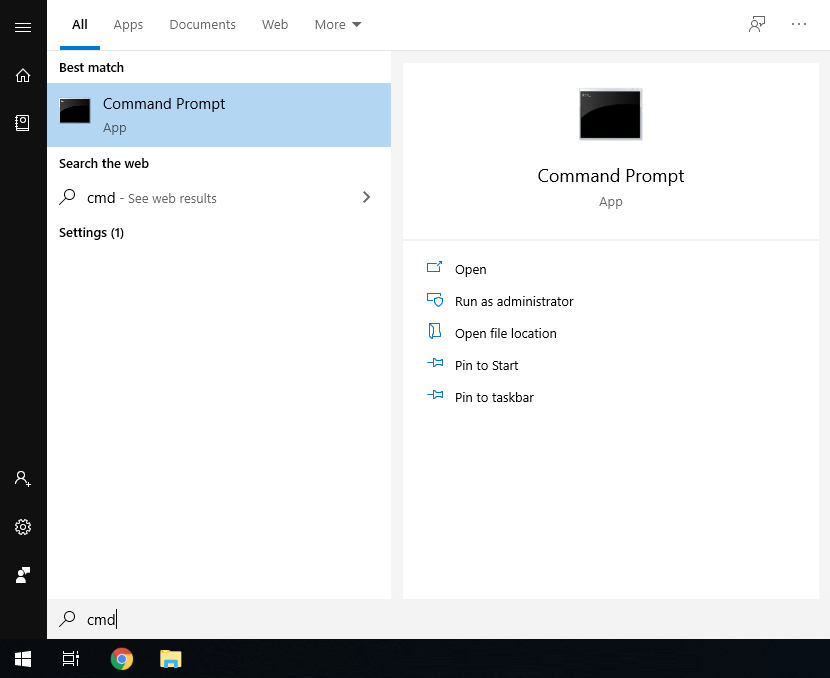
2. Launch the Command Prompt program.
3. Once it opens, enter the command ipconfig and take a screenshot or copy the information as below. We require the IP address, Subnet Mask and Default Gateway.
4. A screenshot can be taken by pressing the Windows + Shift + S keys simultaneously, then paste it into a document/email with Ctrl + V

Finding Available IP Addresses
If you wish to connect devices to the network for remote access, you must give each device an IP address, within your network range. In this example, we will be using a Windows computer which is connected to a modem to find the IP address of the computer, and available IP addresses to use for the devices. If the devices are being installed on a business or managed network, contact an IT representative for assistance.
1. Connect a Windows PC / Laptop, open the start menu and type cmd.

2. Launch the Command Prompt program.
3. Once it opens, enter the command ipconfig and take a screenshot or copy the information as below. Note down the IP Address, Subnet Mask and Default Gateway.
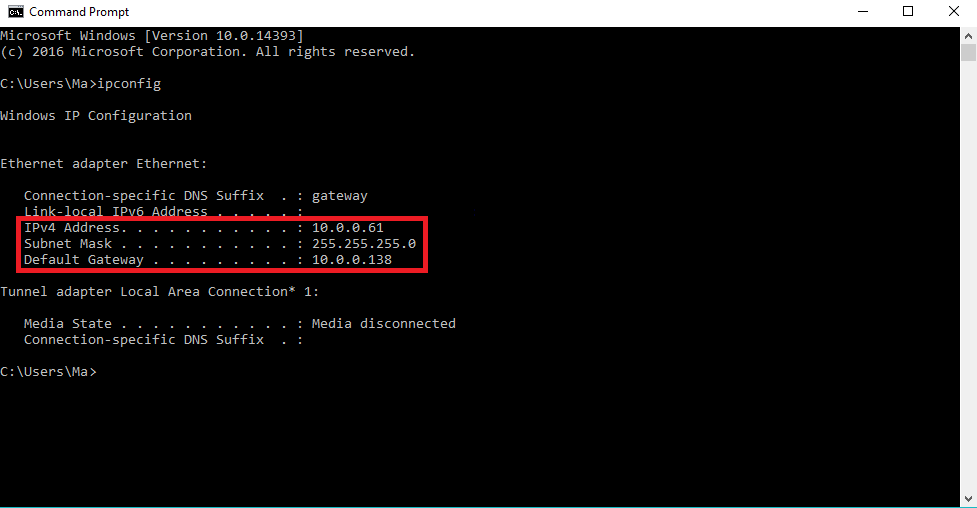
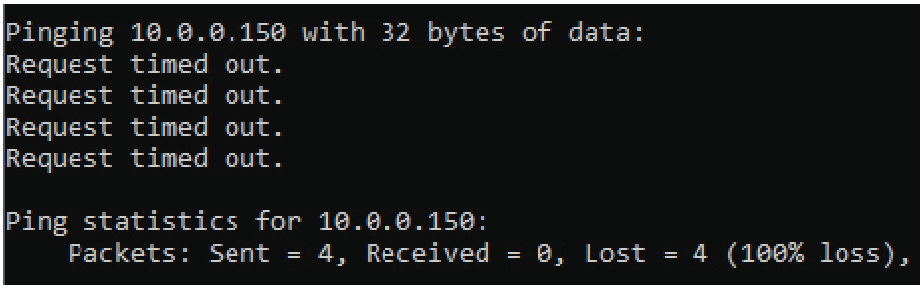
4. In our example, the IP address is 10.0.0.61. To check what IP address is available, type ping 10.0.0.XXX, where XXX is any number between 2 and 254. If Destination host unreachable or Request timed out is show on screen, there is no device using that IP address. Repeat the process to find multiple IP addresses that are available for use. Every devices requires one IP address. 10.0.0.XXX is used as an example, you the IP Address range will vary depending on the network.
5. When configuring the devices, use the IP addresses that you have found that are available, making sure each device has a unique IP address. The Subnet Mask and Default Gateway, will be set the same on each device.
MAC OSX
Finding the IP Range of a Network
This is useful if you are unsure what the network details are, or if you have requested pre-programming. When pre-programming devices, we require these details.
1. Open the Apple Menu ( ) and select System Preferences.
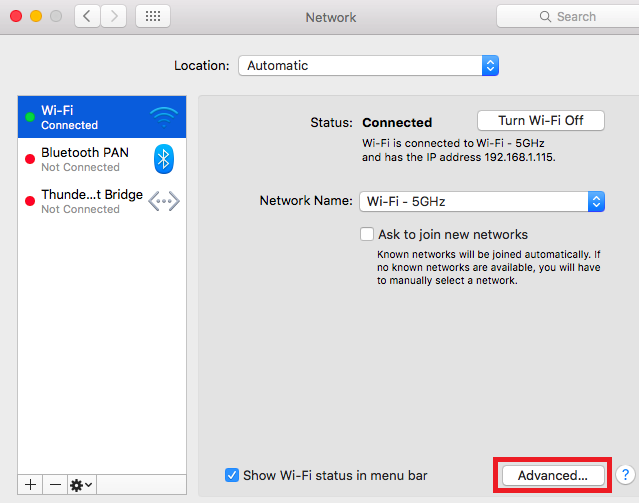
2. Select the Network option.

3. Select either Ethernet (for wired connections) or Wi-Fi (for wireless connections), then select advanced.
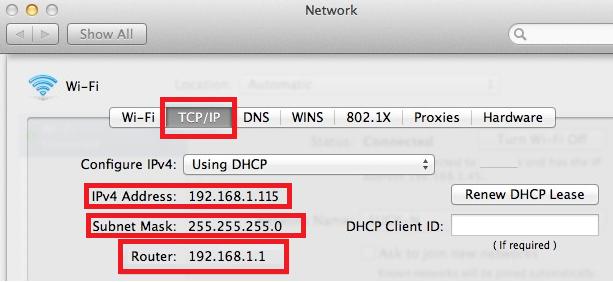
4. Select TCP/IP. The details in red are the network details.
5. A screenshot can be taken by pressing the Command + Shift + 3 keys simultaneously. The screenshot will be saved to the desktop
Finding Available IP Addresses
If you wish to connect devices to the network for remote access, you must give each device an IP address, within your network range. In this example, we will be using a Apple Mac which is connected to a modem to find the IP address of the computer, and available IP addresses to use for the devices. If the devices are being installed on a business or managed network, contact an IT representative for assistance.
1. Follow the steps for Finding the IP Range of a Network - Mac OSX.
2. Press Command + Space bar keys to bring up spotlight.
3. Type Terminal, and double click on the search result.
4. To check what IP address is available, type ping 192.168.1.XXX, where XXX is any number between 2 and 254. If Request timeout is show on screen, there is no device using that IP address. Repeat the process to find multiple IP addresses that are available for use. Every devices requires one IP address. 192.168.1.XXX is used as an example, you the IP Address range will vary depending on the network.
5. When configuring the devices, use the IP addresses that you have found that are available, making sure each device has a unique IP address. The Subnet Mask and Default Gateway, will be set the same on each device.
| Device | IP Address | Subnet Mask | Gateway | Password | Type | Main/Sub |
| Door Station | 192.168.1.108 | 255.255.255.0 | 192.168.1.1 | admin123 | VTO | Main |
| Indoor Monitor | 192.168.1.109 | 255.255.255.0 | 192.168.1.1 | 888888 | VTH | Main |
- Go to the Indoor Monitor, all configuration will be performed from this device. If prompted to select a language, select English, then select OK. If not prompted, proceed to the next step.

- If prompted to choose Apartment or Villa, select Villa, then select OK. If not prompted, proceed to the next step.

- Initialize the Indoor Monitor, by entering a 6 digit password (888888) and email. Select OK.

- If prompted with Do you want to do quick configuration?, Select OK. If Step 3 was completed, skip this step.
- Select Initialize next to the uninitialized Door Station (VTO) and set a user password (admin123) and email. Select OK.

- Once all of the devices are initialized, select Next.
- Select Edit next to the Indoor Monitor (VTH). Set the device type to Main and set the IP Address (192.168.1.109), Netmask (255.255.255.0) and Gateway (192.168.1.1). Select OK..
- Select Edit next to the Door Station (VTO). Set the device type to Main and set the IP Address (192.168.1.108), Netmask (255.255.255.0) and Gateway (192.168.1.1). Set the Time and Date. Select OK.

- Once all devices have had their IP address details and device type set, select One-Key Config. The devices will now be configured.
NOTE: If an error occurs during the configuration, ensure the entered details are correct. - Once the devices have successfully configured, select OK.
- The devices will reboot, allow up to 10 minutes for them to connect.
(SIP V4.0) 2 Door Stations, 2 Indoor Monitors
This method requires the least amount of time to setup and does not require a computer. However, a computer will be required to adjust settings such as door latch timing and date & time.
Below are the example details that we will be using for this guide. If you intend on connecting the intercom to your network for remote access, you will need to obtain the local IP address details for your network. Replace the example IP addresses with IP addresses suitable for your network.
Choosing IP Addresses
To find the IP range on a network, or to find available IP addresses, follow the steps below.
Windows
Finding the IP Range of a Network
This is useful if you are unsure what the network details are, or if you have requested pre-programming. When pre-programming devices, we require these details.
1. Connect a Windows PC / Laptop, open the start menu and type cmd.
2. Launch the Command Prompt program.
3. Once it opens, enter the command ipconfig and take a screenshot or copy the information as below. We require the IP address, Subnet Mask and Default Gateway.
4. A screenshot can be taken by pressing the Windows + Shift + S keys simultaneously, then paste it into a document/email with Ctrl + V
Finding Available IP Addresses
If you wish to connect devices to the network for remote access, you must give each device an IP address, within your network range. In this example, we will be using a Windows computer which is connected to a modem to find the IP address of the computer, and available IP addresses to use for the devices. If the devices are being installed on a business or managed network, contact an IT representative for assistance.
1. Connect a Windows PC / Laptop, open the start menu and type cmd.
2. Launch the Command Prompt program.
3. Once it opens, enter the command ipconfig and take a screenshot or copy the information as below. Note down the IP Address, Subnet Mask and Default Gateway.
4. In our example, the IP address is 10.0.0.61. To check what IP address is available, type ping 10.0.0.XXX, where XXX is any number between 2 and 254. If Destination host unreachable or Request timed out is show on screen, there is no device using that IP address. Repeat the process to find multiple IP addresses that are available for use. Every devices requires one IP address. 10.0.0.XXX is used as an example, you the IP Address range will vary depending on the network.
5. When configuring the devices, use the IP addresses that you have found that are available, making sure each device has a unique IP address. The Subnet Mask and Default Gateway, will be set the same on each device.
MAC OSX
Finding the IP Range of a Network
This is useful if you are unsure what the network details are, or if you have requested pre-programming. When pre-programming devices, we require these details.
1. Open the Apple Menu ( ) and select System Preferences.
2. Select the Network option.
3. Select either Ethernet (for wired connections) or Wi-Fi (for wireless connections), then select advanced.
4. Select TCP/IP. The details in red are the network details.
5. A screenshot can be taken by pressing the Command + Shift + 3 keys simultaneously. The screenshot will be saved to the desktop
Finding Available IP Addresses
If you wish to connect devices to the network for remote access, you must give each device an IP address, within your network range. In this example, we will be using a Apple Mac which is connected to a modem to find the IP address of the computer, and available IP addresses to use for the devices. If the devices are being installed on a business or managed network, contact an IT representative for assistance.
1. Follow the steps for Finding the IP Range of a Network - Mac OSX.
2. Press Command + Space bar keys to bring up spotlight.
3. Type Terminal, and double click on the search result.
4. To check what IP address is available, type ping 192.168.1.XXX, where XXX is any number between 2 and 254. If Request timeout is show on screen, there is no device using that IP address. Repeat the process to find multiple IP addresses that are available for use. Every devices requires one IP address. 192.168.1.XXX is used as an example, you the IP Address range will vary depending on the network.
5. When configuring the devices, use the IP addresses that you have found that are available, making sure each device has a unique IP address. The Subnet Mask and Default Gateway, will be set the same on each device.
| Device | IP Addresses | Subnet Mask | Gateway | Password | Type | Main/Sub |
| Door Station 1 | 192.168.1.108 | 255.255.255.0 | 192.168.1.1 | admin123 | VTO | Main |
| Door Station 2 | 192.168.1.111 | 255.255.255.0 | 192.168.1.1 | admin123 | VTO | Sub |
| Indoor Monitor 1 | 192.168.1.112 | 255.255.255.0 | 192.168.1.1 | 888888 | VTH | Main |
| Indoor Monitor 2 | 192.168.1.113 | 255.255.255.0 | 192.168.1.1 | 888888 | VTH | Sub |
- Go to the Indoor Monitor which will be your Master Indoor Monitor, all configuration will be performed from this device, do not configure any other monitor. If prompted to select a language, select English, then select OK. If not prompted, proceed to the next step.

- If prompted to choose Apartment or Villa, select Villa, then select OK. If not prompted, proceed to the next step.

- Initialize the Indoor Monitor, by entering a 6 digit password (888888) and email. Select OK.

- If prompted with Do you want to do quick configuration?, Select OK. If Step 3 was completed, skip this step.

- Select Initialize next to the second uninitialized Indoor Monitor (VTH) and set a password (888888) and email. Select OK.
- Select Initialize next to the first uninitialized Door Station (VTO) and set a user password (admin123) and email. Select OK.
- Select Initialize next to the second uninitialized Door Station (VTO) and set a user password (admin123) and email. Select OK.

- Once all of the devices are initialized, select Next.

- Select Edit next to the first Indoor Monitor (VTH). Set the device type to Main and set the IP Address (192.168.1.112), Netmask (255.255.255.0) and Gateway (192.168.1.1). Select OK.

- Select Edit next to the second Indoor Monitor (VTH). Set the device type to Sub and set the IP Address (192.168.1.113), Netmask (255.255.255.0) and Gateway (192.168.1.1). Select OK.

- Select Edit next to the first Door Station (VTO). Set the device type to Main and set the IP Address (192.168.1.108), Netmask (255.255.255.0) and Gateway (192.168.1.1). Set the Time and Date. Select OK.

- Select Edit next to the second Door Station (VTO). Set the device type to Sub and set the IP Address (192.168.1.111), Netmask (255.255.255.0) and Gateway (192.168.1.1). Select OK.
- Once all devices have had their IP address details and device type set, select One-Key Config. The devices will now be configured.
NOTE: If an error occurs during the configuration, ensured the entered details are correct. - Once the devices have successfully configured, select OK.
- The devices will reboot, allow up to 10 minutes for them to connect.
Assuming you have configured your door station to the monitor already please follow the steps below.
- Login to the door stations web interface and go to local settings.
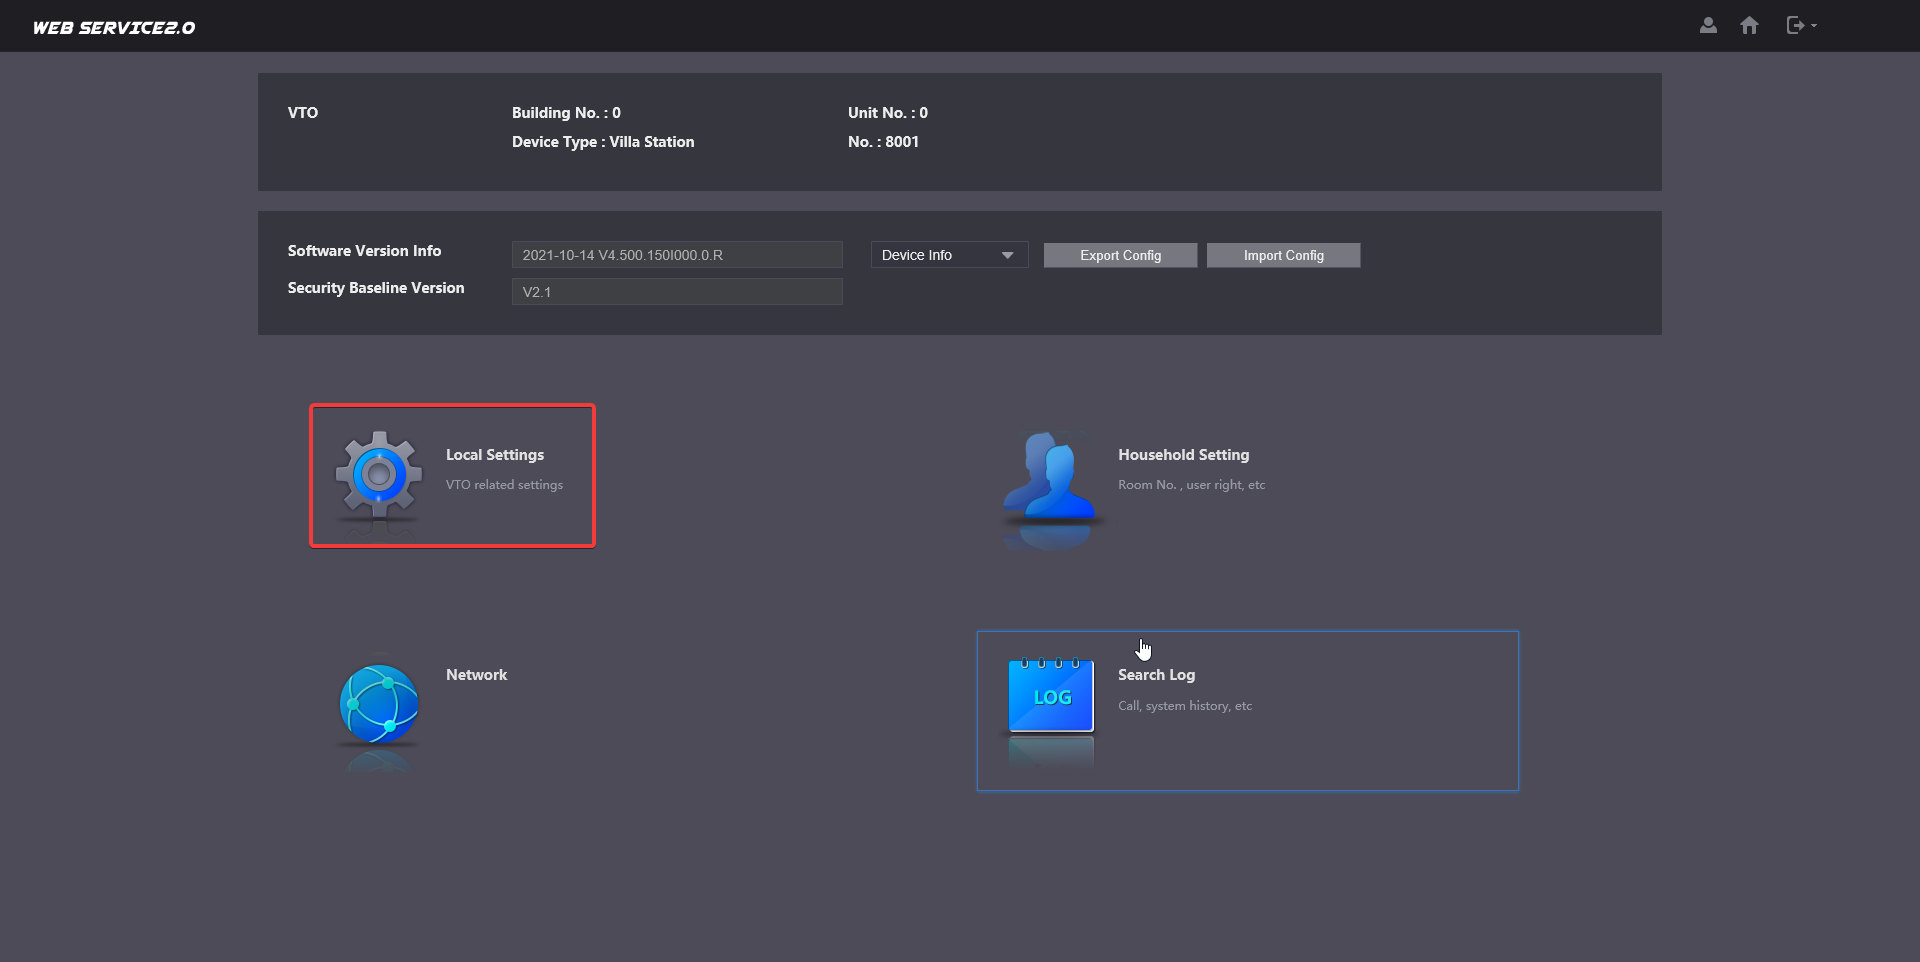
- In Local settings the basic menu will be the first page you see, at the bottom of basic settings you will see the auto capture features. Enable the feature you would like to use.
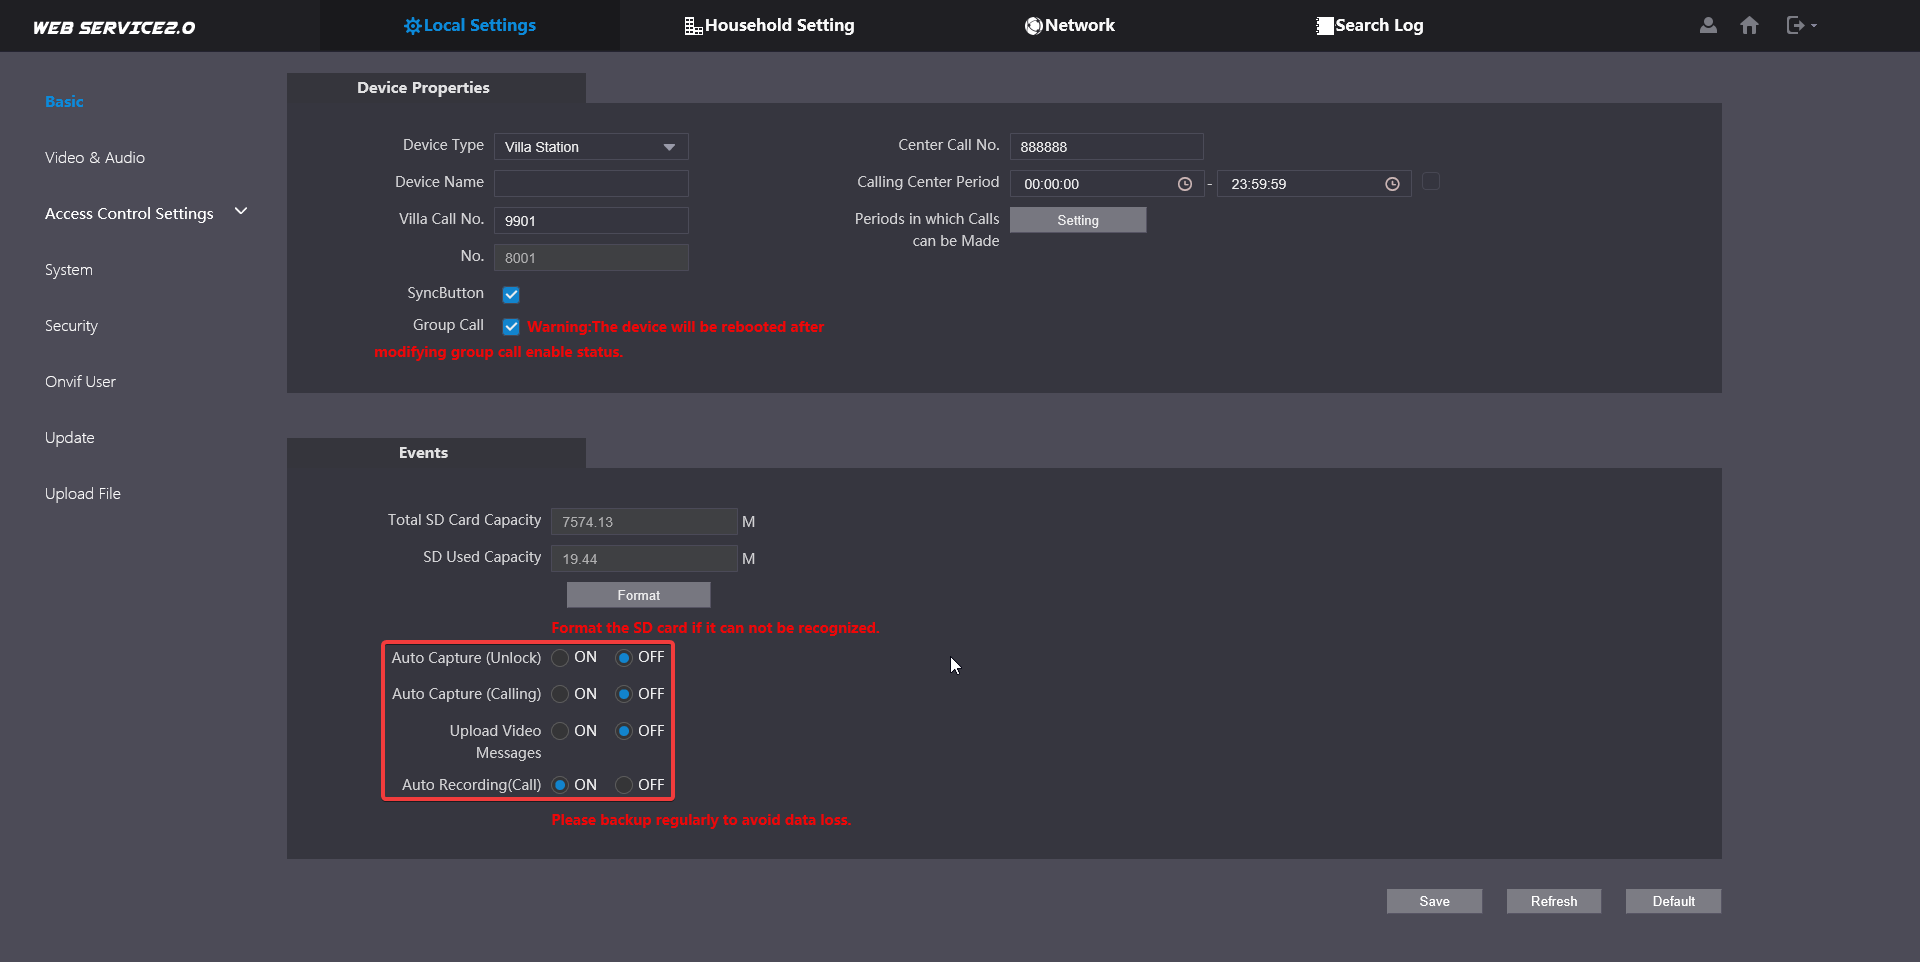
Auto capture feature consists of:
Auto capture (unlock) Will start to record your incoming call between the monitor and door station when you have unlocked the the gate or door from your monitor.
Auto capture (calling) Will start to record when someone presses the call button from the door station calling the monitor.
Auto recording (Call) Will start to record incoming call
You can access the footage via the DMSS application through the playback option. The length of footage recorded will be subjective to the length of the commenced call.