This method requires a computer to set up and is more involved than the One-key Config method. The advantage to this method is the ability to customize settings on the Door Station to suit your requirements, as you will be logged into the Door Station’s web interface.
Below are the example details that we will be using for this guide. If you intend on connecting the intercom to your network for remote access, you will need to obtain the local IP address details for your network. Replace the example IP addresses with IP addresses suitable for your network.
| Device | IP Addresses | Subnet Mask | Gateway | Password | Type | Main/Sub |
| Door Station | 192.168.1.108 | 255.255.255.0 | 192.168.1.1 | admin123 | VTO | Main |
| Indoor Monitor | 192.168.1.109 | 255.255.255.0 | 192.168.1.1 | 888888 | VTH | Main |
Choosing a suitable IP address
Network Identification
To find the IP range on a network, or to find available IP addresses, follow the ...
To find the IP range on a network, or to find available IP addresses, follow the steps below.
Windows
Finding the IP Range of a Network
This is useful if you are unsure what the network details are, or if you have requested pre-programming. When pre-programming devices, we require these details.
1. Connect a Windows PC / Laptop, open the start menu and type cmd.
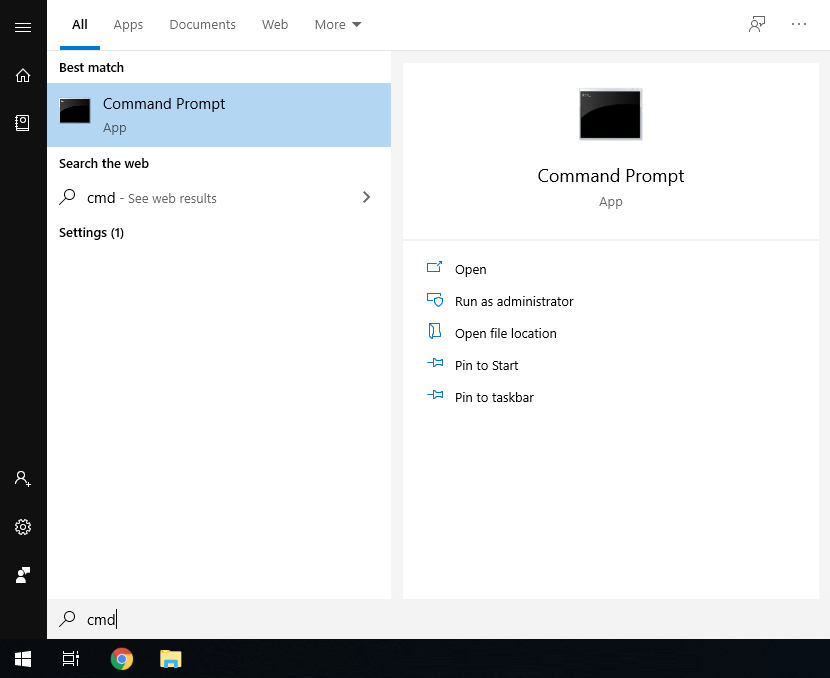
2. Launch the Command Prompt program.
3. Once it opens, enter the command ipconfig and take a screenshot or copy the information as below. We require the IP address, Subnet Mask and Default Gateway.
4. A screenshot can be taken by pressing the Windows + Shift + S keys simultaneously, then paste it into a document/email with Ctrl + V

Finding Available IP Addresses
If you wish to connect devices to the network for remote access, you must give each device an IP address, within your network range. In this example, we will be using a Windows computer which is connected to a modem to find the IP address of the computer, and available IP addresses to use for the devices. If the devices are being installed on a business or managed network, contact an IT representative for assistance.
1. Connect a Windows PC / Laptop, open the start menu and type cmd.

2. Launch the Command Prompt program.
3. Once it opens, enter the command ipconfig and take a screenshot or copy the information as below. Note down the IP Address, Subnet Mask and Default Gateway.
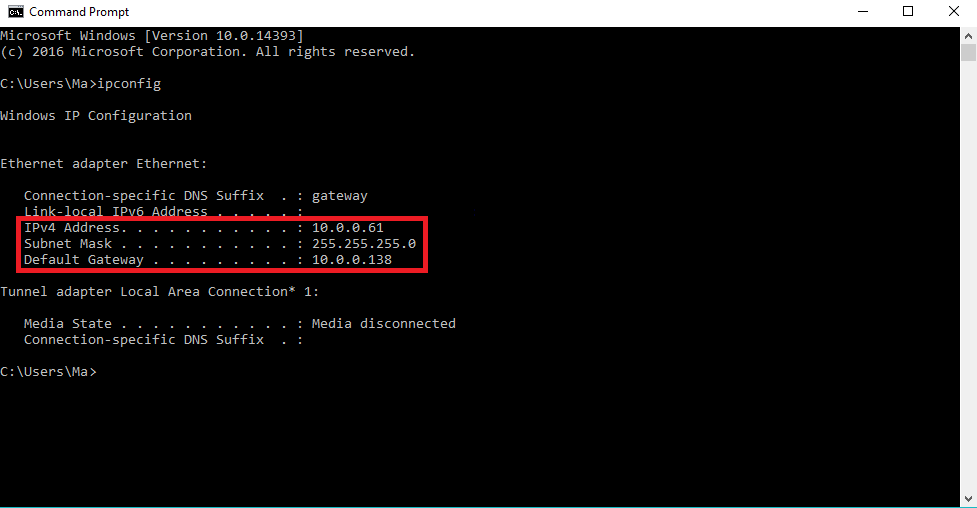
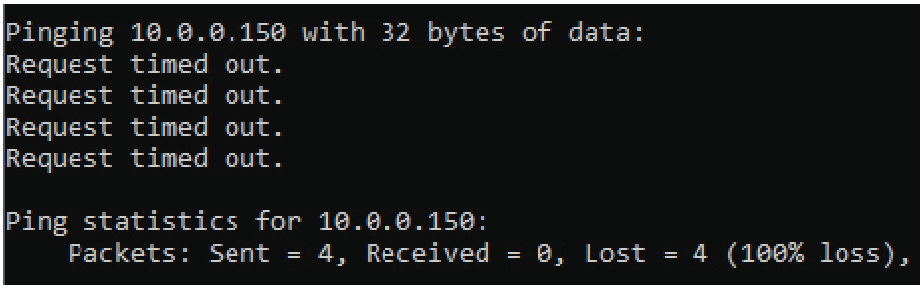
4. In our example, the IP address is 10.0.0.61. To check what IP address is available, type ping 10.0.0.XXX, where XXX is any number between 2 and 254. If Destination host unreachable or Request timed out is show on screen, there is no device using that IP address. Repeat the process to find multiple IP addresses that are available for use. Every devices requires one IP address. 10.0.0.XXX is used as an example, you the IP Address range will vary depending on the network.
5. When configuring the devices, use the IP addresses that you have found that are available, making sure each device has a unique IP address. The Subnet Mask and Default Gateway, will be set the same on each device.
MAC OSX
Finding the IP Range of a Network
This is useful if you are unsure what the network details are, or if you have requested pre-programming. When pre-programming devices, we require these details.
1. Open the Apple Menu ( ) and select System Preferences.
2. Select the Network option.

3. Select either Ethernet (for wired connections) or Wi-Fi (for wireless connections), then select advanced.
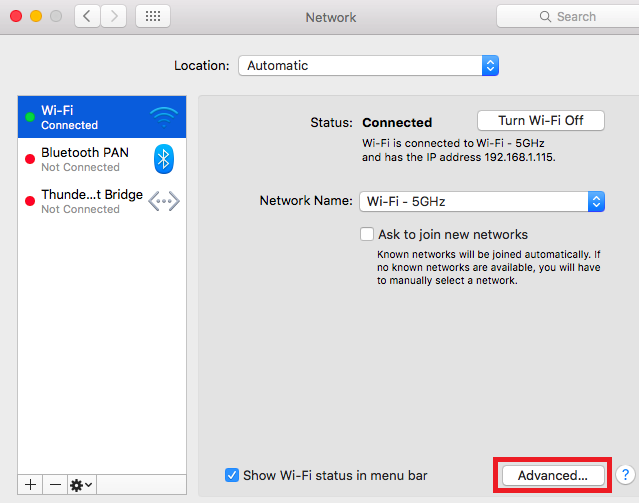
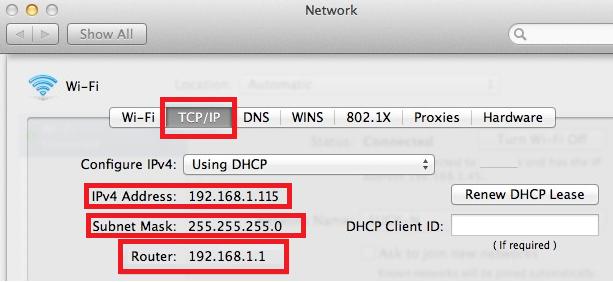
4. Select TCP/IP. The details in red are the network details.
5. A screenshot can be taken by pressing the Command + Shift + 3 keys simultaneously. The screenshot will be saved to the desktop
Finding Available IP Addresses
If you wish to connect devices to the network for remote access, you must give each device an IP address, within your network range. In this example, we will be using a Apple Mac which is connected to a modem to find the IP address of the computer, and available IP addresses to use for the devices. If the devices are being installed on a business or managed network, contact an IT representative for assistance.
1. Follow the steps for Finding the IP Range of a Network - Mac OSX.
2. Press Command + Space bar keys to bring up spotlight.
3. Type Terminal, and double click on the search result.
4. To check what IP address is available, type ping 192.168.1.XXX, where XXX is any number between 2 and 254. If Request timeout is show on screen, there is no device using that IP address. Repeat the process to find multiple IP addresses that are available for use. Every devices requires one IP address. 192.168.1.XXX is used as an example, you the IP Address range will vary depending on the network.
5. When configuring the devices, use the IP addresses that you have found that are available, making sure each device has a unique IP address. The Subnet Mask and Default Gateway, will be set the same on each device.
Manual Residential Intercom Setup Steps
Step 1 - Connect the Intercom Equipment
IP Intercom Wiring
No Network Connectivity (No Phone App) Using 12VDC and direct connection between ...
No Network Connectivity (No Phone App)
Using 12VDC and direct connection between the devices with a CAT5 cable. (No network connection)

Network Connectivity (Use with Phone App)
Using a PoE Switch connected to a router OR using 12VDC and an Ethernet switch connected to a modem.
Devices connected to a PoE Switch, then to a modem
 Devices connected to a modem/Ethernet switch, and powered with 12VDC

Step 2 - Configure the Door Station
2.A
Initialise through Web Interface
Changing the IP address on a Windows Computer
Windows 10
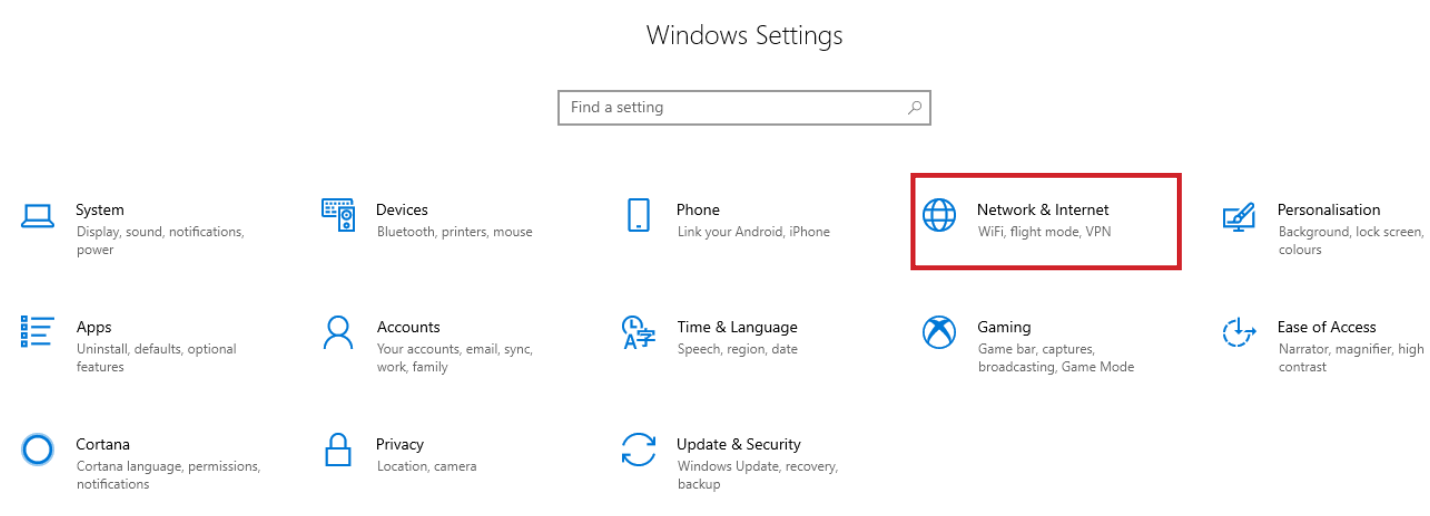
- Open Settings.
- Select Network & Internet.
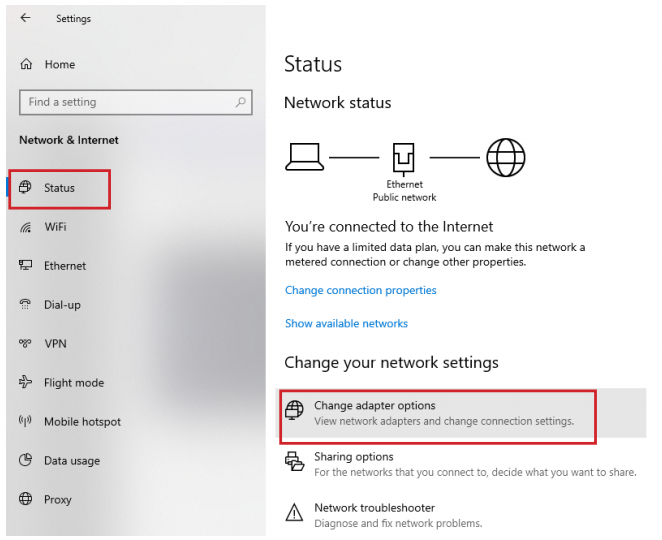
- Select Status, then Change Adapter Options.
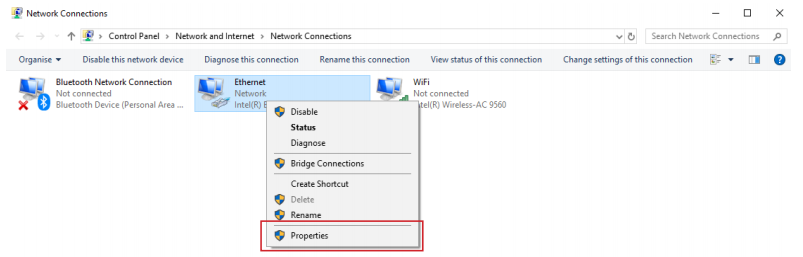
-
Right-click the network adapter you want to change the IP address for, and select Properties.
-
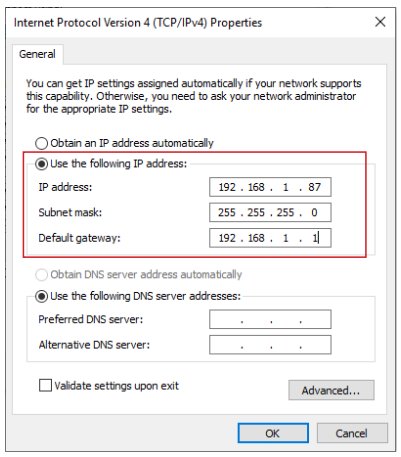
Double-click the Internet Protocol Version 4 (TCP/IPv4) item.
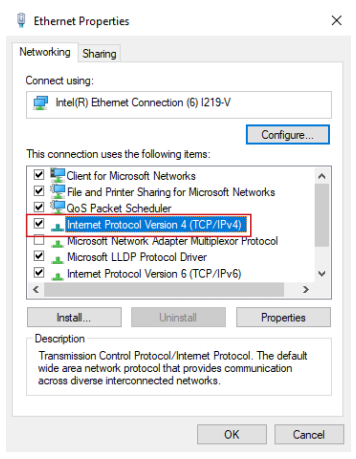
- Click Use the following IP address and enter an IP address in the same range as the device you are trying to access. (E.g when trying to access 192.168.1.108 use a IP address in the 192.168.1.x range.) Note: This cannot be the same as the device you are trying to connect to or any other device on the same network. Save your changes on both windows.
- Type the IP address of the device you are trying to access into the address bar of your web browser.
- Once finished configuring the device, change the adapter settings back to normal by following steps 1-5 and clicking Obtain an IP address automatically.
Windows 11
1. In the Windows search bar at the bottom of the page, type Control Panel and press enter.
2. Select Network and Internet.

3. Select Network and Sharing Centre.

4. Select the link for Connections in the network that you want to change the IP address for.

5. Select Properties.

6. Double-click the Internet Protocol Version 4 (TCP/IPv4) item.

7. Click Use the following IP address and enter an IP address in the same range as the device you are trying to access. (E.g when trying to access 192.168.1.108 use a IP address in the 192.168.1.x range.) Note: This cannot be the same as the device you are trying to connect to or any other device on the same network. Save your changes on both windows.

8. Type the IP address of the device you are trying to access into the address bar of your web browser.
9. Once finished configuring the device, change the adapter settings back to normal by following steps 1-6 and clicking Obtain an IP address automatically.
See the video below for a visual guide of the steps above:
Shortcut
1. In the Windows search bar at the bottom of the page, type Ncpa.cpl and press enter.
2. Right-click the network adapter you want to change the IP address for, and select Properties.
3. Select the Internet Protocol Version 4 (TCP/IPv4) item.

4. Click Use the following IP address and enter an IP address in the same range as the device you are trying to access. (E.g when trying to access 192.168.1.108 use a IP address in the 192.168.1.x range.) Note: This cannot be the same as the device you are trying to connect to or any other device on the same network. Save your changes on both windows.
5. Type the IP address of the device you are trying to access into the address bar of your web browser.
6. Once finished configuring the device, change the adapter settings back to normal by following steps 1-3 and clicking Obtain an IP address automatically.
See the video below for a visual guide of the steps above:
3. Open a web browser (Internet Explorer is recommended) and enter the default IP address of the Door Station (192.168.1.108) into the address bar. (If you Did step 2.b, ignore steps 4,5)
4. You will be prompted to set a password (admin123). Select Next.
5. Tick the check box and enter an email address - this will be used to reset the password if it is ever forgotten. Select Next.
Initialise through Config Tool
How to Initialize a device with Config Tool
This guide Is useful if you are not able to change the IP range of your PC and you need to initialize a device such as a VTO, before you can change an IP address and log into the Web Interface.
- Select Search Setting, and make sure Other Segment Search is Enabled. (This allows an IP outside of your current range to be found)


2. Select the Device(s) you want to Initialize and select Initialize.


3. You will be prompted to Create A password and enter an email Address for password recovery.

4. If Successful you will get a confirmation message and device will now be Initialized.

2.B
Configure VTO
New GUI
3. Log in to the Door Station. The username is admin and the password is the one when initialised.
4. After Logging in the Setup wizard will open, Set as SIP Server and hit next. 
5. Next is the List of Devices, By Default, 9901#X room numbers are already added if you are not using standard room numbers Select Add and Enter VTH details. Hit Next to finish setup Wizard.


6. On main Menu Select Network, and Confirm Network settings are correct.


7. Main Menu Select System and then Time, ensure that time is set correctly

Early GUI
3. Log in to the Door Station. The username is admin and the password is the one when initialised
4. Select Local Setting, then System. Click Sync PC to set the time & date to that of your computer. Enable and set DST if you are in a location that has daylight savings.
NOTE: Ensure the time & date is set correctly, otherwise you may be unable to add the device to the phone app.

5. Select Network Setting.
6. if Initialized via through Web Interface Set the IP Address, Subnet Mask and Gateway to suit your network.
Step 3 - Configure the Monitor
Early GUI
- If prompted to choose Apartment or Villa, select Villa, then select OK. Press Quit to exit One-key configuration. If not prompted, proceed to the next step.
- Initialise the Indoor Monitor, by entering a 6 digit password (888888) and email. Select OK.
- If prompted with Do you want to do quick configuration?, Select Cancel. You will then be on the Main Menu.

- Press and hold down the Settings button - after 6 seconds, a prompt will appear. Enter your password (888888), then select OK.
- Select Network and set the IP Address, Subnet Mask and Gateway to suit your network, or, if no remote connection is required, use the example in the table above.

- Select VTH Config and set the Room No. to 9901#0. Ensure Master is selected. Select OK.

- Select SIP Server and set the Server IP, User Name and Login Pwd. These will be the IP Address, username and password of the Door Station (192.168.1.108, admin, admin123). Do not modify the register password (123456 by default). Select OK.

- Select VTO Config. Set the Main_VTO Name to an easily identified name for the door (e.g Gate or Doorbell). Set the VTO IP Address, User Name and Password. These will be the IP Address, Username and Password of the Door Station (192.168.1.108, admin, admin123).
Turn the EnableStatus button OFF then ON to save the settings. Ensure it is left in the ON position.
- Allow up to 10 minutes for the Indoor Monitor to connect to the Door Station. Once the “
 ” icon disappears, you can press the call button on the Door Station to test the connection.
New GUI
- Select a region and language and then tap Next
- If prompted to choose Apartment or Villa, select Villa, then select Next.
- Initialise the Indoor Monitor, by entering a password (in our case we are using admin123) and email and tap Next. After this monitor will be assigned with the IP address tap Next again
- In step 4 of device configuration select log out on the top right then you will be on the home screen

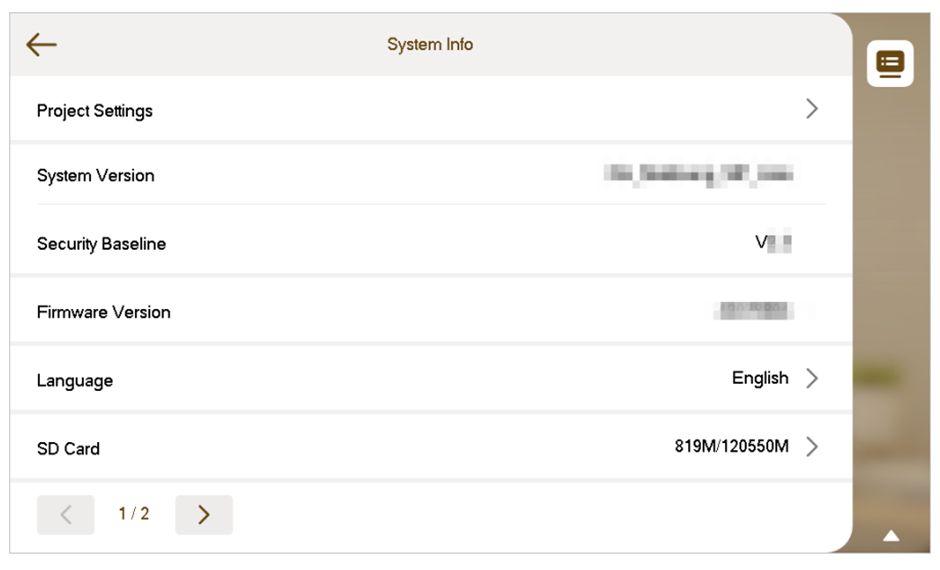
5. On the main screen, select Settings > ![]() icon (System info) > Project settings
icon (System info) > Project settings
6. Enter the password (admin123) and then tap OK

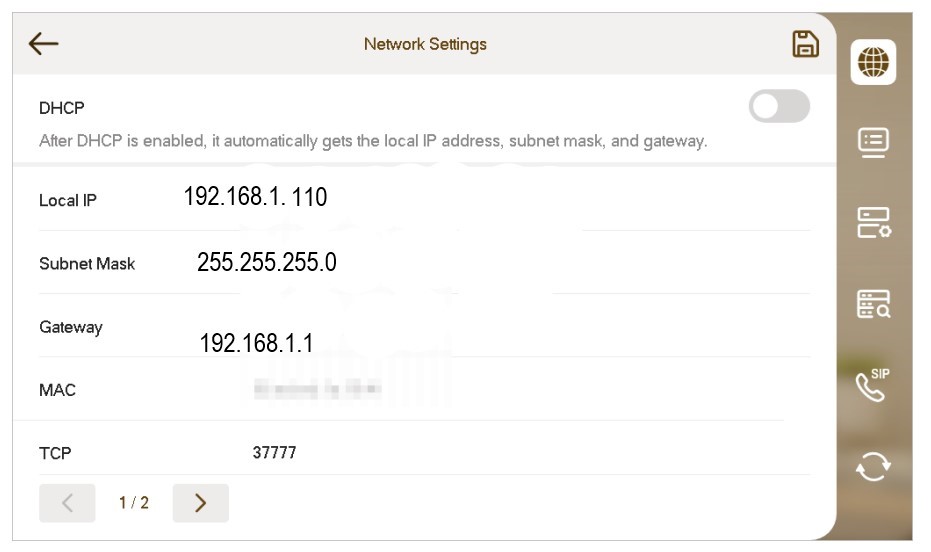
7. Select ![]() icon (Network setting) and set the IP Address, Subnet Mask , and Gateway to suit your network, or, if no remote connection is required, use the example in the image below.
icon (Network setting) and set the IP Address, Subnet Mask , and Gateway to suit your network, or, if no remote connection is required, use the example in the image below.

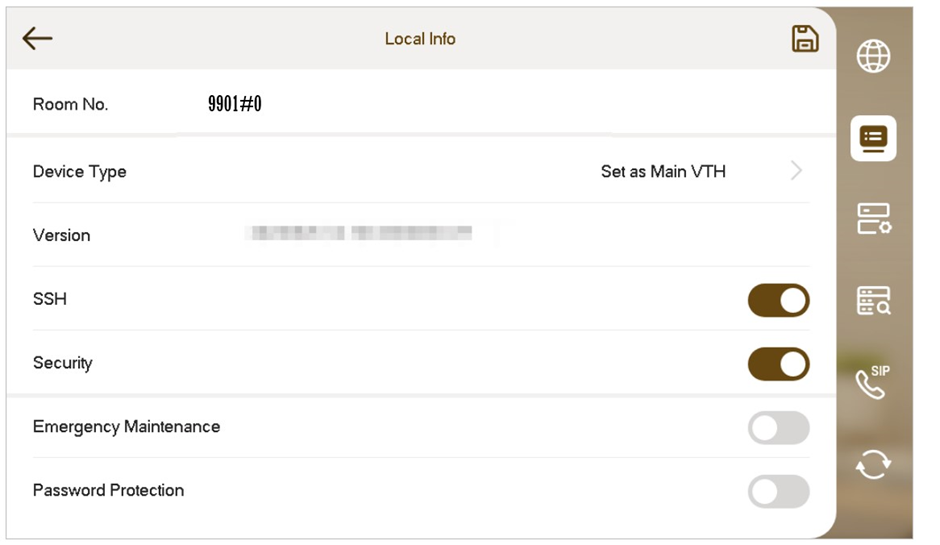
8. Select ![]() icon (Local info) and set the Local info. Set the room no. 9901#0 and ensure device type is set up as Main VTH. Tap
icon (Local info) and set the Local info. Set the room no. 9901#0 and ensure device type is set up as Main VTH. Tap ![]() icon to save the configuration.
icon to save the configuration.
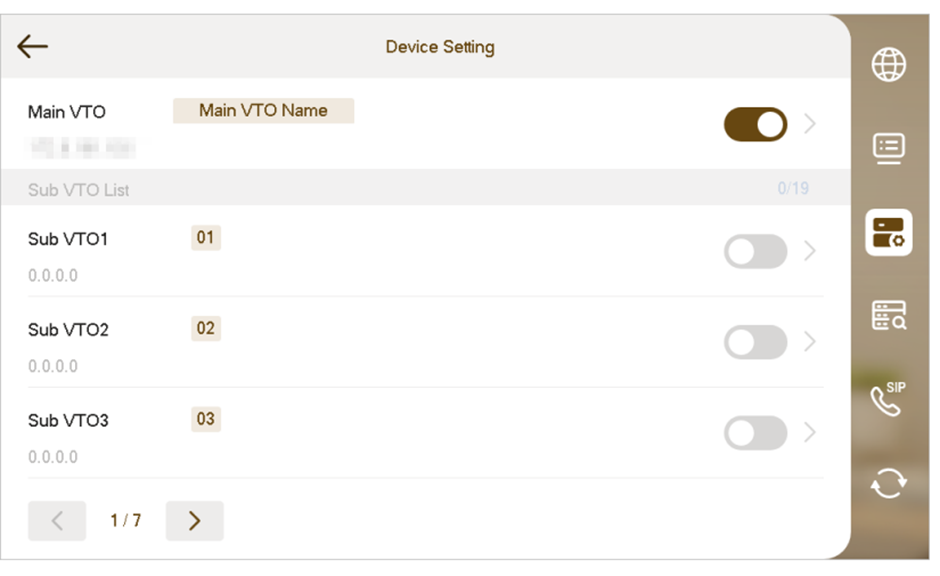
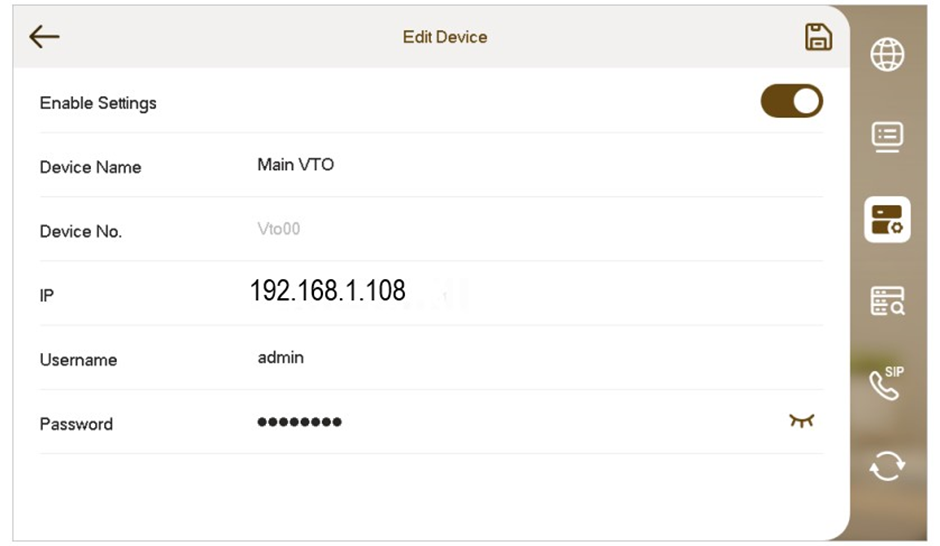
9. Select ![]() icon (Device setting) and tap
icon (Device setting) and tap![]() icon next to the main VTO and then enter the main VTO name, VTO IP address, username, and password. Ensure that the enable setting is turned on. Tap
icon next to the main VTO and then enter the main VTO name, VTO IP address, username, and password. Ensure that the enable setting is turned on. Tap ![]() icon to save the configuration
icon to save the configuration
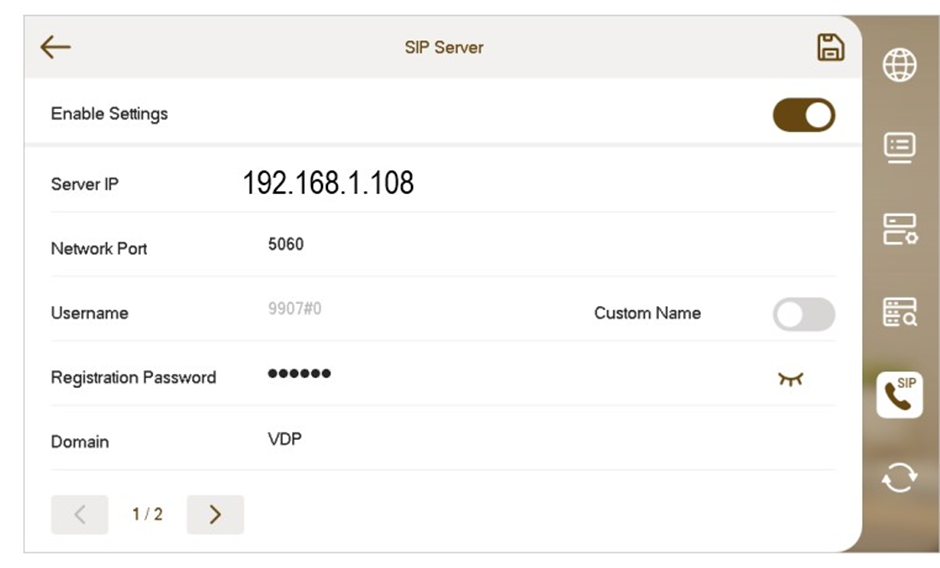
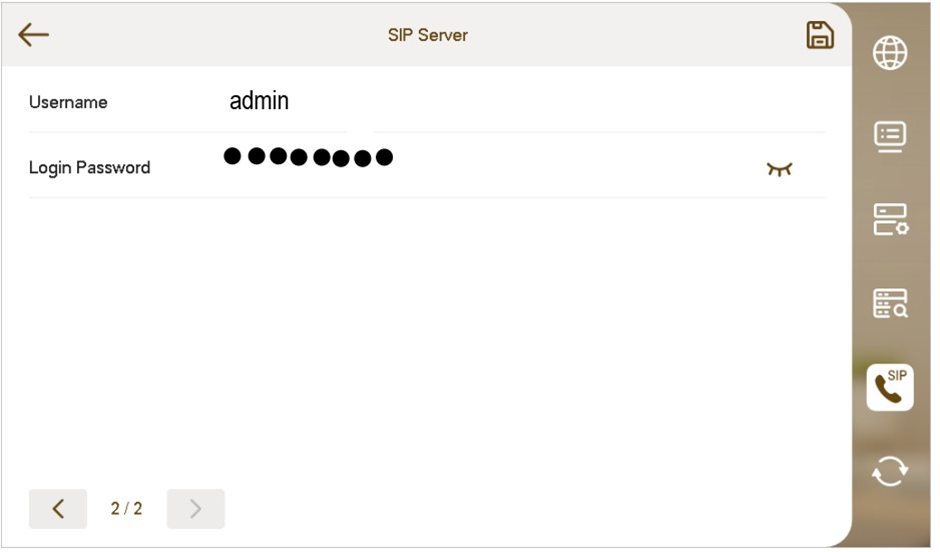
10. Select ![]() icon (SIP server) and set the Server IP, Username, and Login Pwd. These will be the IP address. Username and password of the door station (192.168.1.108, admin, admin123). Ensure the enable status is left on.
icon (SIP server) and set the Server IP, Username, and Login Pwd. These will be the IP address. Username and password of the door station (192.168.1.108, admin, admin123). Ensure the enable status is left on.
Select ![]() icon to save all the changes.
icon to save all the changes.
11. Allow up to 10 minutes for the Indoor Monitor to connect to the Door Station. Once the “![]() ” icon disappears, you can press the call button on the Door Station to test the connection.
” icon disappears, you can press the call button on the Door Station to test the connection.
Step 4 - Add Additional Monitor(s)
Early GUI
Repeat the below steps for each additional monitor. These steps will allow the additional Monitor(s) to ring when the first Indoor Monitor does.
- If prompted to choose Apartment or Villa, select Villa, then select OK. Press Quit to exit One-key configuration. If not prompted, proceed to the next step.
- Initialise the Indoor Monitor, by entering a 6 digit password (888888) and email. Select OK.
- If prompted with Do you want to do quick configuration?, Select Cancel. You will then be on the Main Menu.

- Press and hold down the Settings button - after 6 seconds, a prompt will appear. Enter your password (888888), then select OK.
- Select Network and set the IP Address, Subnet Mask and Gateway to suit your network, or, if no remote connection is required, use the example in the table above.

- Select VTH Config and tap on Master so it changes to Extension, then set the Room No. The Room Number will be the same as the Master Indoor Monitor’s Room Number, but with a different number as the last digit to indicate which extension it is (i.e if 9901#0 is the Master’s room number, then the first extension will be 9901#1, the second extension will be 9901#2 and so on).

- Enter the Master IP & Master Pwd. This will be the Master Indoor Monitor’s IP address and Password (The one you set after first turning it on).
- Select SIP Server and ensure Enable Status is set to ON. Do not modify the register password (123456 by default). Select OK.
- Allow up to 10 minutes for the Indoor Monitor to connect to the Door Station. Once the “” icon disappears, you can press the call button on the Door Station to test the connection.
New GUI
Repeat the below steps for each additional monitor. These steps will allow the additional Monitor(s) to ring when the first Indoor Monitor does.
- Select a region and language and then tap Next
- If prompted to choose Apartment or Villa, select Villa, then select Next.
- Initialise the Indoor Monitor, by entering a password (in our case we are using admin123) and email and tap Next. After this monitor will be assigned with the IP address tap Next again
- In step 4 of device configuration select log out on the top right then you will be on the home screen

5. On the main screen, select Settings > ![]() icon (System info) > Project settings
icon (System info) > Project settings
6.Enter the password (admin123) and then tap OK
7. Select ![]() icon (Network setting) and set the IP Address, Subnet Mask, and Gateway to suit your network, or, if no remote connection is required, use the example in the image below.
icon (Network setting) and set the IP Address, Subnet Mask, and Gateway to suit your network, or, if no remote connection is required, use the example in the image below.
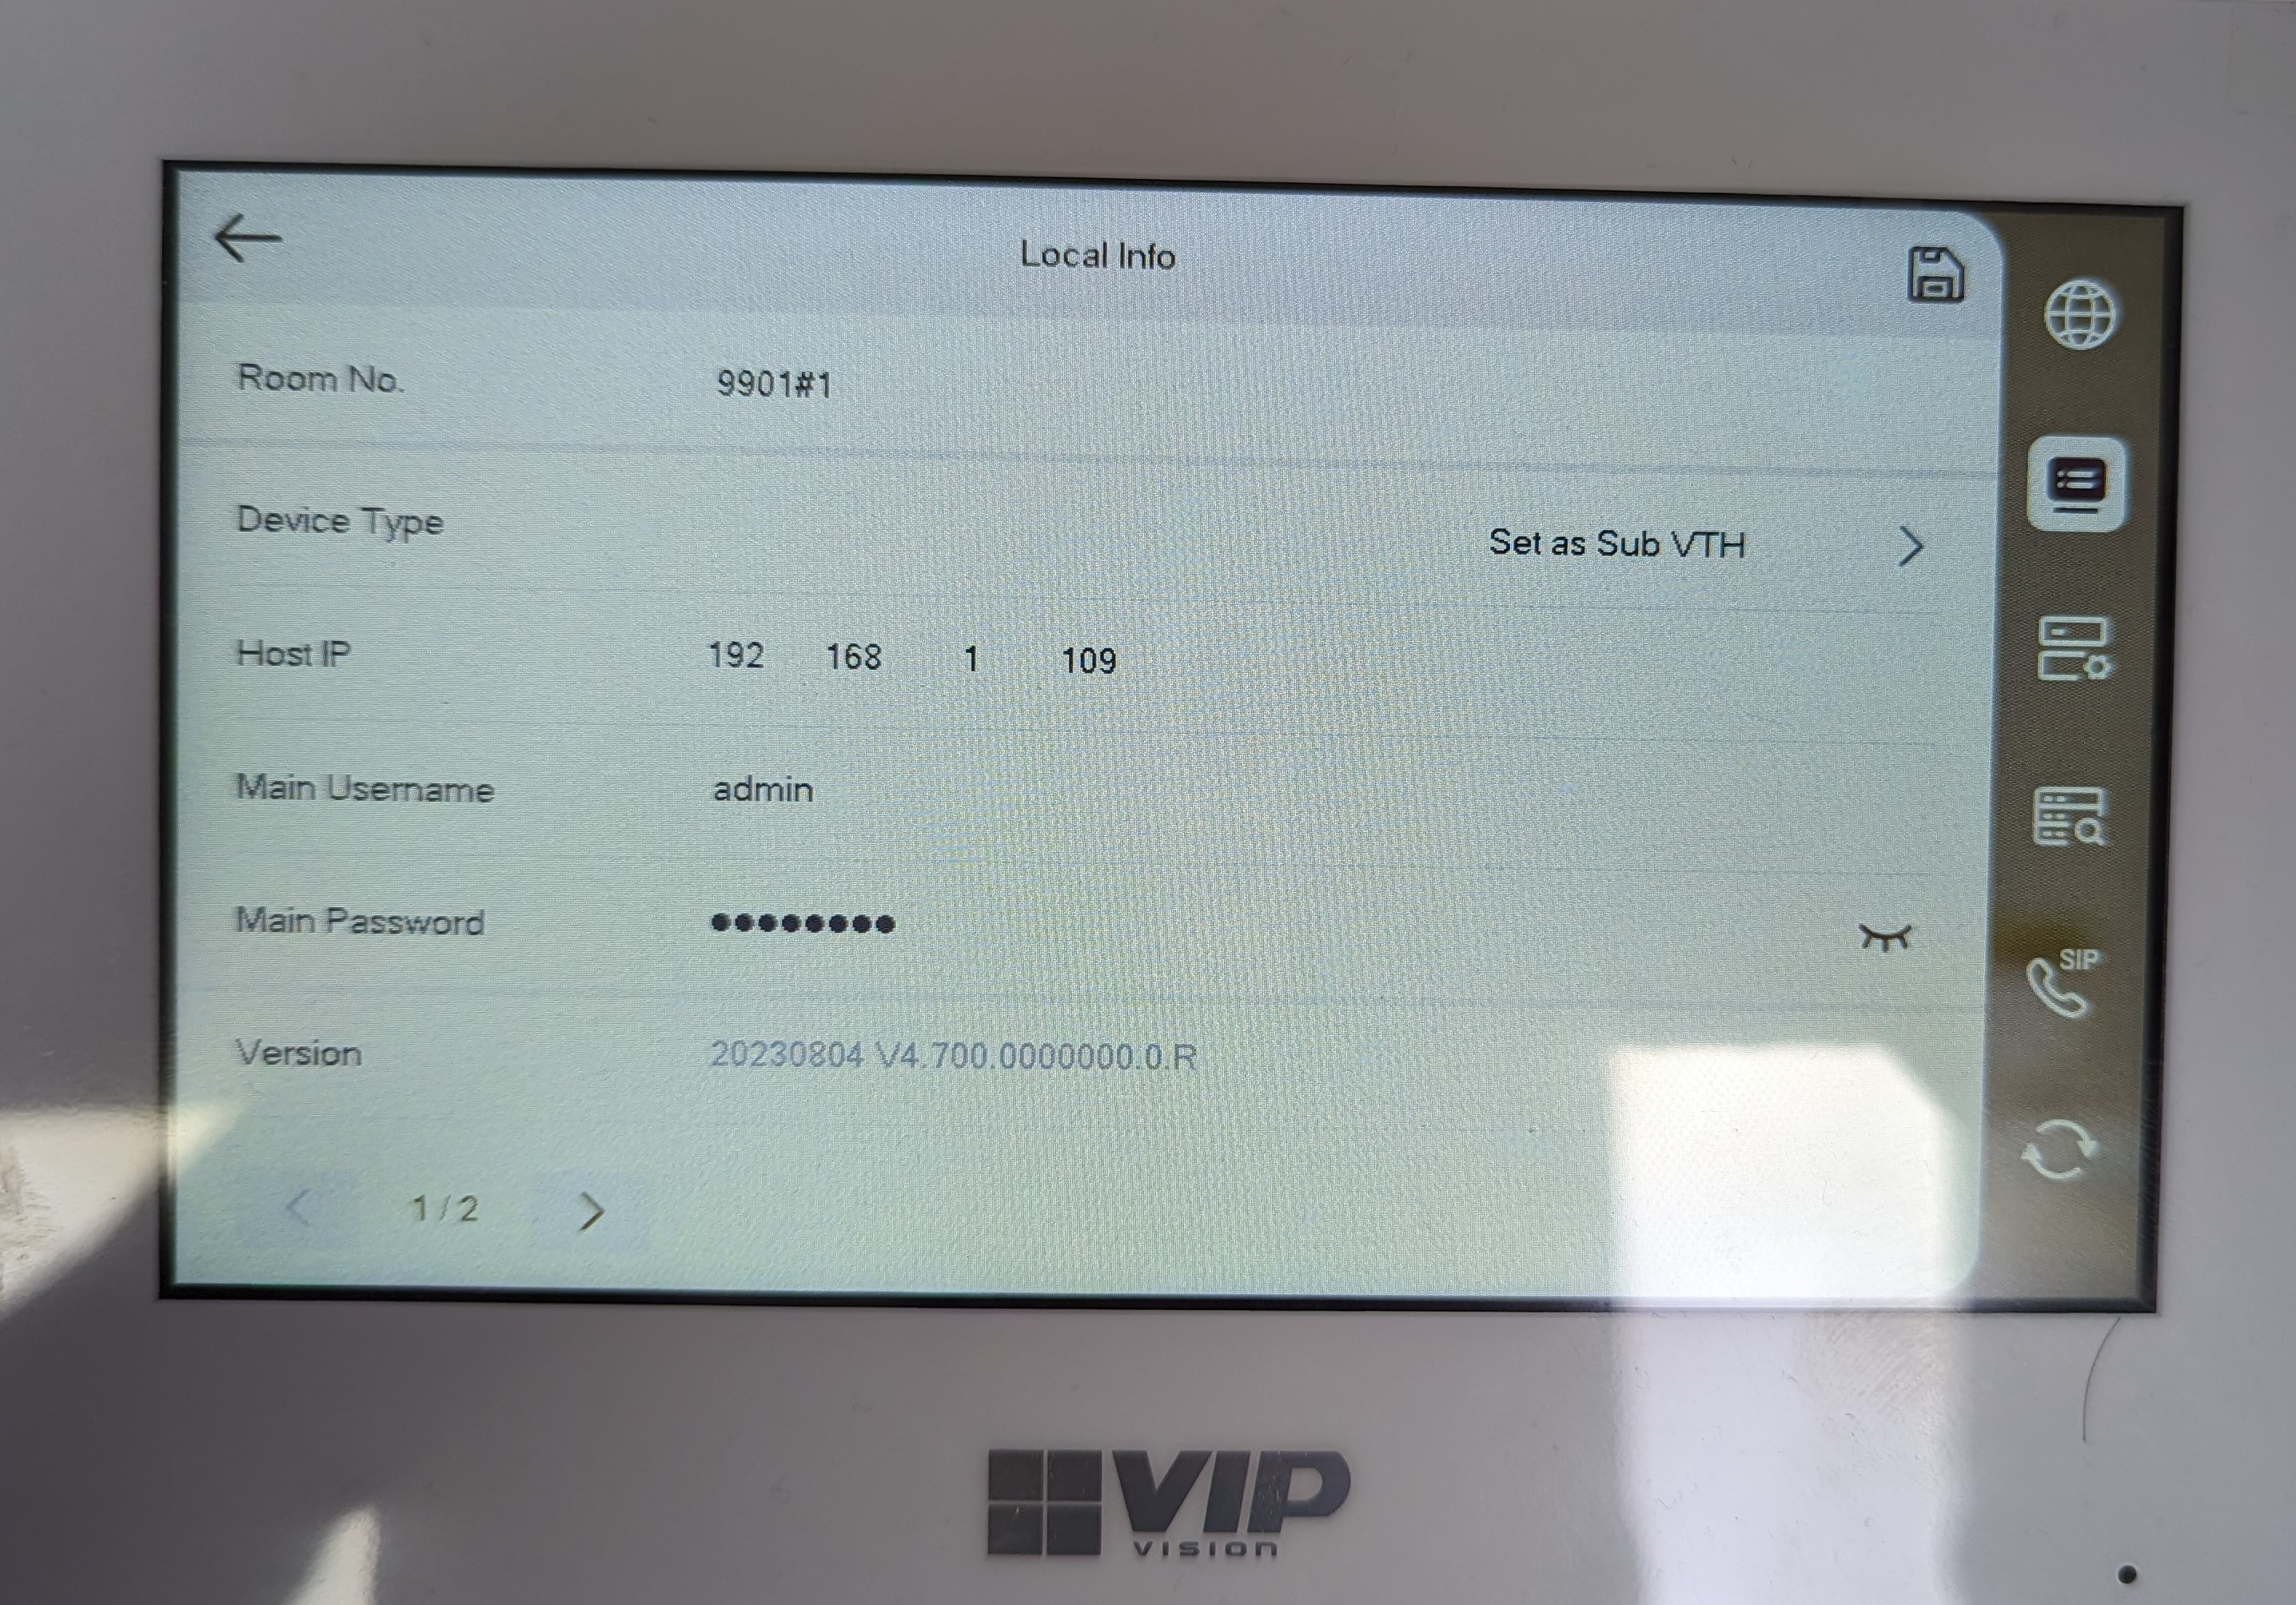
8. Select ![]() icon (Local info) and set the Local info. Set the room no. 9901#1 and ensure the device type is set up as SUB VTH. And, enter the IP address, username and password of the main VTH. Tap
icon (Local info) and set the Local info. Set the room no. 9901#1 and ensure the device type is set up as SUB VTH. And, enter the IP address, username and password of the main VTH. Tap ![]() icon to save the configuration.
icon to save the configuration.
9. Select ![]() icon (Device setting) and tap
icon (Device setting) and tap![]() icon next to the main VTO and ensure that the enable setting is turned on. Tap
icon next to the main VTO and ensure that the enable setting is turned on. Tap ![]() icon to save the configuration.
icon to save the configuration.
10. Select ![]() icon (SIP server) and Ensure the enable status is turned on. Select
icon (SIP server) and Ensure the enable status is turned on. Select ![]() icon to save all the changes.
icon to save all the changes.
11. Allow up to 10 minutes for the Indoor Monitor to connect to the Door Station. Once the “![]() ” icon disappears, you can press the call button on the Door Station to test the connection.
” icon disappears, you can press the call button on the Door Station to test the connection.
Step 5 - Add Additional Door Station(s)
Adding an Additional Door Stations to act as a Sub-VTO
Early GUI
If Initializing the VTO via Config Tool skip to step 7
- Configure Computer to in the same IP Address Range as the Door station (default is 192.168.1.108) if there are any other un-initialized devices on the network Disconnect them to avoid IP conflicts.
- Open Web browser (Internet Explorer is recommended) and type in default IP into the address Bar.
- You will be prompted to set a Password (for simplicity set it as same as master VTO) Select Next Enter Email for password Recovery is Desired and Hit Next.
- You will be taken to a Login Page, enter the password that was set.

5. Select Network Settings and Change the Door Stations IP subnet mask and default gateway to that of the network that the door station will be on. Hit Save, the door station will reboot.

- After Reboot log back into door station with new IP address given (username is admin). (may have to change Computer IP to be back in same range again.)
- After logging in, select Network, then Sip Server. Uncheck the enable box and enter IP Address, SIP Server Username and SIP Server Password.
These are the IP address, Username and Password of the Master VTO, Do not modify the password field. (123456 by default). Select save, the door station will now Reboot.
- Log in back in, and select Local Settings, Room No and change the room number to be one number higher than the Master VTO, (e.g. 8002) Select Confirm to save changes.

- Log into the Master door station Select Household setting VTO no. Management Page, press Add Button, fill out the Details of the Sub VTO.


- On the Master Door Monitor, go into Network/Project Settings, select VTO Config, set the SUB_VTO Name to whatever you wish (e.g. back door) and set the IP Address, Username and Password to that of the door station (set in step 3,5), turn Enable Status OFF then ON to save settings, ensure that it is left in the ON position.

- Allow up to 10 minutes for the Indoor Monitor to connect to the Door Station. Once the “
 ” icon disappears, you can press the call button on the Door Station to test the connection.
New GUI
1. Log Into Door Station Web Interface. In Setup Wizard Select Do not Set as SIP Server and Select Next

2. Change VTO ID to One number Higher the Master VTO or if adding multiple Sub VTO one higher then the Previous VTO, Enter the IP of Master VTO leave Username and Password and change SIP Server Username and SIP Server Password Will be the username and password of the Master VTO.

3. Log Into Master VTO and Click on Device Settings

4. Select Add and enter in details of the Sub VTO that was just configured.

5. After a few minutes the will show online in the device list.
